30分钟内搭建一个全能轻量级springboot 3.4 + 脚手架 <5> 5分钟集成好caffeine并使用注解操作缓存
快速导航
<1> 5分钟快速创建一个springboot web项目
<2> 5分钟集成好最新版本的开源swagger ui,并使用ui操作调用接口
<3> 5分钟集成好druid并使用druid自带监控工具监控sql请求
<4> 5分钟集成好mybatisplus并使用mybatisplus generator自动生成代码
<5> 5分钟集成好caffeine并使用注解操作缓存
<6> 5分钟集成好前端页面,使用vue开发前端
目录
在 Spring Boot 中,注解操作缓存的原理基于 Spring 的缓存抽象 (Spring Cache Abstraction)。使用缓存注解时,Spring 会自动处理与缓存相关的逻辑,而开发者只需要专注于业务代码。常用的缓存注解有 @Cacheable、@CachePut 和 @CacheEvict。
一、准备工作
1.1 maven 安装caffeine和相关依赖
<dependency>
<groupId>com.github.ben-manes.caffeine</groupId>
<artifactId>caffeine</artifactId>
<version>3.1.8</version> <!-- 确保版本兼容 -->
</dependency>
<dependency>
<groupId>org.springframework.boot</groupId>
<artifactId>spring-boot-starter-cache</artifactId>
</dependency>
1.2 配置caffeine
有两种配置方式
1.2.1 javaconfig配置caffeine
package com.example.demo.config;

import com.github.benmanes.caffeine.cache.Caffeine;
import org.springframework.cache.CacheManager;
import org.springframework.cache.annotation.EnableCaching;
import org.springframework.cache.caffeine.CaffeineCacheManager;
import org.springframework.context.annotation.Bean;
import org.springframework.context.annotation.Configuration;

import java.util.List;
import java.util.concurrent.TimeUnit;

@Configuration
@EnableCaching
public class CacheConfig {

    @Bean
    public Caffeine<Object, Object> caffeineConfig() {
        return Caffeine.newBuilder()
                .maximumSize(1000)
                .expireAfterWrite(5, TimeUnit.MINUTES)
//                .weakKeys() // 很坑会,基本上很快就把key清理掉了,缓存再也命中不了
                .recordStats();
    }

    @Bean
    public CacheManager cacheManager(Caffeine<Object, Object> caffeine) {
        CaffeineCacheManager cacheManager = new CaffeineCacheManager();
        cacheManager.setCaffeine(caffeine);
        cacheManager.setCacheNames(List.of(new String[]{"users"}));
        return cacheManager;
    }

}
1.2.2 缓存代码编写
TestController
package com.example.demo.web;

import com.example.demo.entity.User;
import com.example.demo.service.IUserService;
import io.swagger.v3.oas.annotations.Operation;
import io.swagger.v3.oas.annotations.tags.Tag;
import jakarta.annotation.Resource;
import org.springframework.web.bind.annotation.GetMapping;
import org.springframework.web.bind.annotation.PathVariable;
import org.springframework.web.bind.annotation.RequestMapping;
import org.springframework.web.bind.annotation.RestController;

import java.util.List;

@RestController
@RequestMapping("/test")
@Tag(name = "User API", description = "用户管理相关接口")
public class TestController {

    @Resource
    private IUserService userService;

    @GetMapping("")
    @Operation(method = "test", summary = "测试接口")
    public String test(){
        return "test";
    }

    @GetMapping("/user")
    @Operation(method = "allUsers", summary = "获取所有用户")
    public List<User> allUsers(){
        return userService.list();
    }

    @GetMapping("/user/{id}")
    @Operation(method = "getUserCache", summary = "获取用户缓存")
    public void testGetUserCache(@PathVariable String id){
        User user = userService.getUserById(id);
        System.out.println(user);
    }

}
UserServiceImpl
package com.example.demo.service.impl;

import com.baomidou.mybatisplus.extension.service.impl.ServiceImpl;
import com.example.demo.entity.User;
import com.example.demo.mapper.UserMapper;
import com.example.demo.service.IUserService;
import org.springframework.cache.annotation.CacheConfig;
import org.springframework.cache.annotation.CacheEvict;
import org.springframework.cache.annotation.CachePut;
import org.springframework.cache.annotation.Cacheable;
import org.springframework.stereotype.Service;

/**
 * <p>
 * 测试用户 服务实现类
 * </p>
 *
 * @author allens
 * @since 2025-01-15
 */
@Service
public class UserServiceImpl extends ServiceImpl<UserMapper, User> implements IUserService {

    @Cacheable(value = "users", key = "'user_' + #id", unless = "#result == null")
    public User getUserById(String id) {
        // 模拟数据库查询
        return this.getBaseMapper().selectById(id);
    }

    @CachePut(value = "users", key = "#id")
    public void updateUser(String id, String name) {
        // 模拟更新数据库并返回新值
        User user = this.getBaseMapper().selectById(id);
        user.setName(name);
        this.getBaseMapper().updateById(user);
    }

    @CacheEvict(value = "users", key = "#id")
    public void deleteUser(String id) {
        // 模拟删除数据库记录
        System.out.println("User with id " + id + " has been deleted from database and cache.");
        this.getBaseMapper().deleteById(id);
    }

    @CacheEvict(value = "users", allEntries = true)
    public void clearCache() {
        System.out.println("All user cache has been cleared.");
    }

}
1.3 注解说明
请参考我的这篇文章 Springboot 注解使用详解
二、测试

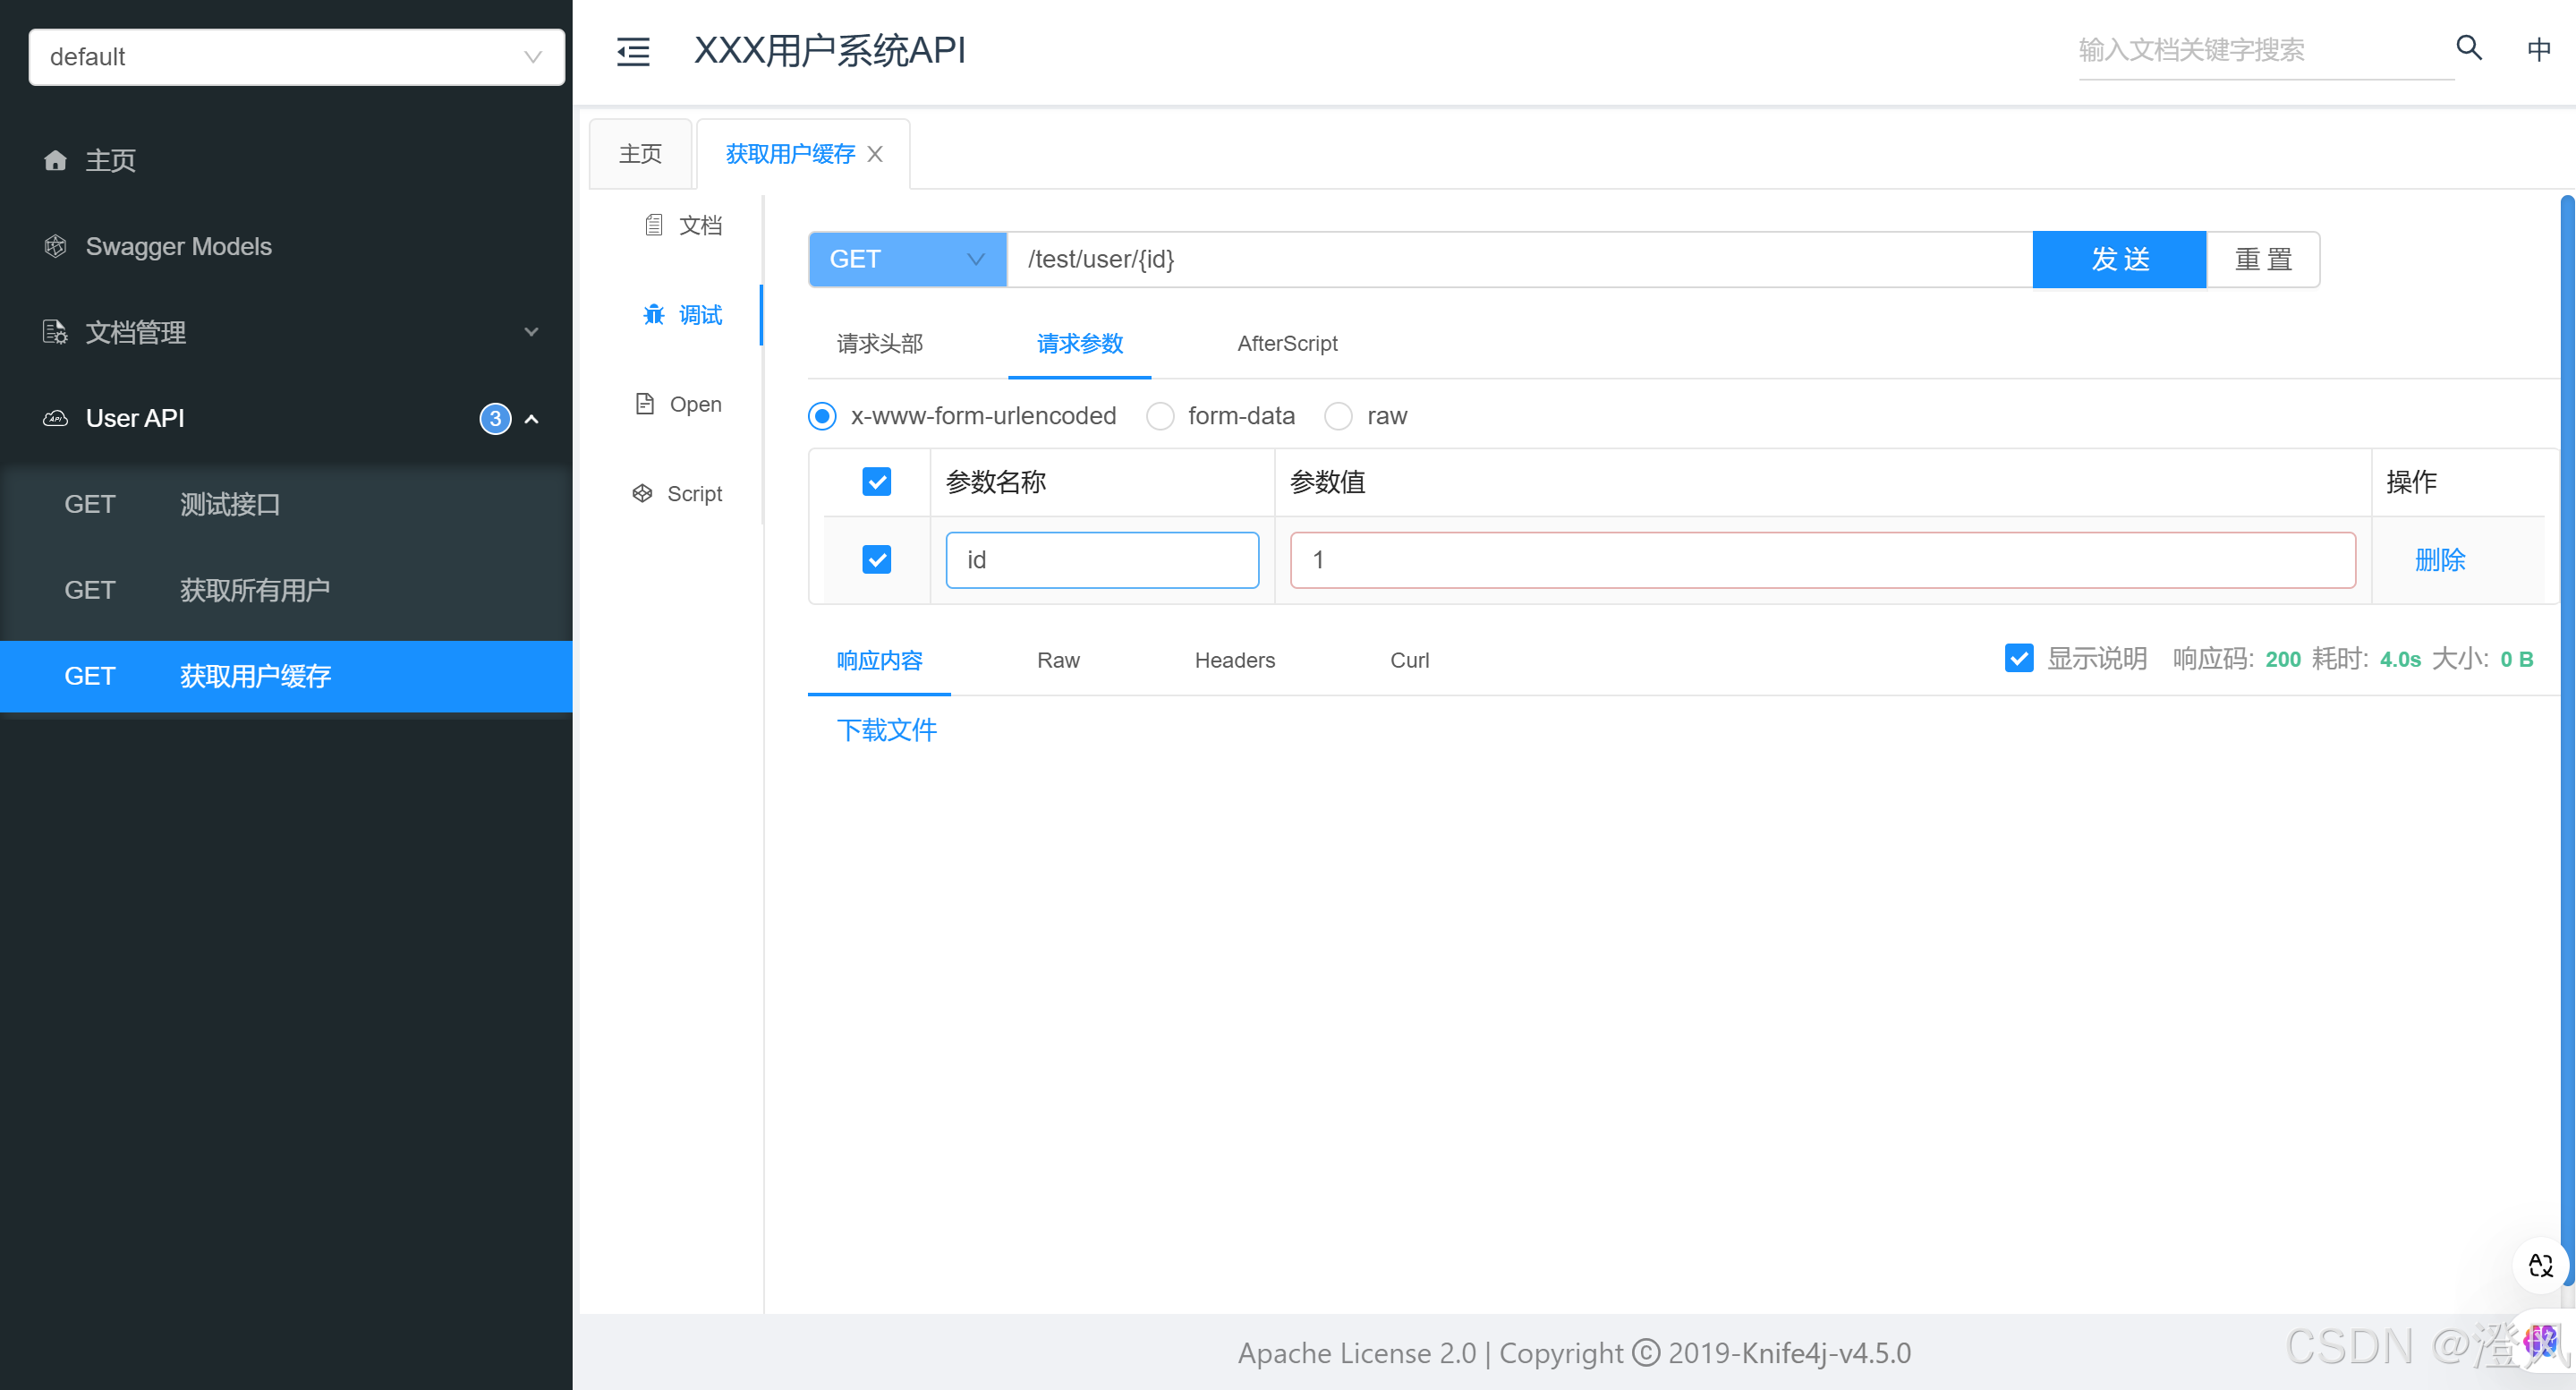
点击发送请求,第一次执行了sql,第二次在方法体中打断点,发现没有进入。且日志未输出相关查询数据库操作。

三、注解操作缓存原理以及一些难点排查
3.1 注解操作缓存原理

工作原理总结:
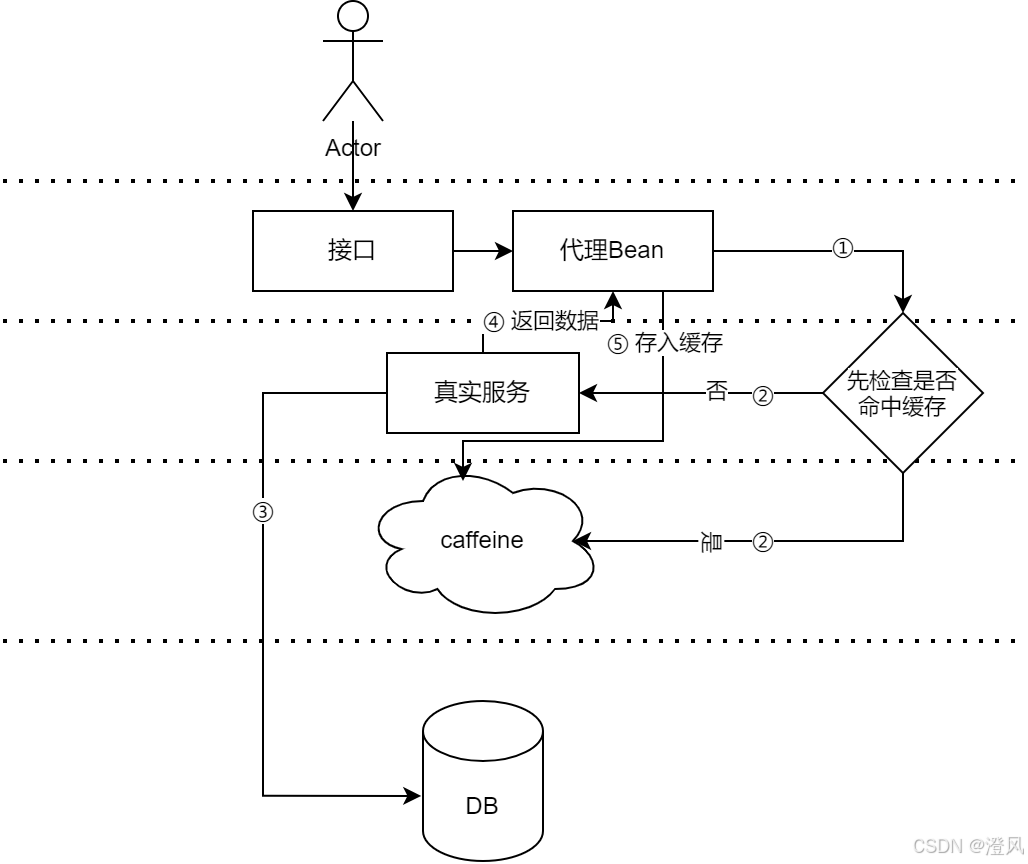
1. 代理模式:Spring 使用动态代理或 CGLIB 代理来拦截带有缓存注解的方法调用。代理会在方法调用之前或之后进行缓存操作。
开启注解缓存是靠 @EnableCaching 来实现的,那么我们从这个注解开始入手:
@Target(ElementType.TYPE)
@Retention(RetentionPolicy.RUNTIME)
@Documented
@Import(CachingConfigurationSelector.class)
public @interface EnableCaching {

/**
 * Indicate whether subclass-based (CGLIB) proxies are to be created as opposed
 * to standard Java interface-based proxies. The default is {@code false}. <strong>
 * Applicable only if {@link #mode()} is set to {@link AdviceMode#PROXY}</strong>.
 * <p>Note that setting this attribute to {@code true} will affect <em>all</em>
 * Spring-managed beans requiring proxying, not just those marked with {@code @Cacheable}.
 * For example, other beans marked with Spring's {@code @Transactional} annotation will
 * be upgraded to subclass proxying at the same time. This approach has no negative
 * impact in practice unless one is explicitly expecting one type of proxy vs another,
 * for example, in tests.
 */
boolean proxyTargetClass() default false;

/**
 * Indicate how caching advice should be applied.
 * <p><b>The default is {@link AdviceMode#PROXY}.</b>
 * Please note that proxy mode allows for interception of calls through the proxy
 * only. Local calls within the same class cannot get intercepted that way;
 * a caching annotation on such a method within a local call will be ignored
 * since Spring's interceptor does not even kick in for such a runtime scenario.
 * For a more advanced mode of interception, consider switching this to
 * {@link AdviceMode#ASPECTJ}.
 */
AdviceMode mode() default AdviceMode.PROXY;

/**
 * Indicate the ordering of the execution of the caching advisor
 * when multiple advices are applied at a specific joinpoint.
 * <p>The default is {@link Ordered#LOWEST_PRECEDENCE}.
 */
int order() default Ordered.LOWEST_PRECEDENCE;

}
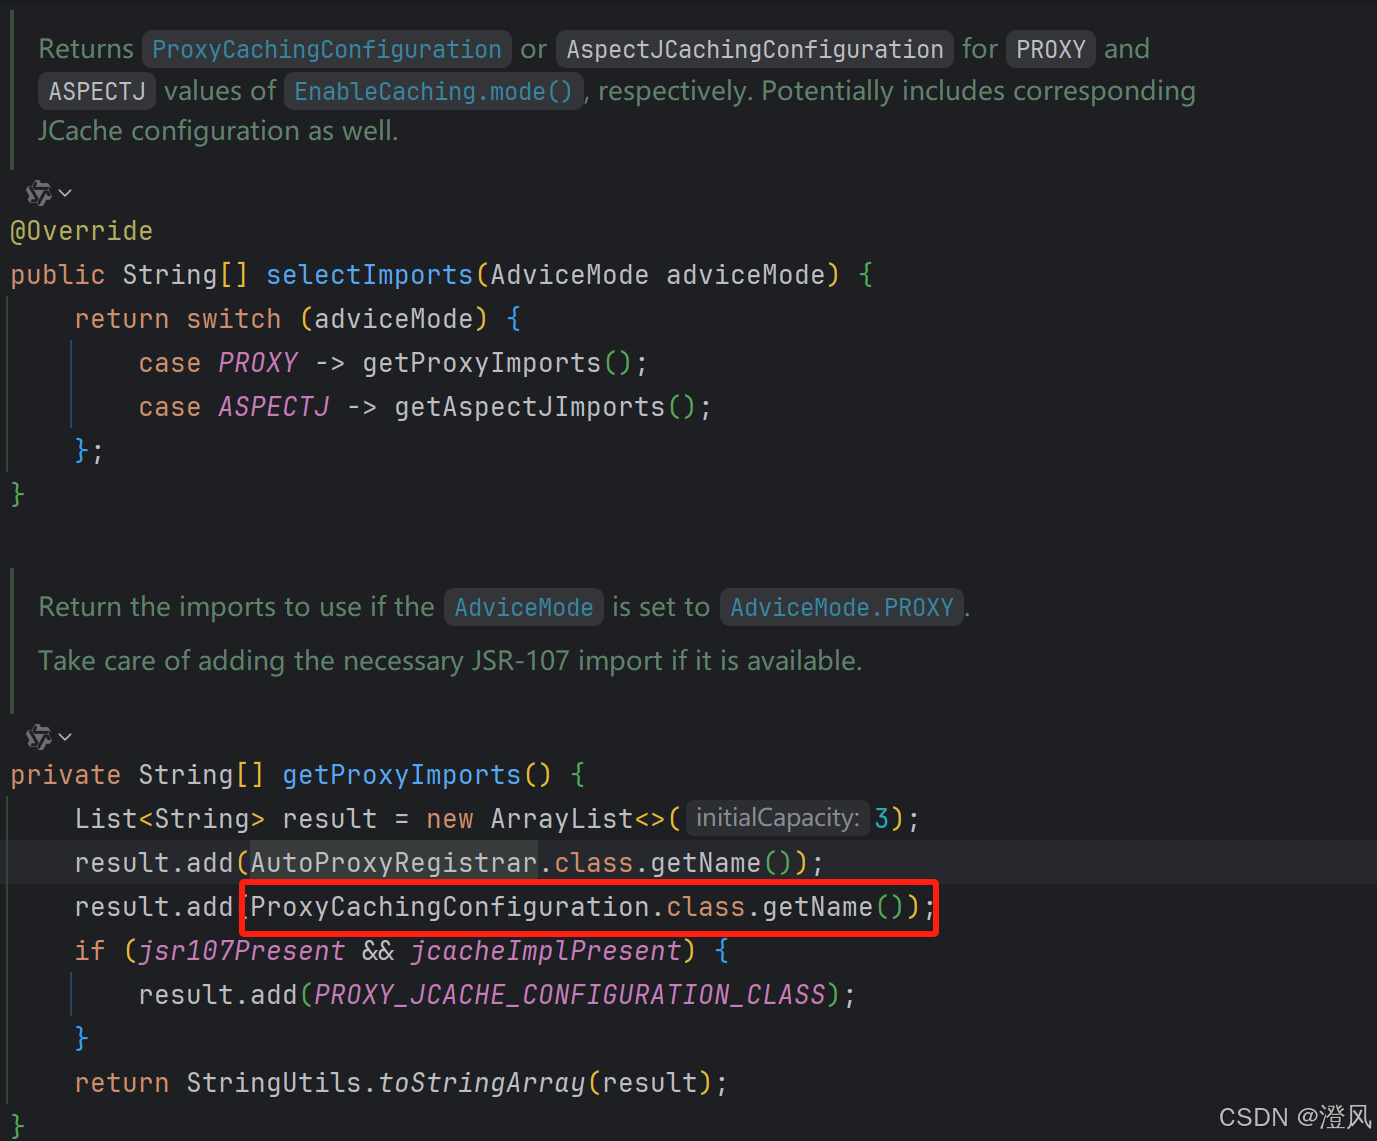
@Import(CachingConfigurationSelector.class) 我们进入CachingConfigurationSelector 看下:

点击进入ProxyCachingConfiguration
@Bean(name = CacheManagementConfigUtils.CACHE_ADVISOR_BEAN_NAME)
@Role(BeanDefinition.ROLE_INFRASTRUCTURE)
public BeanFactoryCacheOperationSourceAdvisor cacheAdvisor(
CacheOperationSource cacheOperationSource, CacheInterceptor cacheInterceptor) {

BeanFactoryCacheOperationSourceAdvisor advisor = new BeanFactoryCacheOperationSourceAdvisor();
advisor.setCacheOperationSource(cacheOperationSource);
advisor.setAdvice(cacheInterceptor);
if (this.enableCaching != null) {
advisor.setOrder(this.enableCaching.<Integer>getNumber("order"));
}
return advisor;
}

@Bean
@Role(BeanDefinition.ROLE_INFRASTRUCTURE)
public CacheOperationSource cacheOperationSource() {
// Accept protected @Cacheable etc methods on CGLIB proxies, as of 6.0.
return new AnnotationCacheOperationSource(false);
}

@Bean
@Role(BeanDefinition.ROLE_INFRASTRUCTURE)
public CacheInterceptor cacheInterceptor(CacheOperationSource cacheOperationSource) {
CacheInterceptor interceptor = new CacheInterceptor();
interceptor.configure(this.errorHandler, this.keyGenerator, this.cacheResolver, this.cacheManager);
interceptor.setCacheOperationSource(cacheOperationSource);
return interceptor;
}
我们可以看到动态代理注入了一个interceptor,我们这个时候就可以猜测,所有的缓存操作都是在这个interceptor里边进行操作的(不熟悉动态代理原理的可以先去看下)。
public class CacheInterceptor extends CacheAspectSupport implements MethodInterceptor, Serializable {

@Override
@Nullable
public Object invoke(final MethodInvocation invocation) throws Throwable {
Method method = invocation.getMethod();

CacheOperationInvoker aopAllianceInvoker = () -> {
try {
return invocation.proceed();
}
catch (Throwable ex) {
throw new CacheOperationInvoker.ThrowableWrapper(ex);
}
};

Object target = invocation.getThis();
Assert.state(target != null, "Target must not be null");
try {
return execute(aopAllianceInvoker, target, method, invocation.getArguments());
}
catch (CacheOperationInvoker.ThrowableWrapper th) {
throw th.getOriginal();
}
}
}
再点击进入 CacheAspectSupport 发现有个方法叫execute,礼拜呢有一个findCachedValue方法,这个就是查询缓存有没有命中,如果有命中直接返回缓存,如果没命中那么就会执行员原服务方法获取数据。
@Nullable
private Object execute(CacheOperationInvoker invoker, Method method, CacheOperationContexts contexts) {
if (contexts.isSynchronized()) {
// Special handling of synchronized invocation
return executeSynchronized(invoker, method, contexts);
}

// Process any early evictions
processCacheEvicts(contexts.get(CacheEvictOperation.class), true,
CacheOperationExpressionEvaluator.NO_RESULT);

// Check if we have a cached value matching the conditions
Object cacheHit = findCachedValue(invoker, method, contexts); // 查询缓存
if (cacheHit == null || cacheHit instanceof Cache.ValueWrapper) { // 判断是否命中缓存
return evaluate(cacheHit, invoker, method, contexts);
}
return cacheHit;
}
CacheAspectSupport.findCachedValue
@Nullable
private Object findCachedValue(CacheOperationInvoker invoker, Method method, CacheOperationContexts contexts) {
for (CacheOperationContext context : contexts.get(CacheableOperation.class)) {
if (isConditionPassing(context, CacheOperationExpressionEvaluator.NO_RESULT)) {
Object key = generateKey(context, CacheOperationExpressionEvaluator.NO_RESULT);
Object cached = findInCaches(context, key, invoker, method, contexts); // 查找缓存
if (cached != null) {
if (logger.isTraceEnabled()) {
logger.trace("Cache entry for key '" + key + "' found in cache(s) " + context.getCacheNames());
}
return cached;
}
else {
if (logger.isTraceEnabled()) {
logger.trace("No cache entry for key '" + key + "' in cache(s) " + context.getCacheNames());
}
}
}
}
return null;
}
CacheAspectSupport.findInCaches
@Nullable
private Object findInCaches(CacheOperationContext context, Object key,
CacheOperationInvoker invoker, Method method, CacheOperationContexts contexts) {

for (Cache cache : context.getCaches()) {
if (CompletableFuture.class.isAssignableFrom(context.getMethod().getReturnType())) {
CompletableFuture<?> result = doRetrieve(cache, key);  // 重试策略
if (result != null) {
return result.exceptionally(ex -> {
getErrorHandler().handleCacheGetError((RuntimeException) ex, cache, key);
return null;
}).thenCompose(value -> (CompletableFuture<?>) evaluate(
(value != null ? CompletableFuture.completedFuture(unwrapCacheValue(value)) : null),
invoker, method, contexts));
}
else {
continue;
}
}
if (this.reactiveCachingHandler != null) {
Object returnValue = this.reactiveCachingHandler.findInCaches(
context, cache, key, invoker, method, contexts);
if (returnValue != ReactiveCachingHandler.NOT_HANDLED) {
return returnValue;
}
}
Cache.ValueWrapper result = doGet(cache, key);
if (result != null) {
return result;
}
}
return null;
}
CacheAspectSupport.doGet 可以看到最终拿的就是我们在cache manager 里边配置的cache
@Nullable
protected Cache.ValueWrapper doGet(Cache cache, Object key) {
try {
return cache.get(key);
}
catch (RuntimeException ex) {
getErrorHandler().handleCacheGetError(ex, cache, key);
return null;  // If the exception is handled, return a cache miss
}
}
2. 缓存管理:缓存的存储和取用是通过 Spring 的缓存抽象来管理的。缓存的实现可以是简单的内存缓存,也可以是分布式缓存,如 Redis 等。
3. 缓存策略:开发者可以通过注解设置不同的缓存策略,例如缓存的键、值、过期时间、条件等。
这种基于注解的缓存方式极大地简化了缓存操作,让开发者专注于业务逻辑的实现,而缓存的管理由 Spring 自动处理。
3.2 难点排查
在做demo的时候发现配置也没错,也没有说是通过本文件的方法去调用提供缓存的方法(这样不走代理,无法执行命中缓存操作),后来发现是weakkey导致的。假如说内存不够的情况下,key就会被直接清楚掉,而我电脑可分配内存很少。可能会频繁触发GC,导致cache key被清除掉了。不清楚weakReference作用的同学可以去看下我写的另一篇文章:
WeakReference浅析
@Bean
public Caffeine<Object, Object> caffeineConfig() {
     return Caffeine.newBuilder()
             .maximumSize(1000)
             .expireAfterWrite(5, TimeUnit.MINUTES)
//                .weakKeys() // 很坑会,基本上很快就把key清理掉了,缓存再也命中不了
             .recordStats();
}
总结
散会
原文地址:https://blog.csdn.net/yh4494/article/details/145160538
免责声明:本站文章内容转载自网络资源,如侵犯了原著者的合法权益,可联系本站删除。更多内容请关注自学内容网(zxcms.com)!
