Springboot 实战运用
一,基本配置
1,pom文件配置介绍
1.1继承
<parent>
    <groupId>org.springframework.boot</groupId>
    <artifactId>spring-boot-starter-parent</artifactId>
    <version>2.5.2</version>
    <relativePath/> <!-- lookup parent from repository -->
</parent>
Spring Boot 的父级依赖,只有继承它项目才是 Spring Boot 项目。
spring-boot-starter-parent 是一个特殊的 starter,它用来提供相关的 Maven 默认依赖。使
用它之后,常用的包依赖可以省去 version 标签
1.2依赖
<dependency>
    <groupId>org.springframework.boot</groupId>
    <artifactId>spring-boot-starter-web</artifactId>
</dependency>
web项目的启动依赖
1.3插件
<plugins>
    <plugin>
        <groupId>org.springframework.boot</groupId>
        <artifactId>spring-boot-maven-plugin</artifactId>
    </plugin>
spring-boot-maven-plugin 插件是将 springboot 的应用程序打包成 jar 包的插件。将所有
应用启动运行所需要的 jar 包都包含进来,从逻辑上将具备了独立运行的条件。当运行"mvn
package"进行打包后,使用"java -jar"命令就可以直接运行。
2.启动类与启动器
启动类与启动器的区别: 启动类表示项目的启动入口
启动器表示 jar 包的坐标
2.1启动类
Spring Boot 的启动类的作用是启动 Spring Boot 项目,是基于 Main 方法来运行的。
注意:启动类在启动时会做注解扫描(@Controller、@Service、@Repository......),扫描
位置为同包或者子包下的注解,所以启动类的位置应放于包的根下。
import org.mybatis.spring.annotation.MapperScan;
import org.springframework.boot.SpringApplication;
import org.springframework.boot.autoconfigure.SpringBootApplication;
@MapperScan("com.rojer.springboot.mapper")
@SpringBootApplication
public class SpringbootApplication {
public static void main(String[] args) {
SpringApplication.run(SpringbootApplication.class, args);
}
}2.2启动器
Spring Boot 将所有的功能场景都抽取出来,做成一个个的 starter(启动器),只需要在项
目里面引入这些 starter 相关场景的所有依赖都会导入进来,要用什么功能就导入什么场景,
在 jar 包管理上非常方便,最终实现一站式开发。
如:
spring-boot-starter
这是 Spring Boot 的核心启动器,包含了自动配置、日志和 YAML。
spring-boot-starter-actuator
帮助监控和管理应用。
spring-boot-starter-web
支持全栈式 Web 开发,包括 Tomcat 和 spring-webmvc。
spring-boot-starter-amqp
通过 spring-rabbit 来支持 AMQP 协议(Advanced Message Queuing Protocol)。
spring-boot-starter-aop
支持面向切面的编程即 AOP,包括 spring-aop 和 AspectJ。
3.yml文件的配置
3.1格式要求
-
大小写敏感
-
使用缩进来代表层级关系
-
相同部分只出现一次
3.2yml文件存放位置
-
当前项目根目录中
-
当前项目根目录下的一个/config 子目录中
-
项目的 resources 即 classpath 根路径中
-
项目的 resources 即 classpath 根路径下的/config 目录中
3.3 yml实际配置
#配置端口
server:
port: 8080
spring:
servlet:
multipart:
#配置单个上传文件大小的限制
max-file-size: 3MB
#配置在一次请求中上传文件的总容量
max-request-size: 10MB
#配置数据源
datasource:
url: jdbc:mysql://localhost:3306/product?useSSL=true&serverTimezone=GMT%2B8
username: root
password: 123456
driver-class-name: com.mysql.cj.jdbc.Driver
#mybatis的额外配置
mybatis:
configuration:
map-underscore-to-camel-case: true
type-aliases-package: com.sxt.sringboot.entity
mapper-locations: classpath:mapper/*.xml4.bootstrap文件配置
4.1bootstrap介绍和特征
Spring Boot 中有两种上下文对象,一种是 bootstrap, 另外一种是 application, bootstrap 是应用程序的父上下文,也就是说 bootstrap 加载优先于 applicaton。bootstrap 主要用于从 额外的资源来加载配置信息,还可以在本地外部配置文件中解密属性。这两个上下文共用一 个环境,它是任何 Spring 应用程序的外部属性的来源。bootstrap 里面的属性会优先加载, 它们默认也不能被本地相同配置覆盖。
-
boostrap 由父 ApplicationContext 加载,比 applicaton 优先加载。
-
boostrap 里面的属性不能被覆盖。
5.spring boot核心注解介绍
5.1@SpringBootApplication
是 SpringBoot 的启动类。
此注解等同于@Configuration+@EnableAutoConfiguration+@ComponentScan 的组合。
5.2@SpringBootConfiguration
@SpringBootConfiguration 注解是@Configuration 注解的派生注解,跟@Configuration
注解的功能一致,标注这个类是一个配置类,只不过@SpringBootConfiguration 是 springboot
的注解,而@Configuration 是 spring 的注解
5.3@Configuration
通过对 bean 对象的操作替代 spring 中 xml 文件
5.4@EnableAutoConfiguration
Spring Boot 自动配置(auto-configuration):尝试根据你添加的 jar 依赖自动配置你的
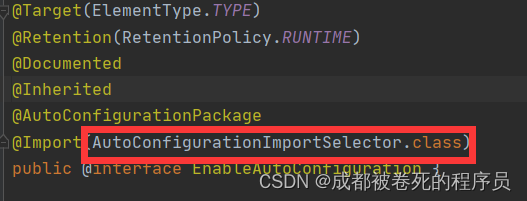
Spring 应用。是@AutoConfigurationPackage 和@Import(AutoConfigurationImportSelector.class)
注解的组合。
5.5@AutoConfigurationPackage
@AutoConfigurationPackage 注解,自动注入主类下所在包下所有的加了注解的类
(@Controller,@Service 等),以及配置类(@Configuration)
5.6@Import({AutoConfigurationImportSelector.class})
直接导入普通的类
导入实现了 ImportSelector 接口的类
导入实现了 ImportBeanDefinitionRegistrar 接口的类
5.7@ComponentScan
组件扫描,可自动发现和装配一些 Bean。
5.8@ConfigurationPropertiesScan
@ConfigurationPropertiesScan 扫描配置属性。@EnableConfigurationProperties 注解的作
用是使用 @ConfigurationProperties 注解的类生效。
二,基本业务的实现
1,修改pom文件加入相关依赖
<dependencies>
        <dependency>
            <groupId>com.github.pagehelper</groupId>
            <artifactId>pagehelper</artifactId>
            <version>5.1.11</version>
        </dependency>
<!--        数据库坐标驱动-->
        <dependency>
            <groupId>mysql</groupId>
            <artifactId>mysql-connector-java</artifactId>
            <version>8.0.25</version>
        </dependency>
<!--        Druid数据源依赖-->
        <dependency>
            <groupId>com.alibaba</groupId>
            <artifactId>druid</artifactId>
            <version>1.2.6</version>
        </dependency>
        <dependency>
            <groupId>org.springframework.boot</groupId>
            <artifactId>spring-boot-starter-web</artifactId>
        </dependency>
        <!--        导入mybatis包-->
        <dependency>
            <groupId>org.mybatis.spring.boot</groupId>
            <artifactId>mybatis-spring-boot-starter</artifactId>
            <version>1.3.2</version>
        </dependency>
        <dependency>
            <groupId>org.projectlombok</groupId>
            <artifactId>lombok</artifactId>
            <version>1.18.20</version>
        </dependency>
        <dependency>
            <groupId>org.springframework.boot</groupId>
            <artifactId>spring-boot-starter-test</artifactId>
            <scope>test</scope>
        </dependency>
        <dependency>
            <groupId>org.apache.commons</groupId>
            <artifactId>commons-lang3</artifactId>
        </dependency>
    </dependencies>
2,编辑yml文件,建立基本配置,如配置端口,数据源等
#配置端口
server:
port: 8080
spring:
servlet:
multipart:
#配置单个上传文件大小的限制
max-file-size: 3MB
#配置在一次请求中上传文件的总容量
max-request-size: 10MB
#配置数据源
datasource:
url: jdbc:mysql://localhost:3306/product?useSSL=true&serverTimezone=GMT%2B8
username: root
password: 123456
driver-class-name: com.mysql.cj.jdbc.Driver
#mybatis的额外配置
mybatis:
configuration:
map-underscore-to-camel-case: true
type-aliases-package: com.sxt.sringboot.entity
mapper-locations: classpath:mapper/*.xml3,修改启动类,使其扫描mapper包
@MapperScan("com.rojer.springboot.mapper")
@SpringBootApplication
public class SpringbootApplication {
public static void main(String[] args) {
SpringApplication.run(SpringbootApplication.class, args);
}
}4,建立controller层,mapper接口,service接口,service实现类
controller层
/**
 *公司controller层
 */
@RestController
@RequestMapping("/back/Company")
public class CompanyController {
    @Autowired
    private CompanyService companyService;
    @PostMapping("/CompanyUpdate")
    public CommonResult companyUpdate(Company company){
        companyService.update(company);
        return CommonResult.success();
    }
    @PostMapping("/CompanyFindAll")
    public CommonResult companyFindAll(Company company){
        List<Company> all = companyService.findAll(company);
        return CommonResult.success(all);
    }
}
mapper接口
/**
* 公司mapper接口
*/
public interface CompanyDao extends BaseDao<Company> {
// 使用注释方法
@Override
@Update("UPDATE `company_information` SET `name` = #{name}, `englishName` = #{englishName},`phone` = #{phone}, `mail` = #{mail}, `fax` = #{fax}, `address` = #{address}, `logo` = #{logo} WHERE (`id` = 1)")
void update(Company company);
@Override
@Select("select * from company_information where id = #{id}")
List<Company> findID(Company company);
@Override
@Select("select * from company_information ")
List<Company> findAll(Company company);
}service接口
/**
 * 公司service接口
 */
public interface CompanyService extends BaseSerice<Company>{
}
service实现类
/**
* 公司service实现类
*/
@Service
public class CompanyServiceImpl implements CompanyService {
@Autowired
private CompanyDao companyDao;
@Override
public List<Company> findAll(Company o) {
List<Company> list = new ArrayList<>();
list = companyDao.findAll(o);
return list;
}
@Override
public List<Company> findID(Company o) {
List<Company> id = companyDao.findID(o);
return id;
}
}三,springboot 如何实现自动装配
补充1:pagehelper的使用
使用pagehelper助手,其sql语句并不会直接发送给到数据库进行查询,而是会先经过mybatis的拦截器,拦截器会截取sql语句。
如:String sql = select * from users 对这句sql进行分页查询时
拦截器会拦截这句sql,转变为 String sql = select * from users limit (curPage-1)*pageSize,pageSize 然后再进行查询。
是一种实际的查询,并不是把所有数据查到放于内存中,在内存里进行分页输出。
补充2:beanFactory和factoryBean 的区别
区别:BeanFactory是个Factory,也就是IOC容器或对象工厂,FactoryBean是个Bean。在Spring中,所有的Bean都是由BeanFactory(也就是IOC容器)来进行管理的。但对FactoryBean而言,这个Bean不是简单的Bean,而是一个能生产或者修饰对象生成的工厂Bean,它的实现与设计模式中的工厂模式和修饰器模式类似 。
自动装配
根据名字实现自动装配是@EnableAutoConfiguration注解,点击进来。

.再点进

图中loadmetadata的方法是加载项目的基本配置数据信息,而getAutoConfigurationEntry方法则是自动装配的逻辑,继续点进去
protected AutoConfigurationEntry getAutoConfigurationEntry(AnnotationMetadata annotationMetadata) {
   if (!isEnabled(annotationMetadata)) {
      return EMPTY_ENTRY;
   }
   AnnotationAttributes attributes = getAttributes(annotationMetadata);
   //这里加载了文件
   List<String> configurations = getCandidateConfigurations(annotationMetadata, attributes);
   configurations = removeDuplicates(configurations);
   Set<String> exclusions = getExclusions(annotationMetadata, attributes);
   checkExcludedClasses(configurations, exclusions);
   configurations.removeAll(exclusions);
   configurations = getConfigurationClassFilter().filter(configurations);
   fireAutoConfigurationImportEvents(configurations, exclusions);
   return new AutoConfigurationEntry(configurations, exclusions);
}
方法中加载文件

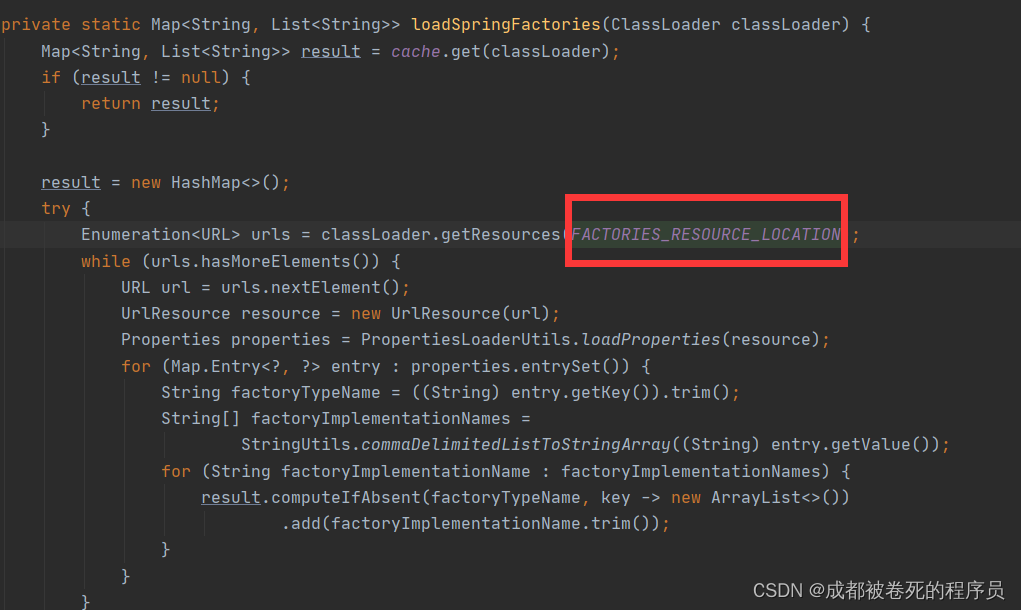
其实到这一步基本清楚了,做的这些事情都是在加载类,那么自动装配到底加载的是什么类呢,这里从外部传入的factoryname是Enableautoconfiguration.class

点进去加载逻辑可以看到是在加载FACTORIES_RESOURCE_LOCATION路径下的类。

会自动扫描所有项目下FACTORIES_RESOURCE_LOCATION这个路径下的类,那么这个路径是啥?
public static final String FACTORIES_RESOURCE_LOCATION = "META-INF/spring.factories";总结:
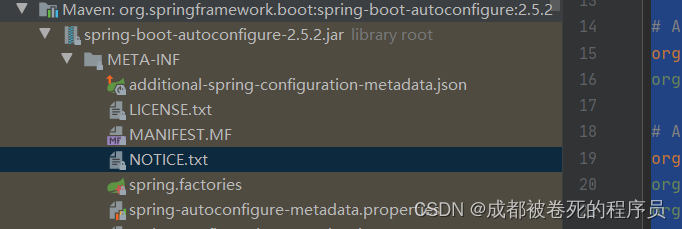
到这里基本清楚了,springboot的自动装配就是通过自定义实现ImportSelector接口,从而导致项目启动时会自动将所有项目META-INF/spring.factories路径下的配置类注入到spring容器中,从而实现了自动装配。
相关的starter和自定义starter都是根据这个实现的。后续有空的话还会写一下如何实现自定义starter的随笔。 系统默认的META-INF/spring.factories路径下配置为

# Initializers
org.springframework.context.ApplicationContextInitializer=\
org.springframework.boot.autoconfigure.SharedMetadataReaderFactoryContextInitializer,\
org.springframework.boot.autoconfigure.logging.ConditionEvaluationReportLoggingListener
# Application Listeners
org.springframework.context.ApplicationListener=\
org.springframework.boot.autoconfigure.BackgroundPreinitializer
# Environment Post Processors
org.springframework.boot.env.EnvironmentPostProcessor=\
org.springframework.boot.autoconfigure.integration.IntegrationPropertiesEnvironmentPostProcessor
# Auto Configuration Import Listeners
org.springframework.boot.autoconfigure.AutoConfigurationImportListener=\
org.springframework.boot.autoconfigure.condition.ConditionEvaluationReportAutoConfigurationImportListener
# Auto Configuration Import Filters
org.springframework.boot.autoconfigure.AutoConfigurationImportFilter=\
org.springframework.boot.autoconfigure.condition.OnBeanCondition,\
org.springframework.boot.autoconfigure.condition.OnClassCondition,\
org.springframework.boot.autoconfigure.condition.OnWebApplicationCondition
# Auto Configure原文地址:https://blog.csdn.net/weixin_54925172/article/details/139300742
免责声明:本站文章内容转载自网络资源,如侵犯了原著者的合法权益,可联系本站删除。更多内容请关注自学内容网(zxcms.com)!
