Vue2+ElementUI下拉、Select组件的封装
Vue2+ElementUI下拉、Select组件的封装:引言
在 Vue2 项目中,ElementUI 的 el-select 组件是常用的下拉选择框组件。它提供了丰富的功能和样式,可以满足各种需求。但是,在实际开发中,我们经常会遇到一些重复性的需求,比如:
- 需要根据不同的条件来过滤选项
- 需要对选项进行自定义格式化
- 需要在下拉框中添加额外的功能,比如搜索、多选等
为了提高开发效率,我们可以对 el-select 组件进行封装,将这些重复性的需求抽象成通用的功能。这样,在后续的项目中,我们就可以直接使用封装好的组件,而无需重复开发。
封装思路
封装 el-select 组件,可以从以下几个方面入手:
- 定义 props: 首先需要定义组件的 props,用于接收外部传入的数据和配置。
- 处理数据: 根据 props 中的数据,对选项进行过滤和格式化。
- 渲染选项: 使用
el-option组件渲染下拉框的选项。 - 扩展功能: 根据需求,添加额外的功能,比如搜索、多选等。
创建组件并使用官网模版
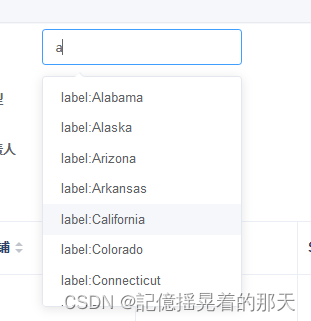
创建组件名为:H3yunSelectCompV1,选择官网的远程搜索下拉组件。
<template>
  <div>
    <el-select
        v-model="value"
        multiple
        filterable
        remote
        reserve-keyword
        placeholder="请输入关键词"
        :remote-method="remoteMethod"
        :loading="loading">
      <el-option
          v-for="item in options"
          :key="item.value"
          :label="item.label"
          :value="item.value">
      </el-option>
    </el-select>
  </div>
</template>

<script>
export default {
  name: "H3yunSelectCompV1",
  data() {
    return {
      options: [],
      value: [],
      list: [],
      loading: false,
      states: ["Alabama", "Alaska", "Arizona",
        "Arkansas", "California", "Colorado",
        "Connecticut", "Delaware", "Florida",
        "Georgia", "Hawaii", "Idaho", "Illinois",
        "Indiana", "Iowa", "Kansas", "Kentucky",
        "Louisiana", "Maine", "Maryland",
        "Massachusetts", "Michigan", "Minnesota",
        "Mississippi", "Missouri", "Montana",
        "Nebraska", "Nevada", "New Hampshire",
        "New Jersey", "New Mexico", "New York",
        "North Carolina", "North Dakota", "Ohio",
        "Oklahoma", "Oregon", "Pennsylvania",
        "Rhode Island", "South Carolina",
        "South Dakota", "Tennessee", "Texas",
        "Utah", "Vermont", "Virginia",
        "Washington", "West Virginia", "Wisconsin",
        "Wyoming"]
    }
  }, mounted() {
    this.list = this.states.map(item => {
      return {value: `value:${item}`, label: `label:${item}`};
    });
  },
  methods: {
    remoteMethod(query) {
      if (query !== '') {
        this.loading = true;
        setTimeout(() => {
          this.loading = false;
          this.options = this.list.filter(item => {
            return item.label.toLowerCase()
                .indexOf(query.toLowerCase()) > -1;
          });
        }, 200);
      } else {
        this.options = [];
      }
    }
  }
}
</script>

<style scoped>

</style>
随便在哪个地方有用上这个组件。

父子组件通信
父组件给子组件传值
<H3yunSelectCompV1 :select="item"></H3yunSelectCompV1>
选择器选中的值传递到父组件,通过地址应用,因为上面父组件给子组件传递了一个对象,子组件可以直接操作对象,这个对象是父子公用的,从而实现父子通信。
1、给选择器绑定一个change事件
<el-select
        v-model="value"
        filterable
        remote
        reserve-keyword
        placeholder="请输入关键词"
        :remote-method="remoteMethod"
        @change="selectChange"
        :loading="loading">
      <el-option
          v-for="item in options"
          :key="item"
          :label="item"
          :value="item">
      </el-option>
    </el-select>
2、在change方法里把选中值赋值到select对象里。(select对象是父组件传递过来的)
selectChange(val) {
      this.select.value = val
       console.log(this.select)
    }
上面通过控制台打印就能清楚的看到效果。

处理change事件
父组件加个change事件
                      <H3yunSelectCompV1
                          :select="item"
                          @change="handleSearch"
                      >
                      </H3yunSelectCompV1>
在子组件里面去触发这个change事件
<el-select
        v-model="value"
        filterable
        remote
        reserve-keyword
        :remote-method="remoteMethod"
        @change="selectChange"
        :loading="loading"
        clearable
    >
      <el-option
          v-for="item in options"
          :key="item"
          :label="item"
          :value="item">
      </el-option>
    </el-select>

methods: {
    selectChange(val) {
      this.select.value = val
      // 触发父组件的change事件
      this.$emit('change', val);
    }
}
处理远程搜索
把远程搜索的URL传进去。
             <H3yunSelectCompV1
                          :select="item"
                          :remoteMethodUrl="tableObj.http.filterRemoteMethodUrl"
                          @change="handleSearch"
                      >
                      </H3yunSelectCompV1>
修改模版原先的远程搜索方法。
remoteMethod(query) {
      if (query !== '') {
        this.loading = true;
        // 200毫秒内有输入清除定时器
        if (this.timerId) {
          clearTimeout(this.timerId);
        }
        this.timerId = setTimeout(async () => {
          this.loading = false;
          // 访问后端接口获取选项
          this.options = await this.getOptions(query)
        }, 200);
      } else {
        this.options = [];
      }
    },
    async getOptions(query) {
      // 后端接口地址
      const url = this.remoteMethodUrl
      // 构建请求参数,param {属性名:查询值}
      const param = {}
      param[this.select.prop] = query;
      // request方法是封装的axios请求 - 自定义
      const optionsObj = await request.post(url, param)
      // 使用 map 筛选出属性名为 this.select.prop 的值  - 自定义,根据后端的返回值自己来定
      const options = optionsObj.map(item => item[this.select.prop]);
      return options
    }
效果如下

原文地址:https://blog.csdn.net/qq_43657722/article/details/136509289
免责声明:本站文章内容转载自网络资源,如本站内容侵犯了原著者的合法权益,可联系本站删除。更多内容请关注自学内容网(zxcms.com)!
