项目实战之网络电话本之发送邮件名片和导出word版个人信息
1、项目介绍
1)项目功能
用户管理:分为管理员、和普通用户,设置不同用户的权限
电话本信息管理:支持管理员和普通用户对电话本的信息进行增删改操作,模糊查询(根据姓名、地址、单位)
文件批量导入:支持管理员通过excel文件批量导入电话本信息
分页功能:对电话本信息管理页面支持分页查看
电话本分组管理:对电话本进行分组,修改、移动、删除
邮件发送名片功能:支持管理员根据电话本信息向用户发送邮件,邮件内容为个人信息名片和附件
用户信息导出功能:导出个人用户的用户信息word文档
2)技术栈描述
前端 html+thymeleaf+jquery+css
后端 Spring Boot + Spring MVC + MyBatis Plus
数据库 MySQL
其他技术 POI Excel 、word文件导入导出、JavaMail API邮件发送
2、邮件发送具体实现
1)导入发送邮件需要的依赖
<!--        邮件发送-->
        <dependency>
            <groupId>org.springframework.boot</groupId>
            <artifactId>spring-boot-starter-mail</artifactId>
        </dependency>
2)添加邮件配置的参数(在application.yml配置文件中)
  mail:
    host: smtp.qq.com  #qq邮件服务器地址 有其他地址
    username: xxxxxxx@qq.com #发件人邮箱
    password: rwcafxsrjxfndfee    #授权码
    default-encoding: UTF-8 #邮件登录字符集编码
    port: 25 #发件人邮件服务器端口
授权码的获取:首先登录QQ邮箱>>>登录成功后找到设置>>>然后找到邮箱设置>>>点击账户>>>找到POP3|SMTP服务>>>点击开启(开启需要验证,验证成功后会有一串授权码用于发送邮件使用)>>>验证成功
3)创建邮件发送controller
以发送个人信息为例
    @Autowired
    MailUtil mailUtil;
    /**
     * 邮件发送名片功能
     * @param contactId
     * @param userId
     * @return
     */
    @RequestMapping("/sendEmailCard")
    public void sendEmailCard(Integer contactId, Integer userId){
        Contacts contacts = this.contactsService.getById(contactId);
        Users user = this.usersService.getById(contacts.getUserId());
        Integer gender0 = contacts.getGender();
        String gender = "男";
        if(gender0==1){
            gender="女";
        }
        String email = contacts.getEmail();
        String content="<html><body><h1>个人名片</h1><p>姓名:" +user.getUsername()+
                "</p><p>单位:" +contacts.getCompany()+
                "</p><p>性别:" +gender+
                "</p><p>年龄:" +contacts.getAge()+
                "</p><p>办公电话:" +contacts.getOfficePhone()+
                "</p><p>传真:" +contacts.getFax()+
                "</p><p>手机号码:" +contacts.getMobile()+
                "</p><p>电子邮件:" +contacts.getEmail()+
                "</p><p>地址:" +contacts.getAddress()+
                "</p><p>备注:" +contacts.getRemarks()+
                "</p></body></html>";
        String imgPath = "D:\\email\\个人信息表.docx";
        mailUtil.sendAttachmentsMail(email, "主题:电话信息验证", content, imgPath);
    }
4) 引入邮件发送工具包
package com.qcby.onlinephonebook.util;

import org.springframework.beans.factory.annotation.Autowired;
import org.springframework.beans.factory.annotation.Value;
import org.springframework.core.io.FileSystemResource;
import org.springframework.mail.SimpleMailMessage;
import org.springframework.mail.javamail.JavaMailSender;
import org.springframework.mail.javamail.MimeMessageHelper;
import org.springframework.stereotype.Component;

import javax.mail.MessagingException;
import javax.mail.internet.MimeMessage;
import java.io.File;

/**
 * <p><p/>
 *
 * @Author: porridge
 * @Date:2022/3/30 10:17
 */
@Component
public class MailUtil {
    @Value("${spring.mail.username}")
    String from;

    @Autowired
    JavaMailSender mailSender;
    //简单邮件
    public void sendSimpleMail(String to, String subject, String content){
        SimpleMailMessage message = new SimpleMailMessage();
        message.setFrom(from); //发件人
        message.setTo(to);//收件人
        message.setSubject(subject); //标题
        message.setText(content);   //文件内容

        try {
            mailSender.send(message);
            System.out.println("简单邮件发送成功!");
        } catch (Exception e){
            System.out.println("发送简单邮件时发生异常!"+e);
        }
    }
    //html格式邮件
    public void sendHtmlMail(String to, String subject, String content){
        MimeMessage message = mailSender.createMimeMessage();
        try {
            //true表示需要创建一个multipart message
            MimeMessageHelper helper = new MimeMessageHelper(message, true);
            helper.setFrom(from);
            helper.setTo(to);
            helper.setSubject(subject);
            helper.setText(content, true);

            mailSender.send(message);
            System.out.println("html邮件发送成功!");
        } catch (MessagingException e) {
            System.out.println("发送html邮件时发生异常!"+e);
        }
    }

    //带附件的邮件
    public void sendAttachmentsMail(String to, String subject, String content, String filePath){
        MimeMessage message = mailSender.createMimeMessage();

        try {
            MimeMessageHelper helper = new MimeMessageHelper(message, true);
            helper.setFrom(from);
            helper.setTo(to);
            helper.setSubject(subject);
            helper.setText(content, true);

            FileSystemResource file = new FileSystemResource(new File(filePath));
            String fileName = filePath.substring(filePath.lastIndexOf(File.separator));
            helper.addAttachment(fileName, file);

            mailSender.send(message);
            System.out.println("带附件的邮件已经发送。");
        } catch (MessagingException e) {
            System.out.println("发送带附件的邮件时发生异常!" + e);
        }
    }

    //带静态资源的邮件
    public void sendInlineResourceMail(String to, String subject, String content, String rscPath, String rscId){
        MimeMessage message = mailSender.createMimeMessage();

        try {
            MimeMessageHelper helper = new MimeMessageHelper(message, true);
            helper.setFrom(from);
            helper.setTo(to);
            helper.setSubject(subject);
            helper.setText(content, true);

            FileSystemResource res = new FileSystemResource(new File(rscPath));
            helper.addInline(rscId, res);

            mailSender.send(message);
            System.out.println("嵌入静态资源的邮件已经发送。");
        } catch (MessagingException e) {
            System.out.println("发送嵌入静态资源的邮件时发生异常!" + e);
        }
    }
}
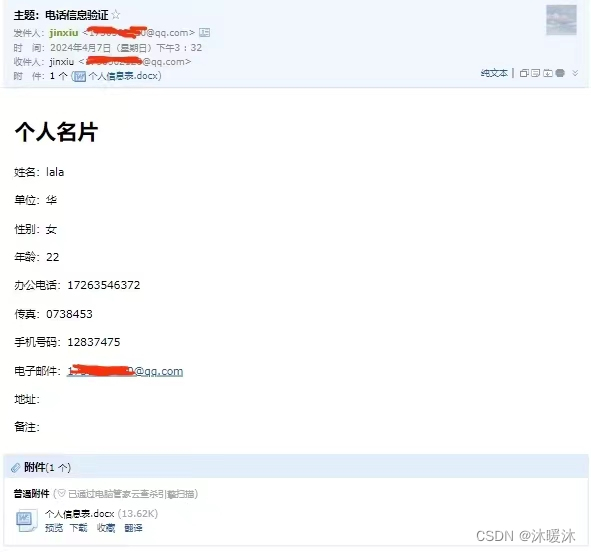
发送成功样例
3、word导出具体实现
1)实现思路
①组装数据
②获取根目录,创建模板文件
③将模板文件写入到根目录
④编译模板,渲染数据
⑤写入到指定目录位置,临时文件
⑥提供前端下载
⑦删除临时文件
2)导入word导出需要的依赖
<!--            word导出-->
        <dependency>
            <groupId>com.deepoove</groupId>
            <artifactId>poi-tl</artifactId>
            <version>1.10.0</version>
        </dependency>
        <dependency>
            <groupId>org.apache.poi</groupId>
            <artifactId>poi</artifactId>
            <version>4.1.2</version>
        </dependency>
        <dependency>
            <groupId>org.apache.poi</groupId>
            <artifactId>poi-ooxml</artifactId>
            <version>4.1.2</version>
        </dependency>
3)在项目resource目录下创建word模板
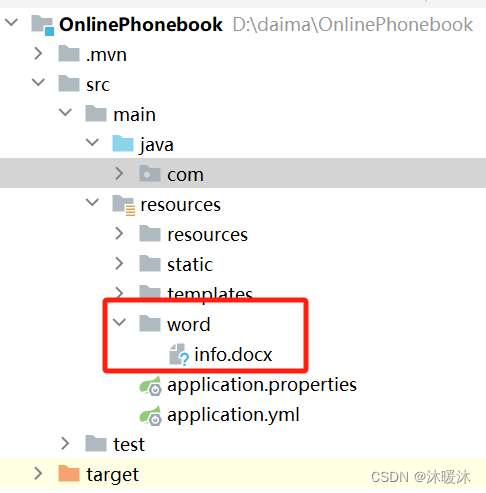
word模板如下:

根据需要,{{}}里面写入需要写入的参数名
4)创建word导出的controller
/**
     * 个人信息word导出
     * @param response
     */
    @RequestMapping("/exportWord")
    public void exportWord(Integer contactId, Integer userId, HttpServletResponse response) {
        Contacts contacts = this.contactsService.getById(contactId);
        String gender = "男";
        if(contacts.getGender()==1){
            gender = "女";
        }
        //1.组装数据
        Map<String, Object> params = new HashMap<>();
        params.put("name",contacts.getName());
        params.put("company", contacts.getCompany());
        params.put("gender", gender);
        params.put("age", contacts.getAge());
        params.put("officePhone", contacts.getOfficePhone());
        params.put("fax", contacts.getFax());
        params.put("mobile", contacts.getMobile());
        params.put("email", contacts.getEmail());
        params.put("address", contacts.getAddress());
        params.put("remarks", contacts.getRemarks());
        //2.获取根目录,创建模板文件
        String path = copyTempFile("word/info.docx");
        String fileName = System.currentTimeMillis() + ".docx";
        String tmpPath = "D:\\email\\" + fileName;
        try {
            //3.将模板文件写入到根目录
            //4.编译模板,渲染数据
            XWPFTemplate template = XWPFTemplate.compile(path).render(params);
            //5.写入到指定目录位置
            FileOutputStream fos = new FileOutputStream(tmpPath);
            template.write(fos);
            fos.flush();
            fos.close();
            template.close();
            //6.提供前端下载
            down(response, tmpPath, fileName);
        } catch (Exception e) {
            e.printStackTrace();
        } finally {
            //7.删除临时文件
            File file = new File(tmpPath);
            file.delete();
            File copyFile = new File(path);
            copyFile.delete();
        }
    }

    /**
     * 用于将文件下载到客户端
     * @param response
     * @param filePath  文件路径
     * @param realFileName  文件名称
     */
    private void down(HttpServletResponse response, String filePath, String realFileName) {
        String percentEncodedFileName = null;
        try {
            percentEncodedFileName = percentEncode(realFileName);
        } catch (UnsupportedEncodingException e) {
            throw new RuntimeException(e);
        }
        StringBuilder contentDispositionValue = new StringBuilder();
        contentDispositionValue.append("attachment; filename=").append(percentEncodedFileName).append(";").append("filename*=").append("utf-8''").append(percentEncodedFileName);

        response.addHeader("Access-Control-Allow-Origin", "*");
        response.addHeader("Access-Control-Expose-Headers", "Content-Disposition,download-filename");
        response.setHeader("Content-disposition", contentDispositionValue.toString());
        response.setHeader("download-filename", percentEncodedFileName);
        try (BufferedInputStream bis = new BufferedInputStream(new FileInputStream(filePath));
             // 输出流
             BufferedOutputStream bos = new BufferedOutputStream(response.getOutputStream());) {
            byte[] buff = new byte[1024];
            int len = 0;
            while ((len = bis.read(buff)) > 0) {
                bos.write(buff, 0, len);
            }
        } catch (Exception e) {
            e.printStackTrace();
        }
    }

    /**
     * 百分号编码工具方法
     * @param s 需要百分号编码的字符串
     * @return 百分号编码后的字符串
     */
    public static String percentEncode(String s) throws UnsupportedEncodingException {
        String encode = URLEncoder.encode(s, StandardCharsets.UTF_8.toString());
        return encode.replaceAll("\\+", "%20");
    }

    /**
     * 复制模板文件用于写入,得到临时路径
     * @param s  模板文件的路径
     * @return
     */
    private String copyTempFile(String s) {
        InputStream inputStream = getClass().getClassLoader().getResourceAsStream(s);
        String tempFileName = System.getProperty("user.home") + "/" + "info.docx";
        File tempFile = new File(tempFileName);
        try {
            FileUtils.copyInputStreamToFile(inputStream, tempFile);
        } catch (IOException e) {
            throw new RuntimeException(e);
        }
        return tempFile.getPath();
    }
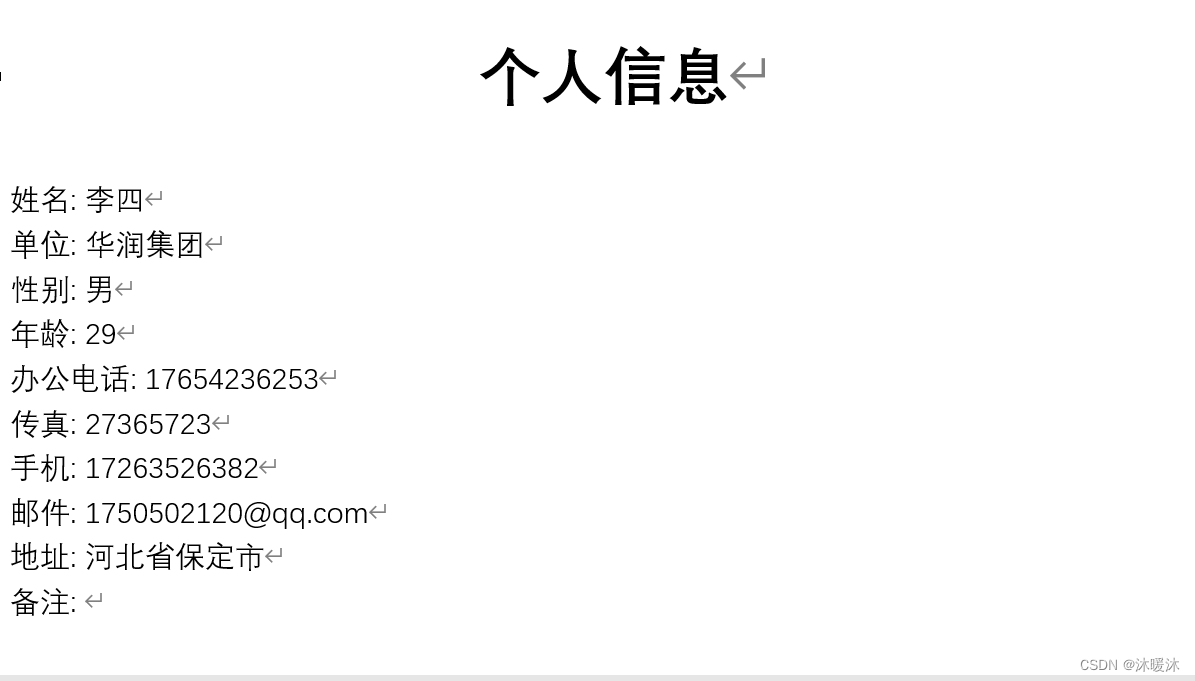
导出成功样例:
原文地址:https://blog.csdn.net/weixin_47480200/article/details/137873129
免责声明:本站文章内容转载自网络资源,如本站内容侵犯了原著者的合法权益,可联系本站删除。更多内容请关注自学内容网(zxcms.com)!