swiper vue-awesome-swiper基本使用以及注意事项
本文中使用vue来演示
1. 安装swiper
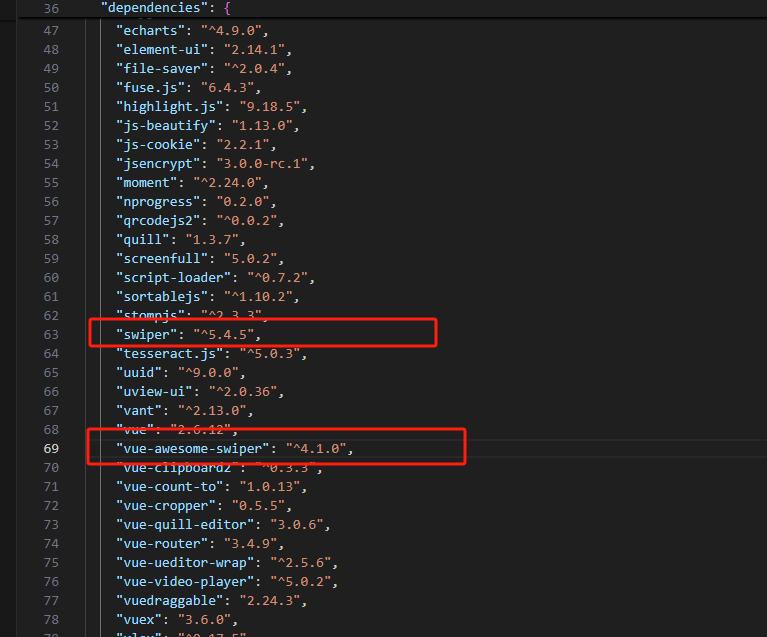
下载插件(最新版本的swiper可能会出现未知bug,所以这里使用5.4.5)
npm i swiper@5.4.5 vue-awesome-swiper@4.1.0 -seve
注意!!
安装swiper和vue-awesome-swiper一定要对应上版本,否则引入,或者语法会出报错,每一个swiper版本都有对应的vue-awesome-swiper版本,如果不安装指定版本,那么就会引入最新版,例如swiper会下载最新版9,但是在国内没有swiper9的文档,那么我们就需要在网上查语法,容易出现错误。

上面这个就是我在网上查找的vue-awesome-swiper使用方法,由于版本没有对应上,所以报错

上面这个图是每个版本的swiper的对比
vue-awesome-swiper插件是基于swiper去做的,所以看swiper文档就可以使用

成功安装后的版本
2. 页面使用
全局使用
import Vue from "vue"
import Swiper from 'vue-awesome-swiper'
import 'swiper/css/swiper.css'
Vue.use(Swiper)
组件使用
import { Swiper, SwiperSlide } from 'vue-awesome-swiper'
import 'swiper/css/swiper.css'
//在components里面进行注册
components: {
    Swiper,
    SwiperSlide
  },
在页面中使用
<swiper :options="swiperOption" ref="swiperRef" class="top-swiper">
      <swiper-slide class="banner-item" v-for="(item, index) in bannerList" :key="index">
        <img :src="item" alt="" style="width: 95%;">
      </swiper-slide>
    </swiper>
在data中绑定配置项
data(){
      return {
       bannerList:['11.png','222.png'],
       swiperOption: {
        pagination: {
          el: ".case-swiper-pagination"
          //区分不同Swiper的组件
        },
        //显示分页
        loop: true,
        //开启循环
        loopedSlides: 6,
        //设置平滑
        slidesPerView: 3,
        //设置能够同时显示的数量(可设置 auto)
        speed: 1000,
        //切换速度

        navigation: {
          prevEl: ".swiper-button-prev2",
          nextEl: ".swiper-button-next2"
        },
        //左右箭头按钮(可自定义)

        // autoplay: false,
        //是否开启自动轮播

        autoplay: {
          delay: 1000,
          stopOnLastSlide: false,
          disableOnInteraction: false
        },
        // 开启自动轮播后,设置自动轮播的延迟时间
        loopAdditionalSlides: 1,
        //复制若干个slide
        // slidesPerGroup: 3,
        // 定义slides的数量多少为一组,即每次切换slides的数量,默认每次切换一张
        on: {
          slideChangeTransitionEnd: function() {
            console.log(this.activeIndex);
            //获取当前下标,切换结束时,告诉我现在是第几个slide
          }
        }
      }
}
bannerList里面的图片需要替换成自己的图片
效果图

3. swiper动态配置项不更新问题
vue-awesome-swiper的配置项,如果是需要动态去实时的更新,那么在vue-awesome-swiper中会检测不到配置项更新,所以视图也不会更新,但实际上我们的数据已经更新了,在这里vue中的响应式已经不生效,
$forceUpdate()强制更新也是没用的,那么我们只能从新渲染组件,删除再从新渲染
最有效,最快的办法就是使用v-if
<template>
  <div class="banner" >
    <swiper v-if="lucy" :options="{ 'slidesPerView': s }" ref="swiperRef" class="top-swiper">
      <swiper-slide class="banner-item" v-for="(item, index) in bannerList" :key="index"
       >
        <img :src="item.bannerUrl" alt="" style="width: 95%;">
      </swiper-slide>
    </swiper>
  </div>
</template>
<script>
import { Swiper, SwiperSlide } from 'vue-awesome-swiper'
import 'swiper/css/swiper.css'

export default {
  name: "banner2",
  components: {
    Swiper,
    SwiperSlide
  },
  props: {
    terminal: {
      type: Number,
    },
    componentContent: {
      type: Object
    },
    bannerList: {
      type: Array
    },
  },
  data() {
    return {
      swiperOption: {
        spaceBetween: 10,
        slidesPerView: 1
      },
      s: 1,
      lucy: true
    }
  },
  watch: {
    "componentContent.slidewid"() {
       this.init()
    }
  },
    methods:{
      init(){
           this.lucy = false
            setTimeout(() => {
              console.log(this.componentContent.slidewid)
              this.s = this.componentContent.slidewid
              this.lucy = true
            }, 100);
      }
    },
  mounted() {
    this.init()
  }
}
</script>
- 给
swiper加上v-if,默认是true,显示 - 动态添加
slidesPerView配置项 - 监听
componentContent.slidewid,这个就是配置项数据 componentContent.slidewid发生改变调用init- 调用
init时,先利用v-if把swiper销毁掉 - 把当前动态的配置项赋值给s
- 最后从新创建
swiper,进行渲染,这样就ok了
4. 动态配置项完整代码
这是一个子组件,配置项并没有写那么多,主要是演示动态的渲染配置项,一些数据需要父组件传过来。
<!--
 * @Author: hukai huzhengen@gmail.com
 * @Date: 2024-06-24 15:40:49
 * @LastEditors: hukai huzhengen@gmail.com
 * @LastEditTime: 2024-11-12 14:08:44
 * @FilePath: \companyadmin\src\components\template\TemplateListRotationDiagram\banner2.vue
 * @Description: 这是默认设置,请设置`customMade`, 打开koroFileHeader查看配置 进行设置: https://github.com/OBKoro1/koro1FileHeader/wiki/%E9%85%8D%E7%BD%AE
-->
<template>
  <div class="banner" :class="'terminal' + terminal" :style="{ 'height': componentContent.height + 'px' }">
    <swiper v-if="lucy" :options="{ 'slidesPerView': s }" ref="swiperRef" class="top-swiper">
      <swiper-slide class="banner-item" style="text-align: center;" v-for="(item, index) in bannerList" :key="index"
        @click="jumpLink(item.linkObj)">
        <img :src="item.bannerUrl" alt="" style="width: 95%;"
          :style="{ 'border-radius': componentContent.corner + 'px' }">
      </swiper-slide>
    </swiper>
  </div>
</template>
<script>
import { Swiper, SwiperSlide } from 'vue-awesome-swiper'
import 'swiper/css/swiper.css'

export default {
  name: "banner2",
  components: {
    Swiper,
    SwiperSlide
  },
  props: {
    terminal: {
      type: Number,
    },
    componentContent: {
      type: Object
    },
    bannerList: {
      type: Array
    },
  },
  data() {
    return {
      swiperOption: {
        spaceBetween: 10,
        slidesPerView: 1
      },
      s: 1,
      lucy: true
    }
  },
  watch: {
    "componentContent.slidewid"() {
      this.lucy = false

      setTimeout(() => {
        console.log(this.componentContent.slidewid)
        this.s = this.componentContent.slidewid
        this.$forceUpdate()
        this.lucy = true
      }, 100);
    }
  },
  mounted() {
    this.lucy = false
    setTimeout(() => {
      console.log(this.componentContent.slidewid)
      this.s = this.componentContent.slidewid
      this.$forceUpdate()
      this.lucy = true
    }, 100);
    console.log(this.componentContent)
  }
}
</script>

<style lang="scss" scoped>
.banner {
  .swiper-container {
    width: 100%;
    height: 100%;
  }

  .banner-item {
    &.swiper-slide {
      width: 80%;
    }

    img {
      width: 100%;
      height: 100%;
    }
  }
}
</style>
展示效果

原文地址:https://blog.csdn.net/m0_74079648/article/details/143716159
免责声明:本站文章内容转载自网络资源,如本站内容侵犯了原著者的合法权益,可联系本站删除。更多内容请关注自学内容网(zxcms.com)!
