Blazor入门-连接MySQL的简单例子:列出数据+简单查询
参考:
ASP.NET Core 6.0 Blazor Server APP并使用MySQL数据库_blazor mysql-CSDN博客
https://blog.csdn.net/mzl87/article/details/129199352
本地环境:win10, visual studio 2022 community, mysql 8.0.33 (MySQL Community Server), net core 6.0
目录
问题
假设本地装有MySQL,里面有一个数据库名为vector,其下有一个表名为basic_unit,现在需要在某个网页上:
- 列出basic_unit中所有数据
- 能根据字段 Name 和(或)Type 查询并列出结果。
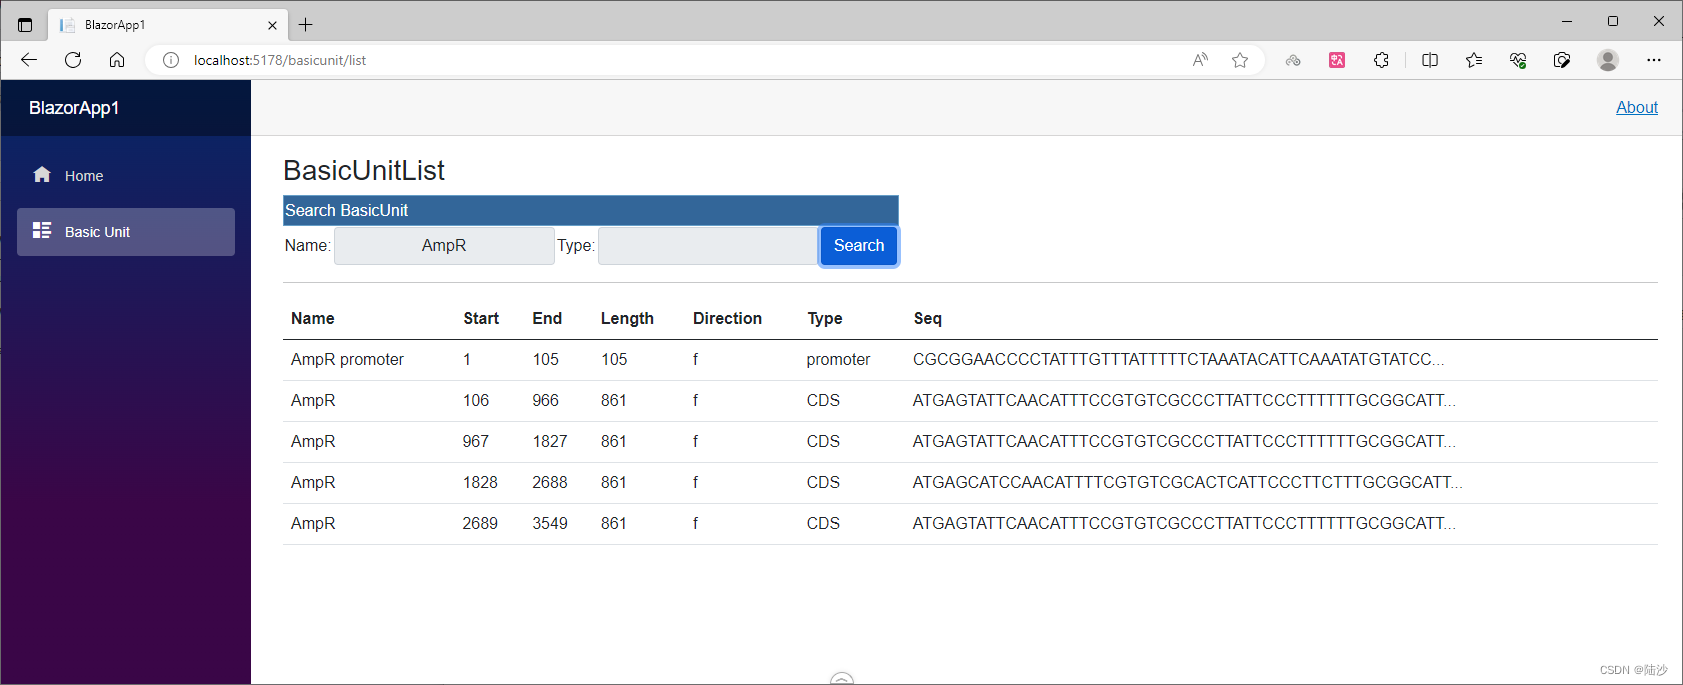
实现效果
- 列出所有数据

- 查询

前置工作
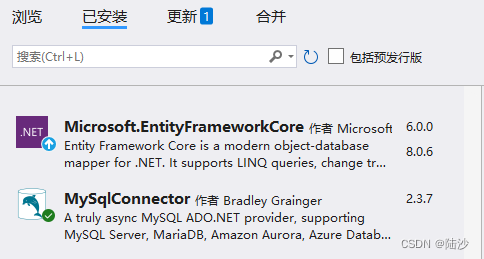
配置VS插件/程序包
使用 NuGet 安装如下两个程序包。其中,第一个包可能要对照.NET的版本,如果对不上会安装失败。

配置MySQL
首先创建一个表:
create table basic_unit(
  id int unsigned not null AUTO_INCREMENT,
  name varchar(200) default null,
  ustart int default -1,
  uend int default -1,
  direction varchar(1) default 'n',
  unit_type varchar(100) default null,
  seq varchar(15000) default null,
  primary key(id)
) engine=InnoDB;
然后创建一个procedure:
use vector;
delimiter $$

mysql> create procedure SearchBU(in n varchar(200), in utype varchar(100))
    -> BEGIN
    -> select name, ustart, uend, direction, unit_type, seq
    -> from basic_unit
    -> where
    ->     name like concat('%', n, '%')
    ->     and
    ->     unit_type like concat('%', utype, '%');
    -> END$$
Query OK, 0 rows affected (0.04 sec)
测试一下procedure是否创建成功:
mysql> call SearchBU("AmpR promoter","promoter");
+---------------+--------+------+-----------+-----------+-----------------------------------------------------------------------------------------------------------+
| name          | ustart | uend | direction | unit_type | seq                                                                                                       |
+---------------+--------+------+-----------+-----------+-----------------------------------------------------------------------------------------------------------+
| AmpR promoter |      1 |  105 | f         | promoter  | CGCGGAACCCCTATTTGTTTATTTTTCTAAATACATTCAAATATGTATCCGCTCATGAGACAATAACCCTGATAAATGCTTCAATAATATTGAAAAAGGAAGAGT |
+---------------+--------+------+-----------+-----------+-----------------------------------------------------------------------------------------------------------+
1 row in set (0.00 sec)

Query OK, 0 rows affected (0.01 sec)
procedure使用方法可以参考:MySQL-存储过程(Stored Procedure)使用
MySQL-存储过程(Stored Procedure)使用-CSDN博客
https://blog.csdn.net/pxy7896/article/details/139290992
blazor配置和编码
blazor项目的创建参见下面的链接,此处不再展开。
Blazor入门-基础知识+vs2022自带例程的理解_blazor教程 菜鸟-CSDN博客
https://blog.csdn.net/pxy7896/article/details/138621017
1.创建模型类
在项目中新建一个文件夹Models,然后创建一个模型类 BasicUnit。我把Models放在Data文件夹下,其实也可以放在根目录,都可以。
namespace BlazorApp1.Data.Models
{
    public class BasicUnit
    {
        public int Id { get; set; }
        public string? Name { get; set; }
        public int Ustart { get; set; } = -1;
        public int Uend { get; set; } = -1;
        public string Direction { get; set; } = "n";
        public string? UnitType { get; set; }
        public string? Seq { get; set; }
    }
}
2.创建连接类
2.1创建连接辅助类
还是在Models下创建一个连接辅助类 MySQLHelper,内容为:
using MySqlConnector;

namespace BlazorApp1.Data.Models
{
    public class MySQLHelper
    {
        //this field gets initialized at Program.cs
        public static string? conStr;

        public static MySqlConnection GetConnection()
        {
            try
            {
                MySqlConnection connection = new MySqlConnection(conStr);
                return connection;
            }
            catch (Exception e)
            {
                Console.WriteLine(e);
                throw;
            }
        }

    }
}
然后在 Program.cs 中初始化这个辅助类:
using BlazorApp1.Data.Models;
....
builder.Services.AddServerSideBlazor();
...
// connect mysql
MySQLHelper.conStr = builder.Configuration["ConnectionStrings:DefaultConnection"];

var app = builder.Build();
...
然后修改 appsettings.json ,增加一段内容:
  "ConnectionStrings": {
    "DefaultConnection": "server=localhost;user id=用户名;password=密码;port=3306;database=数据库名称;"
  },
这样连接辅助类就拿到连接所需的各种信息了。
2.2创建连接类
下面的代码很好理解,就是在函数里执行查询过程,然后包装结果,准备传递给service。
using BlazorApp1.Data.Models;
using MySqlConnector;
using System.Data;

namespace BlazorApp1.Data
{
    public class BasicUnitConnection
    {
        public async Task<BasicUnit[]> SearchBasicUnits(string name, string utype) {
            List<BasicUnit> basicUnits = new List<BasicUnit>();
            // 辅助类提供了连接信息
            using (MySqlConnection conn = MySQLHelper.GetConnection()) {
                // open connection
                conn.Open();
                // SearchBU 是前面创建的查询过程(procedure)
                using (MySqlCommand cmd = new MySqlCommand("SearchBU", conn)) {
                    cmd.CommandType = CommandType.StoredProcedure;
                    // add parameters
                    cmd.Parameters.Add(new MySqlParameter {
                        ParameterName = "@n",
                        DbType = DbType.String,
                        Value = name,
                        Direction = ParameterDirection.Input,
                    });
                    cmd.Parameters.Add(new MySqlParameter
                    {
                        ParameterName = "@utype",
                        DbType = DbType.String,
                        Value = utype,
                        Direction = ParameterDirection.Input,
                    });
                    // 执行查询,将收到的查询结果包装成模型对象
                    // 查询结果应与sql查询语句对应,包括类型
                    using (MySqlDataReader reader = cmd.ExecuteReader()) {
                        while (reader.Read()) {
                            basicUnits.Add(new BasicUnit() {
                                Name = reader.GetString("name"),
                                Ustart = reader.GetInt32("ustart"),
                                Uend = reader.GetInt32("uend"),
                                Direction = reader.GetString("direction"),
                                UnitType = reader.GetString("unit_type"),
                                Seq = reader.GetString("seq"),
                            });
                        }
                    }
                }

            }
            //Console.WriteLine(basicUnits.Count);
            return basicUnits.ToArray();
        }
    }
}
3.创建服务类
服务类更简单了,只要调用上面的连接类里的函数即可。
using BlazorApp1.Data.Models;

namespace BlazorApp1.Data
{
    public class BasicUnitService
    {
        private BasicUnitConnection conn { get; set; } = new BasicUnitConnection();

        public async Task<BasicUnit[]> GetBasicUnitsByNameType(string name, string type) {
            BasicUnit[] res = conn.SearchBasicUnits(name, type).Result.ToArray();
            return res;
        }
    }
}
4.创建客户端razor
razor是显示内容的元件,里面包括一个查询框和一个查询结果列表,两个都是table。
需要注意的是,如果模型的一个属性可能是null,需要注意处理。
@page "/basicunit/list"
@using BlazorApp1.Data
@using BlazorApp1.Data.Models;
@inject BasicUnitService basicUnitService

<h3>BasicUnitList</h3>

<!-- search frame -->
<table>
    <tr style="height: 30px; background-color:#336699 ;
     color:#FFFFFF ;border: solid 1px #659EC7;">
        <td colspan="5" align="left">
            Search BasicUnit
        </td>
    </tr>
    <tr>
        <td>Name:</td>
        <td>
            <input class="input-group-text" type="text" @bind-value="@custName" />
        </td>

        <td>Type:</td>
        <td>
            <input class="input-group-text" type="text" @bind-value="@custType" />
        </td>
        <td>
            <input type="button" class="btn btn-primary"
                   value="Search" @onclick="@searchDetails" />
        </td>
    </tr>
</table>

<hr/>

@if (basicUnits == null)
{
    <p><em>Loading...</em></p>
} else
{
    <table class="table">
        <thead>
            <tr>
                <th>Name</th>
                <th>Start</th>
                <th>End</th>
                <th>Length</th>
                <th>Direction</th>
                <th>Type</th>
                <th>Seq</th>
            </tr>
        </thead>
        <tbody>
            @foreach(var bu in basicUnits)
            {
                bsize = @bu.Uend - bu.Ustart + 1;
                if (@bu.Seq != null)
                {
                    bseq = bu.Seq;
                    if (bsize > 50)
                    {
                        bseq = bseq.Substring(0, 50) + "...";
                    }
                }

                <tr>
                    <td>@bu.Name</td>
                    <td>@bu.Ustart</td>
                    <td>@bu.Uend</td>
                    <td>@bsize</td>
                    <td>@bu.Direction</td>
                    <td>@bu.UnitType</td>
                    <td>@bseq</td>

                </tr>
            }
        </tbody>
    </table>
}
代码部分则是:
@code {
    private string custName = "";
    private string custType = "";
    private BasicUnit[]? basicUnits;
    private int bsize = -1; // 因为要计算seq属性的长度,所以额外用一个变量
    private string bseq = ""; // 显示的seq

protected override async Task OnInitializedAsync()
{
basicUnits = await basicUnitService.GetBasicUnitsByNameType(custName, custType);
}

async Task searchDetails()
{
basicUnits = await basicUnitService.GetBasicUnitsByNameType(custName, custType);
}

}
5.配置侧边栏
修改 NavMenu.razor ,给侧边栏增加一个链接:
<div class="@NavMenuCssClass" @onclick="ToggleNavMenu">
    <nav class="flex-column">
        <div class="nav-item px-3">
            <NavLink class="nav-link" href="/" Match="NavLinkMatch.All">
                <span class="oi oi-home" aria-hidden="true"></span> Home
            </NavLink>
        </div>
        <!-- 新增的部分 -->
        <div class="nav-item px-3">
        <!-- href就是上面razor里@page后跟的字符串 -->
            <NavLink class="nav-link" href="/basicunit/list">
                <span class="oi oi-list-rich" aria-hidden="true"></span> Basic Unit
            </NavLink>
        </div>
        <!-- 新增的部分 END -->
    </nav>
</div>
done.
原文地址:https://blog.csdn.net/pxy7896/article/details/139291068
免责声明:本站文章内容转载自网络资源,如本站内容侵犯了原著者的合法权益,可联系本站删除。更多内容请关注自学内容网(zxcms.com)!
