【低照度图像增强系列(7)】RDDNet算法详解与代码实现(同济大学|ICME)

前言
☀️ 在低照度场景下进行目标检测任务,常存在图像RGB特征信息少、提取特征困难、目标识别和定位精度低等问题,给检测带来一定的难度。
🌻使用图像增强模块对原始图像进行画质提升,恢复各类图像信息,再使用目标检测网络对增强图像进行特定目标检测,有效提高检测的精确度。
⭐本专栏会介绍传统方法、Retinex、EnlightenGAN、SCI、Zero-DCE、IceNet、RRDNet、URetinex-Net等低照度图像增强算法。
👑完整代码已打包上传至资源→低照度图像增强代码汇总
目录
(2)光照损失——illumination_smooth_loss
(3)反射损失——reflectance_smooth_loss

🚀一、RDDNet介绍
学习资料:
- 论文题目:《ZERO-SHOT RESTORATION OF UNDEREXPOSED IMAGES VIA ROBUST RETINEX DECOMPOS》(通过鲁棒性 Retinex 分解对曝光不足的图像进行零样本恢复)
- 论文讲解:ICME| RRDNet《ZERO-SHOT RESTORATION OF UNDEREXPOSED IMAGES VIA ROBUST RETINEX DECOMPOS》论文超详细解读(翻译+精读)
- 原文地址:Zero-Shot Restoration of Underexposed Images via Robust Retinex Decomposition | IEEE Conference Publication | IEEE Xplore
- 源码地址:代码export.arxiv.org/pdf/2109.05838v2.pdf
☀️1.1 RDDNet简介
RRDNet是同济大学在2020年提出来的一种新的三分支全卷积神经网络,认为图像由三部分构成:光照分量,反射分量,噪声分量。在没有pair对的情况下实现低光图像增强,通过对loss进行迭代来有效估计出噪声和恢复光照。
研究背景
- 曝光不足的图像由于能见度差和黑暗中的潜在噪声,通常会出现严重的质量下降。
- 现有的图像增强方法忽略了噪声,因此使用带噪声分量的Retinex模型作为基础。
- 基于学习(数据驱动)的方法限制了模型的泛化能力,因此提出zero-shot的学习模式。
算法框架
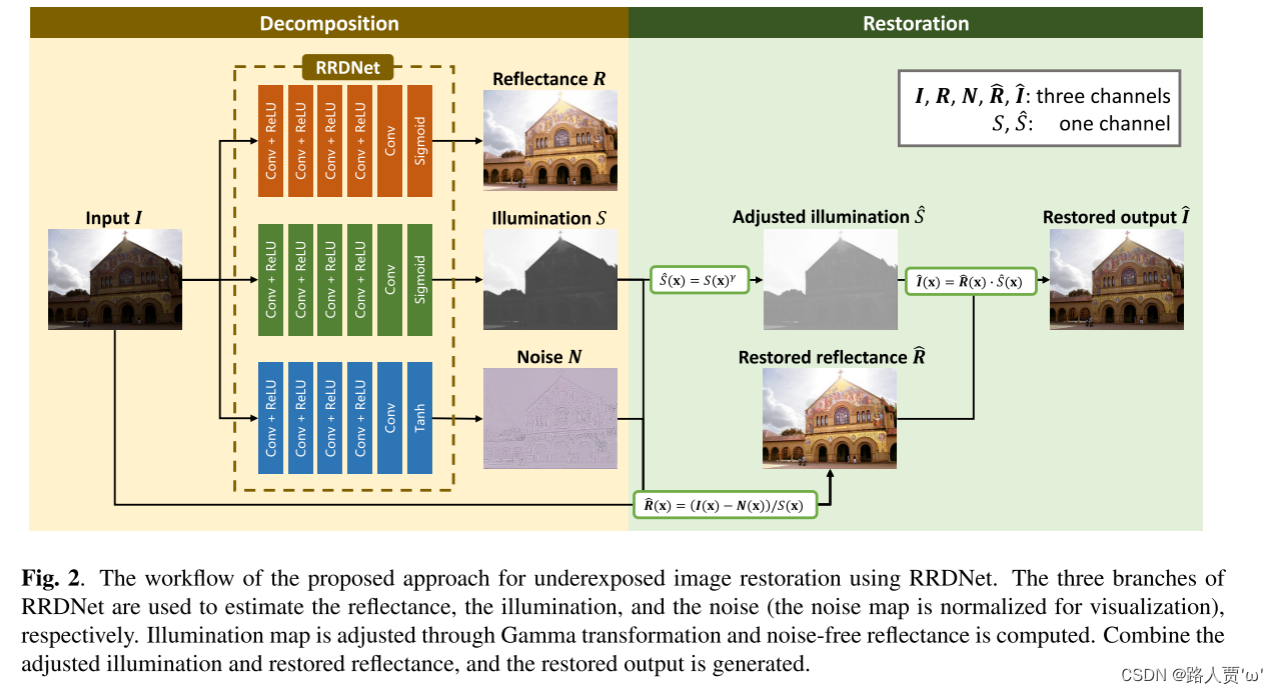
- 通过三分支网络把输入图像分解为反射图、光照图和噪声图三个分量。
- 通过Gamma变换调整光照图,再计算得到无噪声的反射图。
- 结合光照图和反射图,重构得到最终结果。
损失函数
1. Retinex重构损失,取最大通道值作为初始光照图,用来约束光照图。在光照图的基础上约束反射图和噪声。

2. 纹理增强损失,通过平滑光照图可以帮助增强反射图的纹理。具体损失公式是带有权重的总变分损失,权重的设计规则是,梯度大的地方权重小,即权重与梯度成负相关即可,这里是将梯度经过高斯滤波放在分母。

3. 光照指导的噪声损失,根据噪声随着光照的变大而变大的假设,可以使用光照图来做权重指导,其次考虑两点:
(1)假定噪声范围限定
(2)通过平滑反射图来得到噪声,本身并没有直接得到噪声的损失,只是通过对反射图做总变分约束来去噪

🚀二、RDDNet核心代码
代码框架如图所示:
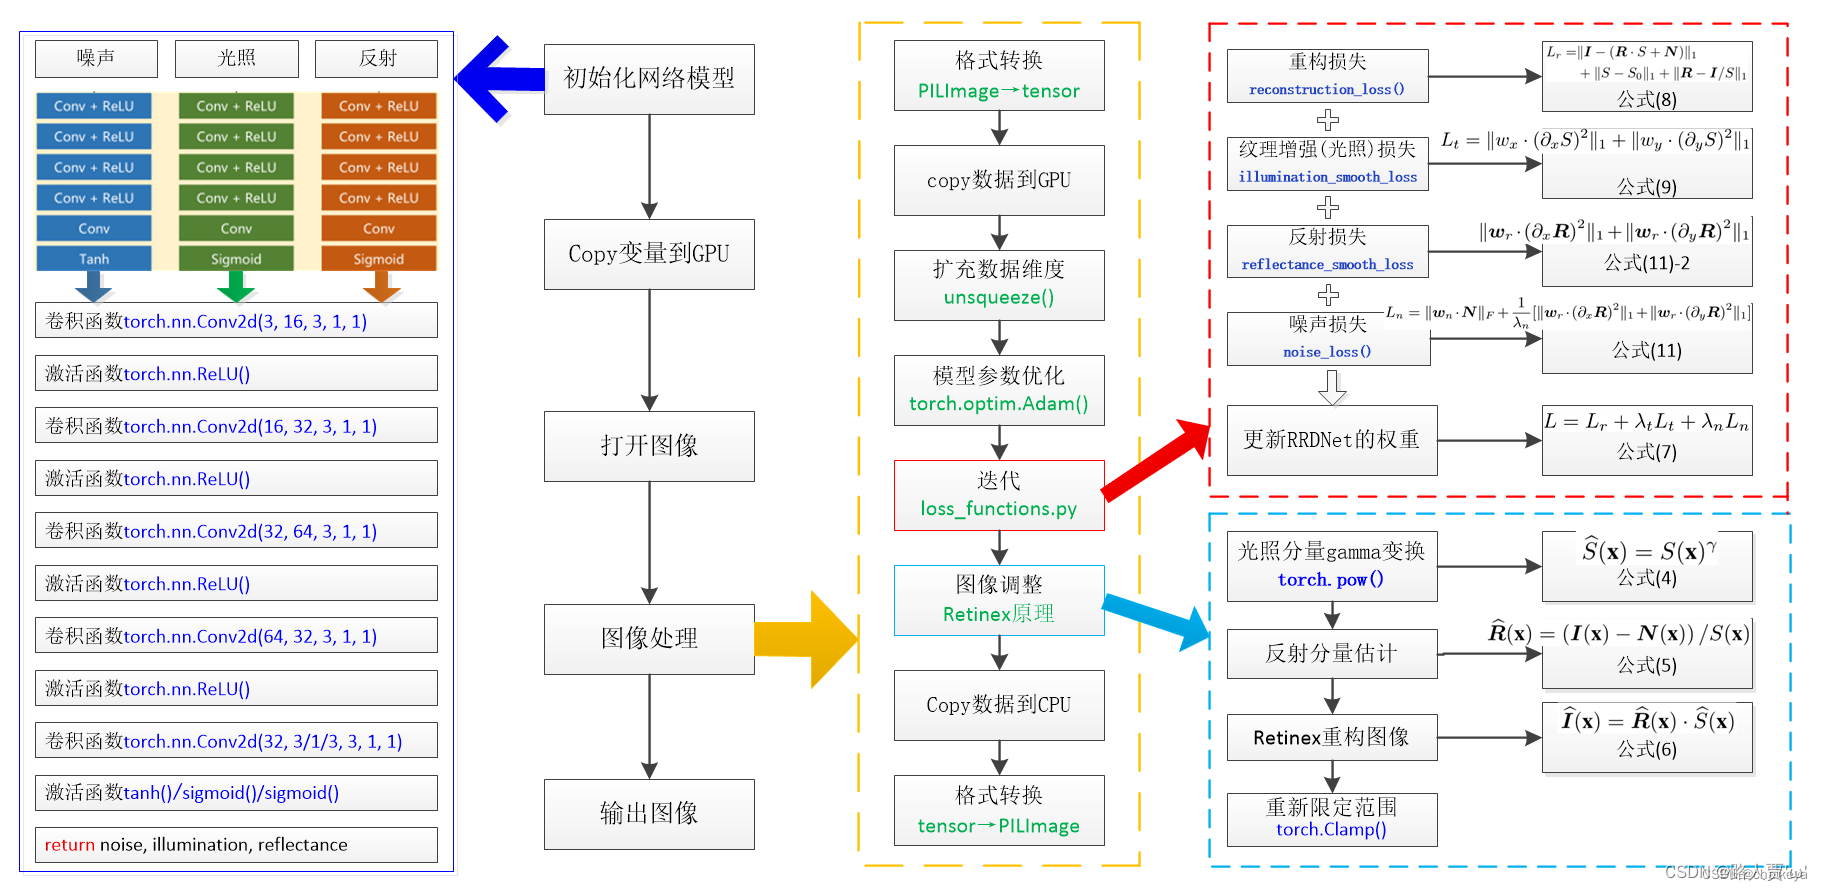
(图片来源:【代码笔记】RRDNet 网络-CSDN博客 谢谢大佬!@chaiky)
☀️2.1 网络模型—RRDNet.py
import torch
import torch.nn as nn

class RRDNet(nn.Module):
    def __init__(self):
        super(RRDNet, self).__init__()

 #----------- 1.illumination(光照估计)---------------------------#
        self.illumination_net = nn.Sequential(
            nn.Conv2d(3, 16, 3, 1, 1),
            nn.ReLU(),
            nn.Conv2d(16, 32, 3, 1, 1),
            nn.ReLU(),
            nn.Conv2d(32, 64, 3, 1, 1),
            nn.ReLU(),
            nn.Conv2d(64, 32, 3, 1, 1),
            nn.ReLU(),
            nn.Conv2d(32, 1, 3, 1, 1),

        )

 #----------- 2.reflectance(反射率估计)---------------------------#
        self.reflectance_net = nn.Sequential(
            nn.Conv2d(3, 16, 3, 1, 1),
            nn.ReLU(),
            nn.Conv2d(16, 32, 3, 1, 1),
            nn.ReLU(),
            nn.Conv2d(32, 64, 3, 1, 1),
            nn.ReLU(),
            nn.Conv2d(64, 32, 3, 1, 1),
            nn.ReLU(),
            nn.Conv2d(32, 3, 3, 1, 1)
        )

 #----------- 3.noise(噪声估计)---------------------------#
        self.noise_net = nn.Sequential(
            nn.Conv2d(3, 16, 3, 1, 1),
            nn.ReLU(),
            nn.Conv2d(16, 32, 3, 1, 1),
            nn.ReLU(),
            nn.Conv2d(32, 64, 3, 1, 1),
            nn.ReLU(),
            nn.Conv2d(64, 32, 3, 1, 1),
            nn.ReLU(),
            nn.Conv2d(32, 3, 3, 1, 1)
        )

    def forward(self, input):
        illumination = torch.sigmoid(self.illumination_net(input))
        reflectance = torch.sigmoid(self.reflectance_net(input))
        noise = torch.tanh(self.noise_net(input))

        return illumination, reflectance, noise
我们可以对照上图左边的结构来理解代码。
-
illumination_net: 主要是负责对输入图像进行处理以获取光照信息,包括一系列卷积层和ReLU激活函数,最终输出一个通道数为1的图像,表示光照强度。
-
reflectance_net: 主要是负责提取输入图像的反射率信息,同样包括一系列卷积层和ReLU激活函数,最终输出一个通道数为3的图像,表示反射率在RGB通道上的分布。
-
noise_net: 主要是则用于估计输入图像的噪声信息,同样由一系列卷积层和ReLU激活函数组成,最终输出一个通道数为3的图像,表示噪声在RGB通道上的分布。
最后,illumination_net和reflectance_net的输出经过sigmoid函数处理,而noise_net的输出则经过tanh函数处理。
☀️2.2 损失函数—loss_functions.py
import torch
import torch.nn as nn
import torch.nn.functional as F
import conf

 #----------- 1.reconstruction_loss:计算重构损失---------------------------#
def reconstruction_loss(image, illumination, reflectance, noise):
    reconstructed_image = illumination*reflectance+noise
    return torch.norm(image-reconstructed_image, 1)

 #----------- 2.gradient: 计算输入图像在水平和垂直方向上的梯度--------------------#
def gradient(img):
    height = img.size(2)
    width = img.size(3)
    gradient_h = (img[:,:,2:,:]-img[:,:,:height-2,:]).abs()
    gradient_w = (img[:, :, :, 2:] - img[:, :, :, :width-2]).abs()
    gradient_h = F.pad(gradient_h, [0, 0, 1, 1], 'replicate')
    gradient_w = F.pad(gradient_w, [1, 1, 0, 0], 'replicate')
    gradient2_h = (img[:,:,4:,:]-img[:,:,:height-4,:]).abs()
    gradient2_w = (img[:, :, :, 4:] - img[:, :, :, :width-4]).abs()
    gradient2_h = F.pad(gradient2_h, [0, 0, 2, 2], 'replicate')
    gradient2_w = F.pad(gradient2_w, [2, 2, 0, 0], 'replicate')
    return gradient_h*gradient2_h, gradient_w*gradient2_w

 #----------- 3.normalize01: 将输入图像进行归一化到0到1的范围内---------------------#
def normalize01(img):
    minv = img.min()
    maxv = img.max()
    return (img-minv)/(maxv-minv)

 #----------- 4.gaussianblur3: 3通道的高斯模糊---------------------------#
def gaussianblur3(input):
    slice1 = F.conv2d(input[:,0,:,:].unsqueeze(1), weight=conf.gaussian_kernel, padding=conf.g_padding)
    slice2 = F.conv2d(input[:,1,:,:].unsqueeze(1), weight=conf.gaussian_kernel, padding=conf.g_padding)
    slice3 = F.conv2d(input[:,2,:,:].unsqueeze(1), weight=conf.gaussian_kernel, padding=conf.g_padding)
    x = torch.cat([slice1,slice2, slice3], dim=1)
    return x

 #----------- 5.illumination_smooth_loss: 计算光照平滑损失---------------------------#
def illumination_smooth_loss(image, illumination):
    gray_tensor = 0.299*image[0,0,:,:] + 0.587*image[0,1,:,:] + 0.114*image[0,2,:,:]
    max_rgb, _ = torch.max(image, 1)
    max_rgb = max_rgb.unsqueeze(1)
    gradient_gray_h, gradient_gray_w = gradient(gray_tensor.unsqueeze(0).unsqueeze(0))
    gradient_illu_h, gradient_illu_w = gradient(illumination)
    weight_h = 1/(F.conv2d(gradient_gray_h, weight=conf.gaussian_kernel, padding=conf.g_padding)+0.0001)
    weight_w = 1/(F.conv2d(gradient_gray_w, weight=conf.gaussian_kernel, padding=conf.g_padding)+0.0001)
    weight_h.detach()
    weight_w.detach()
    loss_h = weight_h * gradient_illu_h
    loss_w = weight_w * gradient_illu_w
    max_rgb.detach()
    return loss_h.sum() + loss_w.sum() + torch.norm(illumination-max_rgb, 1)

 #----------- 6.reflectance_smooth_loss:计算反射率平滑损失---------------------------#
def reflectance_smooth_loss(image, illumination, reflectance):
    gray_tensor = 0.299*image[0,0,:,:] + 0.587*image[0,1,:,:] + 0.114*image[0,2,:,:]
    gradient_gray_h, gradient_gray_w = gradient(gray_tensor.unsqueeze(0).unsqueeze(0))
    gradient_reflect_h, gradient_reflect_w = gradient(reflectance)
    weight = 1/(illumination*gradient_gray_h*gradient_gray_w+0.0001)
    weight = normalize01(weight)
    weight.detach()
    loss_h = weight * gradient_reflect_h
    loss_w = weight * gradient_reflect_w
    refrence_reflect = image/illumination
    refrence_reflect.detach()
    return loss_h.sum() + loss_w.sum() + conf.reffac*torch.norm(refrence_reflect - reflectance, 1)

 #----------- 7.noise_loss: 计算噪声损失---------------------------#
def noise_loss(image, illumination, reflectance, noise):
    weight_illu = illumination
    weight_illu.detach()
    loss = weight_illu*noise
    return torch.norm(loss, 2)
(1)重构损失——reconstruction_loss
图像的分解组件必须满足Robust Retinex的公式,将RGB三个通道中最大强度值S的初始值,在此基础上约束反射图和噪声。

(2)光照损失——illumination_smooth_loss
通过平滑的光照图可以增强暗区域的纹理细节,公式中x和y是水平和垂直方向,Wx和Wy是确保图像平滑的权重参数。

权重与梯度呈反比,梯度大的地方权重小,梯度小的地方权重大,因此将高斯滤波G放在分母,这里公式中的I是输入图像转换成的灰度图,Wy的计算方式和Wx的相同。
(3)反射损失——reflectance_smooth_loss
通过平滑反射图来得到噪声,本身并没有直接得到噪声的损失,只是通过对反射图做总变分约束来去噪。

(4)噪声损失——noise_loss
为了增加图像的清晰度增加了图像的对比度,与此同时,图像的噪声也被放大,出于以下两点限制噪声:
- 噪声的范围需要被限制。
- 噪声可以平滑的反射图限制。

☀️2.3 Retinex操作—pipline.py
import os
import numpy as np
import cv2
import torch
import torch.optim as optim
import torch.nn as nn
from PIL import Image
from torchvision import transforms
import torch.nn.init as init

from model.RRDNet import RRDNet
from loss.loss_functions import reconstruction_loss, illumination_smooth_loss, reflectance_smooth_loss, noise_loss, normalize01
import conf

 #----------- retinex图像增强---------------------------#
def pipline_retinex(net, img):
    img_tensor = transforms.ToTensor()(img)  # [c, h, w] #将输入图像转换为张量,并调整形状
    img_tensor = img_tensor.to(conf.device)
    img_tensor = img_tensor.unsqueeze(0)     # [1, c, h, w]

    optimizer = optim.Adam(net.parameters(), lr=conf.lr)

    # iterations:迭代优化过程
    for i in range(conf.iterations+1):
        # forward:通过网络前向传播得到光照、反射率和噪声图像。
        illumination, reflectance, noise = net(img_tensor)  # [1, c, h, w]
        # loss computing:计算总损失,并进行反向传播优化网络参数。
        loss_recons = reconstruction_loss(img_tensor, illumination, reflectance, noise)  # 重构损失
        loss_illu = illumination_smooth_loss(img_tensor, illumination) # 光照损失
        loss_reflect = reflectance_smooth_loss(img_tensor, illumination, reflectance) #反射损失
        loss_noise = noise_loss(img_tensor, illumination, reflectance, noise) # 噪声损失

        loss = loss_recons + conf.illu_factor*loss_illu + conf.reflect_factor*loss_reflect + conf.noise_factor*loss_noise

        # backward
        net.zero_grad()
        loss.backward()
        optimizer.step()

        # log:每隔 100 次迭代打印日志,显示重建损失、光照损失、反射率损失和噪声损失的数值。
        if i%100 == 0:
            print("iter:", i, '  reconstruction loss:', float(loss_recons.data), '  illumination loss:', float(loss_illu.data), '  reflectance loss:', float(loss_reflect.data), '  noise loss:', float(loss_noise.data))


    # adjustment:对增强后的图像进行调整
    adjust_illu = torch.pow(illumination, conf.gamma)
    res_image = adjust_illu*((img_tensor-noise)/illumination)# 对增强后的图像进行调整
    res_image = torch.clamp(res_image, min=0, max=1)# 对调整后的图像进行限幅操作,确保像素值在 0 到 1 之间。

    if conf.device != 'cpu':
        res_image = res_image.cpu()
        illumination = illumination.cpu()
        adjust_illu = adjust_illu.cpu()
        reflectance = reflectance.cpu()
        noise = noise.cpu()

    # 将处理后的张量转换为 PIL 图像
    res_img = transforms.ToPILImage()(res_image.squeeze(0))
    illum_img = transforms.ToPILImage()(illumination.squeeze(0))
    adjust_illu_img = transforms.ToPILImage()(adjust_illu.squeeze(0))
    reflect_img = transforms.ToPILImage()(reflectance.squeeze(0))
    noise_img = transforms.ToPILImage()(normalize01(noise.squeeze(0)))

    return res_img, illum_img, adjust_illu_img, reflect_img, noise_img


if __name__ == '__main__':

    # Init Model
    net = RRDNet()
    net = net.to(conf.device)

    # Test
    img = Image.open(conf.test_image_path)

    res_img, illum_img, adjust_illu_img, reflect_img, noise_img = pipline_retinex(net, img)
    res_img.save('./test/result.jpg')
    illum_img.save('./test/illumination.jpg')
    adjust_illu_img.save('./test/adjust_illumination.jpg')
    reflect_img.save('./test/reflectance.jpg')
    noise_img.save('./test/noise_map.jpg')
这段代码基本都注释了,就不再详细讲解了~
🚀三、RDDNet代码复现
☀️3.1 环境配置
- Python 3
- PyTorch >= 0.4.1
- PIL >= 6.1.0
- Opencv-python>=3.4
☀️3.2 运行过程
这个也是运行比较简单,配好环境就行 。不再过多叙述~
☀️3.3 运行效果
没错,你怎么知道我去看邓紫棋演唱会啦~

原文地址:https://blog.csdn.net/weixin_43334693/article/details/139169688
免责声明:本站文章内容转载自网络资源,如本站内容侵犯了原著者的合法权益,可联系本站删除。更多内容请关注自学内容网(zxcms.com)!