node:nvm下载使用与node版本管理
node:nvm下载使用与node版本管理
1 前言
nvm(Node Version Manager)是一款用于管理Node.js版本的工具,支持在一个系统中切换和安装多个Node.js版本。使用nvm可以方便升级或降低Node.js版本,也可以在同一台机器上同时使用多个版本的Node.js。
2 安装与使用
(2.1)安装nvm
查看安装的node版本:
node -v
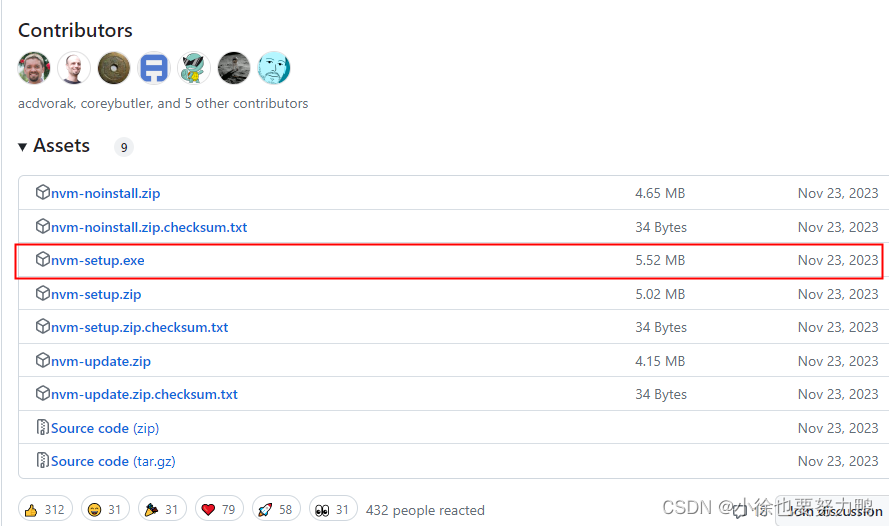
nvm下载地址:
https://github.com/coreybutler/nvm-windows/releases

exe能自动配置环境变量
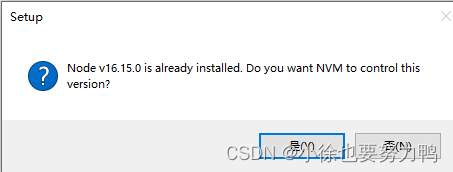
安装时,若已经安装过Node,需要nvm关联该版本,点击是即可。

查看本机的环境变量:

win + R打开cmd终端,输入nvm root查看nvm安装根目录:
nvm root
结果:
Current Root: C:\Users\{user}\AppData\Roaming\nvm
(3)安装node
(3.1)查看nvm的命令:
nvm -help
结果:
Running version 1.1.12.

Usage:

  nvm arch                     : Show if node is running in 32 or 64 bit mode.
  nvm current                  : Display active version.
  nvm debug                    : Check the NVM4W process for known problems (troubleshooter).
  nvm install <version> [arch] : The version can be a specific version, "latest" for the latest current version, or "lts" for the
                                 most recent LTS version. Optionally specify whether to install the 32 or 64 bit version (defaults
                                 to system arch). Set [arch] to "all" to install 32 AND 64 bit versions.
                                 Add --insecure to the end of this command to bypass SSL validation of the remote download server.
  nvm list [available]         : List the node.js installations. Type "available" at the end to see what can be installed. Aliased as ls.
  nvm on                       : Enable node.js version management.
  nvm off                      : Disable node.js version management.
  nvm proxy [url]              : Set a proxy to use for downloads. Leave [url] blank to see the current proxy.
                                 Set [url] to "none" to remove the proxy.
  nvm node_mirror [url]        : Set the node mirror. Defaults to https://nodejs.org/dist/. Leave [url] blank to use default url.
  nvm npm_mirror [url]         : Set the npm mirror. Defaults to https://github.com/npm/cli/archive/. Leave [url] blank to default url.
  nvm uninstall <version>      : The version must be a specific version.
  nvm use [version] [arch]     : Switch to use the specified version. Optionally use "latest", "lts", or "newest".
                                 "newest" is the latest installed version. Optionally specify 32/64bit architecture.
                                 nvm use <arch> will continue using the selected version, but switch to 32/64 bit mode.
  nvm root [path]              : Set the directory where nvm should store different versions of node.js.
                                 If <path> is not set, the current root will be displayed.
  nvm [--]version              : Displays the current running version of nvm for Windows. Aliased as v.
(3.2)查看nvm安装的Node版本:
nvm ls
或者:
nvm list
如果还未安装,显示如下:
No installations recognized.
(3.3)nvm install <版本号> 命令,安装指定版本的Node.js:
nvm install v18.2.0
安装完毕:
Downloading node.js version 18.2.0 (64-bit)...
Extracting node and npm...
Complete
npm v8.9.0 installed successfully.


Installation complete. If you want to use this version, type

nvm use 18.2.0
安装后查看:
nvm list
结果:
18.2.0
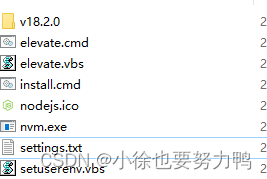
同时安装目录下出现v18.2.0的目录:

(3.4)nvm安装另一版本的Node:
nvm install v17.0.1
安装后查看安装版本:
nvm list
结果如下:
18.2.0
17.0.1
切换使用Node并查看版本:
nvm use 17.0.1 //Now using node v17.0.1 (64-bit)
切换后查看当前node版本:
node -v //v17.0.1
再次切换node版本:
nvm use 18.2.0//Now using node v18.2.0 (64-bit)
查看版本:
node -v//v18.2.0
(3.5)nvm常用命令:
nvm off                     // 禁用node.js版本管理(不卸载任何东西)
nvm on                      // 启用node.js版本管理
nvm install <version>       // 安装node.js的命名 version是版本号 例如:nvm install 8.12.0
nvm uninstall <version>     // 卸载node.js是的命令,卸载指定版本的nodejs,当安装失败时卸载使用
nvm ls                      // 显示所有安装的node.js版本
nvm list available          // 显示可以安装的所有node.js的版本
nvm use <version>           // 切换到使用指定的nodejs版本
nvm v                       // 显示nvm版本
nvm install stable          // 安装最新稳定版
(3.6)vscode使用nvm切换管理node版本
注意:安装完nvm后,原本打开的vscode需要关闭后重新打开,才能执行nvm命令,否则可能提示:无法将“nvm”项识别为 cmdlet、函数、脚本文件或可运行程序的名称。
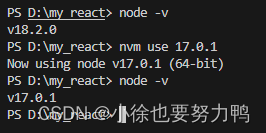
这里重启vscode后,ctrl + ` 快捷键打开vscode的terminal终端,查看以及切换Node如下即可:

然后可以根据需求选择不同node版本执行即可:
let method = "getAge";

class Xiaoxu {
    constructor(){

    }

    [method](){
        console.log('xiaoxu lai le.')
    }
}

new Xiaoxu().getAge() //xiaoxu lai le

最后,之所以需要切换不同的版本,因为比如ES2022的改动,在低版本的node执行时,会产生预期之外的错误,所以按需执行对应的node版本即可。
原文地址:https://blog.csdn.net/a232884c/article/details/137613961
免责声明:本站文章内容转载自网络资源,如本站内容侵犯了原著者的合法权益,可联系本站删除。更多内容请关注自学内容网(zxcms.com)!
