SenseVoice 实测,阿里开源语音大模型,识别效果和效率优于 Whisper,居然还能检测掌声、笑声!5分钟带你部署体验
前段时间,带着大家捏了一个对话机器人:
手把手带你搭建一个语音对话机器人,5分钟定制个人AI小助手(新手入门篇)
其中语音识别(ASR)方案,采用的是阿里开源的 FunASR,这刚不久,阿里又开源了一个更强的音频基础模型,该模型具有如下能力:
- 语音识别(ASR)
- 语种识别(LID)
- 语音情感识别(SER)
- 声学事件分类(AEC)
- 声学事件检测(AED)
今天就带着大家体验一番~
0. 项目简介
模型结构如下图所示:

模型亮点:
-
多语言语音识别:
经过超过40万小时的数据训练,支持50多种语言,其识别性能超越了Whisper模型。 -
丰富的转录能力:
具备出色的情感识别能力,在测试数据上超越了当前最佳模型。
提供声音事件检测能力,支持检测各种常见的人机交互事件,如背景音乐、掌声、笑声、哭泣、咳嗽和打喷嚏。 -
高效推理:
SenseVoice-Small模型采用非自回归的端到端框架,具有极低的推理延迟。处理10秒音频仅需70毫秒,比Whisper-Large快15倍。 -
便捷的微调:
提供便捷的微调脚本和策略,使用户能够根据业务场景轻松解决长尾样本问题。
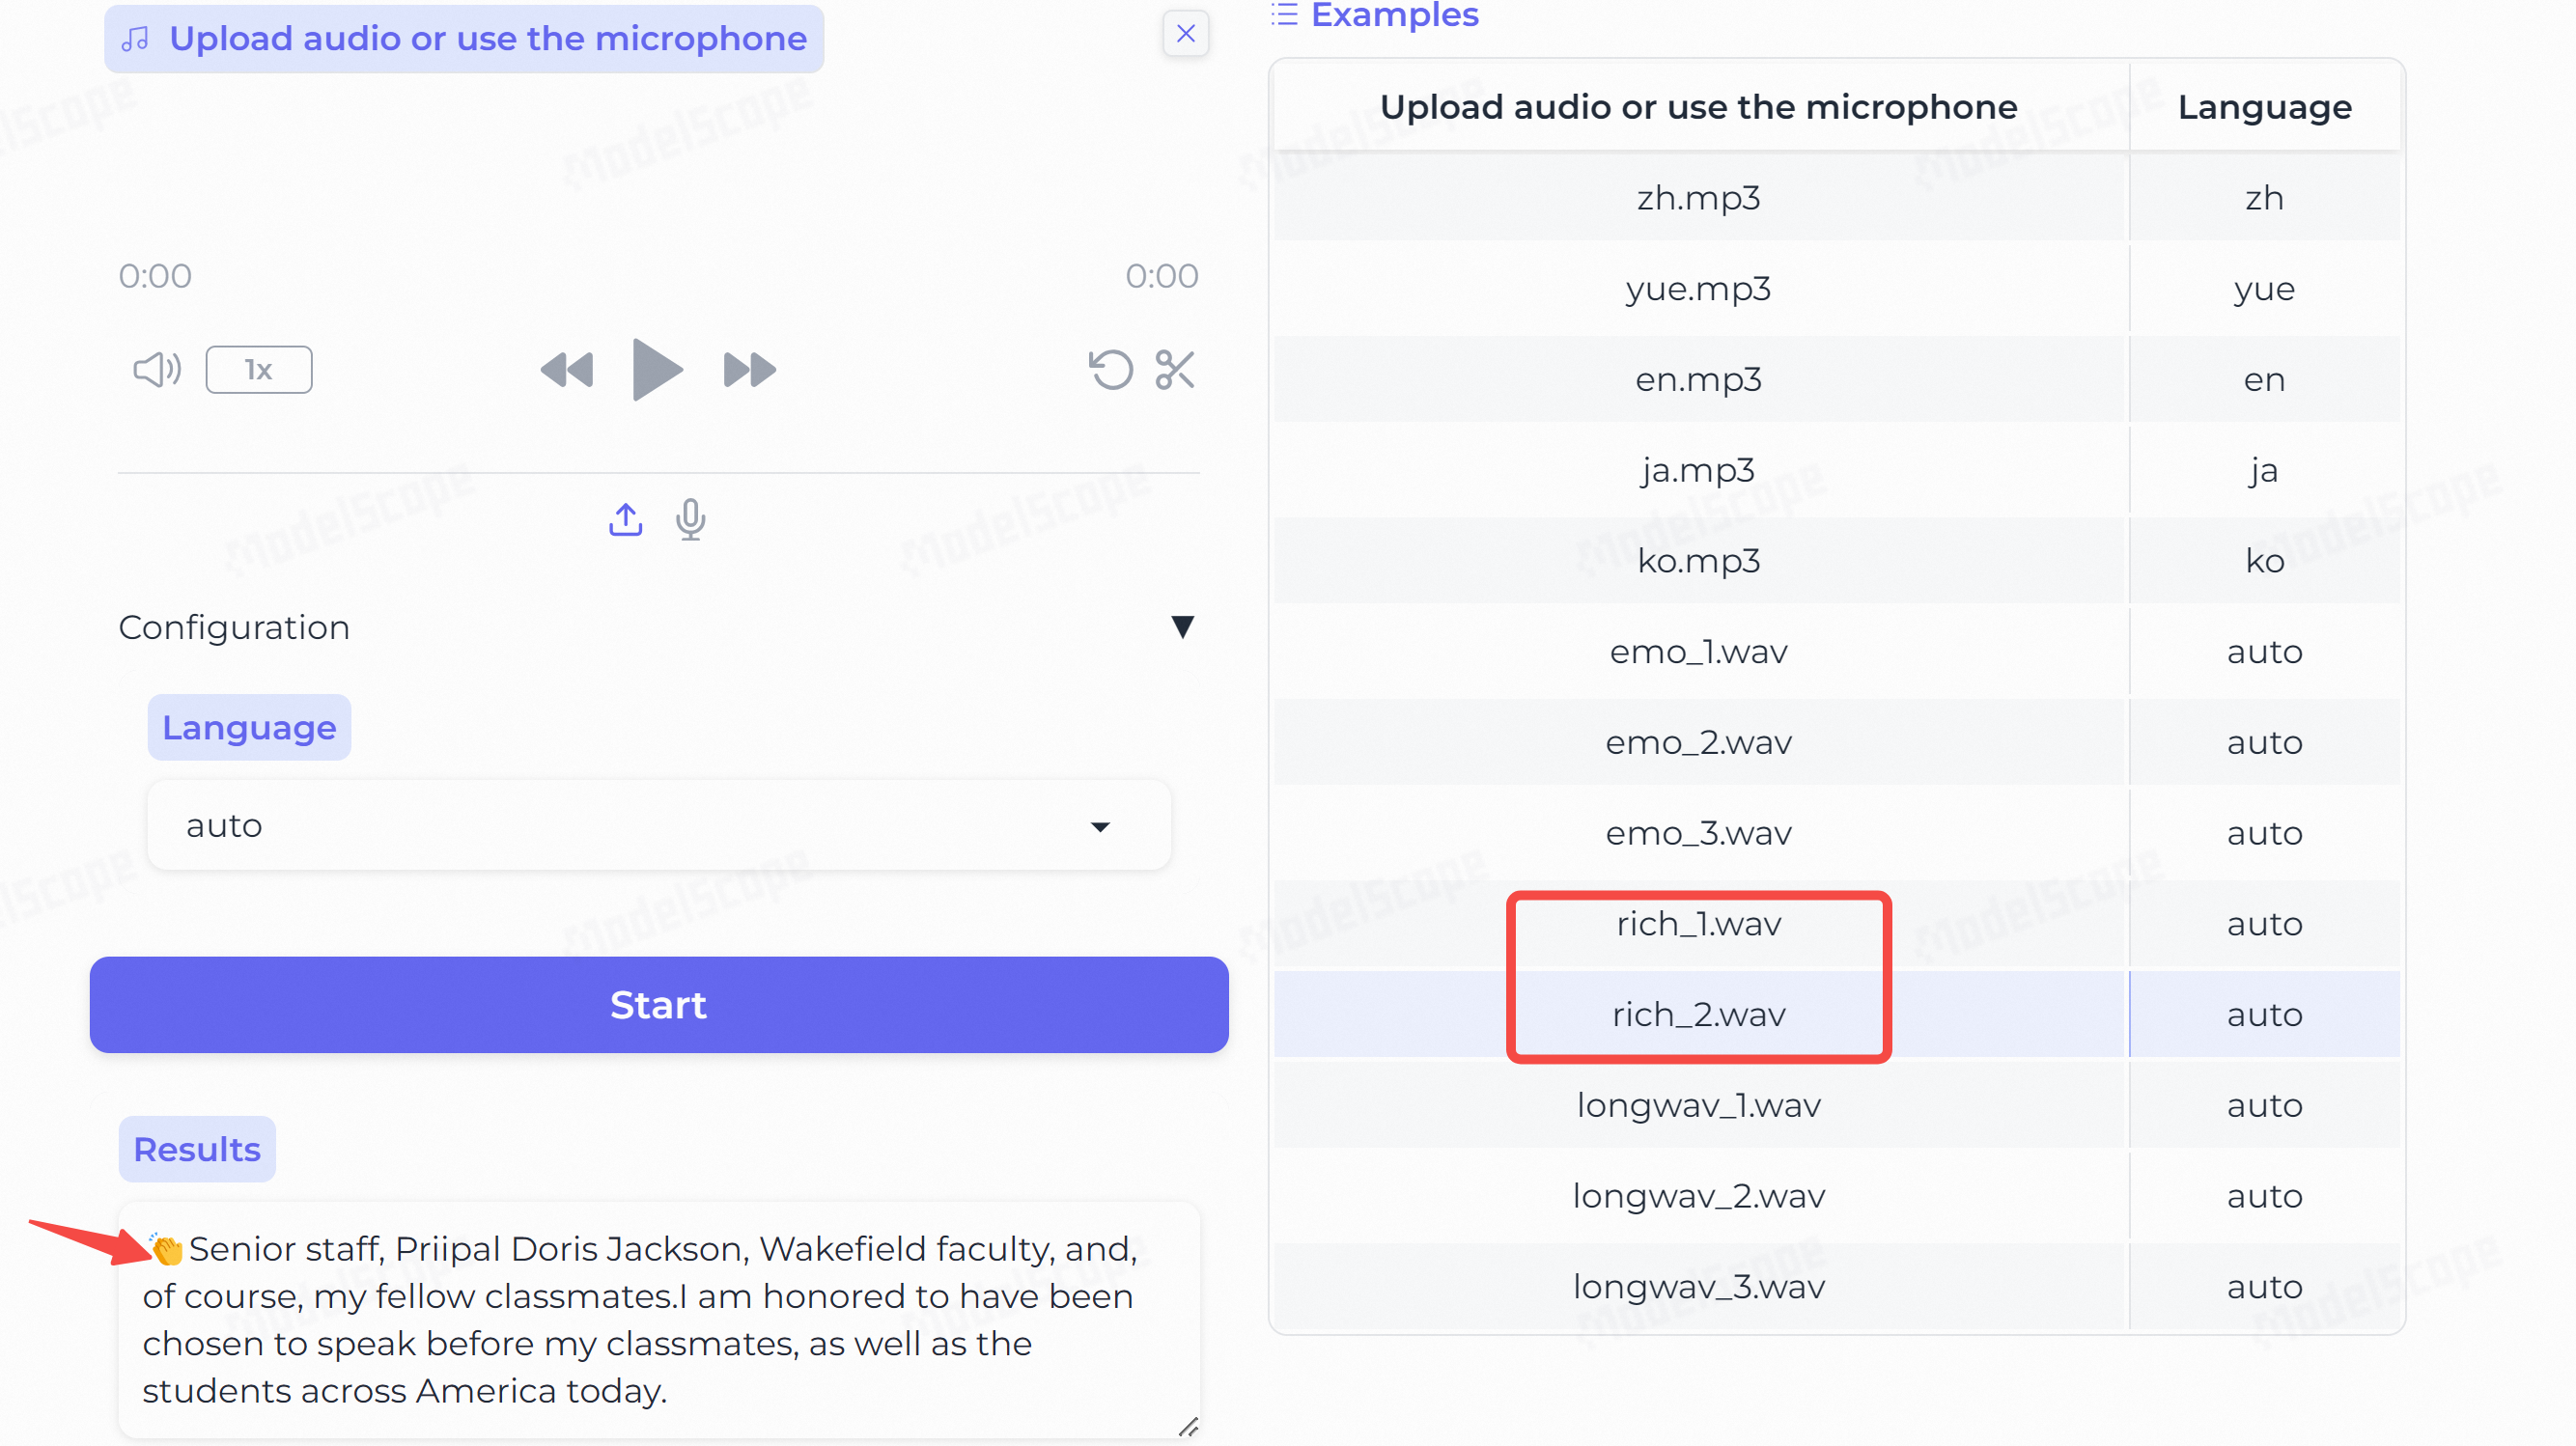
1. 在线体验
语音识别:支持中、粤、英、日、韩语等 50 多种语言。
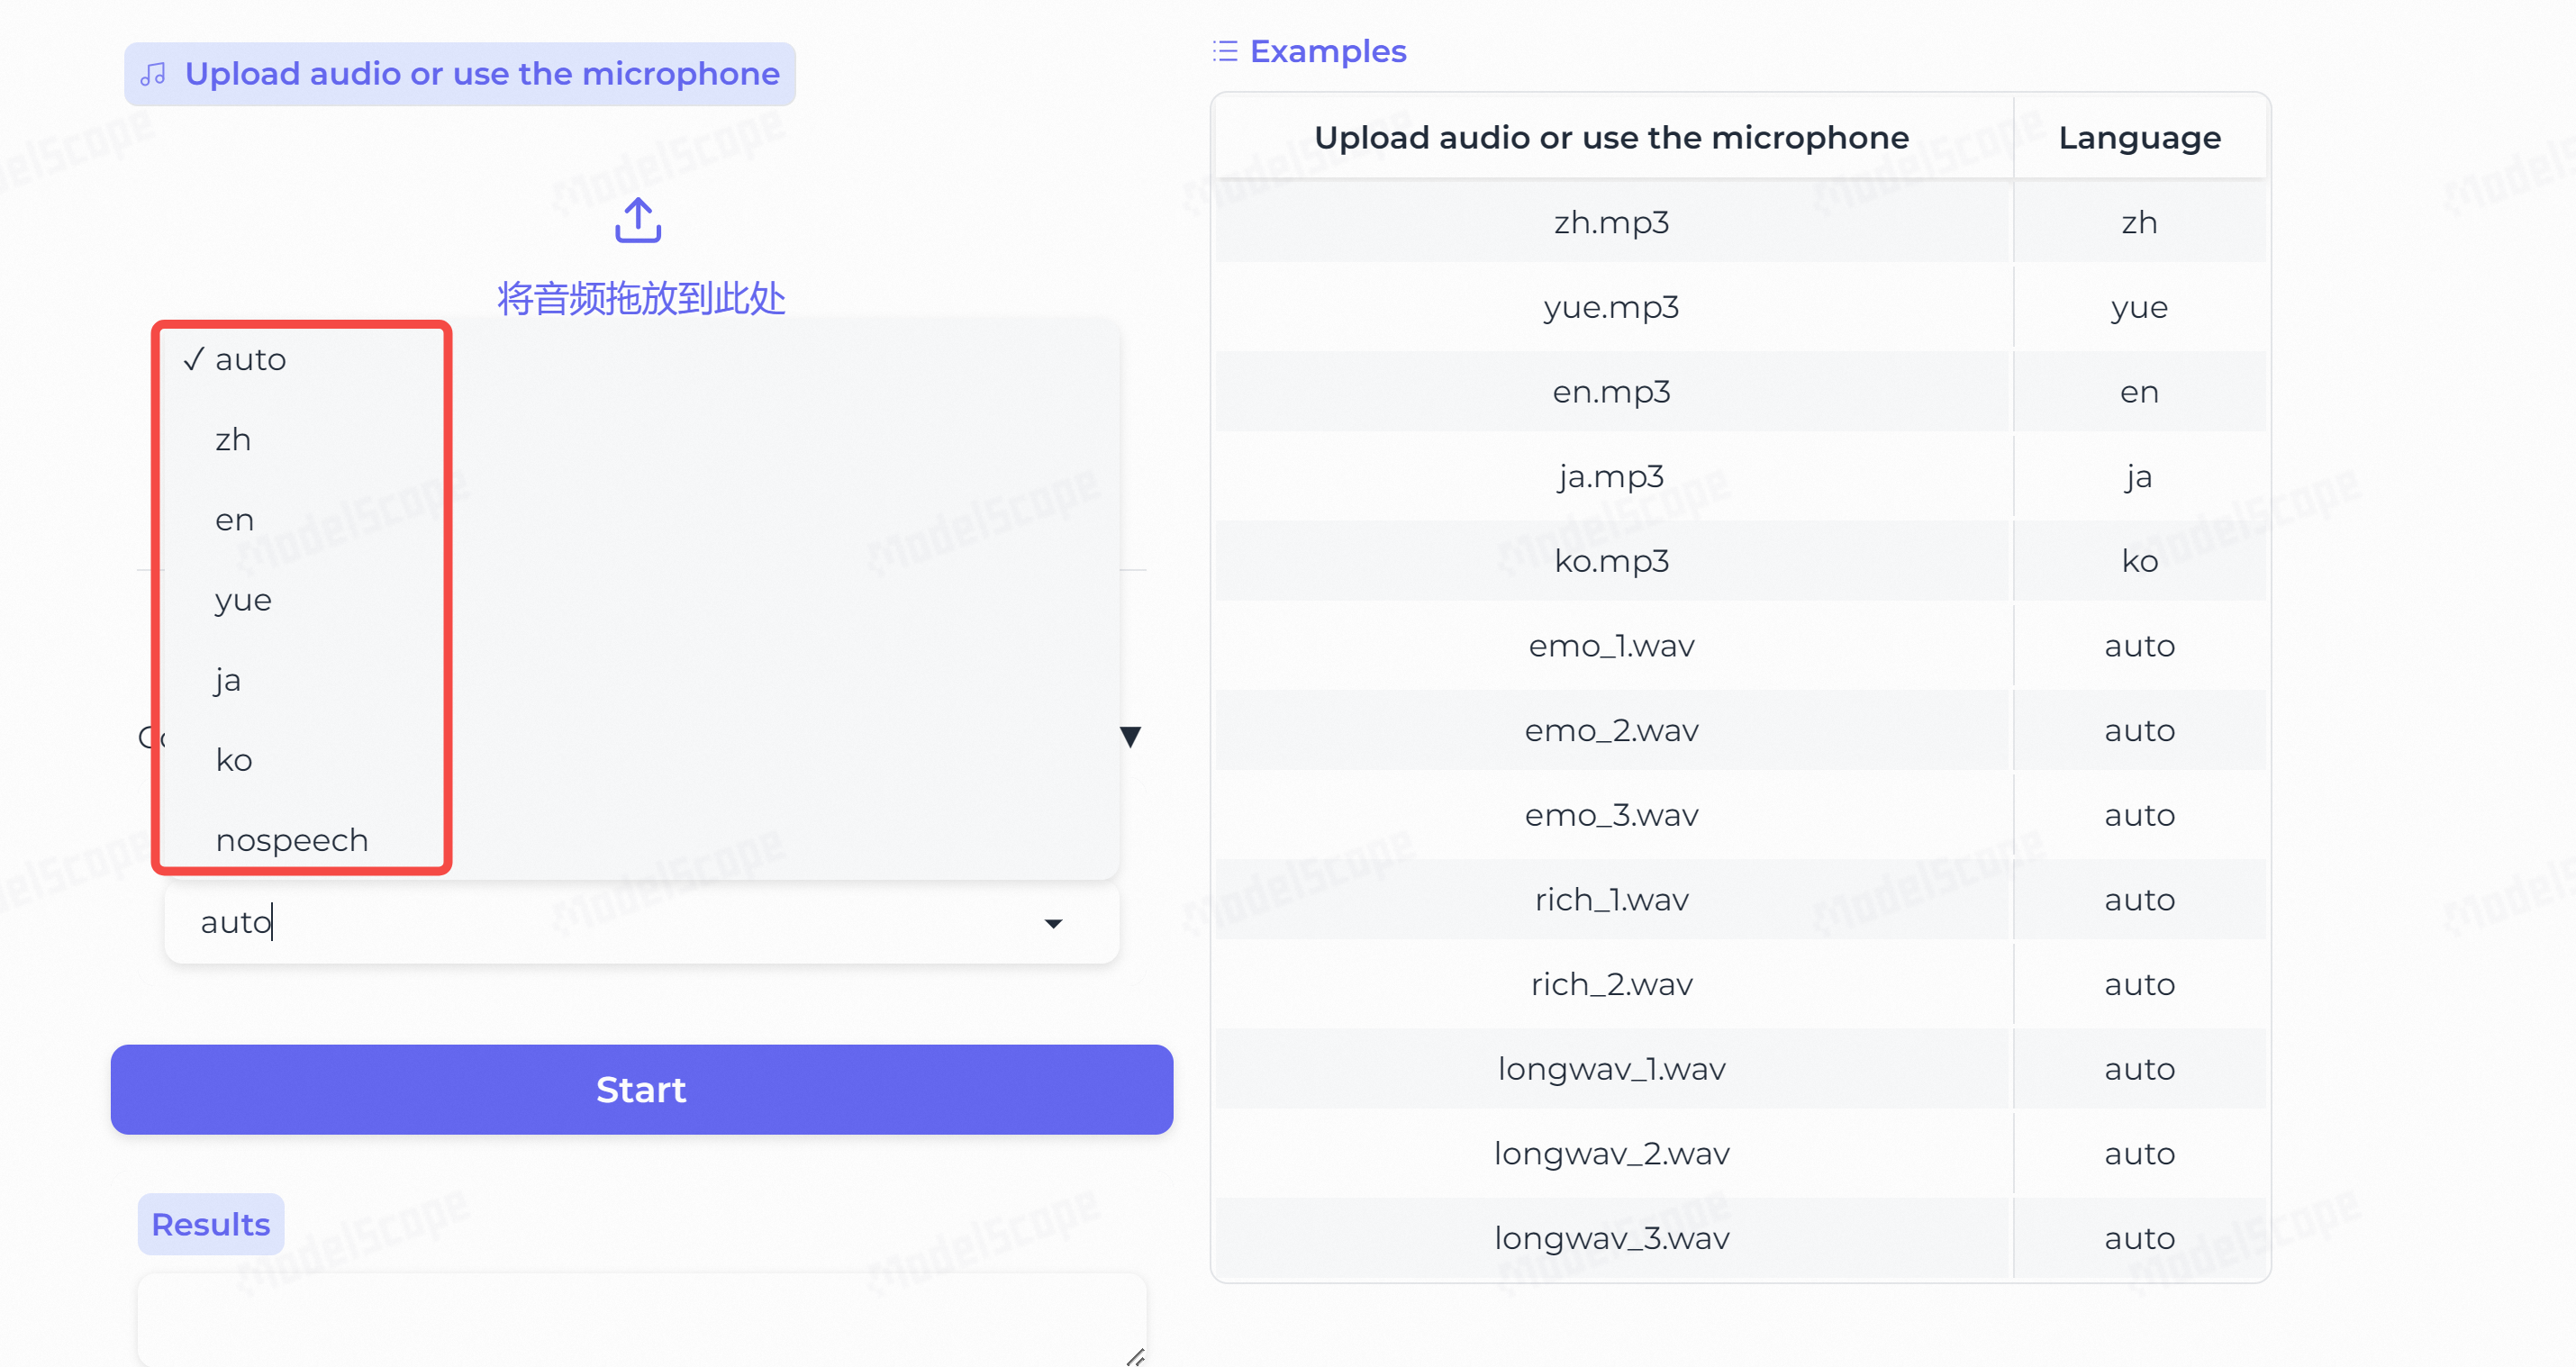
情感识别:比如积极 or 消极,以 Emoji 表情输出。
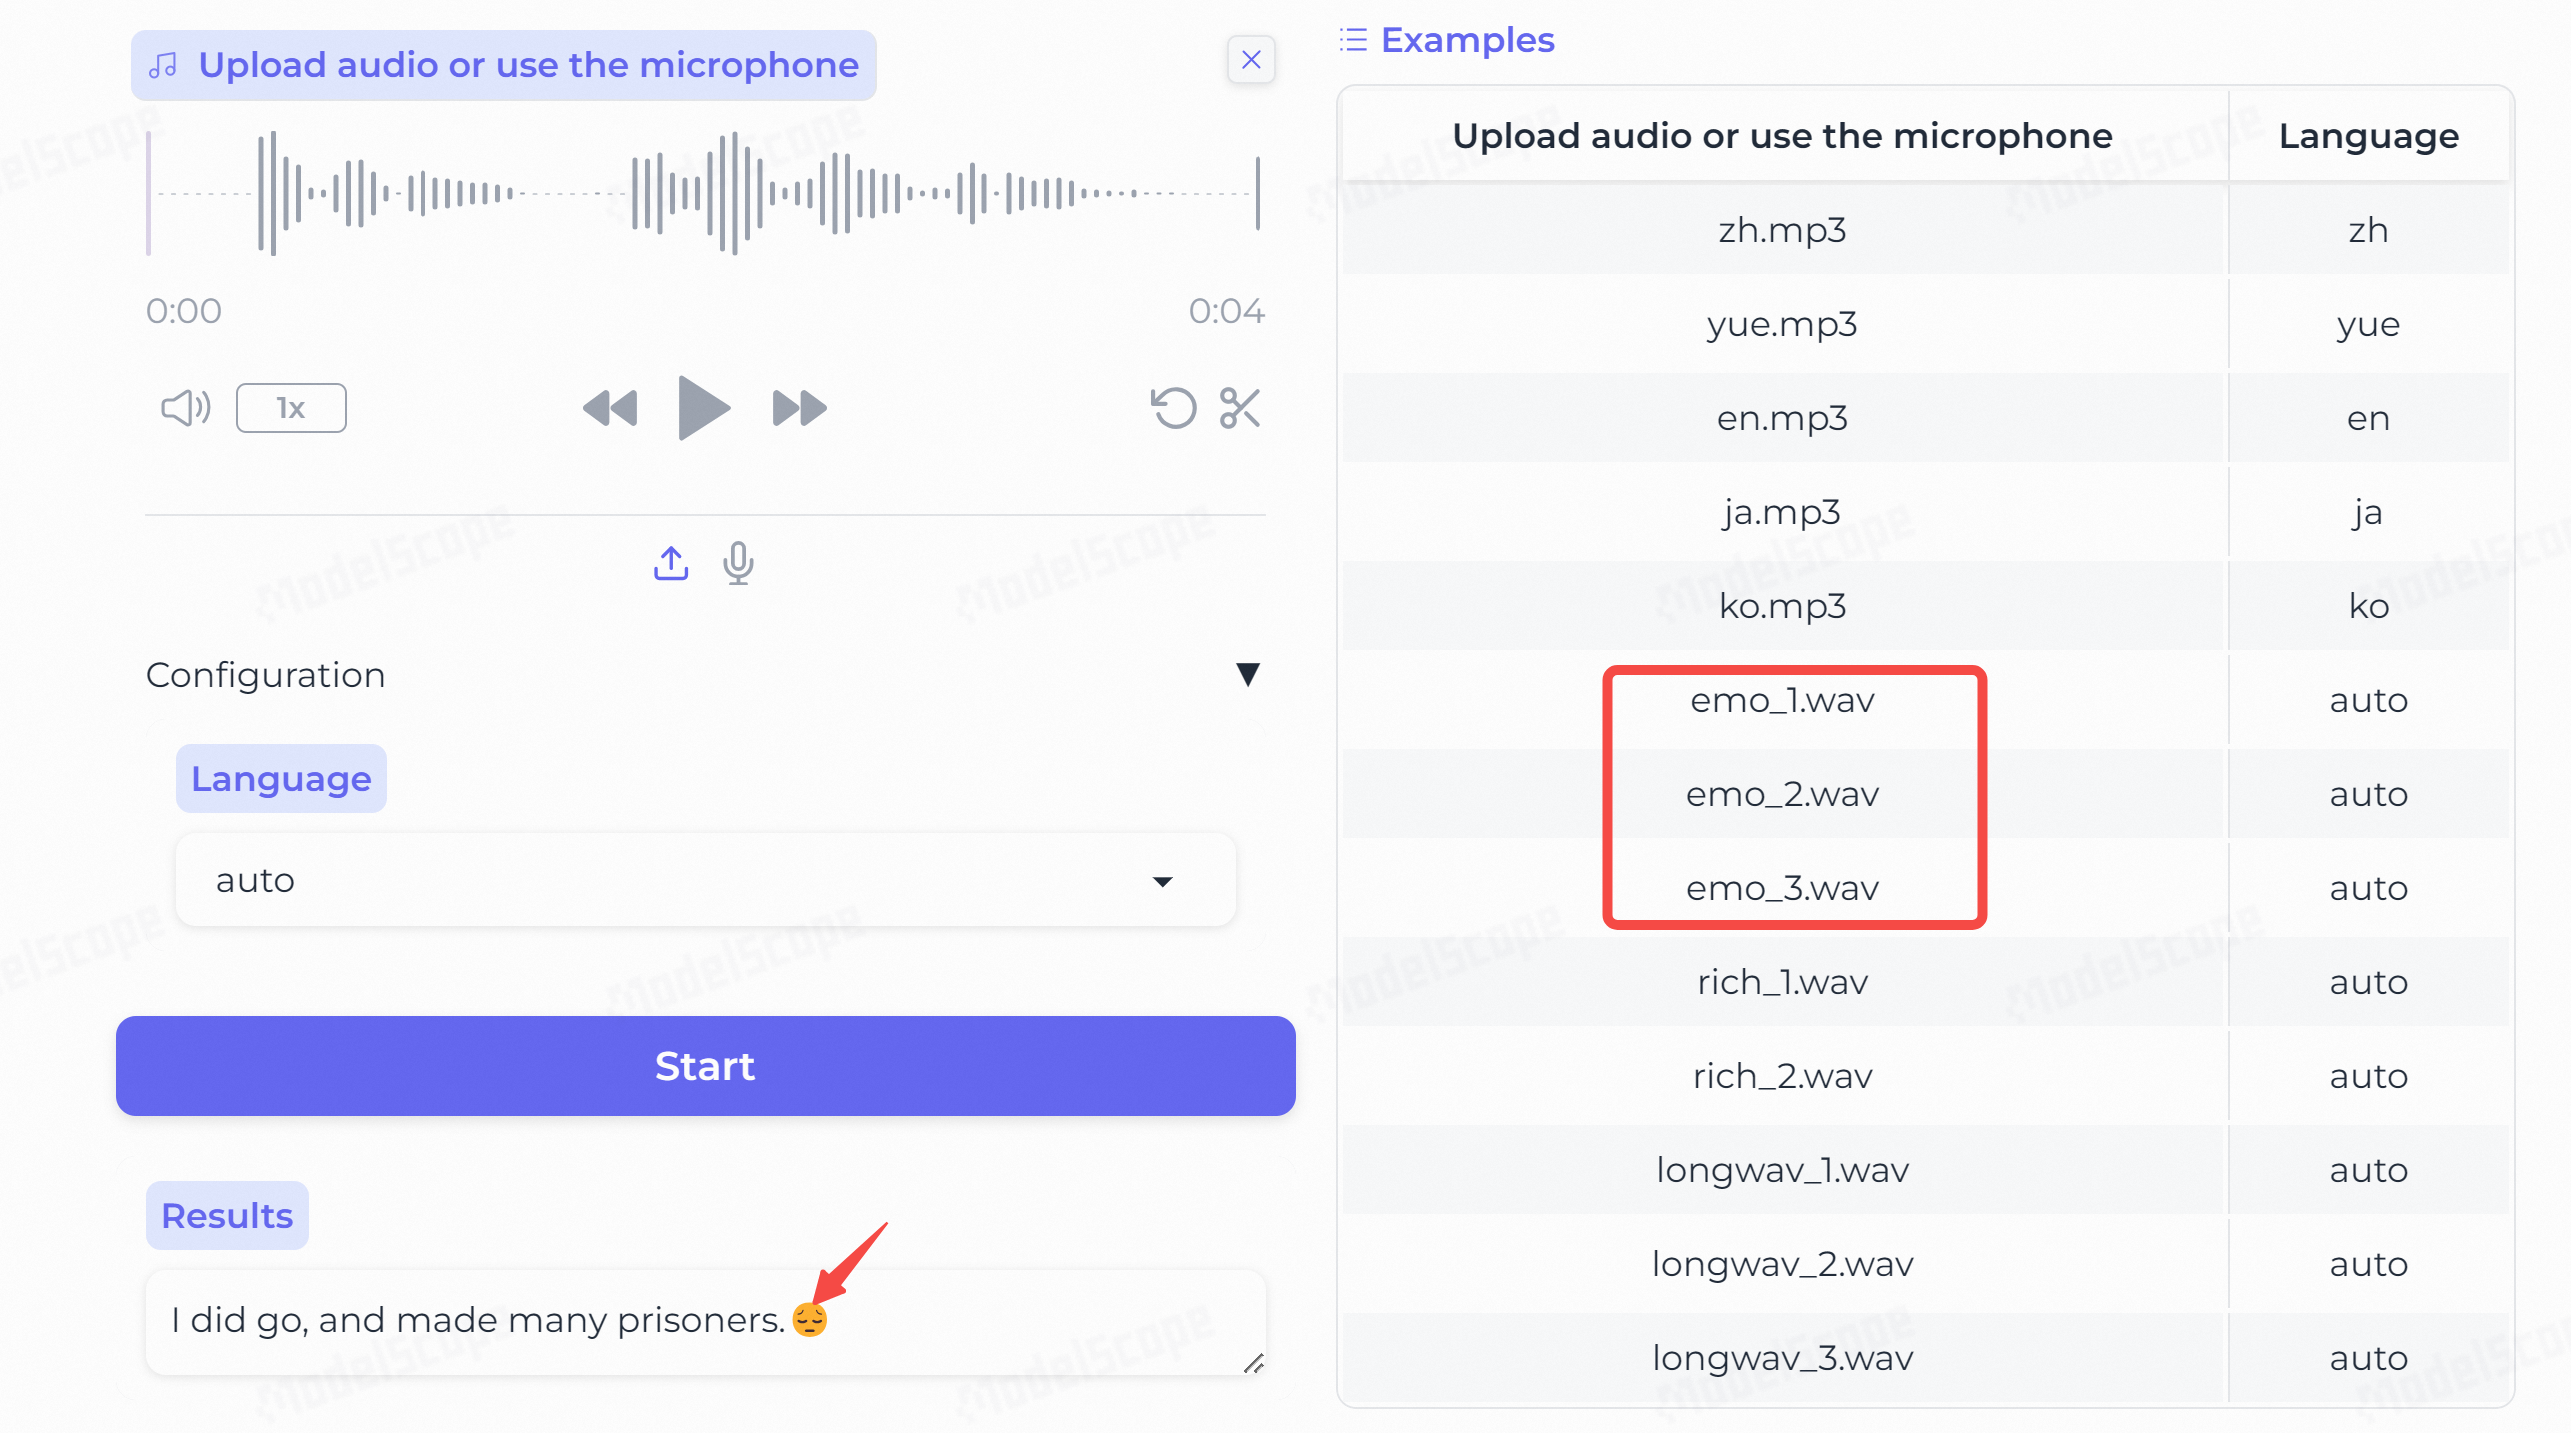
音频事件检测:同样以 Emoji 表情输出。
2. 本地部署
2.1 安装 & 测试
首先 git 下载到本地,然后安装必要的包:
git clone https://github.com/FunAudioLLM/SenseVoice.git
pip install -r requirements.txt
注意:
- 本项目依赖的
funasr版本要>=1.1.2,这个和funasr语音识别模型的版本是不匹配的,如果要同时使用这两个模型,会出现版本冲突,所以最好采用 conda 管理 python 环境。 - 本项目依赖的
torchaudio需要更新到最新版本,否则会出现报错。
接下来,我们采用官方脚本进行测试:
from funasr import AutoModel
from funasr.utils.postprocess_utils import rich_transcription_postprocess

model_dir = "iic/SenseVoiceSmall"
model = AutoModel(
    model=model_dir,
    trust_remote_code=True,
    remote_code="./model.py",
    vad_model="fsmn-vad",
    vad_kwargs={"max_single_segment_time": 30000},
    device="cuda:0",
)

res = model.generate(
    input=f"{model.model_path}/example/en.mp3",
    cache={},
    language="auto",  # "zn", "en", "yue", "ja", "ko", "nospeech"
    use_itn=True,
    batch_size_s=60,
    merge_vad=True,  #
    merge_length_s=15,
)
text = rich_transcription_postprocess(res[0]["text"])
print(text)
首次使用,会下载模型,默认保存在你的根目录下:~/.cache/modelscope/。
2.2 FastAPI 部署
测试成功后,我们采用 FastAPI 把模型部署成一个服务,方便提供给其他应用调用。
2.2.1 服务端
首先准备好服务端代码 speech_server.py:
import torch
import base64
import uvicorn
from fastapi import FastAPI
from funasr import AutoModel
from funasr.utils.postprocess_utils import rich_transcription_postprocess
from pydantic import BaseModel

# asr model
model = AutoModel(
    model="iic/SenseVoiceSmall",
    trust_remote_code=True,
    remote_code="./model.py",
    vad_model="fsmn-vad",
    vad_kwargs={"max_single_segment_time": 30000},
    device="cuda:0",
)

# 定义asr数据模型,用于接收POST请求中的数据
class ASRItem(BaseModel):
    wav : str # 输入音频

app = FastAPI()
@app.post("/asr")
async def asr(item: ASRItem):
    try:
        data = base64.b64decode(item.wav)
        with open("test.wav", "wb") as f:
            f.write(data)
        res = model.generate("test.wav",
                            language="auto",  # "zn", "en", "yue", "ja", "ko", "nospeech"
                            use_itn=True,
                            batch_size_s=60,
                            merge_vad=True,  #
                            merge_length_s=15,)
        text = rich_transcription_postprocess(res[0]["text"])
        result_dict = {"code": 0, "msg": "ok", "res": text}
    except Exception as e:
        result_dict = {"code": 1, "msg": str(e)}
    return result_dict

if __name__ == '__main__':
    uvicorn.run(app, host='0.0.0.0', port=2002)
2.2.2 服务启动
CUDA_VISIBLE_DEVICES=0 python speech_server.py > log.txt 2>&1 &
服务成功启动,可以发现显存只占用 1202 M,比上一篇的 FunASR 更轻量~
+-----------------------------------------------------------------------------------------+
| Processes:                                                                              |
|  GPU   GI   CI        PID   Type   Process name                              GPU Memory |
|        ID   ID                                                               Usage      |
|=========================================================================================|
|    2   N/A  N/A   3178377      C   python                                       1202MiB |
+-----------------------------------------------------------------------------------------+
2.2.3 客户端
最后,我们来编写客户端代码:
import base64
import requests

url = "http://10.18.32.170:2002/"

def asr_damo_api(wav_path):
    headers = {'Content-Type': 'application/json'}
    with open(wav_path, "rb") as f:
        wav = base64.b64encode(f.read()).decode()
    data = {"wav": wav}
    response = requests.post(url+"asr", headers=headers, json=data)
    response = response.json()
    if response['code'] == 0:
        res = response['res']
        return res
    else:
        return response['msg']

if __name__ == '__main__':
    res = asr_damo_api("xxx/.cache/modelscope/hub/iic/SenseVoiceSmall/example/en.mp3")
    print(res)
写在最后
本文通过对 SenseVoice 模型的实操,带领大家快速上手语音识别模型。
希望能激发你的更多创作灵感,打造自己的 AI 助手。
如果你对本项目感兴趣,欢迎点赞收藏并分享给更多朋友!
原文地址:https://blog.csdn.net/u010522887/article/details/140624599
免责声明:本站文章内容转载自网络资源,如本站内容侵犯了原著者的合法权益,可联系本站删除。更多内容请关注自学内容网(zxcms.com)!