HarmonyOS Next 实战卡片开发 03
HarmonyOS Next 实战卡片开发 03
在前面两张,我们基本掌握了卡片的使用流程,本章节就通过一个实战来加强对卡片使用的理解。
要完成的案例
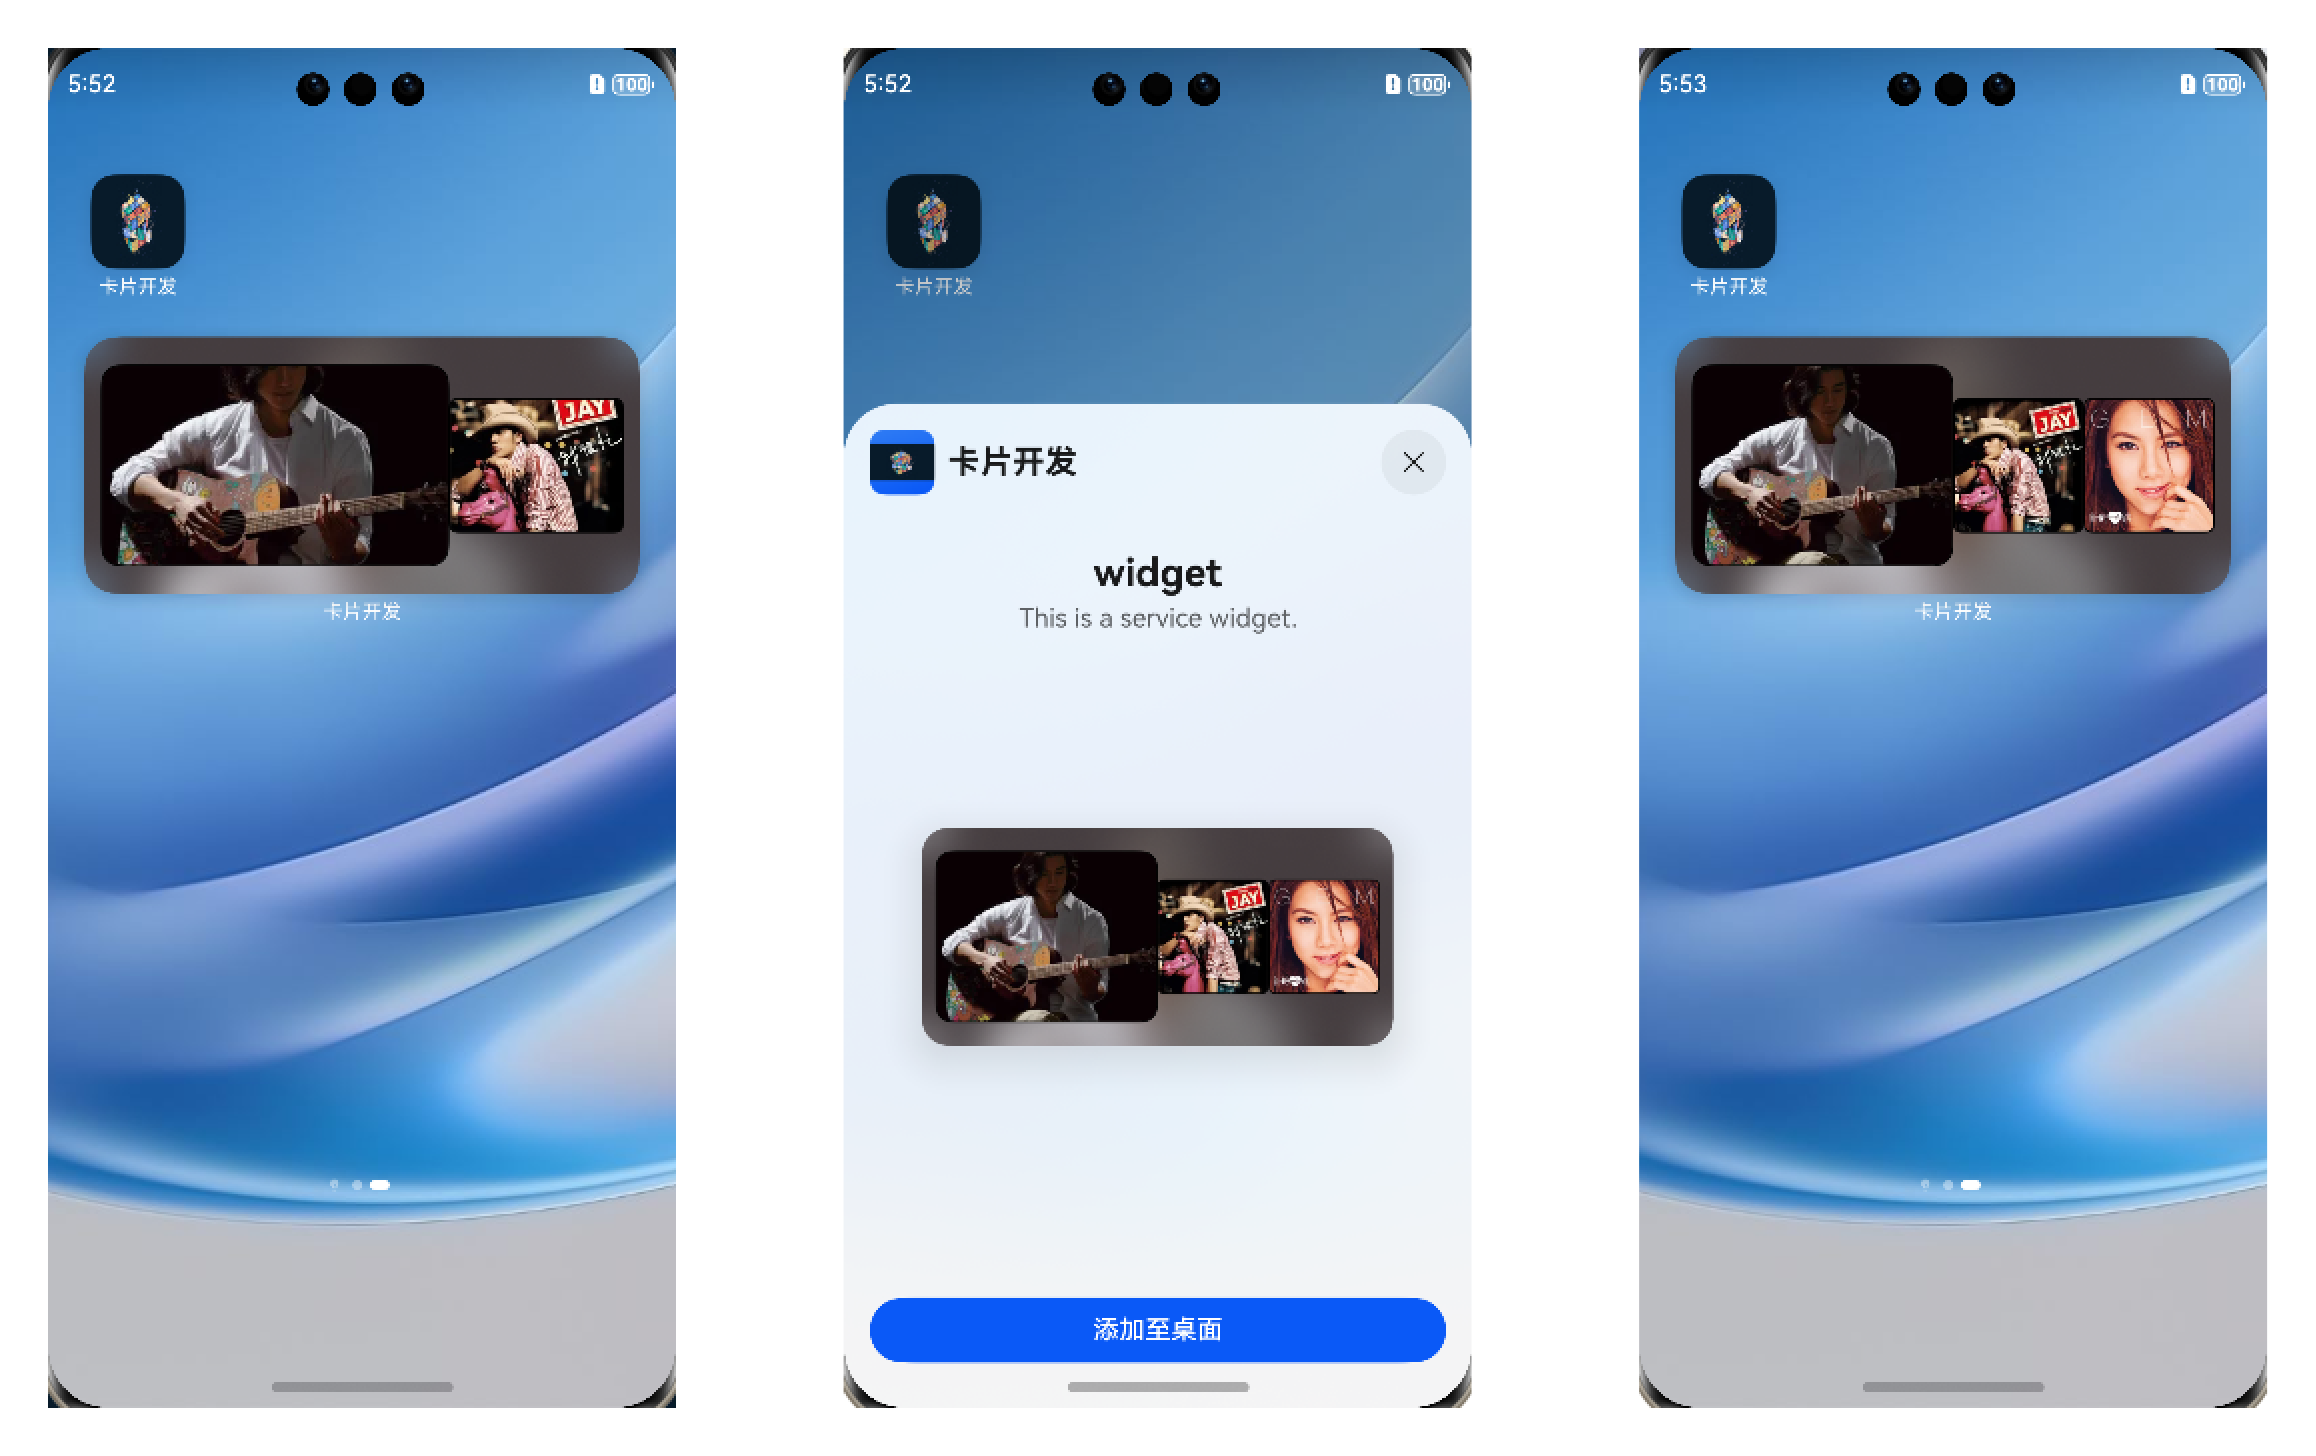

新建项目和新建服务卡片
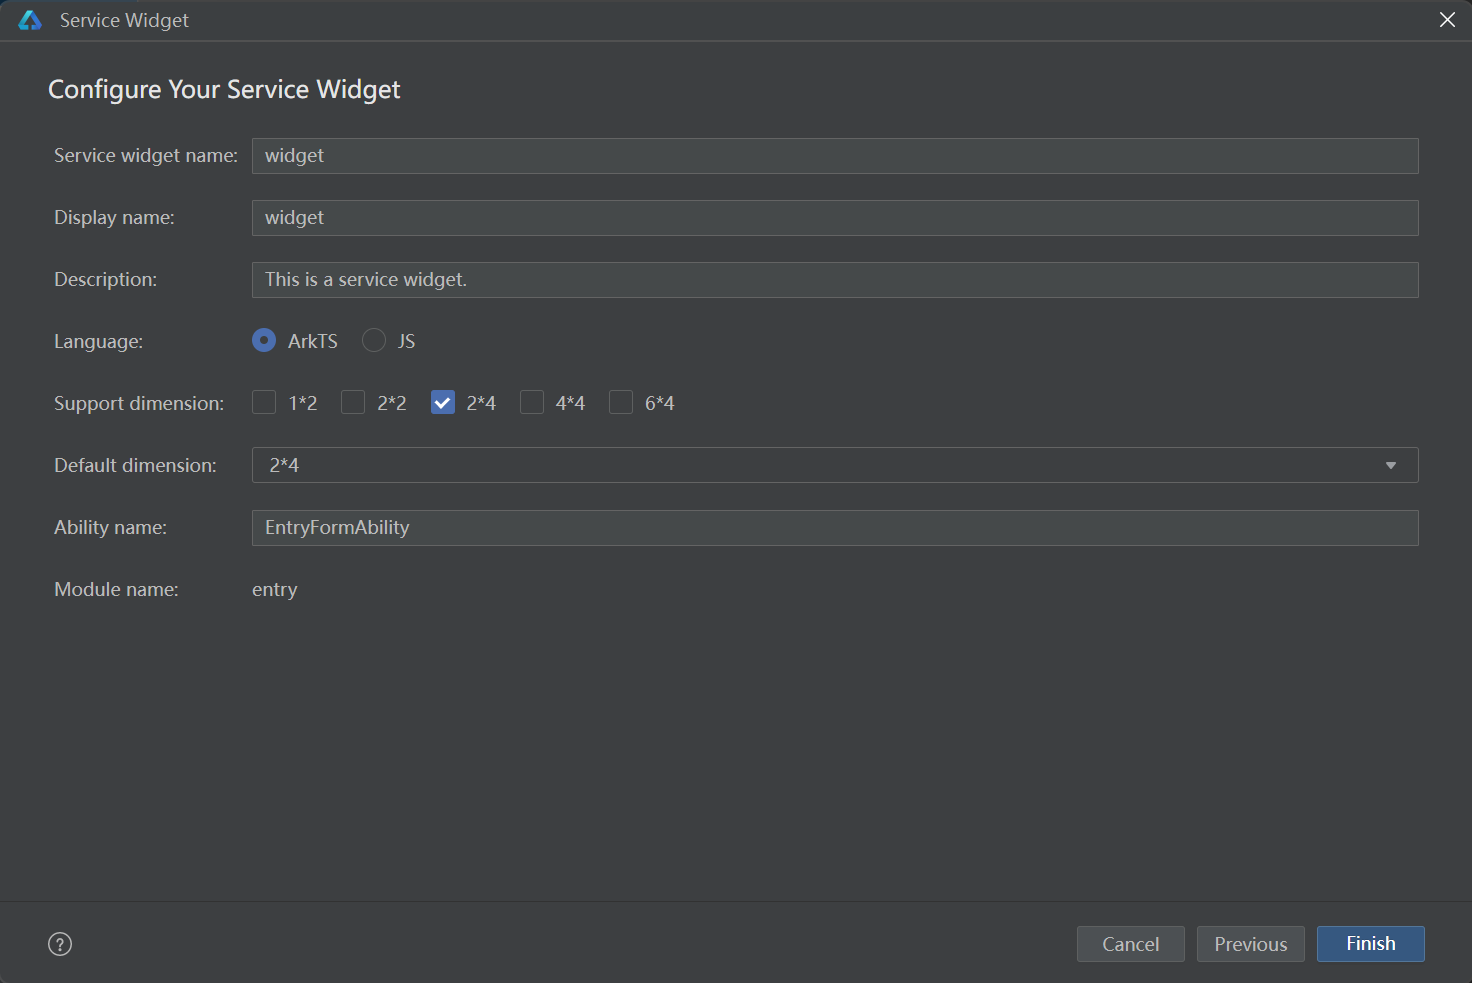
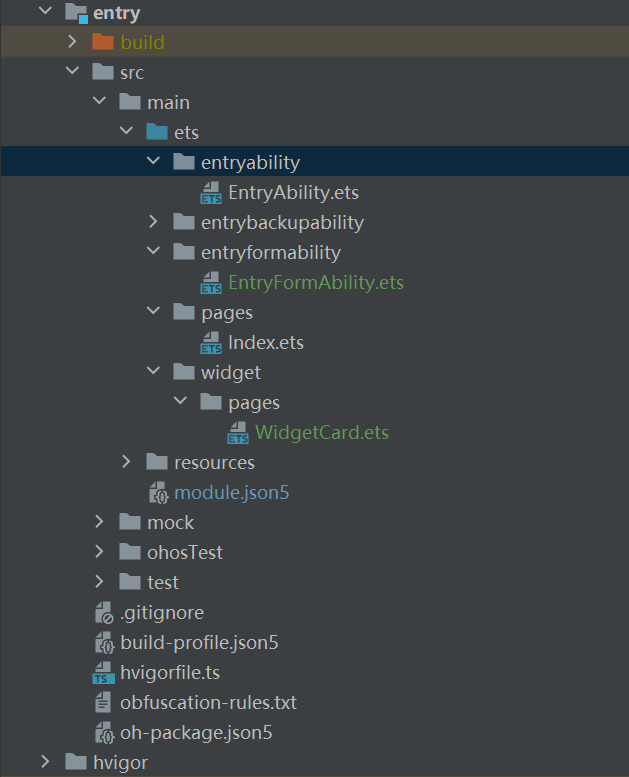
设置沉浸式
entry/src/main/ets/entryability/EntryAbility.ets

首页显示轮播图数据

1. 申请网络权限
entry/src/main/module.json5

2. 新建工具文件 /utils/index.ets
entry/src/main/ets/utils/index.ets
export const swiperInit = () => {

  AppStorage.setOrCreate("swiperList", [
    "https://env-00jxhf99mujs.normal.cloudstatic.cn/card/1.webp?expire_at=1729734506&er_sign=e51cb3b4f4b28cb2da96fd53701eaa69",
    "https://env-00jxhf99mujs.normal.cloudstatic.cn/card/2.webp?expire_at=1729734857&er_sign=b2ffd42585568a094b9ecfb7995a9763",
    "https://env-00jxhf99mujs.normal.cloudstatic.cn/card/3.webp?expire_at=1729734870&er_sign=50d5f210191c113782958dfd6681cd2d",
  ])
  AppStorage.setOrCreate("activeIndex", 0)
}
3. 初始化
entry/src/main/ets/entryability/EntryAbility.ets

4. 页面中使用
entry/src/main/ets/pages/Index.ets
@Entry
@Component
struct Index {
  @StorageProp("swiperList")
  swiperList: string[] = []
  @StorageLink("activeIndex")
  activeIndex: number = 0


  build() {
    Column() {
      Swiper() {
        ForEach(this.swiperList, (img: string) => {
          Image(img)
            .width("80%")
        })
      }
      .loop(true)
      .autoPlay(true)
      .interval(3000)

      .onChange(index => this.activeIndex = index)
    }
    .height('100%')
    .width('100%')
    .justifyContent(FlexAlign.Center)
    .backgroundImage(this.swiperList[this.activeIndex])
    .backgroundBlurStyle(BlurStyle.Thin)
    .backgroundImageSize(ImageSize.Cover)
    .animation({ duration: 500 })
  }
}
5. 效果

创建卡片时,获取卡片id

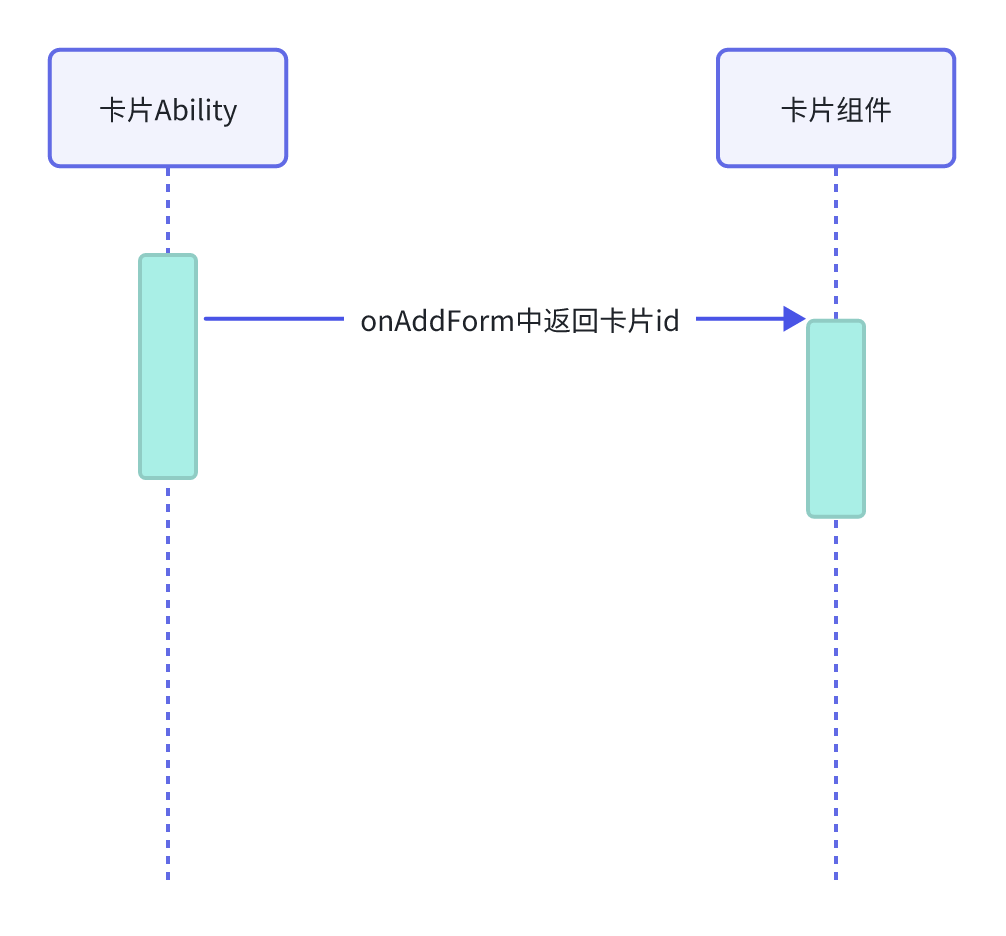
1. 获取和返回卡片id
这里解析下为什么要返回id给卡片组件,因为后期卡片想要向应用通信时,应用响应数据要根据卡片id来响应。
另外 formExtensionAbility进程不能常驻后台,即在卡片生命周期回调函数中无法处理长时间的任务,在生命周期调度完成后会继续存在10秒,如10秒内没有新的
生命周期回调触发则进程自动退出。针对可能需要10秒以上才能完成的业务逻辑,建议拉起主应用进行处理,处理完成后使用updateForm通知卡片进行刷新
entry/src/main/ets/entryformability/EntryFormAbility.ets
  onAddForm(want: Want) {
    class FormData {
      // 获取卡片id
      formId: string = want.parameters!['ohos.extra.param.key.form_identity'].toString();
    }

    let formData = new FormData()
    return formBindingData.createFormBindingData(formData);
  }
2. 接受和显示卡片id
entry/src/main/ets/widget/pages/WidgetCard.ets
const localStorage = new LocalStorage()

@Entry(localStorage)
@Component
struct WidgetCard {
  @LocalStorageProp("formId")
  formId: string = ""

  build() {
    Row() {
      Text(this.formId)
    }
    .width("100%")
    .height("100%")
    .justifyContent(FlexAlign.Center)
    .padding(10)

  }
}
3. 效果

记录卡片id,持久化存储
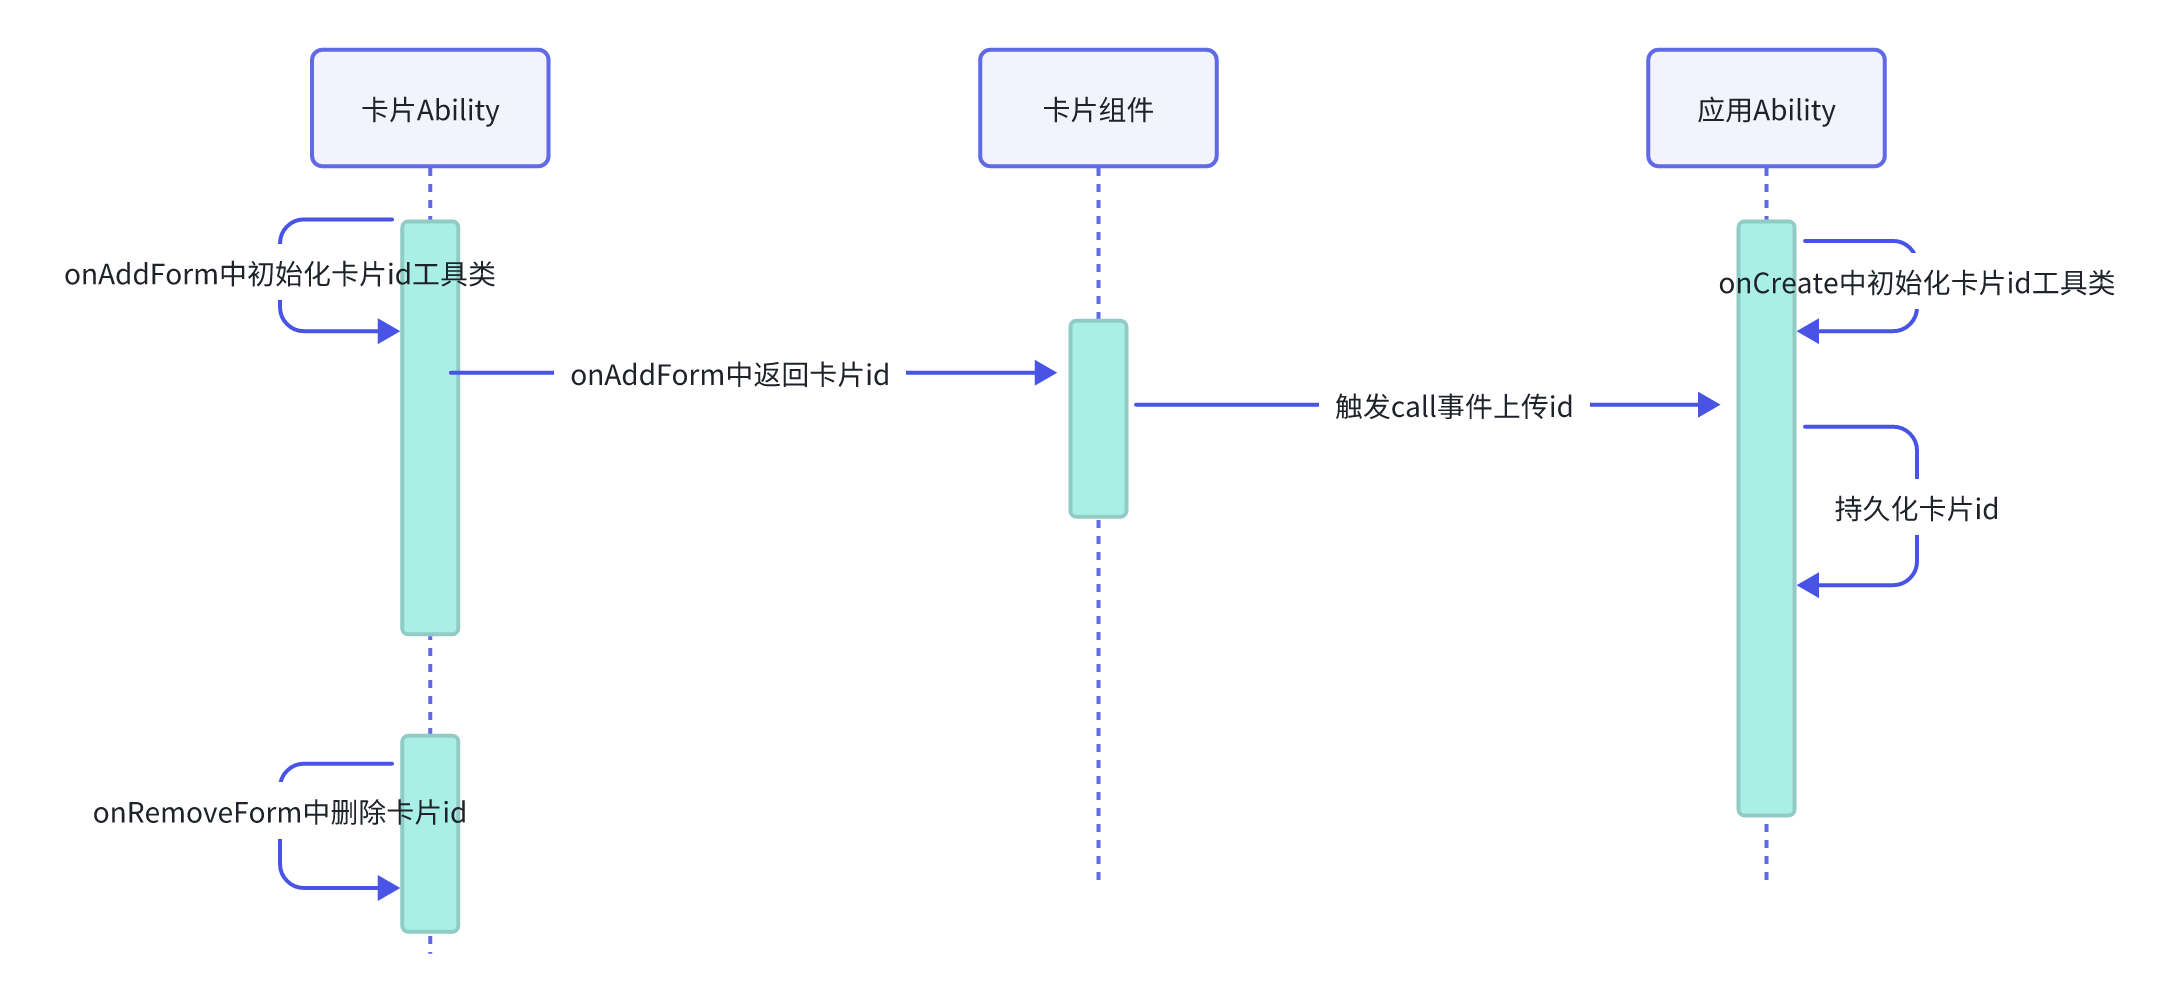
主要流程如下:
- 封装持久化存储卡片id的工具类
- 初始化卡片id工具类
- 卡片主动上传卡片id
- 应用Aibility接收卡片id
- 接收卡片id并且持久化
- 移除卡片时,删除卡片id
1. 封装持久化存储卡片id的工具类
此时接收到卡片id后,需要将卡片id持久化存储,避免重新打卡手机时,无法联系到已经创建的卡片
entry/src/main/ets/utils/index.ets
export class FormIdStore {
  static key: string = "wsy_collect"
  static dataPreferences: preferences.Preferences | null = null;
  static context: Context | null = null

  //  初始化
  static init(context?: Context) {
    if (!FormIdStore.dataPreferences) {
      if (context) {
        FormIdStore.context = context
      }
      FormIdStore.dataPreferences =
        preferences.getPreferencesSync(FormIdStore.context || getContext(), { name: FormIdStore.key })
    }
  }

  //  获取卡片id 数组
  static getList() {
    FormIdStore.init()
    const str = FormIdStore.dataPreferences?.getSync(FormIdStore.key, '[]')
    const list = JSON.parse(str as string) as string[]
    console.log("list卡片", list)
    return list
  }

  // 新增卡片数组
  static async set(item: string) {
    FormIdStore.init()
    const list = FormIdStore.getList()
    if (!list.includes(item)) {
      list.push(item)
      FormIdStore.dataPreferences?.putSync(FormIdStore.key, JSON.stringify(list))
      await FormIdStore.dataPreferences?.flush()
    }

  }

  // 删除元素
  static async remove(item: string) {
    FormIdStore.init()
    const list = FormIdStore.getList()
    const index = list.indexOf(item)
    if (index !== -1) {
      list.splice(index, 1)
      FormIdStore.dataPreferences?.putSync(FormIdStore.key, JSON.stringify(list))
      await FormIdStore.dataPreferences?.flush()
    }
  }
}
2. 初始化卡片id工具类
-
onCreate中初始化
entry/src/main/ets/entryability/EntryAbility.ets
onCreate(want: Want, launchParam: AbilityConstant.LaunchParam): void { FormIdStore.init(this.context) -
onAddForm中初始化
onAddForm(want: Want) {
  FormIdStore.init(this.context)
3. 卡片主动上传卡片id
利用watch监听器来触发上传
entry/src/main/ets/widget/pages/WidgetCard.ets
const localStorage = new LocalStorage()

@Entry(localStorage)
@Component
struct WidgetCard {
  @LocalStorageProp("formId")
  @Watch("postData")
  formId: string = ""

  // 上传卡片id
  postData() {
    postCardAction(this, {
      action: 'call',
      abilityName: 'EntryAbility',
      params: {
        method: 'createCard',
        formId: this.formId
      }
    });
  }

  build() {
    Row() {
      Text(this.formId)
    }
    .width("100%")
    .height("100%")
    .justifyContent(FlexAlign.Center)
    .padding(10)

  }
}
4. 应用Aibility接收卡片id
entry/src/main/ets/entryability/EntryAbility.ets
// callee中要求返回的数据类型
class MyPara implements rpc.Parcelable {
  marshalling(dataOut: rpc.MessageSequence): boolean {
    return true
  }

  unmarshalling(dataIn: rpc.MessageSequence): boolean {
    return true
  }
}

onCreate(want: Want, launchParam: AbilityConstant.LaunchParam): void {
    FormIdStore.init(this.context)
    // 监听事件
    this.callee.on("createCard", (data: rpc.MessageSequence) => {
      // 接收id
      const formId = (JSON.parse(data.readString() as string) as Record<string, string>).formId

      return new MyPara()
    })
  }
5. 接收卡片id并且持久化
-
开启后台运行权限 “ohos.permission.KEEP_BACKGROUND_RUNNING”
entry/src/main/module.json5
"requestPermissions": [ { "name": "ohos.permission.INTERNET" }, { "name": "ohos.permission.KEEP_BACKGROUND_RUNNING" } ], -
持久化
 onCreate(want: Want, launchParam: AbilityConstant.LaunchParam): void {
    FormIdStore.init(this.context)
    // 监听事件
    this.callee.on("createCard", (data: rpc.MessageSequence) => {
      // 接收id
      const formId = (JSON.parse(data.readString() as string) as Record<string, string>).formId
      // 2 持久化
      FormIdStore.set(formId)

      return new MyPara()
    })
  }
6. 移除卡片时,删除卡片id
entry/src/main/ets/entryformability/EntryFormAbility.ets
  onRemoveForm(formId: string) {
    FormIdStore.remove(formId)
  }
封装下载图片工具类
将下载图片和拼接卡片需要格式的代码封装到文件中 该工具类可以同时下载多张图片,使用了Promise.all 来统一接收结果
entry/src/main/ets/utils/CardDonwLoad.ets
1. 封装的工具说明
interface IDownFile {
  fileName: string
  imageFd: number
}

// 卡片显示 需要的数据结构
export class FormDataClass {
  // 卡片需要显示图片场景, 必填字段(formImages 不可缺省或改名), fileName 对应 fd
  formImages: Record<string, number>

  constructor(formImages: Record<string, number>) {
    this.formImages = formImages
  }
}


export class CardDownLoad {
  context: Context | null
  then: Function | null = null
  imgFds: number[] = []

  constructor(context: Context) {
    this.context = context
  }

  // 下载单张图片
  async downLoadImage(netFile: string) {
  }

  // 下载一组图片
  async downLoadImages(netFiles: string[]) {
  }

  // 私有下载网络图片的方法
  private async _down(netFile: string) {
  }

  // 手动关闭文件
  async closeFile() {
    this.imgFds.forEach(fd => fileIo.closeSync(fd))
    this.imgFds = []
  }
}
2. 封装的实现
import { http } from '@kit.NetworkKit';
import { fileIo } from '@kit.CoreFileKit';


interface IDownFile {
  fileName: string
  imageFd: number
}

// 卡片显示 需要的数据结构
export class FormDataClass {
  // 卡片需要显示图片场景, 必填字段(formImages 不可缺省或改名), fileName 对应 fd
  formImages: Record<string, number>

  constructor(formImages: Record<string, number>) {
    this.formImages = formImages
  }
}


export class CardDownLoad {
  context: Context | null
  then: Function | null = null
  imgFds: number[] = []

  constructor(context: Context) {
    this.context = context
  }

  // 下载单张图片
  async downLoadImage(netFile: string) {
    const obj = await this._down(netFile)
    let imgMap: Record<string, number> = {};
    imgMap[obj.fileName] = obj.imageFd
    if (!this.imgFds.includes(obj.imageFd)) {
      this.imgFds.includes(obj.imageFd)
    }
    return new FormDataClass(imgMap)
  }

  // 下载一组图片
  async downLoadImages(netFiles: string[]) {
    let imgMap: Record<string, number> = {};

    const promiseAll = netFiles.map(url => {
      const ret = this._down(url)
      return ret
    })
    const resList = await Promise.all(promiseAll)
    resList.forEach(v => {
      imgMap[v.fileName] = v.imageFd
      if (!this.imgFds.includes(v.imageFd)) {
        this.imgFds.includes(v.imageFd)
      }
    })


    return new FormDataClass(imgMap)
    // return resList.map(v => `memory://${v.fileName}`)
  }

  // 私有下载网络图片的方法
  private async _down(netFile: string) {

    let tempDir = this.context!.getApplicationContext().tempDir;
    let fileName = 'file' + Date.now();
    let tmpFile = tempDir + '/' + fileName;

    let httpRequest = http.createHttp()
    let data = await httpRequest.request(netFile);
    if (data?.responseCode == http.ResponseCode.OK) {

      let imgFile = fileIo.openSync(tmpFile, fileIo.OpenMode.READ_WRITE | fileIo.OpenMode.CREATE);

      await fileIo.write(imgFile.fd, data.result as ArrayBuffer);

      const obj: IDownFile = {
        fileName,
        imageFd: imgFile.fd
      }
      // setTimeout(() => {
      // }, 0)
      // fileIo.close(imgFile);
      httpRequest.destroy();
      return obj
    } else {
      httpRequest.destroy();
      return Promise.reject(null)
    }

  }

  // 手动关闭文件
  async closeFile() {
    this.imgFds.forEach(fd => fileIo.closeSync(fd))
    this.imgFds = []
  }
}
卡片发起通知,获取网络图片

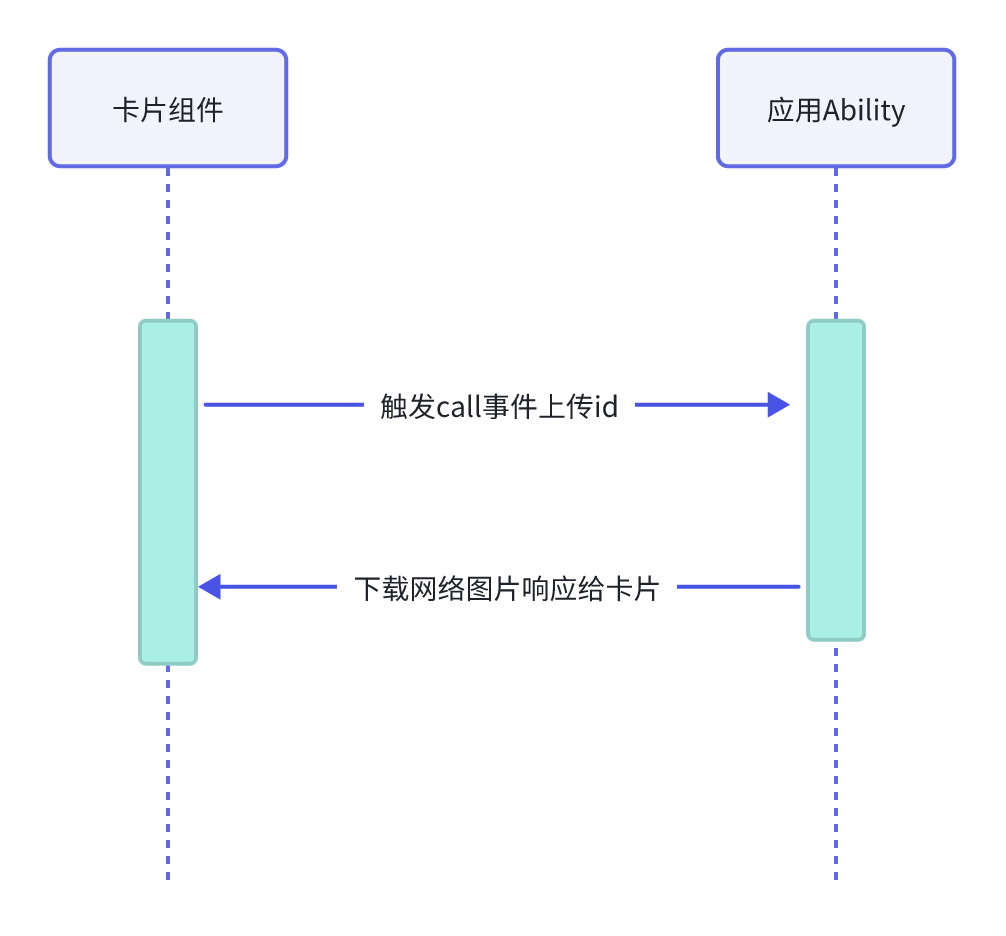
- 准备好卡片代码,用来接收返回的网络图片数据
- 应用Ability接收卡片通知,下载网络图片,并且返回给卡片
1. 准备好卡片代码,用来接收返回的网络图片数据
const localStorage = new LocalStorage()

@Entry(localStorage)
@Component
struct WidgetCard {
  // 用来显示图片的数组
  @LocalStorageProp("imgNames")
  imgNames: string[] = []
  // 卡片id
  @LocalStorageProp("formId")
  @Watch("postData")
  formId: string = ""
  // 当前显示的大图 -  和 应用-首页保持同步
  @LocalStorageProp("activeIndex")
  activeIndex: number = 0

  postData() {
    postCardAction(this, {
      action: 'call',
      abilityName: 'EntryAbility',
      params: {
        method: 'createCard',
        formId: this.formId
      }
    });
  }

  build() {
    Row() {
      ForEach(this.imgNames, (url: string, index: number) => {
        Image(url)
          .border({ width: 1 })
          .layoutWeight(this.activeIndex === index ? 2 : 1)
          .height(this.activeIndex === index ? "90%" : "60%")
          .borderRadius(this.activeIndex === index ? 12 : 5)
          .animation({ duration: 300 })
      })
    }
    .width("100%")
    .height("100%")
    .justifyContent(FlexAlign.Center)
    .padding(10)
    .backgroundImage(this.imgNames[this.activeIndex])
    .backgroundBlurStyle(BlurStyle.Thin)
    .backgroundImageSize(ImageSize.Cover)
    .animation({ duration: 300 })
  }
}
2. 应用Ability接收卡片通知,下载网络图片,并且返回给卡片
entry/src/main/ets/entryability/EntryAbility.ets
// callee中要求返回的数据类型

 class MyPara implements rpc.Parcelable {
  marshalling(dataOut: rpc.MessageSequence): boolean {
    return true
  }

  unmarshalling(dataIn: rpc.MessageSequence): boolean {
    return true
  }
}


export default class EntryAbility extends UIAbility {
  onCreate(want: Want, launchParam: AbilityConstant.LaunchParam): void {
    // 监听事件
    this.callee.on("createCard", (data: rpc.MessageSequence) => {
      // 接收id
      const formId = (JSON.parse(data.readString() as string) as Record<string, string>).formId
      // 持久化
      FormIdStore.set(formId)

      class FormData {
        imgName?: string[] = []
        activeIndex?: number = AppStorage.get("activeIndex")!
      }

      const formInfo = formBindingData.createFormBindingData(new FormData)
      // 先响应空数据 等待网络图片下载完毕后,再响应网络图片数据
      formProvider.updateForm(formId, formInfo)
      const cardDownLoad = new CardDownLoad(this.context)
      cardDownLoad.downLoadImages(AppStorage.get("swiperList") as string[])
        .then(ret => {
          const urls = Object.keys(ret.formImages).map(v => `memory://${v}`)
          // 返回卡片数组
          class CimgNames {
            imgNames: string[] = urls
            formImages: Record<string, number> = ret.formImages
          }

          const formInfo = formBindingData.createFormBindingData(new CimgNames)
          formProvider.updateForm(formId, formInfo)
          //   关闭文件
          cardDownLoad.closeFile()
        })


      // 临时处理、防止报错
      return new MyPara()
    })
  }

}
3. 效果

卡片同步轮播
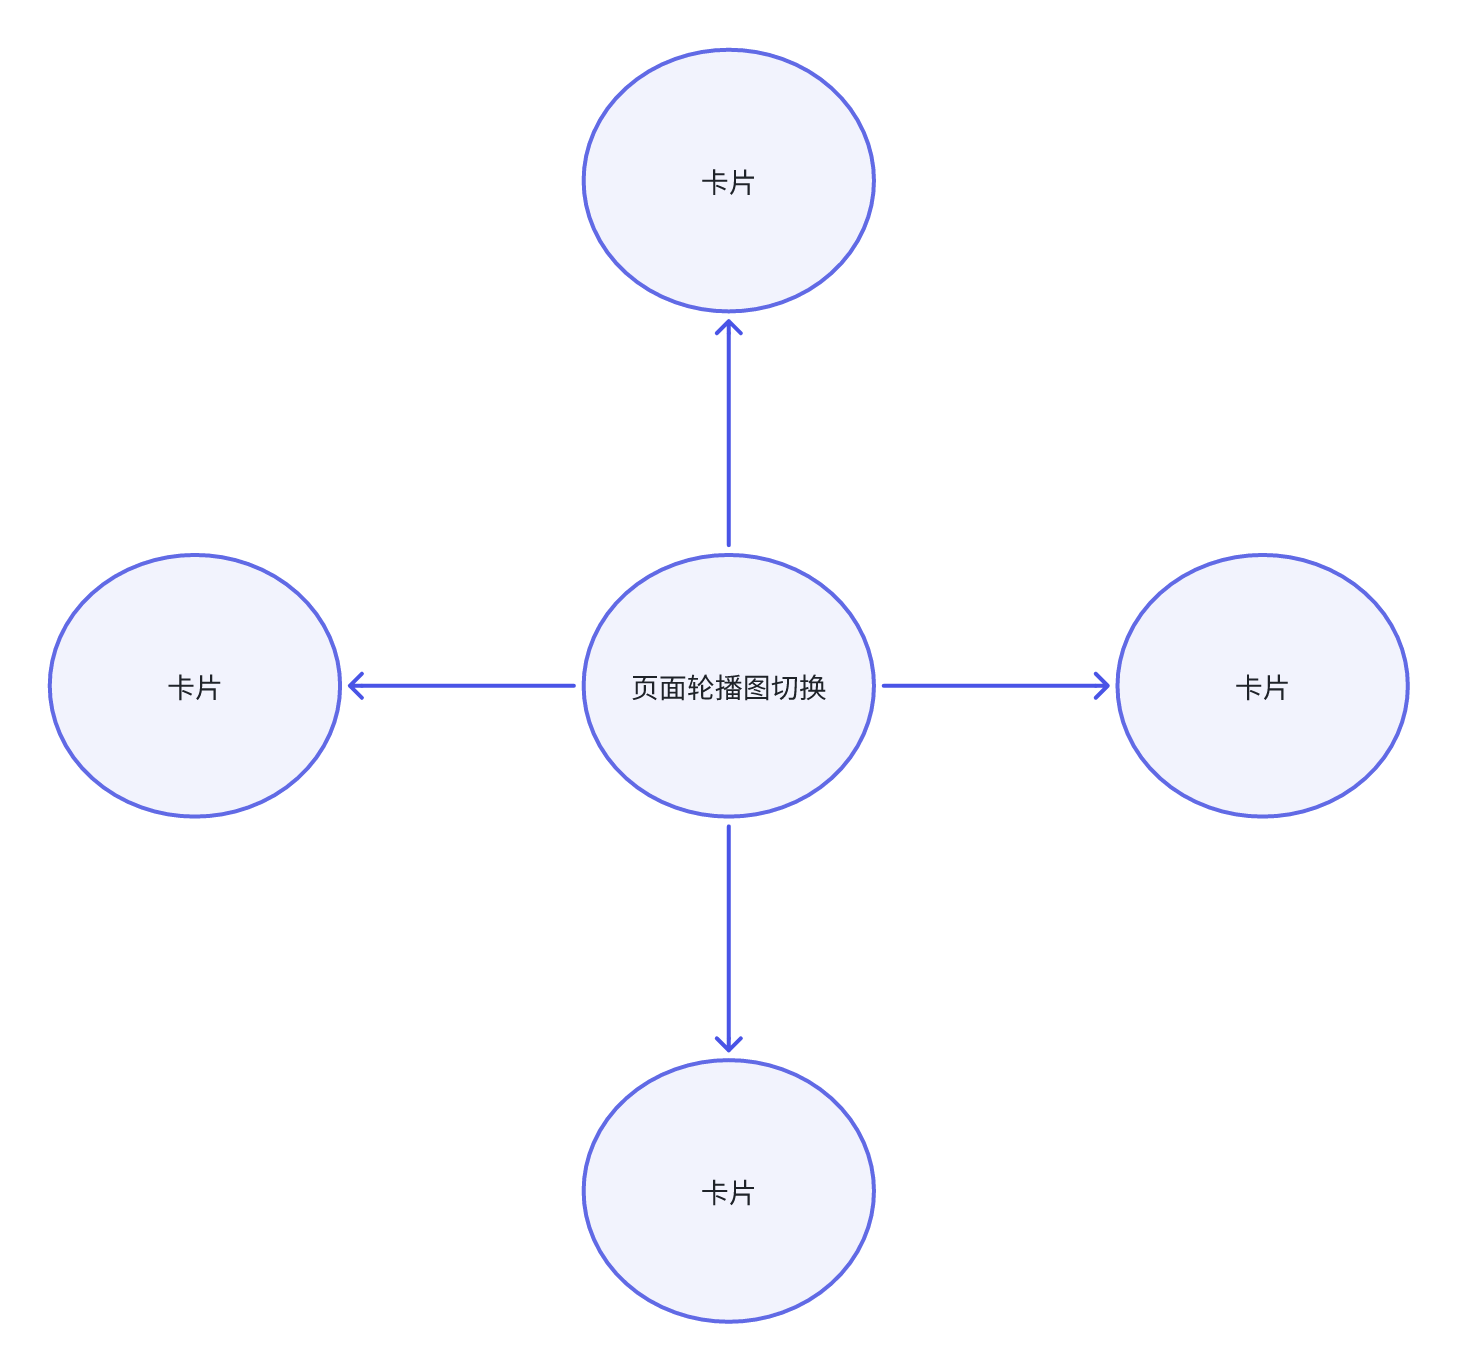
该功能主要是首页在图片轮播时,通知所有的卡片同时更新
entry/src/main/ets/pages/Index.ets
1. 监听轮播图onChange事件,设置当前显示的下标
      Swiper() {
        ForEach(this.swiperList, (img: string) => {
          Image(img)
            .width("80%")
        })
      }
      .loop(true)
      .autoPlay(true)
      .interval(3000)
      .onChange(index => this.activeIndex = index)
2. 监听下标的改变,通知持久化存储中所有的卡片进行更新
  @StorageLink("activeIndex")
  @Watch("changeIndex")
  activeIndex: number = 0

  // 通知所有卡片一并更新
  changeIndex() {
    const list = FormIdStore.getList()
    const index = this.activeIndex
    list.forEach(id => {
      class FdCls {
        activeIndex: number = index
      }

      const formInfo = formBindingData.createFormBindingData(new FdCls())
      formProvider.updateForm(id, formInfo)
    })
  }
3. 效果

总结
FormExtensionAbility进程不能常驻后台,即在卡片生命周期回调函数中无法处理长时间的任务,在生命周期调度完成后会继续存在10秒,如10秒内没有新的
生命周期回调触发则进程自动退出。针对可能需要10秒以上才能完成的业务逻辑,建议拉起主应用进行处理,处理完成后使用updateForm通知卡片进行刷
新。
1. 项目开发流程
- 新建项目与服务卡片:创建新的项目和服务卡片,为后续开发搭建基础框架。
- 设置沉浸式体验:在
EntryAbility.ets中进行相关设置,优化用户视觉体验。
2. 首页轮播图数据显示
- 申请网络权限:在
module.json5中申请,为数据获取做准备。 - 新建工具文件:在
/utils/index.ets中创建swiperInit函数,用于初始化轮播图数据,包括设置轮播图列表和初始索引。 - 初始化操作:在
EntryAbility.ets中进行初始化。 - 页面使用:在
Index.ets中构建轮播图组件,通过Swiper、ForEach等实现轮播效果,轮播图可自动播放、循环,并能响应索引变化。
3. 卡片 id 的处理
- 获取与返回卡片 id:在
EntryFormAbility.ets的onAddForm函数中获取卡片 id,并返回给卡片组件。原因是后期卡片向应用通信时,应用需根据卡片 id 响应,同时注意formExtensionAbility进程的后台限制。 - 接受与显示卡片 id:在
WidgetCard.ets中接受并显示卡片 id。 - 卡片 id 的持久化存储
- 封装工具类:在
/utils/index.ets中封装FormIdStore类,实现初始化、获取卡片 id 列表、新增和删除卡片 id 等功能。 - 初始化工具类:在
EntryAbility.ets的onCreate和onAddForm中初始化。 - 卡片主动上传:在
WidgetCard.ets中利用watch监听器触发上传卡片 id。 - 应用接收与持久化:在
EntryAbility.ets中接收卡片 id 并持久化,同时需开启后台运行权限。 - 移除卡片时处理:在
EntryFormAbility.ets的onRemoveForm中删除卡片 id。
- 封装工具类:在
4. 图片相关操作
- 封装下载图片工具类:在
CardDonwLoad.ets中封装,包括下载单张或一组图片的功能,以及手动关闭文件功能,涉及网络请求和文件操作。 - 卡片发起通知获取网络图片
- 卡片准备接收数据:在
WidgetCard.ets中准备接收网络图片数据的代码,包括显示图片数组、卡片 id 等相关变量和操作。 - 应用处理与返回数据:在
EntryAbility.ets中接收卡片通知,下载网络图片并返回给卡片,先响应空数据,下载完成后再更新卡片数据。
- 卡片准备接收数据:在
5. 卡片同步轮播功能
- 监听轮播图 onChange 事件:在
Index.ets中通过Swiper组件的onChange事件设置当前显示下标。 - 通知卡片更新:在
Index.ets中监听下标改变,通知持久化存储中的所有卡片更新,实现首页与卡片轮播同步。
作者
作者:万少
链接:https://www.nutpi.net/
來源:坚果派 著作权归作者所有。
商业转载请联系作者获得授权,非商业转载请注明出处。
原文地址:https://blog.csdn.net/u013176440/article/details/143656825
免责声明:本站文章内容转载自网络资源,如本站内容侵犯了原著者的合法权益,可联系本站删除。更多内容请关注自学内容网(zxcms.com)!
