如何使用C++调用Pytorch模型进行推理测试:使用libtorch库
如何使用C++调用Pytorch模型进行推理测试:使用libtorch库
目录
一、环境准备
1,linux:以ubuntu 22.04系统为例
1. 准备CUDA和CUDNN
有两种方式配置cuda和cudnn,一种是在系统环境安装,可以参考:深度学习环境配置——ubuntu安装CUDA与CUDNN
还有一种是在conda虚拟环境使用cudatoolkit-dev包,具体可以参考:Installing-and-Test-PyTorch-C-API-on-Ubuntu-with-GPU-enabled
我选择的方式是在系统环境安装cuda12.1和cudnn8.9.2。
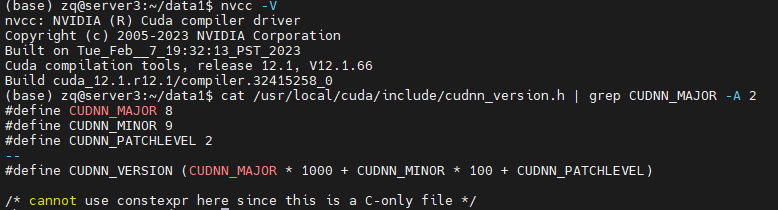
可使用如下命令查看是否安装成功:
NVCC -V
cat /usr/local/cuda/include/cudnn_version.h | grep CUDNN_MAJOR -A 2
2. 准备C++环境
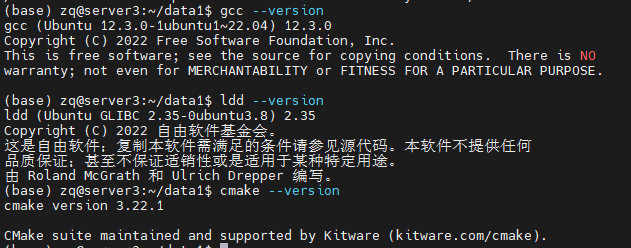
安装gcc, cmake和GLIBC,用apt install即可
可使用如下命令是否查看是否安装成功:
gcc --version
cmake --version
ldd --version
3, 下载libtorch文件
去pytoch官网https://pytorch.org/下载即可:
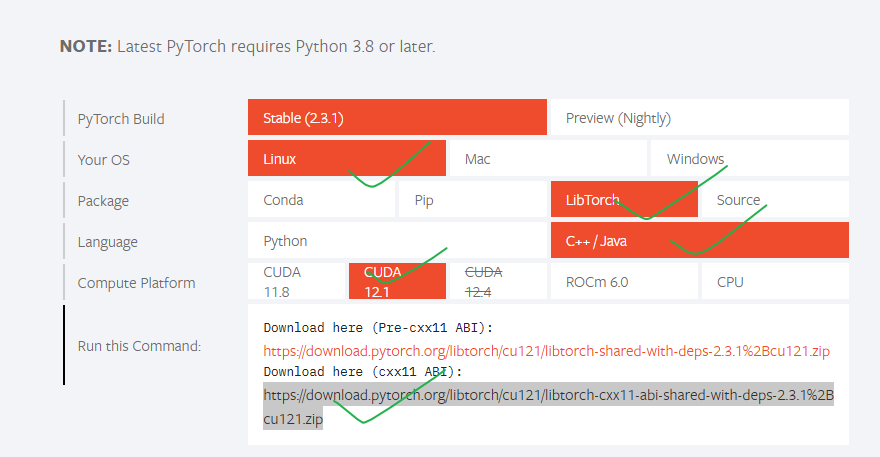
可使用如下命令下载并解压:
wget https://download.pytorch.org/libtorch/cu121/libtorch-cxx11-abi-shared-with-deps-2.3.1%2Bcu121.zip
unzip libtorch-cxx11-abi-shared-with-deps-2.3.1+cu121.zip
将libtorch路径配置到path变量:
vim ~/.bashrc
最后一行加入:
export LD_LIBRARY_PATH=/path/to/libtorch/lib:$LD_LIBRARY_PATH
注意将/path/to/libtorch替换为实际的path,我这里是/mnt/data1/zq/libtorch
查看是否成功:
source ~/.bashrc
echo $LD_LIBRARY_PATH

4, 编写测试libtorch是否安装成功
创建main.cpp文件,内容如下:
#include <torch/torch.h>
#include <iostream>

int main() {
    if (torch::cuda::is_available()) {
        std::cout << "CUDA is available! Running on GPU." << std::endl;
        // 创建一个随机张量并将其移到GPU上
        torch::Tensor tensor_gpu = torch::rand({2, 3}).cuda();
        std::cout << "Tensor on GPU:\n" << tensor_gpu << std::endl;
    } else {
        std::cout << "CUDA not available! Running on CPU." << std::endl;
        // 创建一个随机张量并保持在CPU上
        torch::Tensor tensor_cpu = torch::rand({2, 3});
        std::cout << "Tensor on CPU:\n" << tensor_cpu << std::endl;
    }
    return 0;
}
编译和运行
创建CMakeLists.txt文件,内容如下:
cmake_minimum_required(VERSION 3.10 FATAL_ERROR)
project(test_project)

# Setting the C++ standard to C++17
set(CMAKE_CXX_STANDARD 17)
set(CMAKE_CXX_STANDARD_REQUIRED ON)

# If additional compiler flags are needed
add_compile_options(-Wall -Wextra -pedantic)

# Setting the location of LibTorch
set(Torch_DIR "/path/to/libtorch/share/cmake/Torch")
find_package(Torch REQUIRED)

# Specify the name of the executable and the corresponding source file
add_executable(test_project main.cpp)

# Linking LibTorch libraries
target_link_libraries(test_project "${TORCH_LIBRARIES}")

# Set the output directory for the executable
set(EXECUTABLE_OUTPUT_PATH ${PROJECT_SOURCE_DIR}/bin)
/path/to/libtorch替换为实际的path
编译并测试:
mkdir build
cd build
cmake ..
make
编译完成之后,应该会出现一个bin目录,其中有一个test_project文件,直接运行即可看到输出。

出现CUDAFloatType说明,libtorch的GPU版本安装成功。
2, windows: 以win10系统为例
1, 准备CUDA和CUDNN
2,准备C++编译环境
这一步需要配置cmake, mingw。可参考:Windows 配置 C/C++ 开发环境
建议直接安装Visual Studio这个IDE,可参考:Windows libtorch C++部署GPU版
3,下载安装libtorch
参考这个视频:
win10系统上LibTorch的安装和使用(cuda10.1版本)
4. 注意事项
windows环境我没有做测试,不保证一定可以成功。linux环境是亲自测试的,保证可以复现
二、C++代码封装Pytorch模型测试:以resnet-18分类为例
1, 安装opencv用于读取图像
需要使用opencv来读取图像数据,可通过如下命令安装:
sudo apt install libopencv-dev
dpkg -l | grep libopencv # 查看是否安装成功
2,用python导出训练好的pytorch模型
在将PyTorch模型应用于C++环境之前,需要将其转换为TorchScript。这可以通过两种方式实现:tracing 或 scripting。可以通过如下代码导出训练好的ResNet-18模型:
import torch
import torchvision

# 加载预训练的模型
model = torchvision.models.resnet18(pretrained=True)

# 将模型设置为评估模式
model.eval()

# 创建一个示例输入
example_input = torch.rand(1, 3, 224, 224)  # 模型输入的大小

# 使用tracing导出模型
traced_script_module = torch.jit.trace(model, example_input)
traced_script_module.save("resnet18.pt")
3,编写C++代码测试
创建main.cpp文件,内容如下:
#include <torch/script.h>
#include <torch/torch.h>
#include <opencv2/opencv.hpp>
#include <iostream>
#include <filesystem>

// Function to transform image to tensor
torch::Tensor transform_image(const cv::Mat& image) {
    cv::Mat img_transformed;
    cv::cvtColor(image, img_transformed, cv::COLOR_BGR2RGB);
    cv::resize(img_transformed, img_transformed, cv::Size(224, 224));
    img_transformed.convertTo(img_transformed, CV_32FC3, 1.0/255);
    auto img_tensor = torch::from_blob(img_transformed.data, {img_transformed.rows, img_transformed.cols, 3}, torch::kFloat);
    img_tensor = img_tensor.permute({2, 0, 1});
    img_tensor = torch::data::transforms::Normalize<torch::Tensor>({0.485, 0.456, 0.406}, {0.229, 0.224, 0.225})(img_tensor);
    img_tensor = img_tensor.unsqueeze(0);
    return img_tensor;
}

// Load the model and classify an image
void classify_image(const std::string& model_path, const std::string& image_path) {
    // Load the model
    torch::jit::script::Module model = torch::jit::load(model_path);
    model.eval(); // Switch to evaluation mode

    // Load and transform the image
    cv::Mat image = cv::imread(image_path, cv::IMREAD_COLOR);
    if (image.empty()) {
        std::cerr << "Could not read the image: " << image_path << std::endl;
        return;
    }
    torch::Tensor tensor_image = transform_image(image);

    // Perform inference
    torch::Tensor output = model.forward({tensor_image}).toTensor();
    int64_t pred = output.argmax(1).item<int64_t>();

    std::cout << "The image is classified as class index: " << pred << std::endl;
}

int main(int argc, char* argv[]) {
    std::string model_path = "resnet18.pt"; // Default model path
    std::string image_path = "default_image.jpg"; // Default image path

    // 从命令行接受两个参数, 分别作为model_path和image_path
    if (argc >= 3) {
        model_path = argv[1];
        image_path = argv[2];
    } else {
        std::cout << "Using default model and image paths." << std::endl;
    }

    classify_image(model_path, image_path);
    return 0;
}
创建CMakeLists.txt,内容如下:
cmake_minimum_required(VERSION 3.10 FATAL_ERROR)
project(ImageClassification)

set(CMAKE_CXX_STANDARD 17)
set(CMAKE_CXX_STANDARD_REQUIRED ON)

# 设置LibTorch的位置, /path/to/libtorch替换为实际路径
set(Torch_DIR "/path/to/libtorch/share/cmake/Torch")
find_package(Torch REQUIRED)

find_package(OpenCV REQUIRED)

add_executable(ImageClassification main.cpp)
target_link_libraries(ImageClassification "${TORCH_LIBRARIES}" "${OpenCV_LIBS}")
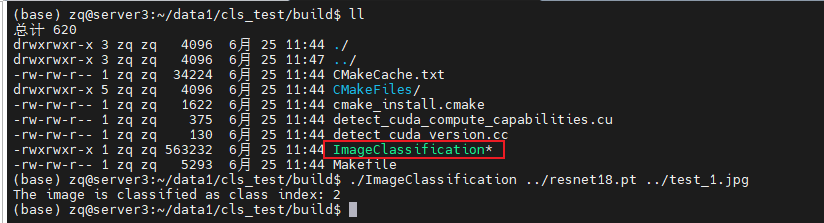
编译并运行:
mkdir build && cd build
cmake ..
make
在build目录下会出现ImageClassification这个可执行文件,直接运行传入model_path和image_path即可。
原文地址:https://blog.csdn.net/weixin_42364196/article/details/140204443
免责声明:本站文章内容转载自网络资源,如本站内容侵犯了原著者的合法权益,可联系本站删除。更多内容请关注自学内容网(zxcms.com)!