HarmoneyOS--Ability(能力)、窗口、通知
标题
一、什么是Ability?
开发模式提供的开发功能抽象的描述。
其中重要的是UiAbility,界面组件能力,负责所有界面的处理。
通过配置可以变更单例,多例,指定实例,在module.json5中进行配置
如:
单例:lunchType:'singleton'
多例:lunchType:'standard'
指定实例:lunchType:'specified'
二、使用步骤(单例和多例)
1.单例和多例
操作步骤:
1.在module.json5中进行配置单例、多例、指定实例。
单例:lunchType:'singleton'
多例:lunchType:'standard'
"abilities": [
      {"launchType": "singleton"}
     ]
2.唤起页面:
//2.1 链接上下文
  private cont = getContext(this) as common.UIAbilityContext
//2.2 定义参数Want
const want: Want = {
      // deviceId:'', 标识ID,可选
      bundleName: 'com.www.myapplication', //包名: appScope
      moduleName: 'entry', // 模块名称 module.json5
      abilityName: 'EntryAbilityNext', //应用名称  module.json5
      parameters: {} // 参数
    }
//2.3 拉起页面
con.startAbility(want)


3.若传递了参数,则需要在拉起页面中的ability中进行接收
  onCreate(want: Want, launchParam: AbilityConstant.LaunchParam): void {
    this.getParams(want)
  }
  onNewWant(want: Want, launchParam: AbilityConstant.LaunchParam): void {
    this.getParams(want)
  }

  getParams(want: Want) {
    const par = want.parameters as Record<string, string>
    AppStorage.setOrCreate('message', par.message)
  }
2.指定实例
操作步骤:
思路:
// 子模块配置指定实例
// 链接上下文
// 配置Want
// 调用函数并传参,结束接收数据
// 创建MyAbilityStage , 并重写函数onAcceptWant
// 配置module.json 定义路径
// 在子模块UiAbility接收参数(onCreat和onNewWant)
1.在module.json5中进行配置单例、多例、指定实例。
"abilities": [
指定实例:lunchType:'specified'
{"launchType": "specified"}
]
2.唤起页面:
//2.1 链接上下文
private cont = getContext(this) as common.UIAbilityContext
//2.2 定义参数Want
//2.3 拉起页面
this.cont.startAbilityForResult({
bundleName: 'com.www.myapplication', //包名: appScope
moduleName: 'OtherApplication', // 模块名称 module.json5
abilityName: 'OtherApplicationAbility', // 模块名称 module.json5
parameters: {
message: '传递子给的模块数据' // 参数
key:id // 用于指定实例
}
})
.then((res) => {
// 返回的数据
const data = res.want?.parameters as Record<string, string>
console.log('system===>回调接收数据' + JSON.stringify(data.message))
this.message = data.message
}).catch((err: BusinessError) => {
promptAction.showToast({ message: '开启实例异常' + JSON.stringify(err) })
})
3.若传递了参数,则需要在拉起页面中的ability中进行接收
onCreate(want: Want, launchParam: AbilityConstant.LaunchParam): void {
this.getParams(want)
}
onNewWant(want: Want, launchParam: AbilityConstant.LaunchParam): void {
this.getParams(want)
}
getParams(want: Want) {
const par = want.parameters as Record<string, string>
AppStorage.setOrCreate('message', par.message)
}
4. 在拉起页面创建MyAbilityStage类
export default class MyAbilityStage extends AbilityStage {
// 重写函数
override onAcceptWant(want: Want) {
if (want.abilityName === 'InnerEntryAbility') {
console.log('system===>重写' + want.abilityName)
const param = want.parameters as Record<string, string>
return 'InnerEntryAbility' + param.key
}
return ''
}
}
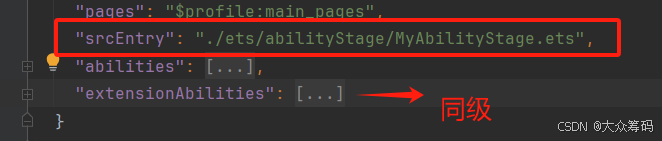
5.在module.json5中配置,见下面
"srcEntry": "./ets/abilityStage/MyAbilityStage.ets",
6.在拉起页面编辑往主模块返回数据
// 链接上下文
const cont = getContext(this) as common.UIAbilityContext
// want :拉起主应用
// 调用函数,返回结果并可以关闭当前应用
cont.terminateSelfWithResult({ // 返回参数使用的
resultCode: 200, want: {
bundleName: 'com.www.myapplication',
moduleName: 'entry',
abilityName: 'EntryAbility',
parameters: {
message: '子模块数据处理完成'
}
}
}, () => {
// 关闭应用
})
三、窗口
思路:
1.ability中初始化生命周期将windowStage保存到全局应用中。
2.在需要开启子窗口的位置,设置大小,位置,加载页面遮罩层等UI,并接收window结果值保存到全局应用中
3.在小窗口位置调用window,执行关闭并操作其他业务(关闭主窗口的遮罩层,则需要进行使用订阅)
1.ability中初始化生命周期将windowStage保存到全局应用中。
onWindowStageCreate(windowStage: window.WindowStage): void {
AppStorage.setOrCreate('windowStage',windowStage)
}
2.在需要开启子窗口的位置,设置大小,位置,加载页面遮罩层等UI,并接收window结果值保存到全局应用中
1.变量
  // 读取全局应用状态
  private windowStage: window.WindowStage | undefined = AppStorage.get('windowStage')
  // 遮罩层
  @State isShow: boolean = false


2.遮罩层UI
if (this.isShow) {
        Rect()
          .width('100%')
          .height('100%')
          .backgroundColor("#ffddecec")
          .opacity(0.2)
      }


3.设置子窗口大小,位置:
// 弹出小窗口 .并将数据保存到应用状态管理中
this.windowStage?.createSubWindow('dLog').then((win: window.Window) => {
   const system = display.getDefaultDisplaySync() // 获取系统的数据,获取到宽高
   // 画小弹框的大小
   win.resize(system.width * 0.8, system.height * 0.2)
   // 所在位置
   win.moveWindowTo(system.width / 9, system.height - (system.height / 4))

   this.isShow = true
   //设置加载路径
   win.setUIContent('pages/CodePage', () => { // 需要重新创建一个entry
     //开启弹框
     win.showWindow().then(() => {})
   })
   // 保存应用
   AppStorage.setOrCreate('window', win)
 })
3.在小窗口位置调用window,执行关闭并操作其他业务(关闭主窗口的遮罩层,则需要进行使用订阅)
  private win: window.Window | undefined = AppStorage.get('window')

//关闭窗口并关闭主窗口遮罩层(小窗口发布)
  this.win?.destroyWindow(()=>{
    getContext(this).eventHub.emit('close') // 点击取消或者确定使用订阅关闭遮罩层
    router.replaceUrl({url:'pages/HomePage'}) // 只有在会调用才可以进行跳转,同步操作
  })


// 主窗口进行订阅,并执行相关操作
  // 生命周期加载订阅
  aboutToAppear(): void {
    getContext(this).eventHub.on('close', () => {
      this.isShow = false // 关闭遮罩层
    })
  }
四、通知
  // 开启通知,在组件加载的时候
  async getNotification() {
    let context = getContext(this) as common.UIAbilityContext;
    let result = await notificationManager.isNotificationEnabled()
    if (!result) {
      notificationManager.requestEnableNotification(context)
    }
  }
原文地址:https://blog.csdn.net/Crowd_chips/article/details/142642777
免责声明:本站文章内容转载自网络资源,如本站内容侵犯了原著者的合法权益,可联系本站删除。更多内容请关注自学内容网(zxcms.com)!