Spring Security
概述
SpringSecurity 两个核心功能:
-
用户认证(Authentication):系统确认用户是否登录。
-
用户授权(Authorization):系统判断用户是否有权限去做某些事。
SpringSecurity 本质是一个过滤链。
-
FilterSecurityInterceptor:是一个方法级的权限过滤器,位于过滤链的最底部。
-
ExceptionTranslationFilter:是一个异常过滤器,用来处理在认证授权过程中抛出的异常。
-
UsernamePasswordAuthenticationFilter:对 login 的 POST 请求做拦截,校验表单中的用户名和密码。
项目启动
mvn 依赖
    <parent>
        <groupId>org.springframework.boot</groupId>
        <artifactId>spring-boot-starter-parent</artifactId>
        <version>3.0.5</version>
    </parent>

<dependency>
            <groupId>org.springframework.boot</groupId>
            <artifactId>spring-boot-starter-security</artifactId>
    </dependency>

        <dependency>
            <groupId>org.springframework.boot</groupId>
            <artifactId>spring-boot-starter-web</artifactId>
        </dependency>

        <dependency>
            <groupId>org.springframework.boot</groupId>
            <artifactId>spring-boot-starter-test</artifactId>
            <scope>test</scope>
        </dependency>
Controller
@RestController
@RequestMapping("/test")
public class TestController {
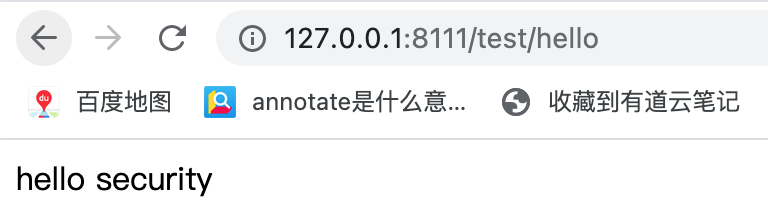
@GetMapping("hello")
public String hello() {
return "hello security";
}
}
想要访问接口需要登录认证
- 用户名:user
- 密码:

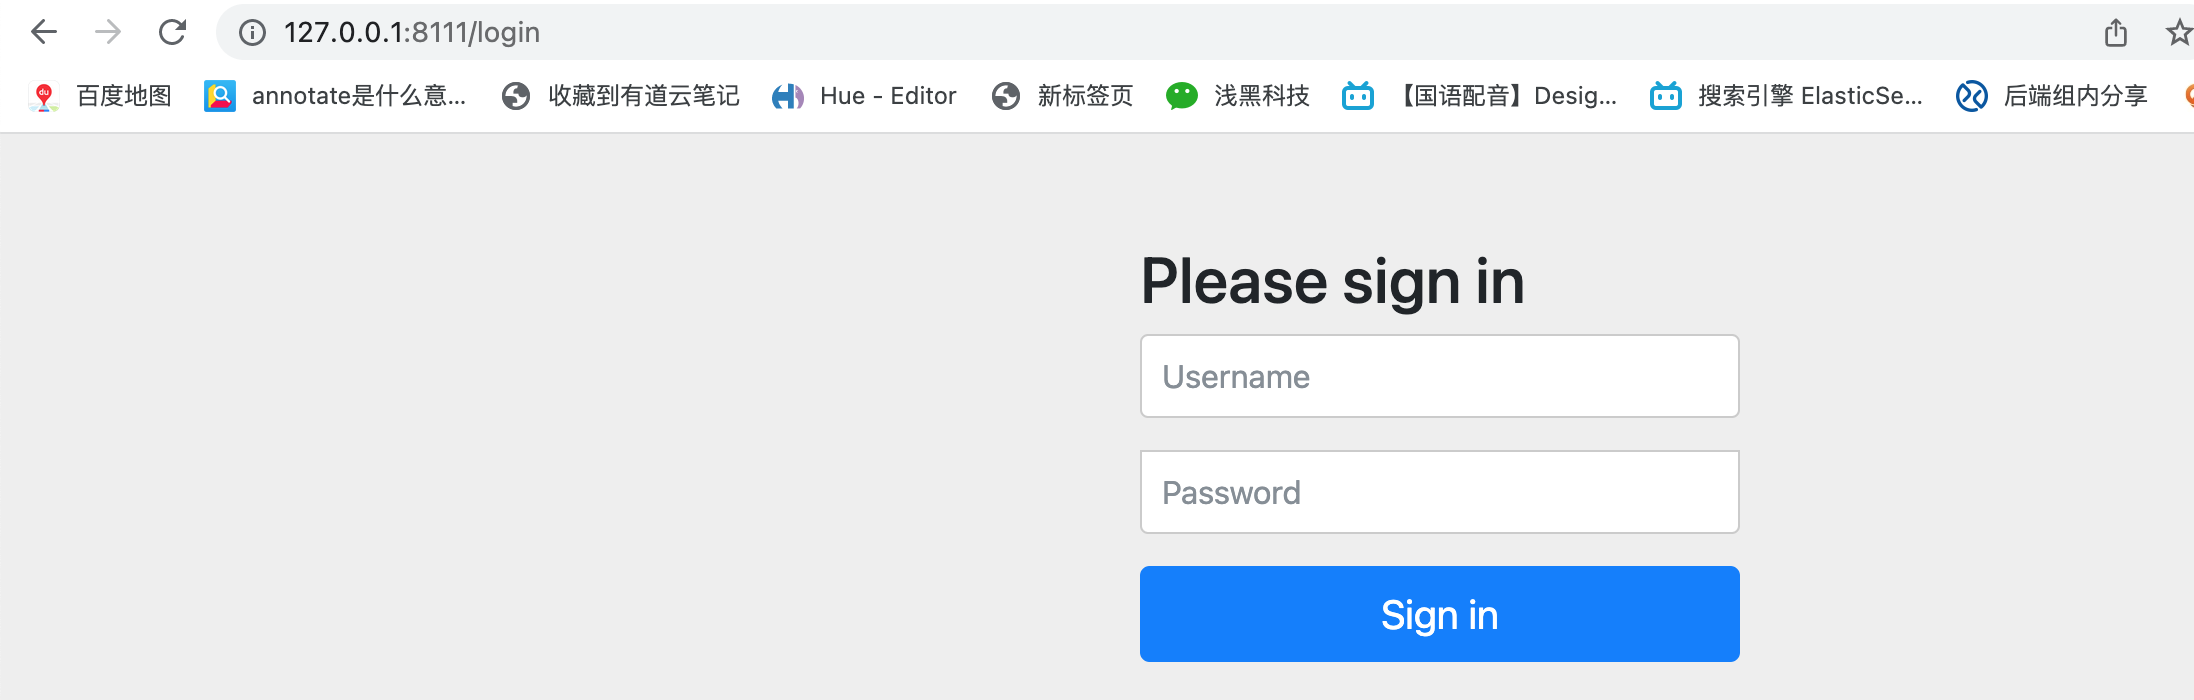
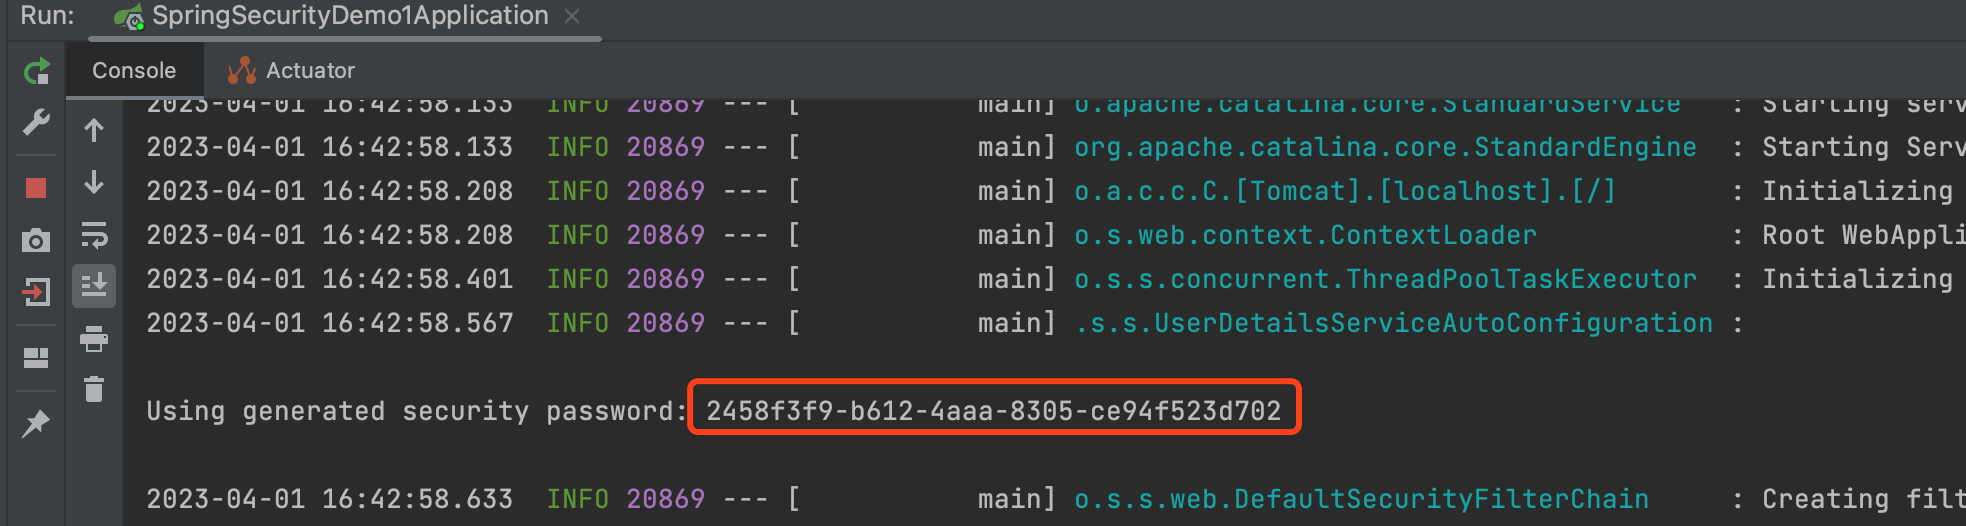
登录成功后,才能访问到密码
设置登录密码
- 通过配置文件
- 通过配置类
- 自定义编写实现类
配置文件
spring.security.user.name=dyf
spring.security.user.password=dyf
配置类
import org.springframework.context.annotation.Bean;
import org.springframework.context.annotation.Configuration;
import org.springframework.security.config.annotation.authentication.builders.AuthenticationManagerBuilder;
import org.springframework.security.config.annotation.web.configuration.WebSecurityConfigurerAdapter;
import org.springframework.security.crypto.bcrypt.BCryptPasswordEncoder;
import org.springframework.security.crypto.password.PasswordEncoder;

@Configuration
public class SecurityConfig extends WebSecurityConfigurerAdapter {
    @Override
    protected void configure(AuthenticationManagerBuilder auth) throws Exception {
        // 对密码加密
        BCryptPasswordEncoder passwordEncoder = new BCryptPasswordEncoder();
        String password = passwordEncoder.encode("dzh");

        auth.inMemoryAuthentication().withUser("dzh").password(password).roles("admin");
    }

    @Bean
    PasswordEncoder password() {
        return new BCryptPasswordEncoder();
    }
}
自定义编写实现类
UserDetailsService 接口:查询数据库中用户名和密码。
自己实现 UserDetailsService 接口,后续需要从数据库中查询用户信息做校验,也是在此处处理。
@Service("userDetailService")
public class MyUserDetailsService implements UserDetailsService {
    @Override
    public UserDetails loadUserByUsername(String username) throws UsernameNotFoundException {
        List<GrantedAuthority> auths = AuthorityUtils.commaSeparatedStringToAuthorityList("role");
        return new User("mary", new BCryptPasswordEncoder().encode("123"), auths);
    }
}
将 MyUserDetailsService 注入到 Spring-Security 框架
@Configuration
public class SecurityConfig extends WebSecurityConfigurerAdapter {
    @Autowired
    private UserDetailsService userDetailService;

    @Override
    protected void configure(AuthenticationManagerBuilder auth) throws Exception {
        auth.userDetailsService(userDetailService).passwordEncoder(password());
    }

    @Bean
    PasswordEncoder password() {
        return new BCryptPasswordEncoder();
    }
}
数据库
引入数据库 mvn 依赖
    <dependency>
            <groupId>com.baomidou</groupId>
            <artifactId>mybatis-plus-boot-starter</artifactId>
            <version>3.0.5</version>
        </dependency>

        <dependency>
            <groupId>mysql</groupId>
            <artifactId>mysql-connector-java</artifactId>
        </dependency>

        <dependency>
            <groupId>org.projectlombok</groupId>
            <artifactId>lombok</artifactId>
        </dependency>
数据连接配置信息
spring.datasource.driver-class-name=com.mysql.cj.jdbc.Driver
spring.datasource.url=jdbc:mysql://127.0.0.1:3306/dyf?serverTimezone=GMT%2B8
spring.datasource.username=root
spring.datasource.password=12345678
在 Mysql 中添加 user_info 表
CREATE TABLE `user_info` (
    `id` BIGINT(20) UNSIGNED NOT NULL AUTO_INCREMENT COMMENT '自增长主键',
    username VARCHAR(32) NOT NULL DEFAULT '0' COMMENT '用户名',
    password VARCHAR(32) NOT NULL COMMENT '密码',
    PRIMARY KEY (id),
    UNIQUE KEY username (username)
)  ENGINE=INNODB AUTO_INCREMENT=1 DEFAULT CHARSET=UTF8 COMMENT='用户表'
实体类
import lombok.Data;

@Data
public class UserInfo {
    private int id;
    private String username;
    private String password;
}
对数据的操作
@Repository
public interface UserMapper extends BaseMapper<UserInfo> {
}
在 MyUserDetailsService 调用 mapper 中的方法查询数据库,进行认证。
@Service("userDetailService")
public class MyUserDetailsService implements UserDetailsService {
    @Autowired
    UserMapper userMapper;

    @Override
    public UserDetails loadUserByUsername(String username) throws UsernameNotFoundException {
//        List<GrantedAuthority> auths = AuthorityUtils.commaSeparatedStringToAuthorityList("role");
//        return new User("mary", new BCryptPasswordEncoder().encode("123"), auths);

      // 调用 userMapper 方法查询数据库
        QueryWrapper<UserInfo> wrapper = new QueryWrapper();
        wrapper.eq("username", username);
        UserInfo userInfo = userMapper.selectOne(wrapper);
        if (userInfo == null) {
            throw new UsernameNotFoundException("用户名不存在");
        }
        List<GrantedAuthority> role = AuthorityUtils.commaSeparatedStringToAuthorityList("role");
        return new User(username, new BCryptPasswordEncoder().encode(userInfo.getPassword()), role);
    }
}
在启动类加 @MapperScan 注解。
@SpringBootApplication
@MapperScan("com.dyf.spring.security.demo.mapper")
public class SpringSecurityDemo1Application {
    public static void main(String[] args) {
        SpringApplication.run(SpringSecurityDemo1Application.class, args);
    }
}
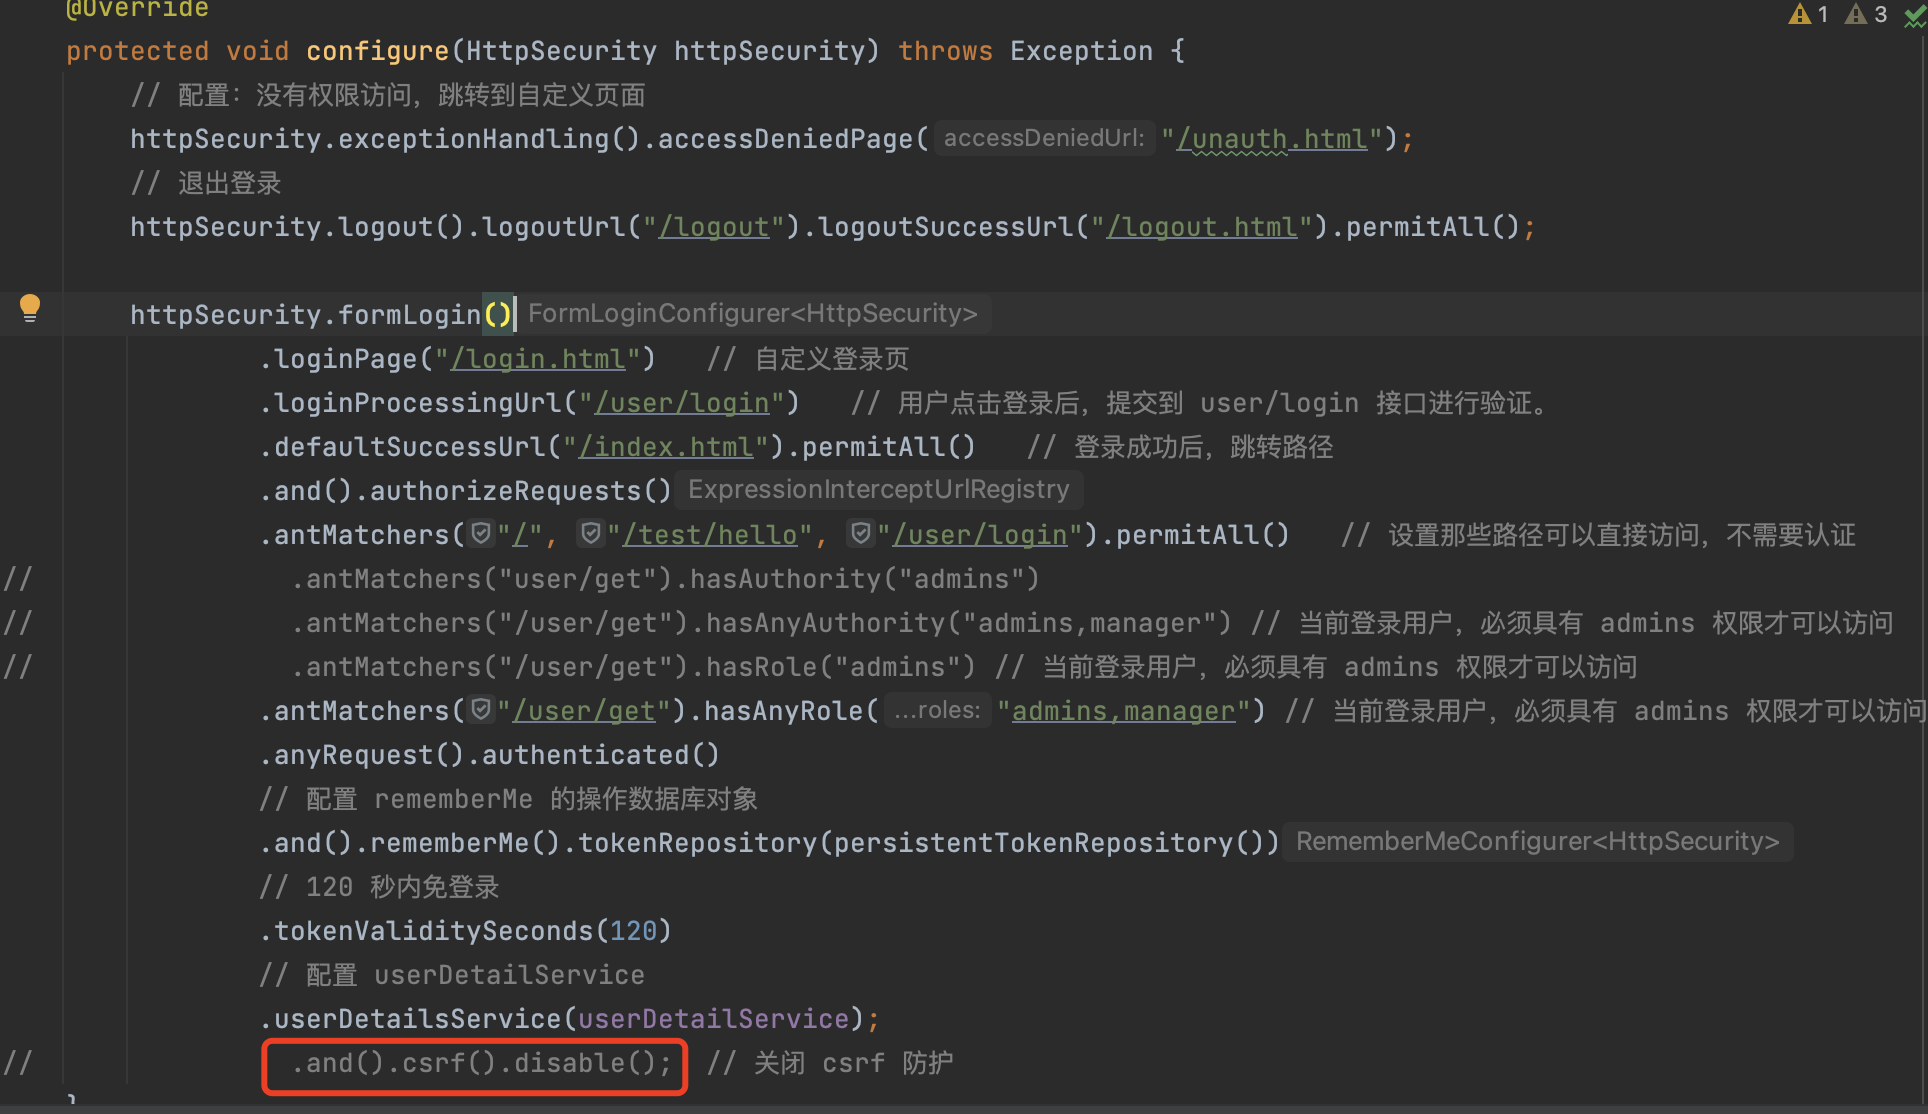
自定义登录页
在 SecurityConfig 类中配置:
/user/login 这个服务,需要我们去实现,是 Spring Security 自带的
    @Override
    protected void configure(HttpSecurity httpSecurity) throws Exception {
        httpSecurity.formLogin()
                .loginPage("/login.html")   // 自定义登录页
                .loginProcessingUrl("/user/login")   // 用户点击登录后,提交到 user/login 接口进行验证。
                .defaultSuccessUrl("/index.html").permitAll()   // 登录成功后,跳转路径
                .and().authorizeRequests().antMatchers("/", "/test/hello", "/user/login").permitAll()   // 设置那些路径可以直接访问,不需要认证
                .anyRequest().authenticated()
                .and().csrf().disable(); // 关闭 csrf 防护
    }
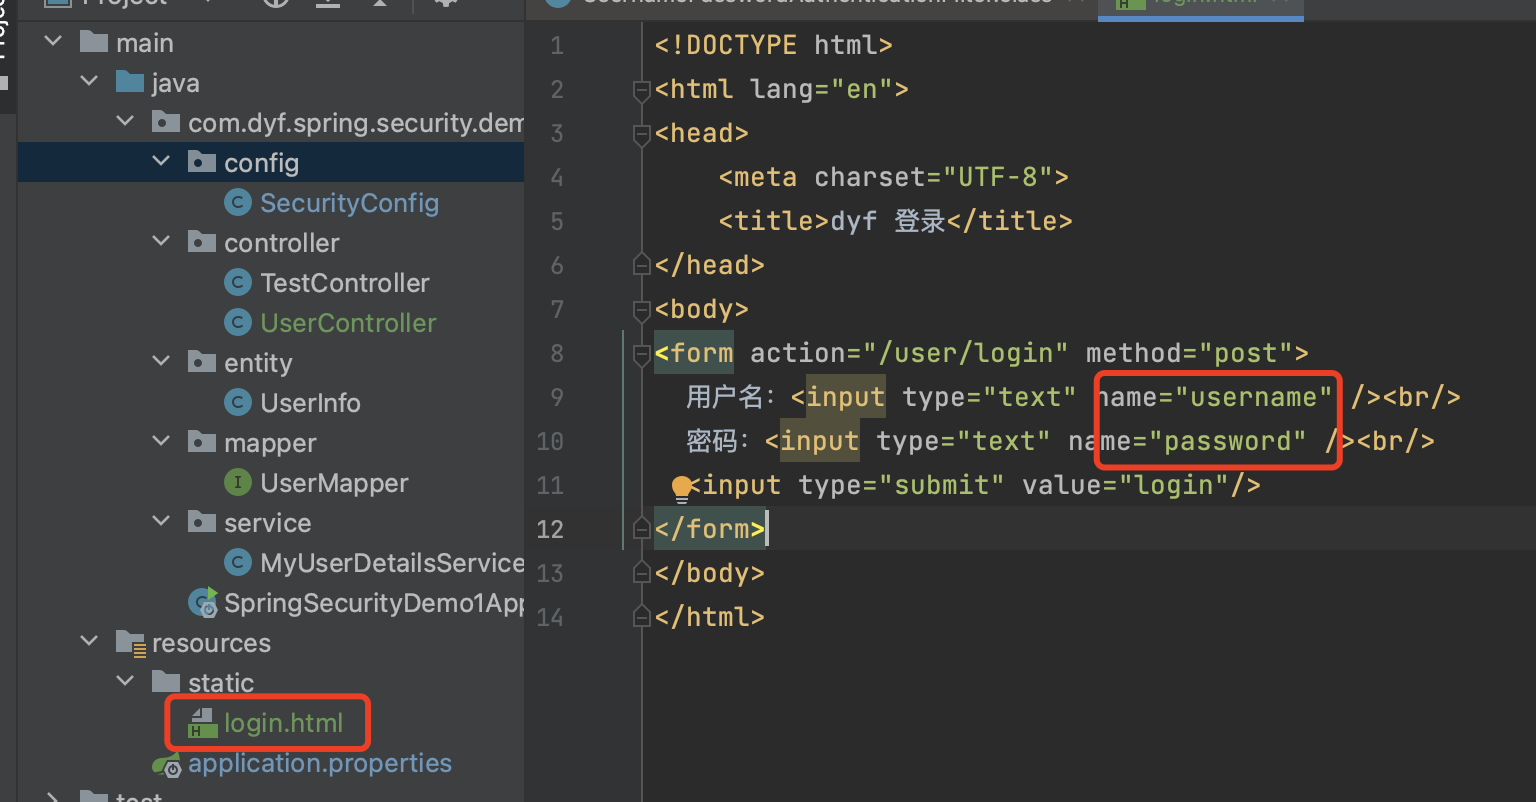
注意表单中的文本框名称必须是:username、password。因为在 Spring Security 框架中写死了,这个两个名称。约定大于配置。

角色/权限的访问控制
hasAuthority 方法
如果当前用户有权限,则返回 true,否则返回 false。
下图:对接口 user/get 进行权限限制
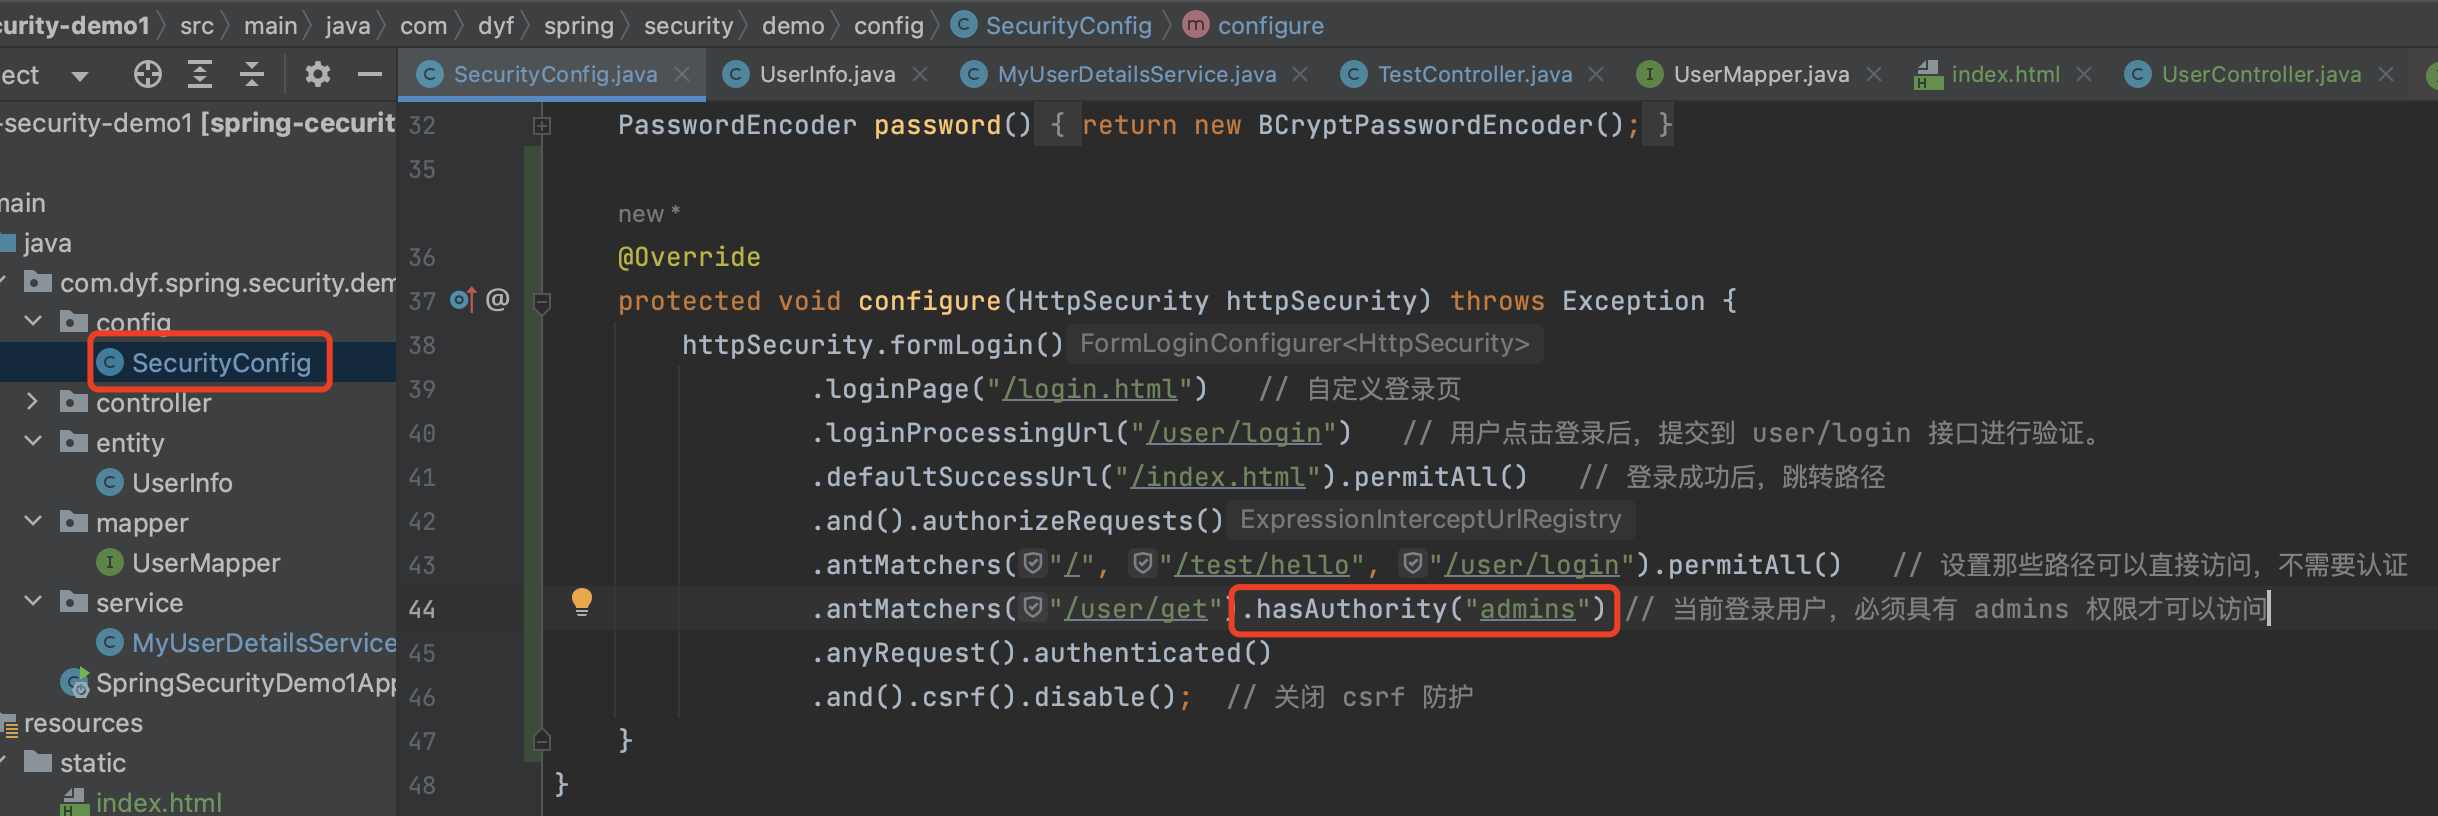
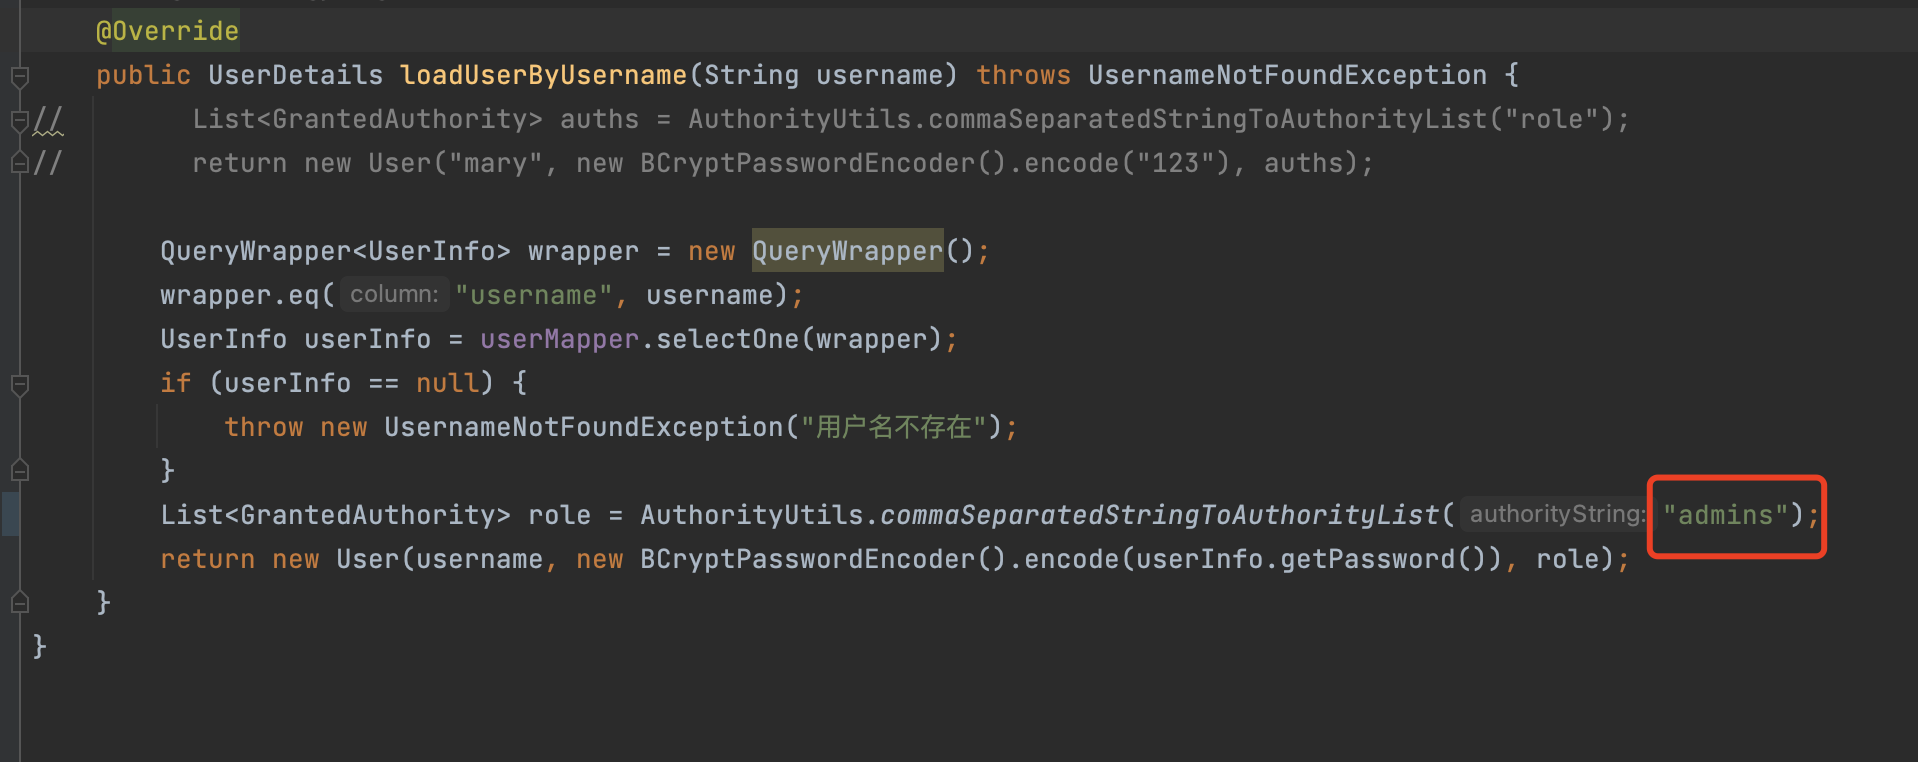
下图:在用户登录时进行赋访问权限(MyUserDetailsService 类)
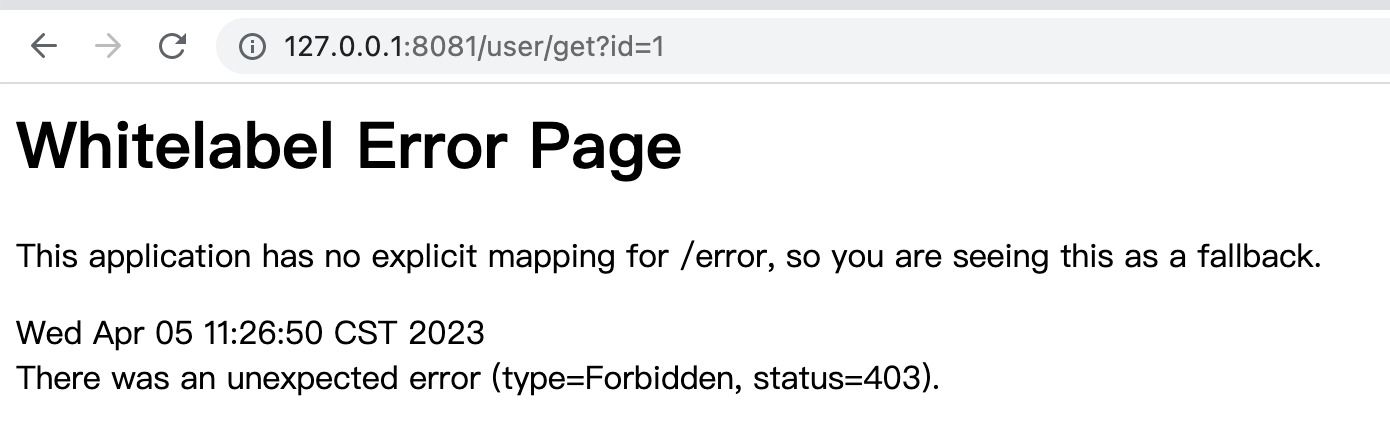
如果没有权限访问,就会报 403 的错误。
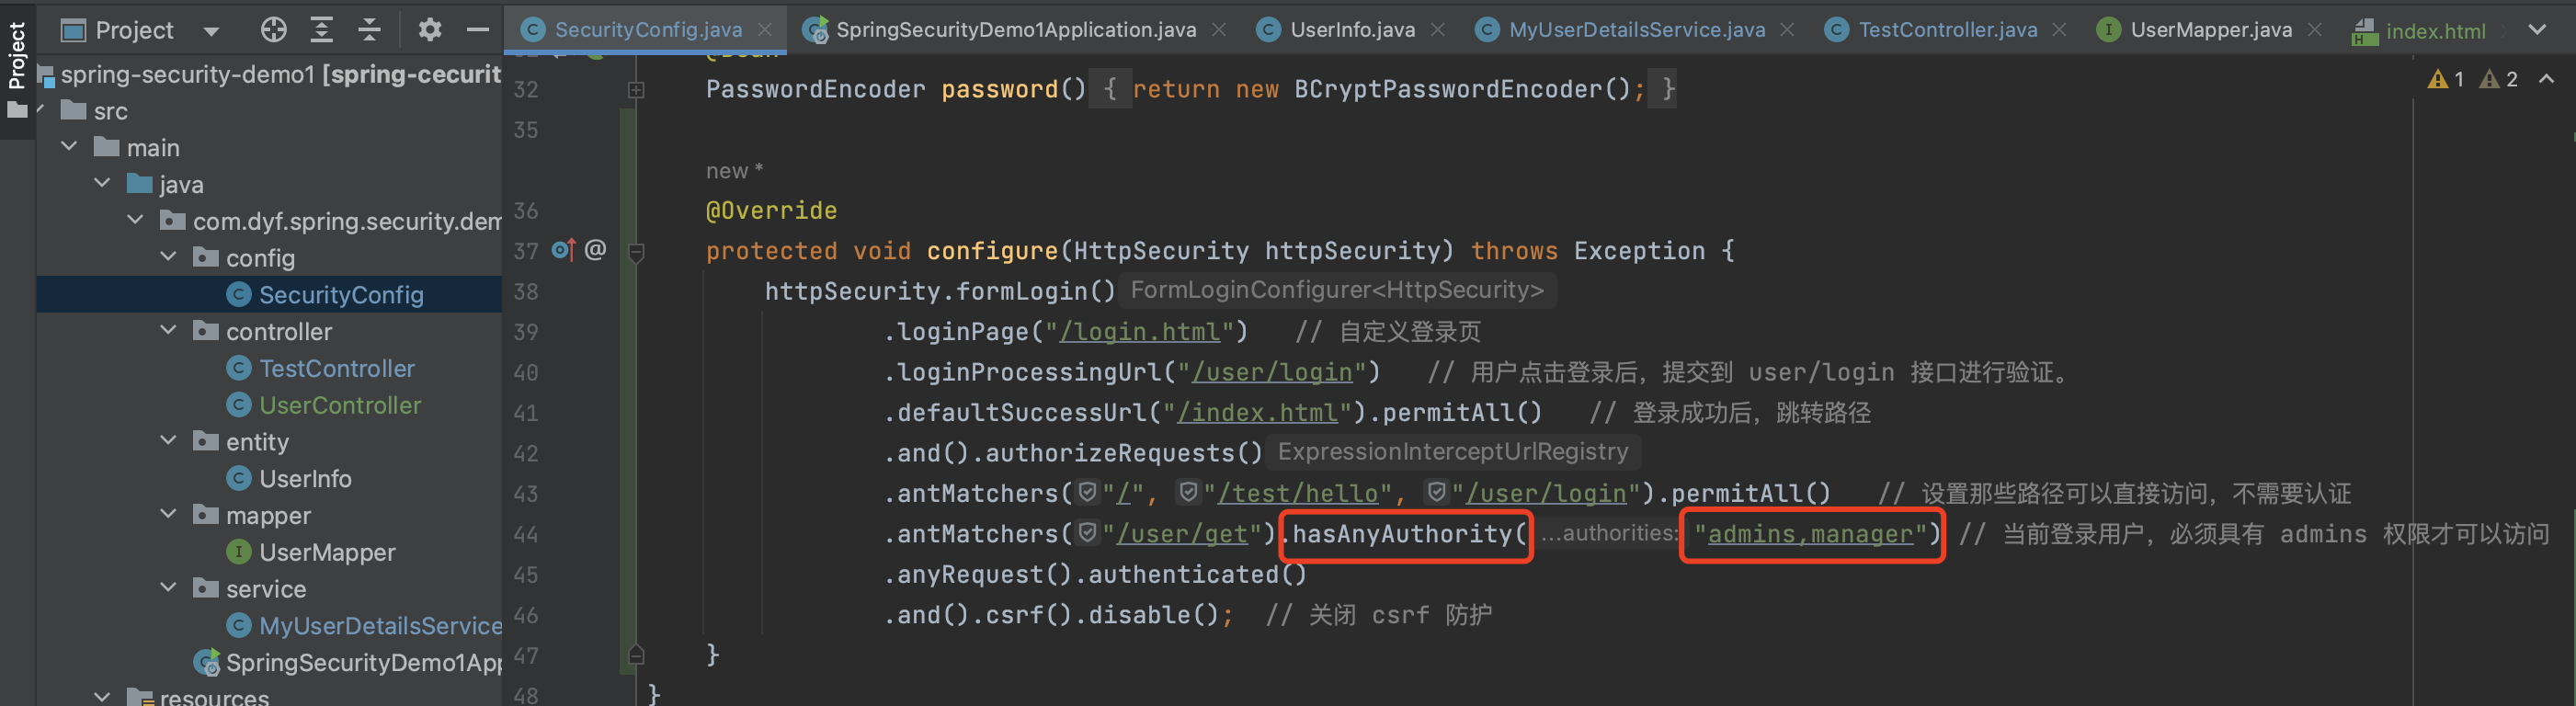
hasAnyAuthority
如果用户有多个权限,hasAuthority 无法实现,需要使用 hasAnyAuthority。
hasRole 和 hasAnyRole
如果当前用户有角色,则返回 true,否则返回 false。
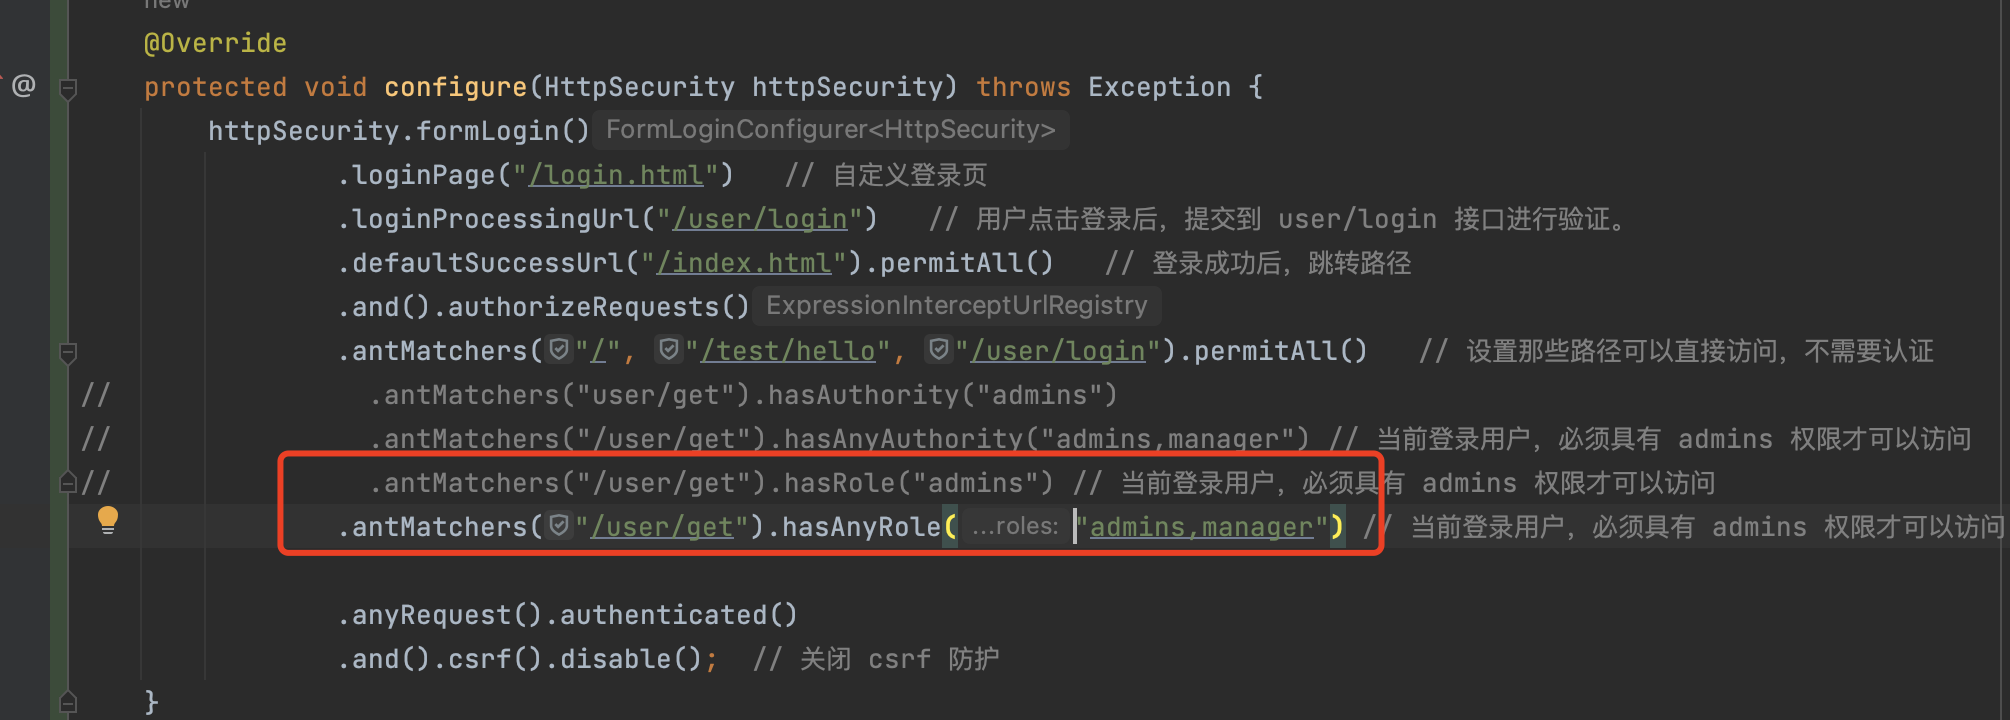
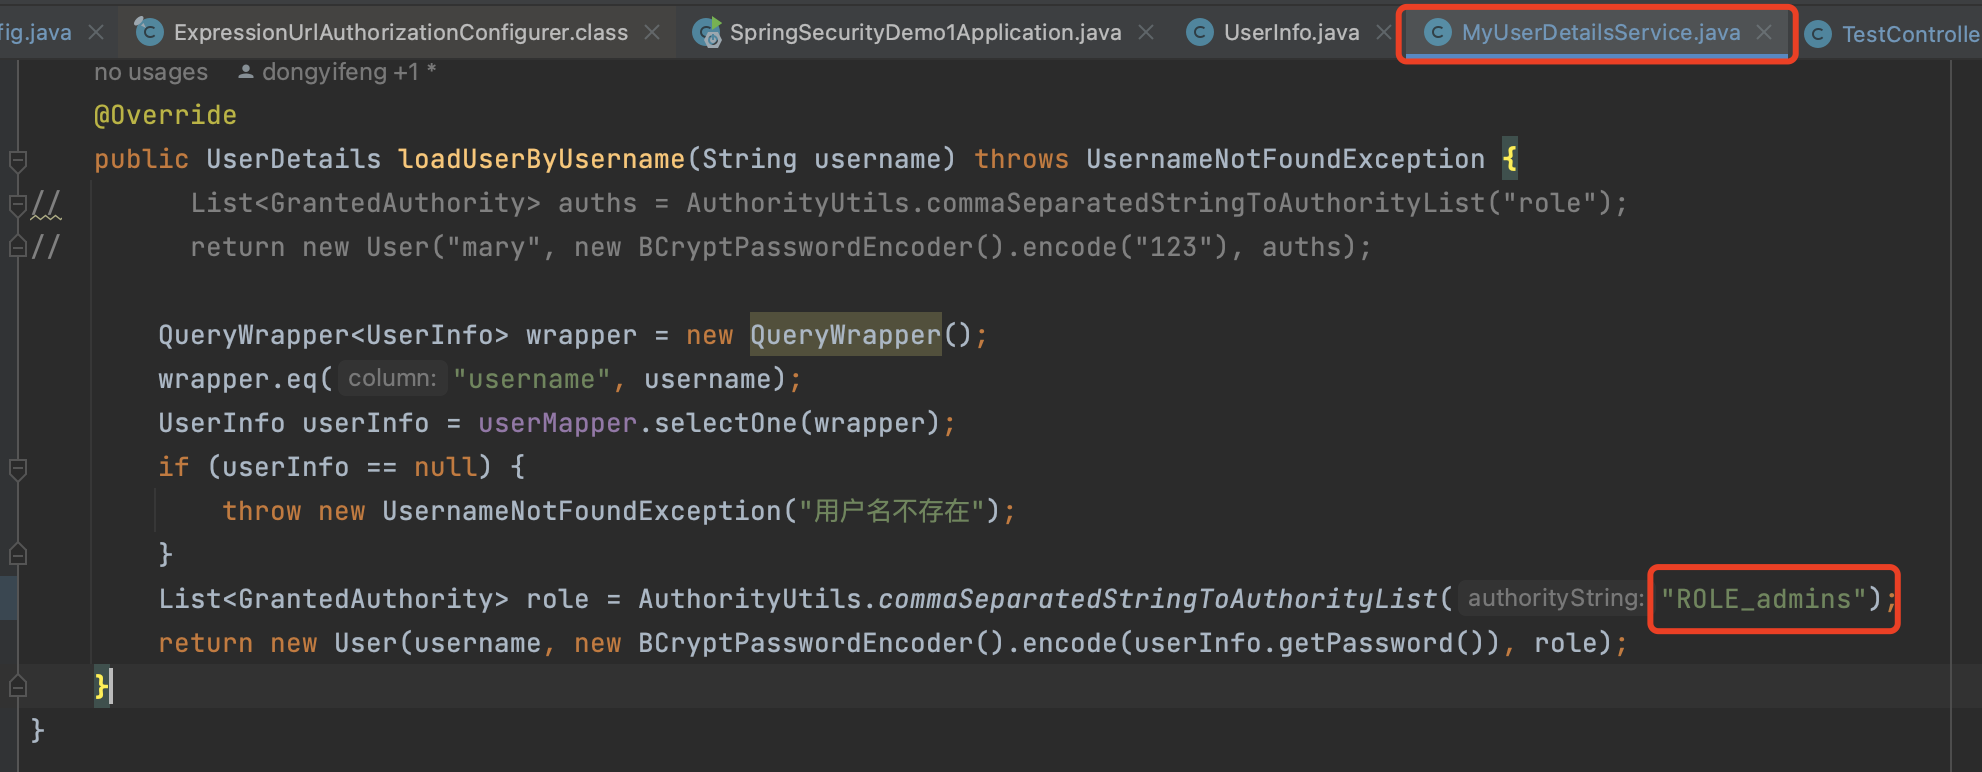
注意:角色必须 “ROLE_” 为前缀,在 hasRole 方法中自动加上了,但是给用户赋权那里需要自己加上。

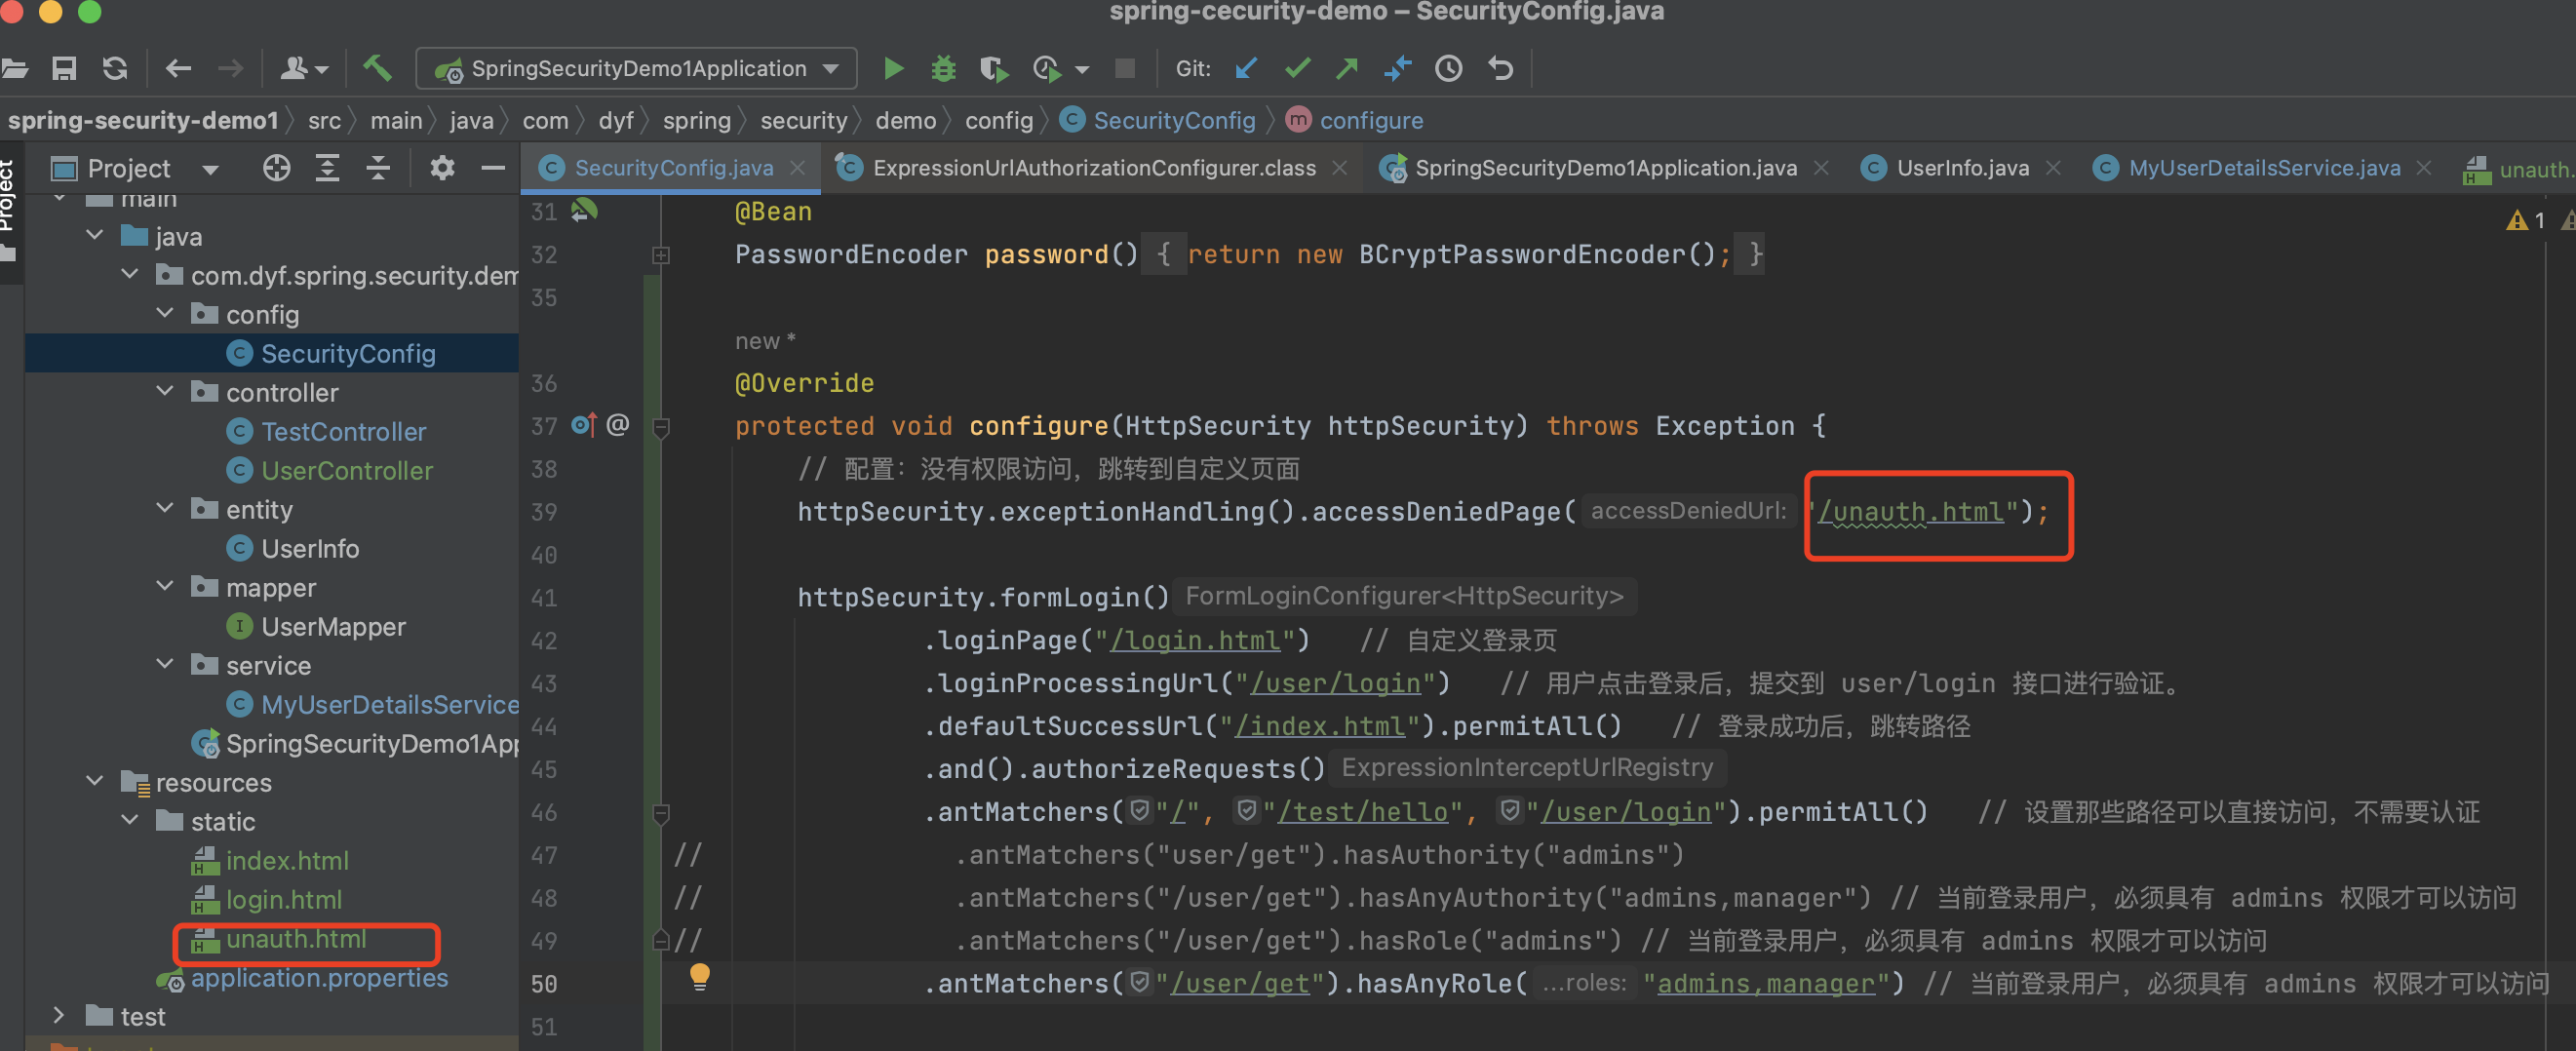
自定义 403 页面
下图:在配置类中设置,403 跳转页面。
授权认证注解
使用注解前,需要开启注解:@EnableGlobalMethodSecurity(securedEnabled = true)
@SpringBootApplication
@MapperScan("com.dyf.spring.security.demo.mapper")
@EnableGlobalMethodSecurity(securedEnabled = true)
public class SpringSecurityDemo1Application {
    public static void main(String[] args) {
        SpringApplication.run(SpringSecurityDemo1Application.class, args);
    }
}
@Secured
用户具有某个角色,可以访问该方法。加载 Service 里面的方法依然有效。
    @GetMapping("update")
    @Secured({"ROLE_sale", "ROLE_manager"})
    public String update() {
        return "user update";
    }
@PreAuthorize
进入方法前进行权限验证。
注意:书写格式,外层是双引号,内层是单引号。
    @GetMapping("update")
    @PreAuthorize("hasAnyAuthority('admins')")
    public String update() {
        return "user update";
    }
@PostAuthorize
方法执行后进行权限验证。该注解一般用于根据返回值进行权限校验。
注意:书写格式,外层是双引号,内层是单引号。
    @GetMapping("update")
    @PostAuthorize("hasAnyAuthority('admins')")
    public String update() {
        return "user update";
    }
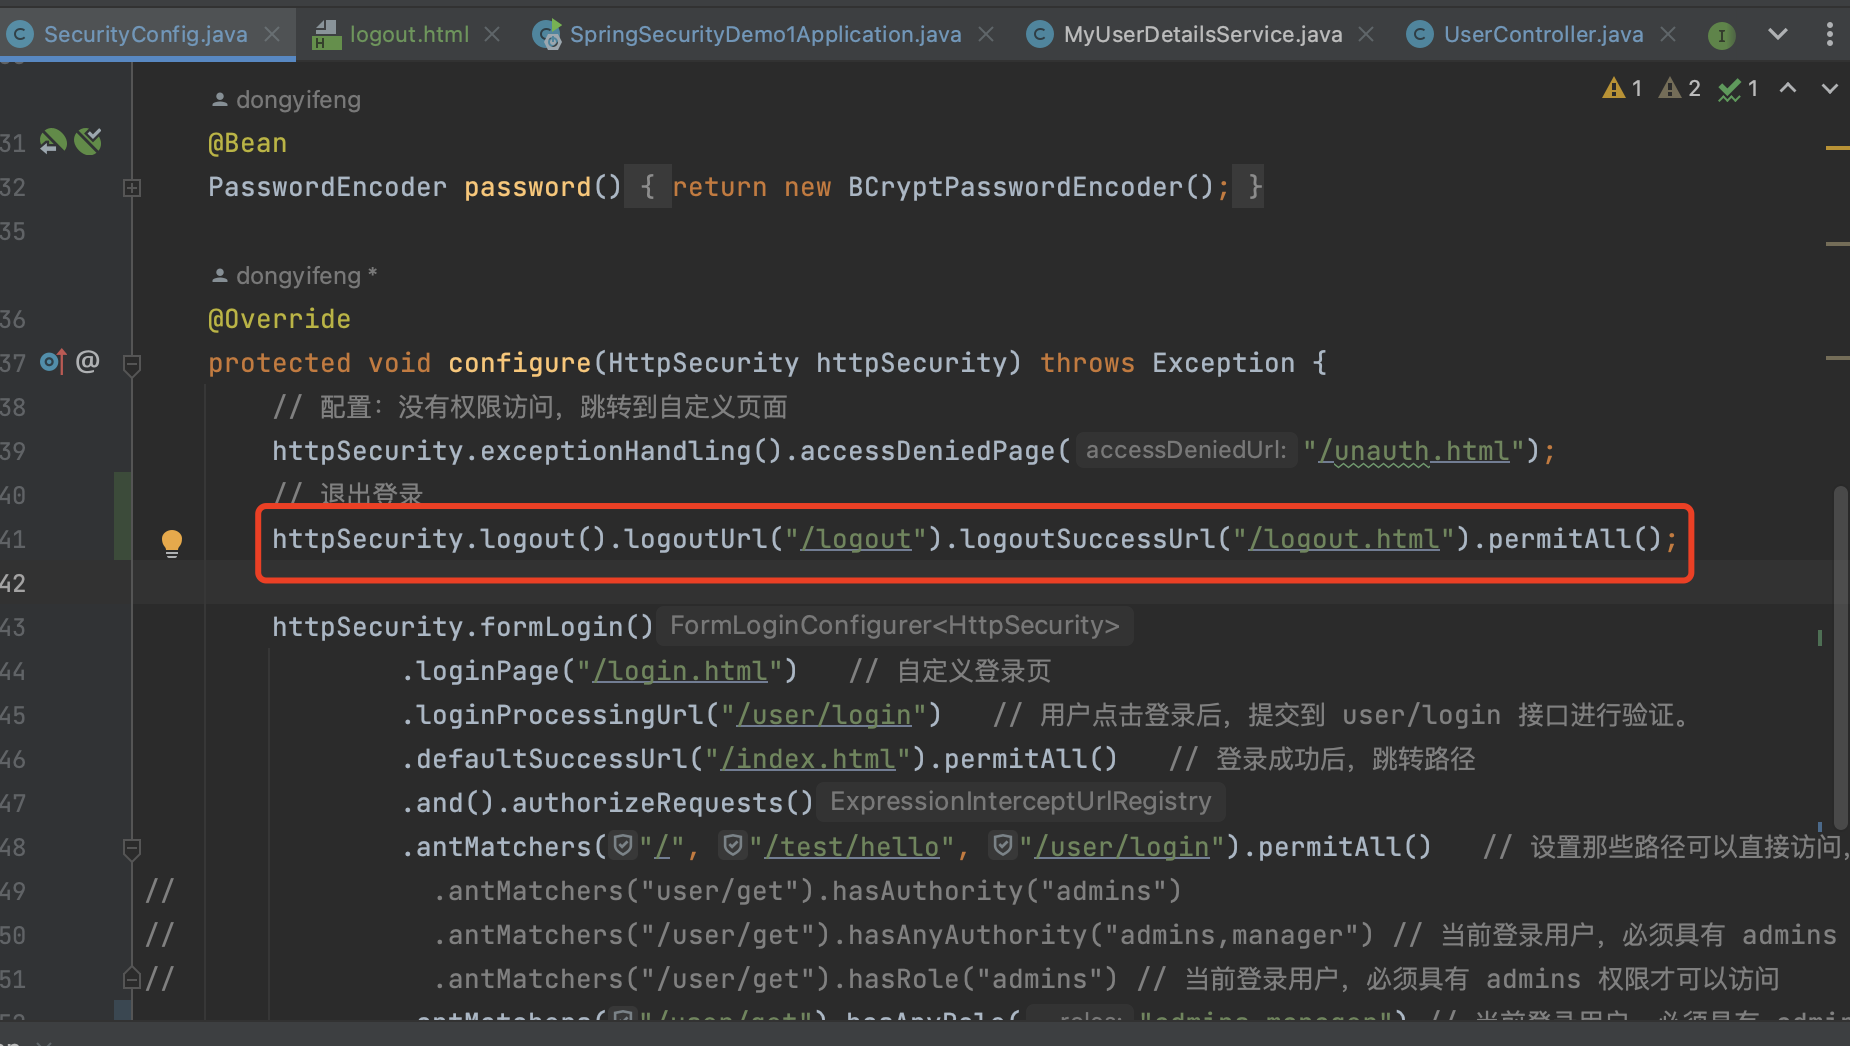
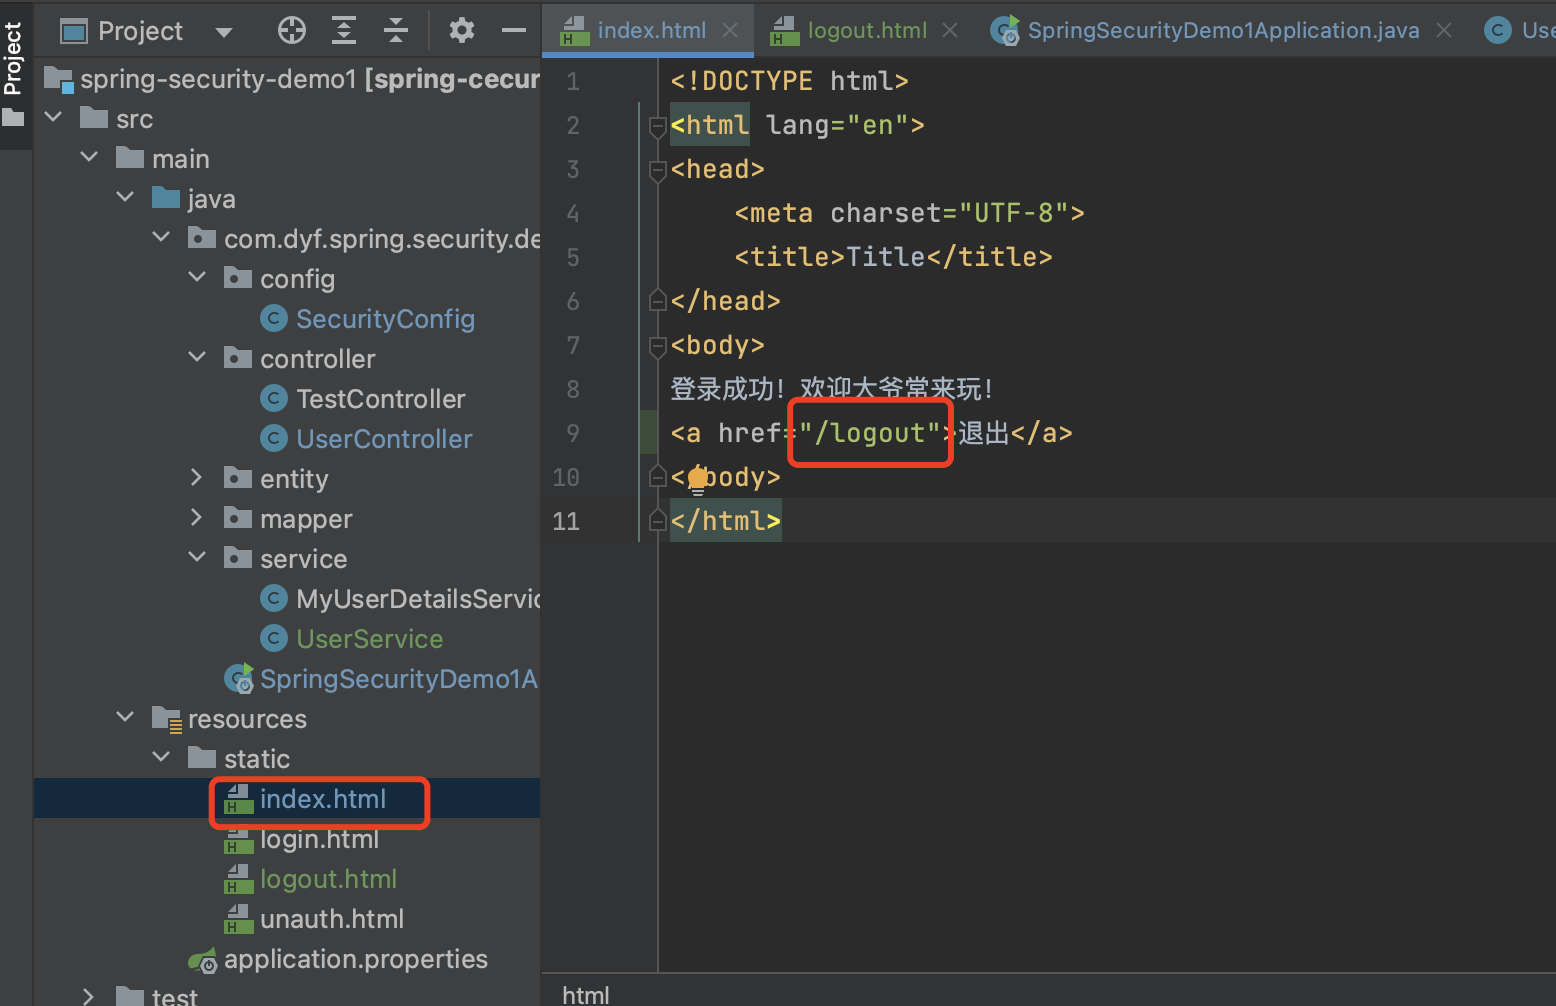
用户注销
在配置类中添加:退出登录
        // 退出登录
        httpSecurity.logout().logoutUrl("/logout").logoutSuccessUrl("/logout.html").permitAll();
在成功登录页,添加退出 的链接:/logout (在 SecurityConfig 中配置的路径)
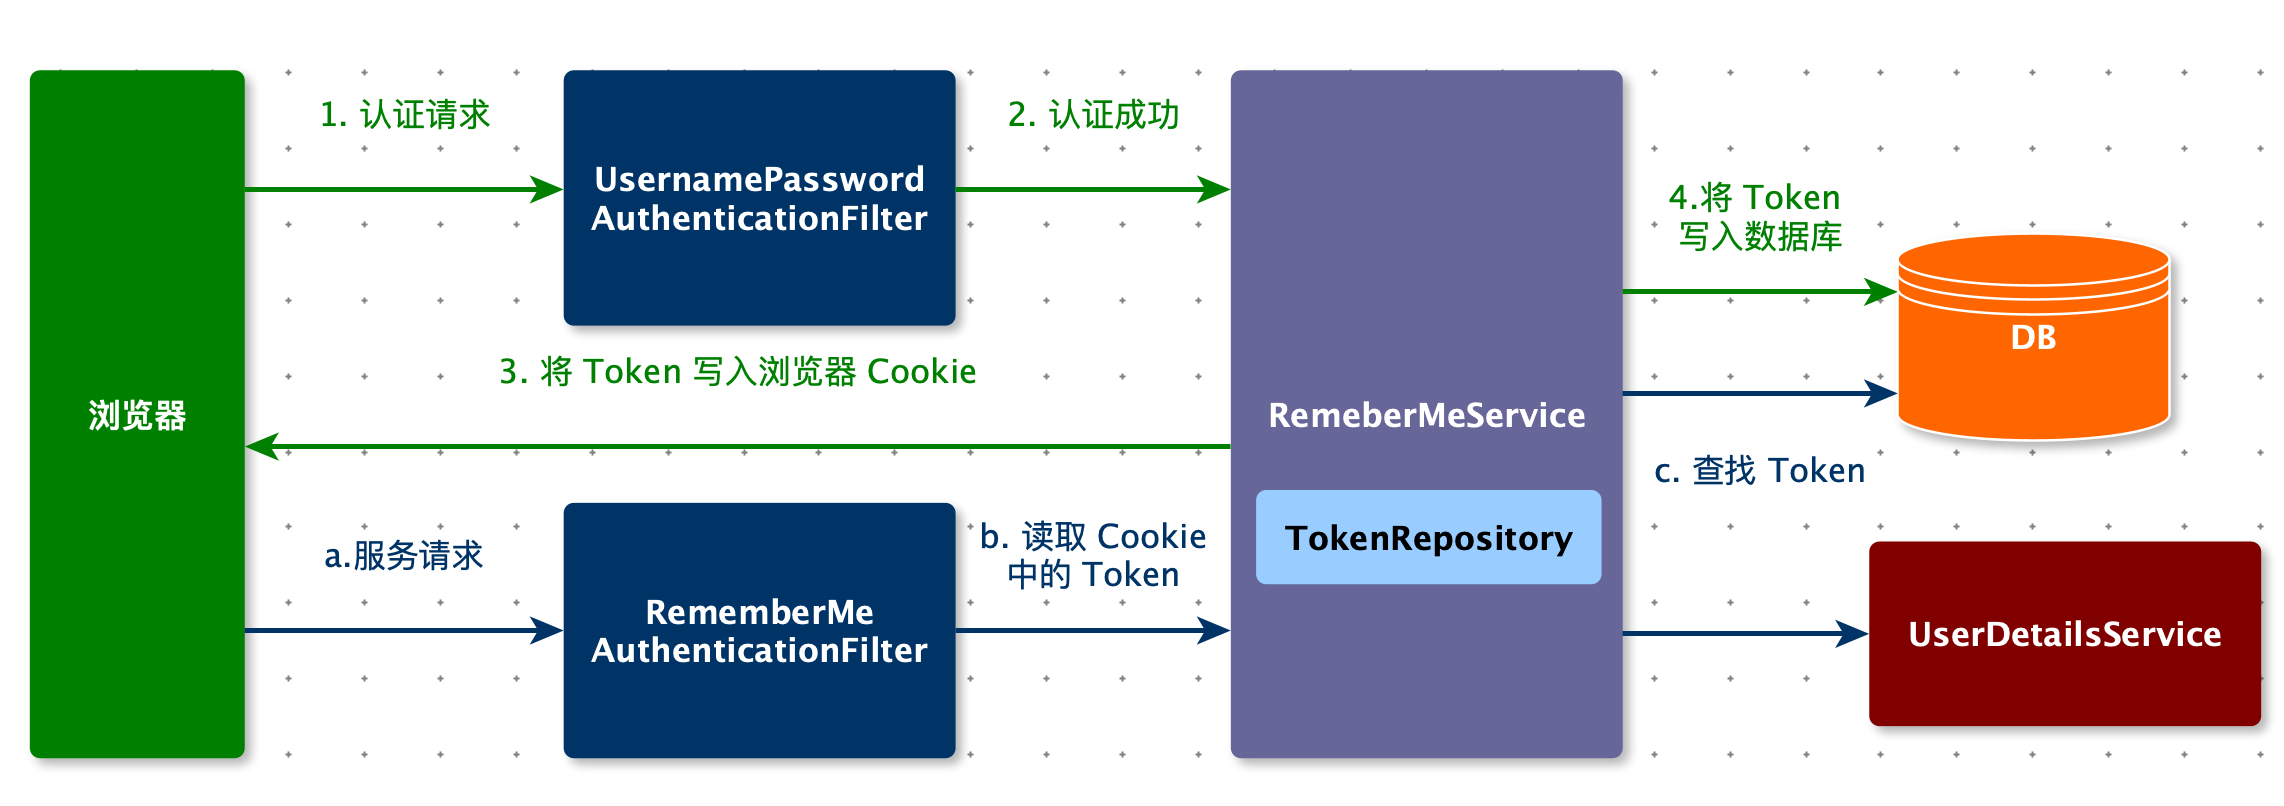
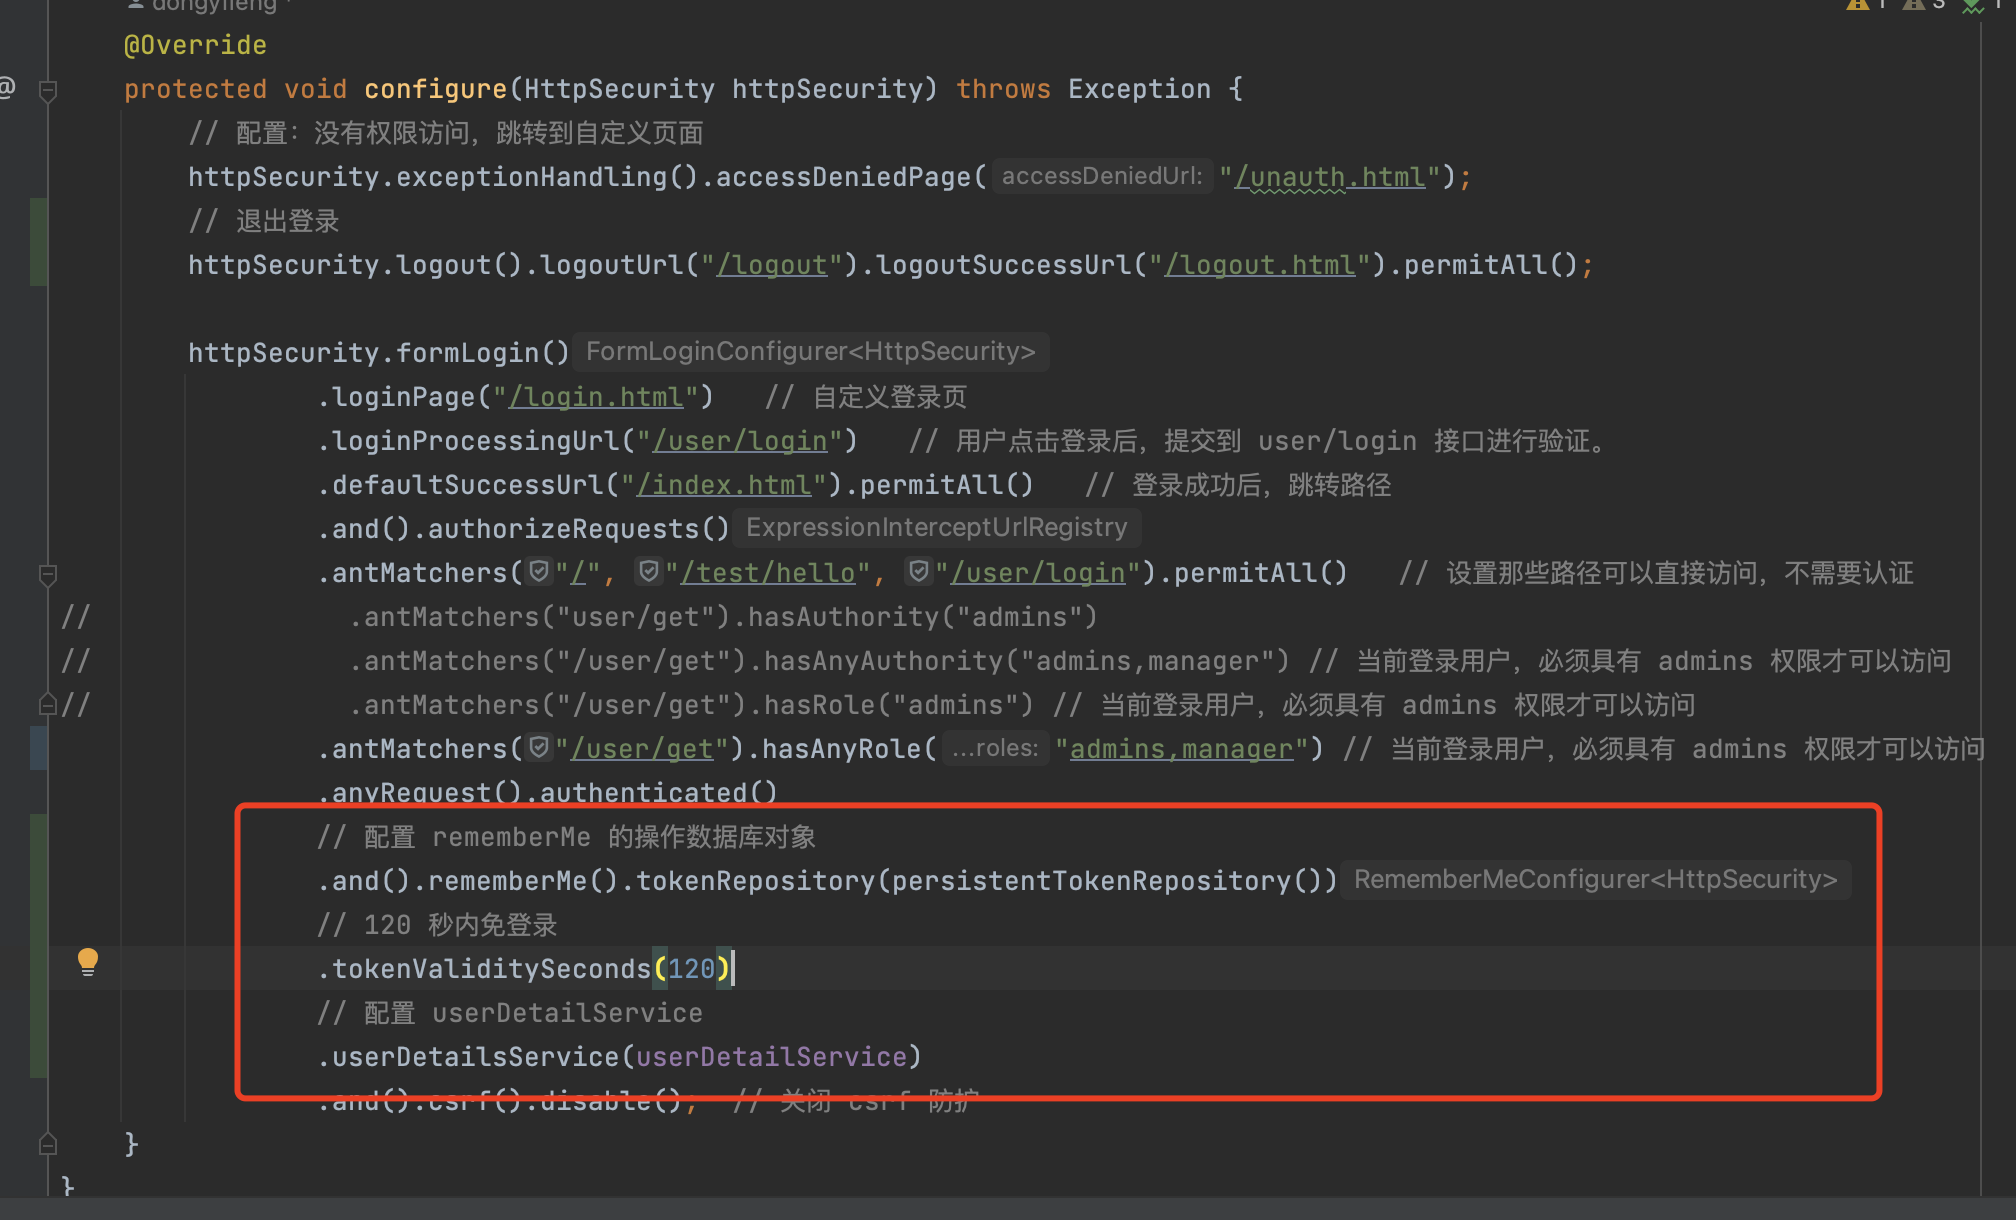
基于数据库的记住我
如下图:实现多长时间内免登录。

如下图:整体认证流程
- 用户第一次发送认证请求,在 UsernamePasswordAuthenticationFilter 中进行认证。
- 认证成功后,调用 RemberMeService
- RemberMeService 将 Token 写入浏览器 Cookie
- RemberMeService 将 Token 写入数据库中。
当服务在再次请求受限服务时
a. 服务请求打到 RemberMeAuthenticationFilter 过滤器。
b. RemberMeAuthenticationFilter 读取 Cookie 中 Token
c. 在 RemberMeService 从 DB 读取 Token 与 Cookie 中 Token 校验,一致,通过,否则不通过。
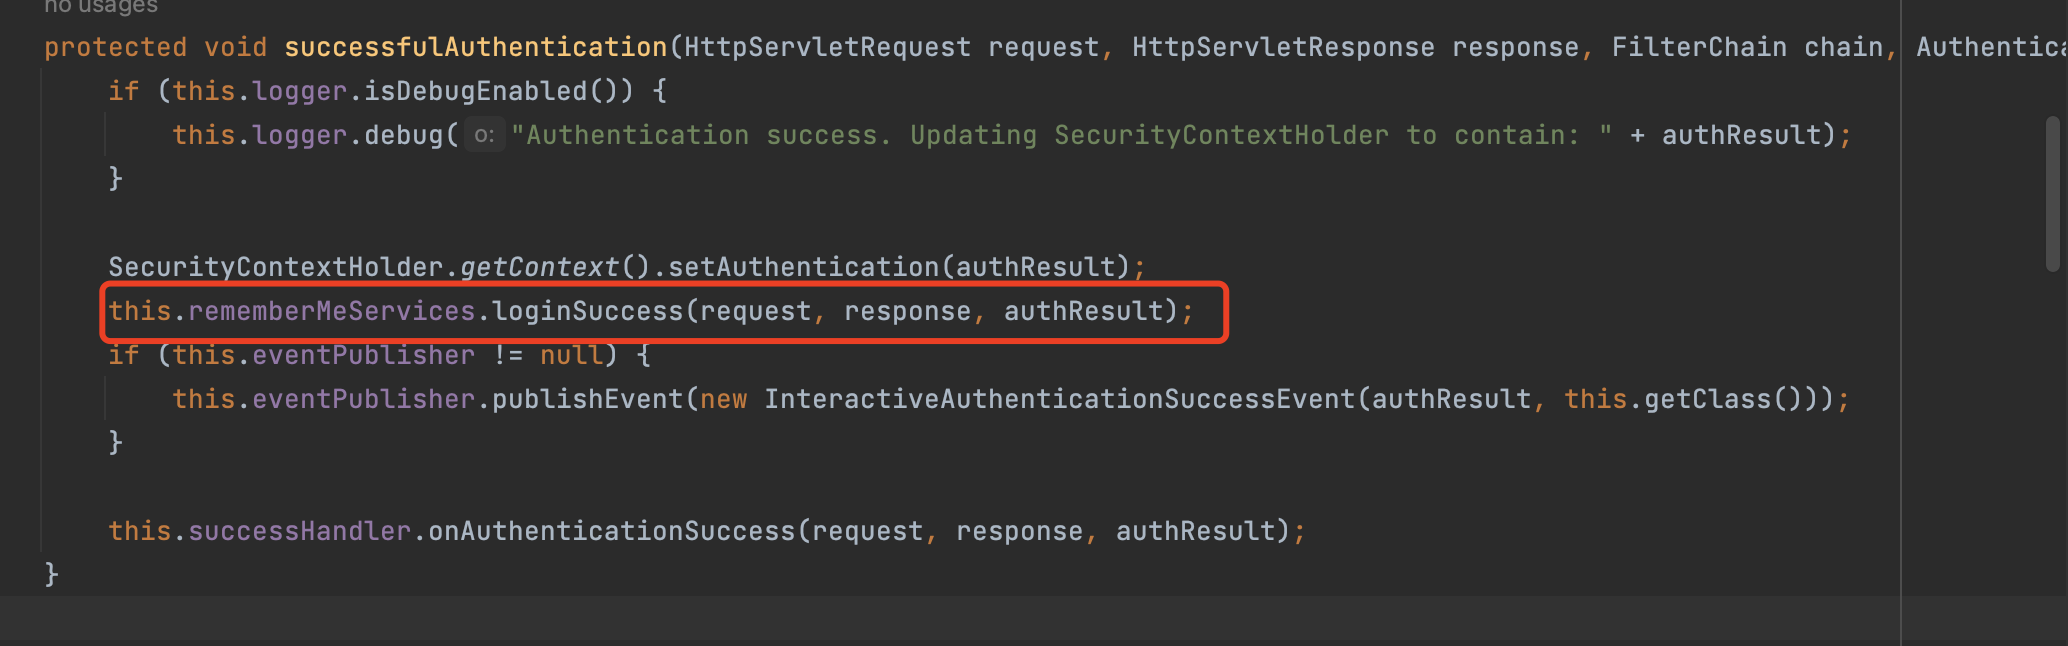
UsernamePasswordAuthenticationFilter 的父类 AbstractAuthenticationProcessingFilter.doFilter() 中的 successfulAuthentication 使用了 remmberMeServices 进行登录验证。
下面是 AbstractRememberMeServices.loginSuccess() 的源码:
    public final void loginSuccess(HttpServletRequest request, HttpServletResponse response, Authentication successfulAuthentication) {
      // 参数校验
      // this.parameter 等于 ”remember-me“
        if (!this.rememberMeRequested(request, this.parameter)) {
            this.logger.debug("Remember-me login not requested.");
        } else {
          // 登录校验
            this.onLoginSuccess(request, response, successfulAuthentication);
        }
    }

protected abstract void onLoginSuccess(HttpServletRequest var1, HttpServletResponse var2, Authentication var3);
PersistentTokenBasedRememberMeServices.onLoginSuccess 的源码
    protected void onLoginSuccess(HttpServletRequest request, HttpServletResponse response, Authentication successfulAuthentication) {
      // 获取用户名
        String username = successfulAuthentication.getName();
        this.logger.debug("Creating new persistent login for user " + username);
        PersistentRememberMeToken persistentToken = new PersistentRememberMeToken(username, this.generateSeriesData(), this.generateTokenData(), new Date());

        try {
          // 生成 token 字符串
            this.tokenRepository.createNewToken(persistentToken);
          // 添加到 Cookie 中
            this.addCookie(persistentToken, request, response);
        } catch (Exception var7) {
            this.logger.error("Failed to save persistent token ", var7);
        }
    }
将 Token 的数据写入数据库,全靠 JdbcTokenRepositoryImpl 类:
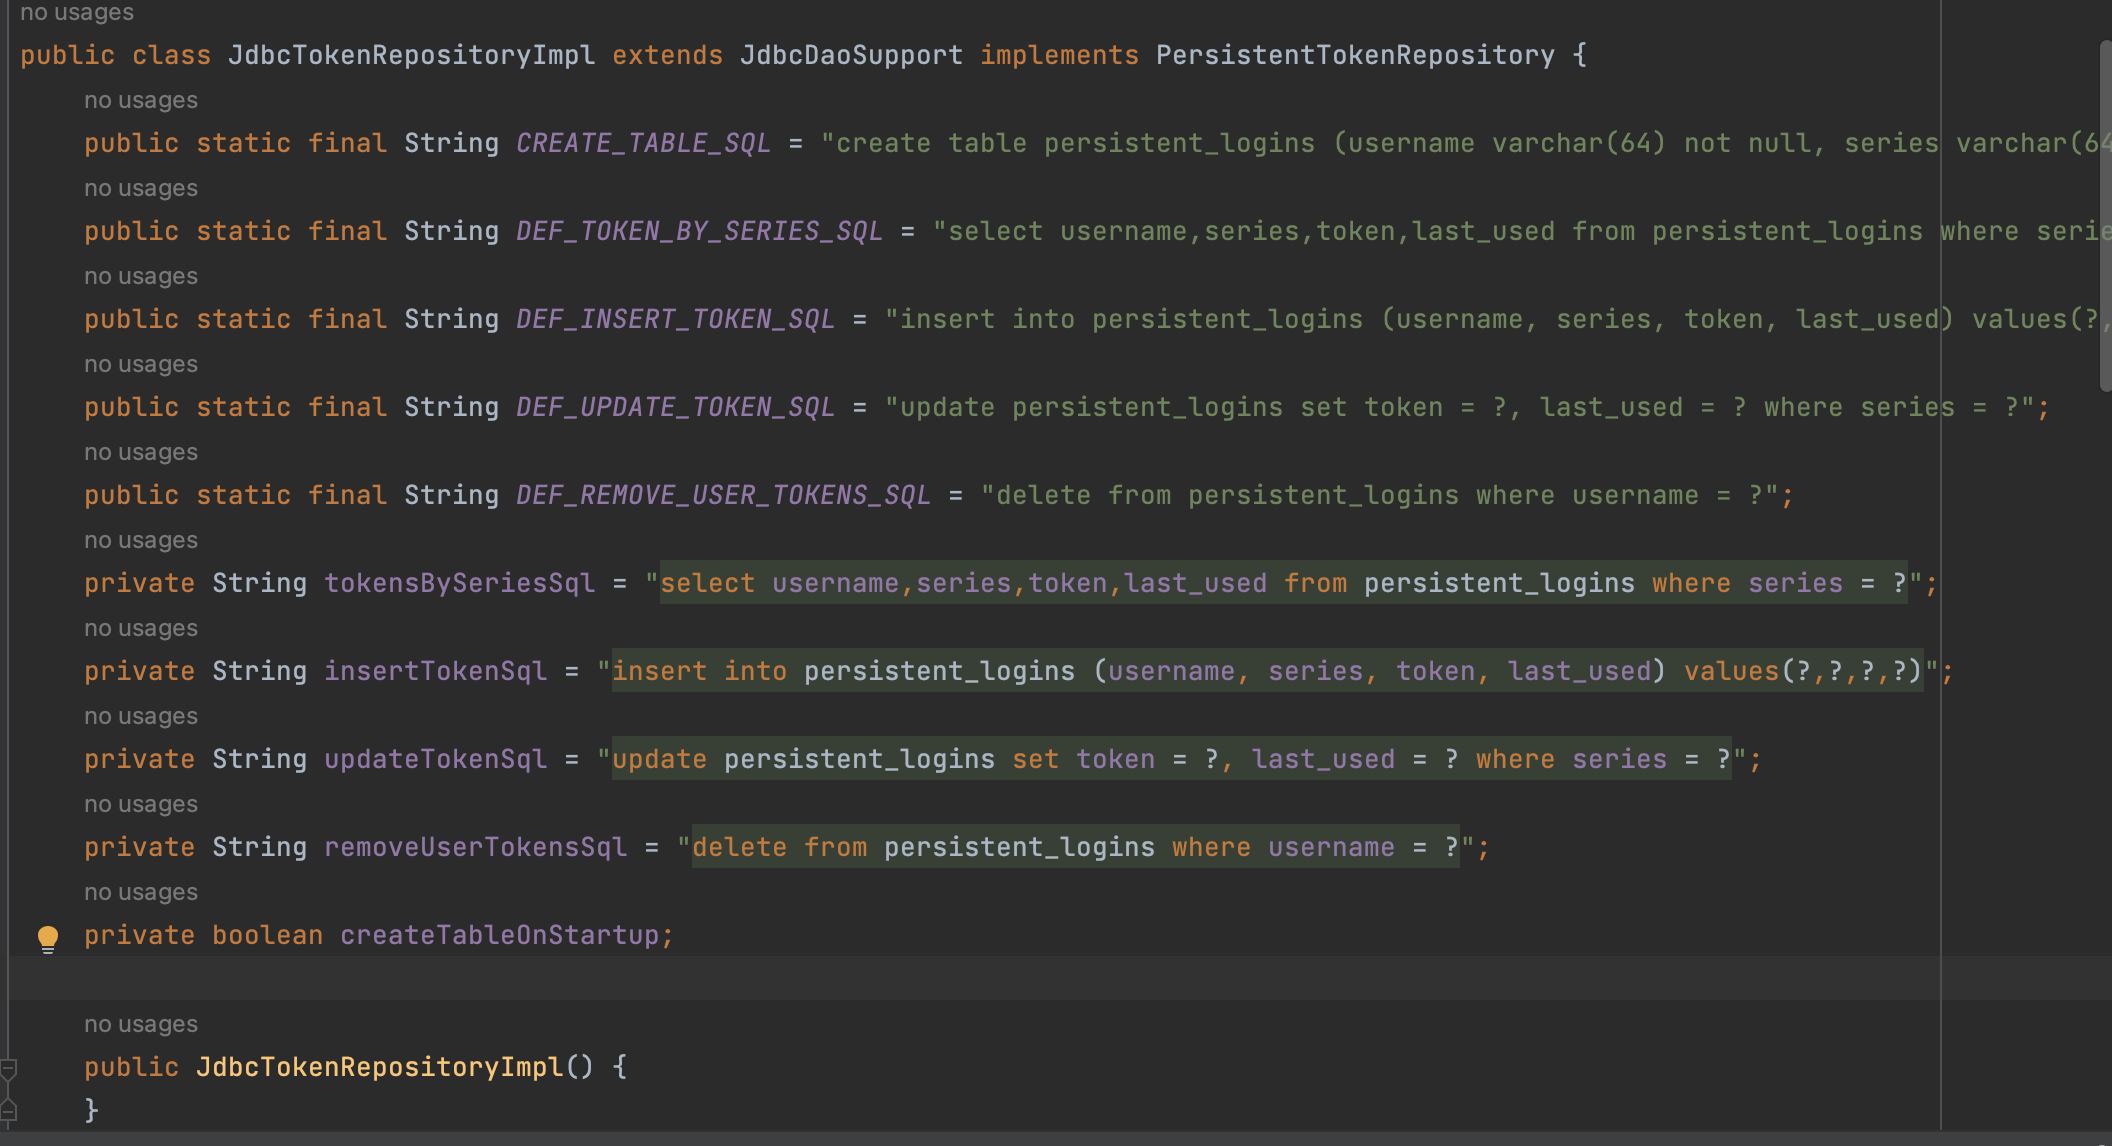
 public void createNewToken(PersistentRememberMeToken token) {
        this.getJdbcTemplate().update(this.insertTokenSql, new Object[]{token.getUsername(), token.getSeries(), token.getTokenValue(), token.getDate()});
    }
当服务在再次请求受限服务时
RememberMeAuthenticationFilter.doFilter()
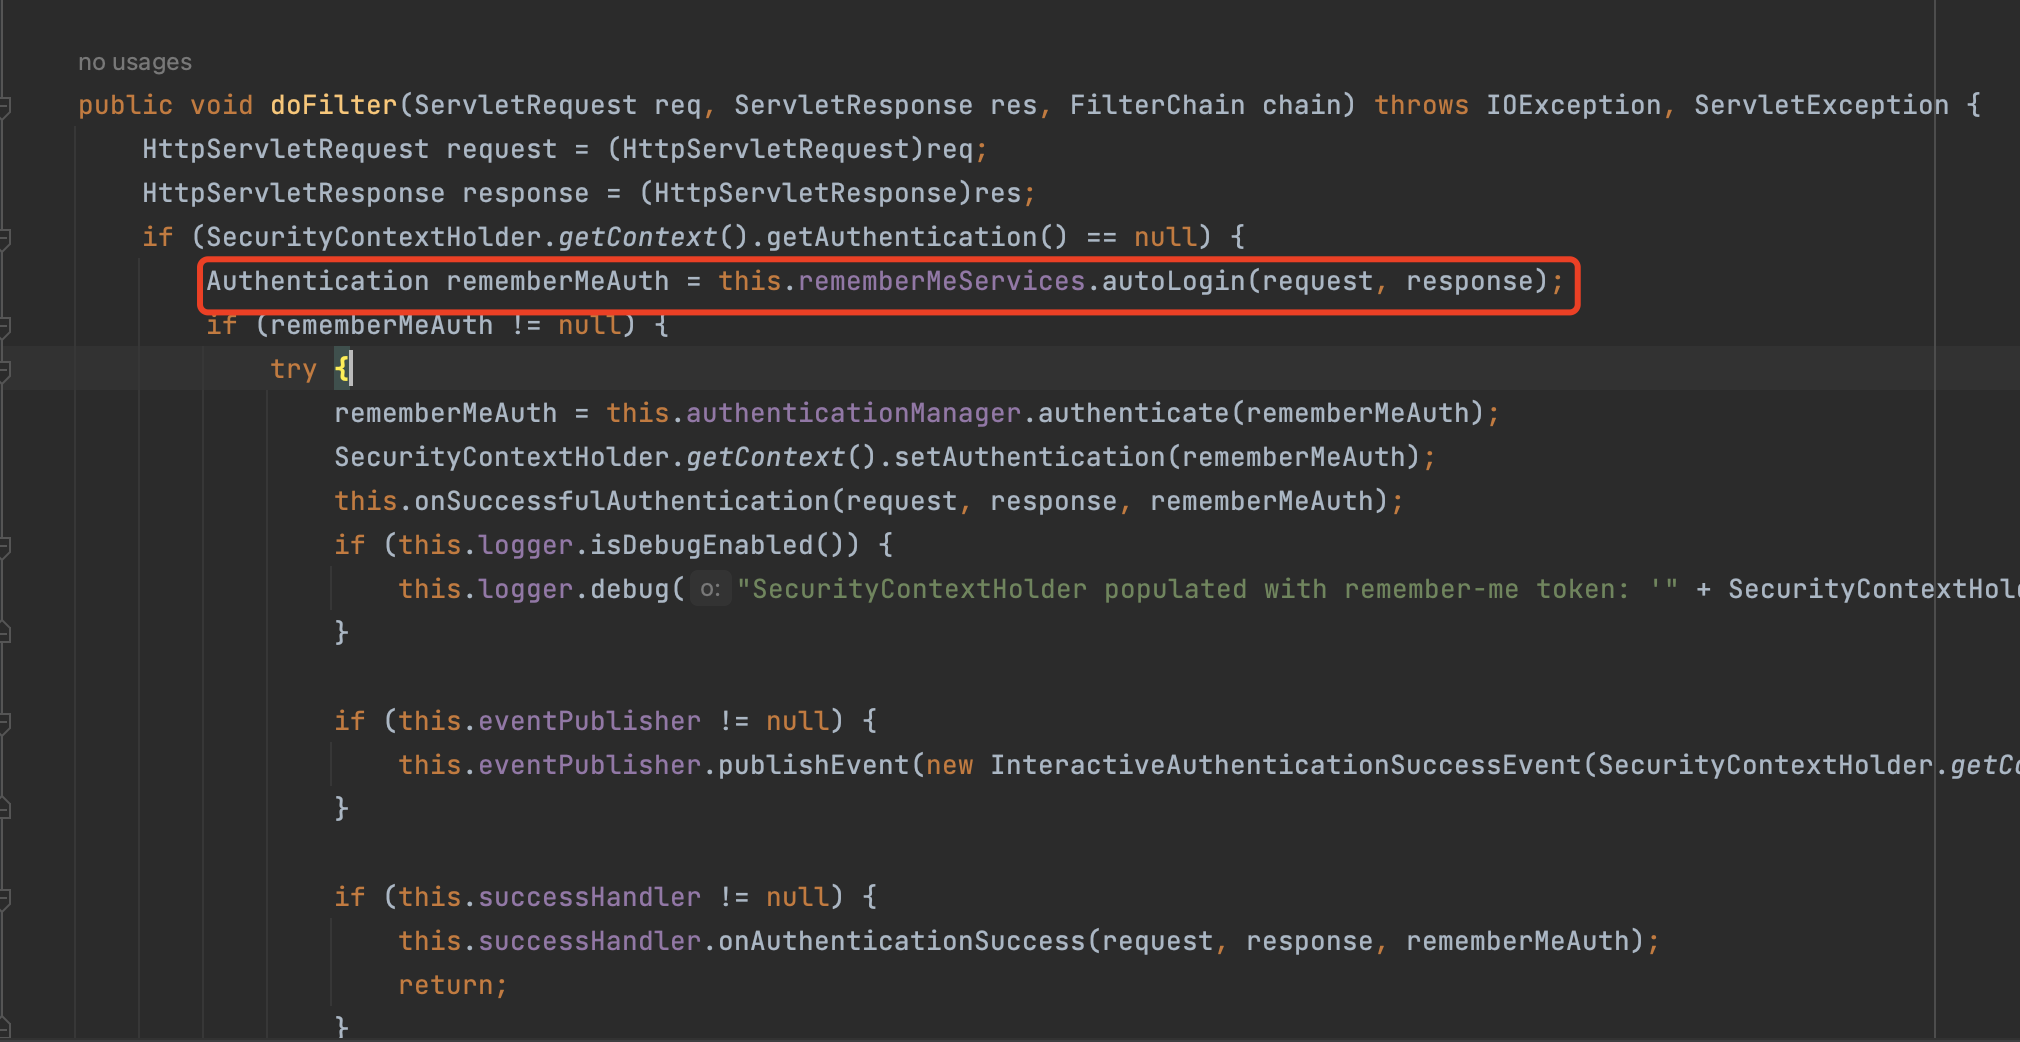
AbstractRememberMeServices.autoLogin()
    public final Authentication autoLogin(HttpServletRequest request, HttpServletResponse response) {
      // 从 Cookie 获取 Token
        String rememberMeCookie = this.extractRememberMeCookie(request);
        if (rememberMeCookie == null) {
            return null;
        } else {
            this.logger.debug("Remember-me cookie detected");
            if (rememberMeCookie.length() == 0) {
                this.logger.debug("Cookie was empty");
                this.cancelCookie(request, response);
                return null;
            } else {
                UserDetails user = null;

                try {
                  // 解码 Cookie 中的 Token
                    String[] cookieTokens = this.decodeCookie(rememberMeCookie);
                  // 用子类的方法验证 Cookie 中的令牌信息是否合法
                    user = this.processAutoLoginCookie(cookieTokens, request, response);
                  // 校验用户信息
                    this.userDetailsChecker.check(user);
                    this.logger.debug("Remember-me cookie accepted");
                  // 创建并返回认证成功的Authentication对象
                    return this.createSuccessfulAuthentication(request, user);
                } catch (CookieTheftException var6) {
                    this.cancelCookie(request, response);
                    throw var6;
                } catch (UsernameNotFoundException var7) {
                    this.logger.debug("Remember-me login was valid but corresponding user not found.", var7);
                } catch (InvalidCookieException var8) {
                    this.logger.debug("Invalid remember-me cookie: " + var8.getMessage());
                } catch (AccountStatusException var9) {
                    this.logger.debug("Invalid UserDetails: " + var9.getMessage());
                } catch (RememberMeAuthenticationException var10) {
                    this.logger.debug(var10.getMessage());
                }

                this.cancelCookie(request, response);
                return null;
            }
        }
    }
public class TokenBasedRememberMeServices extends AbstractRememberMeServices {

    @Override
    protected UserDetails processAutoLoginCookie(String[] cookieTokens, HttpServletRequest request,HttpServletResponse response) {
        // ["root", "1664974500735", "9e44c8368018d34..."]
        // 1、如果 cookieTokens 数组的长度不等于 3 则格式错误,抛出异常
        if (cookieTokens.length != 3) {
            throw new InvalidCookieException(
                "Cookie token did not contain 3" + " tokens, but contained '" + Arrays.asList(cookieTokens) + "'");
        }
        // 2、获取 cookieTokens 数组中 index=1 处的值,即 token 的过期时间:1664974500735
        long tokenExpiryTime = getTokenExpiryTime(cookieTokens);
        // 3、判断令牌是否过期,如果己经过期,则拋出异常。
        if (isTokenExpired(tokenExpiryTime)) {
            throw new InvalidCookieException("Cookie token[1] has expired (expired on '" + new Date(tokenExpiryTime)
                                             + "'; current time is '" + new Date() + "')");
        }
        // 4、根据用户名(cookieTokens 数组的第1项)查询出当前用户对象
        UserDetails userDetails
            = getUserDetailsService().loadUserByUsername(cookieTokens[0]);

        Assert.notNull(userDetails, () -> "UserDetailsService " + getUserDetailsService()
                       + " returned null for username " + cookieTokens[0] + ". " + "This is an interface contract violation");

// 5、生成一个签名:"9e44c8368018d34940dd599e422e2e3c"
        String expectedTokenSignature = makeTokenSignature(tokenExpiryTime, userDetails.getUsername(),userDetails.getPassword());

        // 6、判断cookieTokens[2]中的签名和生成的签名是否相等,如果不相等则抛出异常,相等则令牌合法
        if (!equals(expectedTokenSignature, cookieTokens[2])) {
            throw new InvalidCookieException("Cookie token[2] contained signature '" + cookieTokens[2]
                                             + "' but expected '" + expectedTokenSignature + "'");
        }
        return userDetails;
    }

    // 获取token的过期时间
    private long getTokenExpiryTime(String[] cookieTokens) {
        try {
            // 获取cookieTokens数组中的第二个值,并将其转为Long类型
            return new Long(cookieTokens[1]);
        }
        catch (NumberFormatException nfe) {
            throw new InvalidCookieException(
                "Cookie token[1] did not contain a valid number (contained '" + cookieTokens[1] + "')");
        }
    }

    protected boolean isTokenExpired(long tokenExpiryTime) {
        return tokenExpiryTime < System.currentTimeMillis();
    }

    // 计算要放入cookie中的数字签名,默认值为 MD5 ("username:tokenExpiryTime:password:key")
    protected String makeTokenSignature(long tokenExpiryTime, String username, String password) {
        //首先将用户名、令牌过期时间、用户密码以及 key 组成一个宇符串,中间用“:”隔开
        String data = username + ":" + tokenExpiryTime + ":" + password + ":" + getKey();
        try {
            MessageDigest digest = MessageDigest.getInstance("MD5");
            // 然后通过MD5 消息摘要算法对该宇符串进行加密,将加密结果转为一个字符串返回;
            return new String(Hex.encode(digest.digest(data.getBytes())));
        }catch (NoSuchAlgorithmException ex) {
            throw new IllegalStateException("No MD5 algorithm available!");
        }
    }
}
步骤
- 创建数据库表:persistent_logins
- 修改配置类:注入数据源,配置对象。
- 配置类:配置自动登录。
- 页面添加复选框
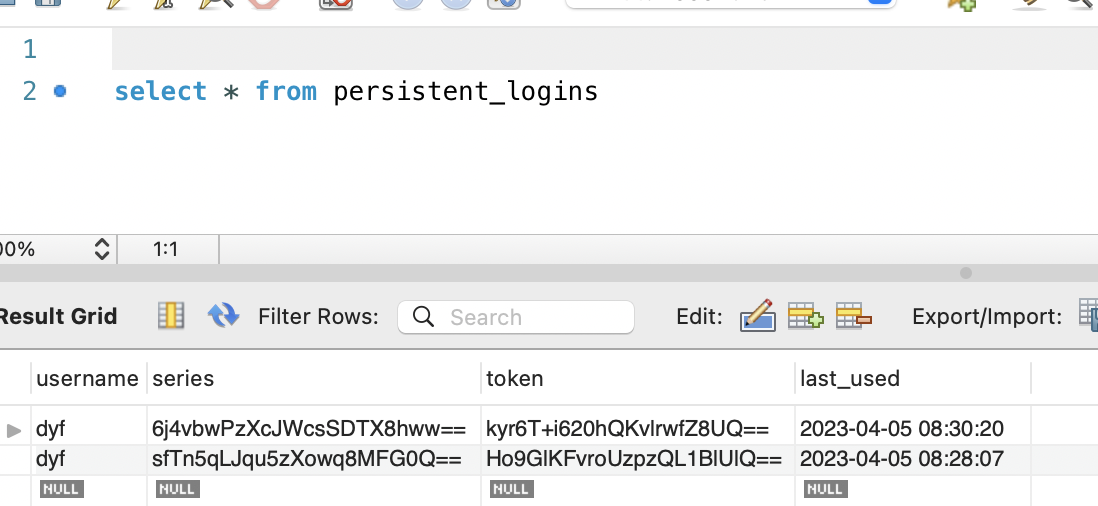
存储 Token 的建表 SQL
CREATE TABLE persistent_logins (
    username VARCHAR(64) NOT NULL,
    series VARCHAR(64) PRIMARY KEY,
    token VARCHAR(64) NOT NULL,
    last_used TIMESTAMP NOT NULL
)
修改配置类:注入数据源,配置对象。
    @Autowired
    private DataSource dataSource;

    @Bean
    public PersistentTokenRepository persistentTokenRepository() {
        JdbcTokenRepositoryImpl jdbcTokenRepository = new JdbcTokenRepositoryImpl();
        jdbcTokenRepository.setDataSource(dataSource);
        // 是否自动生成 persistent_logins 表
//        jdbcTokenRepository.setCreateTableOnStartup(true);
        return jdbcTokenRepository;
    }
配置 HttpSecurity 类:配置自动登录
页面添加复选框
在 Html 页面上新增自动登录 的复择框。
注意:这里name 必须是 remember-me

测试:登录完毕后,数据库中有数据。
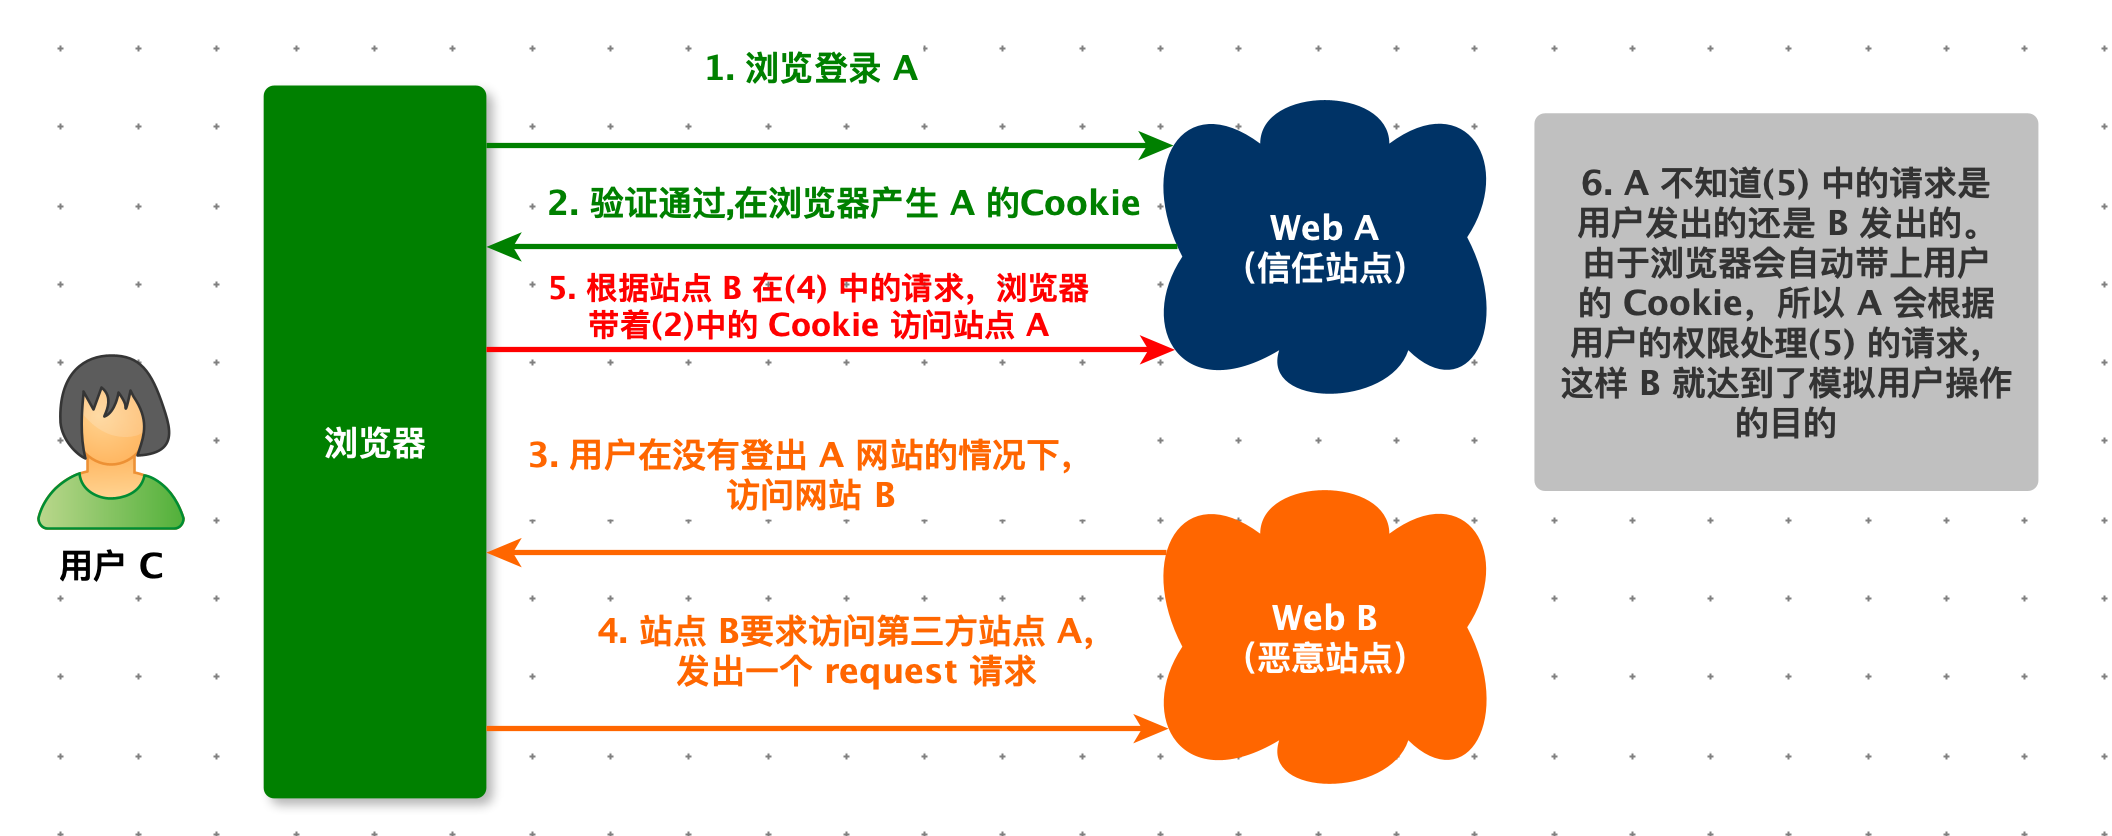
CSRF
CSRF(Cross-Site request forgery),也被称为 one-click attack 或者 session riding,即跨站请求伪造攻击。
CSRF 利用的是网站对用户浏览器的信任。
从 Spring Security 4.0 开始,默认请求会开启 CSRF 保护。Spring Security 只针对 PATCH、POST、PUT、DELETE 方法进行防护。
步骤:
- 确认 Spring Security 的 CSRF 是开启状态。
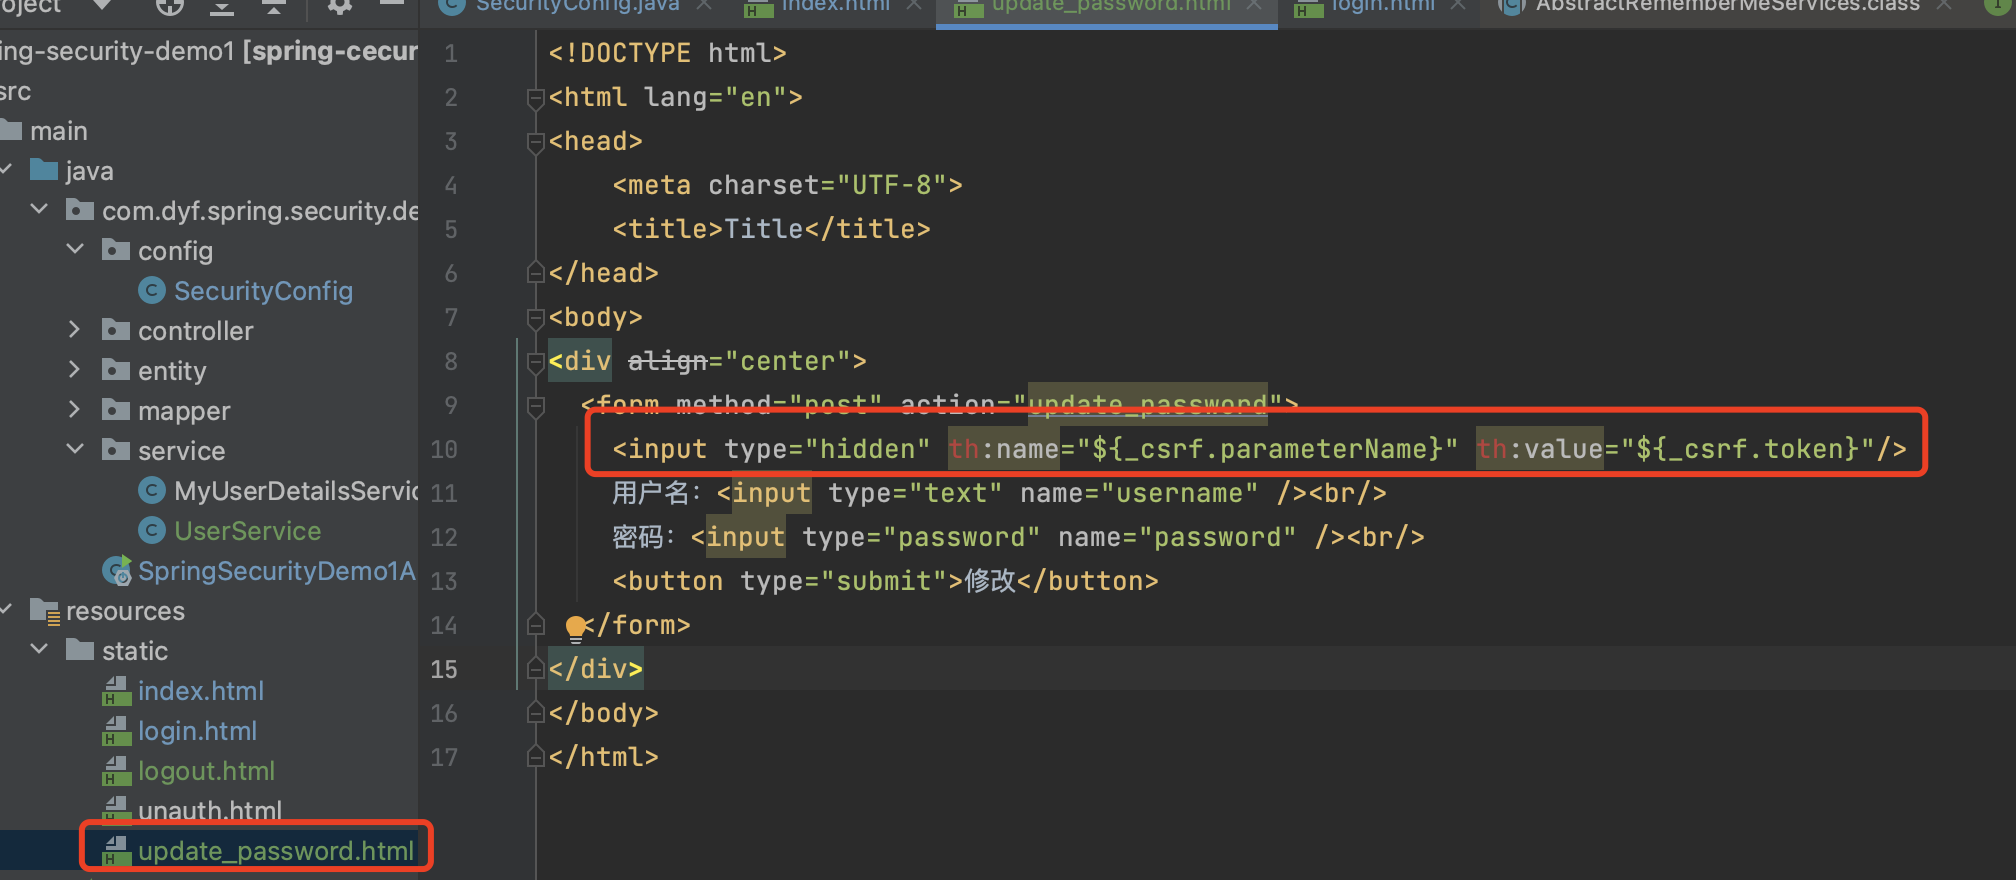
- 在页面中添加 hidden
确认 Spring Security 的 CSRF 是开启状态。
在页面中添加 hidden
Spring Security 实现 CSRF 的源码在 CsrfFilter 类中。
public final class CsrfFilter extends OncePerRequestFilter {
/**
 * The default RequestMatcher that indicates if CSRF protection is required or
 * not. The default is to ignore GET, HEAD, TRACE, OPTIONS and process all other
 * requests.
 * 用于检测哪些请求需要csrf保护,这里的缺省配置是:GET, HEAD, TRACE, OPTIONS这种只读的
 * HTTP动词都被忽略不做csrf保护,而其他PATCH, POST, PUT,DELETE等会修改服务器状态的HTTP
 * 动词会受到当前Filter的csrf保护。
 */
public static final RequestMatcher DEFAULT_CSRF_MATCHER = new DefaultRequiresCsrfMatcher();

private final Log logger = LogFactory.getLog(getClass());
private final CsrfTokenRepository tokenRepository;
private RequestMatcher requireCsrfProtectionMatcher = DEFAULT_CSRF_MATCHER;
// 用于CSRF保护验证逻辑失败进行处理
private AccessDeniedHandler accessDeniedHandler = new AccessDeniedHandlerImpl();

// 构造函数,使用指定的csrf token存储库构造一个CsrfFilter实例
// 缺省情况下,使用Spring Security 的 Springboot web 应用,选择使用的
// csrfTokenRepository是一个做了惰性封装的HttpSessionCsrfTokenRepository实例。
// 也就是说相应的 csrf token保存在http session中。
public CsrfFilter(CsrfTokenRepository csrfTokenRepository) {
Assert.notNull(csrfTokenRepository, "csrfTokenRepository cannot be null");
this.tokenRepository = csrfTokenRepository;
}

@Override
protected void doFilterInternal(HttpServletRequest request,
HttpServletResponse response, FilterChain filterChain)
throws ServletException, IOException {
request.setAttribute(HttpServletResponse.class.getName(), response);

// 从csrf token存储库中获取针对当前请求的csrf token。
CsrfToken csrfToken = this.tokenRepository.loadToken(request);
// 记录针对当前请求是否不存在csrf token
final boolean missingToken = csrfToken == null;
if (missingToken) {
// 如果存储库中尚不存在针对当前请求的csrf token,生成一个,把它关联到
// 当前请求保存到csrf token存储库中
csrfToken = this.tokenRepository.generateToken(request);
this.tokenRepository.saveToken(csrfToken, request, response);
}

// 将从存储库中获取得到的或者新建并保存到存储库的csrf token保存为请求的两个属性
request.setAttribute(CsrfToken.class.getName(), csrfToken);
request.setAttribute(csrfToken.getParameterName(), csrfToken);

if (!this.requireCsrfProtectionMatcher.matches(request)) {
// 检测当前请求是否需要csrf保护,如果不需要,放行继续执行filter chain的其他逻辑
filterChain.doFilter(request, response);
return;
}

// 尝试从请求头部或者参数中获取浏览器端传递过来的实际的csrf token。
// 缺省情况下,从头部取出时使用header name: X-CSRF-TOKEN
// 从请求中获取参数时使用的参数名称是 : _csrf
String actualToken = request.getHeader(csrfToken.getHeaderName());
if (actualToken == null) {
actualToken = request.getParameter(csrfToken.getParameterName());
}
if (!csrfToken.getToken().equals(actualToken)) {
// csrf token存储库中取出的token和浏览器端传递过来的token不相等的情况有两种:
// 1. 针对该请求在存储库中并不存在csrf token
// 2. 针对该请求在存储库中的csrf token和请求参数实际携带的不一致
if (this.logger.isDebugEnabled()) {
this.logger.debug("Invalid CSRF token found for "
+ UrlUtils.buildFullRequestUrl(request));
}
if (missingToken) {
// 1. 针对该请求在存储库中并不存在csrf token , 处理方案:
// 抛出异常 MissingCsrfTokenException
this.accessDeniedHandler.handle(request, response,
new MissingCsrfTokenException(actualToken));
}
else {
// 2. 针对该请求在存储库中的csrf token和请求参数实际携带的不一致,处理方案:
// 抛出异常 InvalidCsrfTokenException
this.accessDeniedHandler.handle(request, response,
new InvalidCsrfTokenException(csrfToken, actualToken));
}
return;
}

// 当前请求需要经该Filter的csrf验证逻辑并且通过了csrf验证,放行,继续执行filter chain
// 其他部分逻辑
filterChain.doFilter(request, response);
}

/**
 * Specifies a RequestMatcher that is used to determine if CSRF protection
 * should be applied. If the RequestMatcher returns true for a given request,
 * then CSRF protection is applied.
 *
 * 指定一个RequestMatcher用来检测一个请求是否需要应用csrf保护验证逻辑。
 *
 * The default is to apply CSRF protection for any HTTP method other than GET, HEAD,
 * TRACE, OPTIONS.
 * 缺省行为是针对GET, HEAD,TRACE, OPTIONS这种只读性的HTTP请求不做csrf保护验证,验证其他
 * 那些会更新服务器状态的HTTP请求,比如PATCH, POST, PUT,DELETE等。
 *
 *
 * @param requireCsrfProtectionMatcher the RequestMatcher used to determine if
 * CSRF protection should be applied.
 */
public void setRequireCsrfProtectionMatcher(
RequestMatcher requireCsrfProtectionMatcher) {
Assert.notNull(requireCsrfProtectionMatcher,
"requireCsrfProtectionMatcher cannot be null");
this.requireCsrfProtectionMatcher = requireCsrfProtectionMatcher;
}

/**
 * Specifies a AccessDeniedHandler that should be used when CSRF protection
 * fails.
 * 指定一个AccessDeniedHandler用于CSRF保护验证逻辑失败进行处理。
 *
 * The default is to use AccessDeniedHandlerImpl with no arguments.
 * 缺省行为是使用一个不但参数的AccessDeniedHandlerImpl实例。
 *
 * @param accessDeniedHandler the AccessDeniedHandler to use
 */
public void setAccessDeniedHandler(AccessDeniedHandler accessDeniedHandler) {
Assert.notNull(accessDeniedHandler, "accessDeniedHandler cannot be null");
this.accessDeniedHandler = accessDeniedHandler;
}
 // 用于检测哪些HTTP请求需要应用csrf保护的RequestMatcher,
 // 缺省行为是针对GET, HEAD,TRACE, OPTIONS这种只读性的HTTP请求不做csrf保护,
 // 其他那些会更新服务器状态的HTTP请求,比如PATCH, POST, PUT,DELETE等需要csrf保护。
private static final class DefaultRequiresCsrfMatcher implements RequestMatcher {
private final HashSet<String> allowedMethods = new HashSet<>(
Arrays.asList("GET", "HEAD", "TRACE", "OPTIONS"));

@Override
public boolean matches(HttpServletRequest request) {
return !this.allowedMethods.contains(request.getMethod());
}
}
}
原文地址:https://blog.csdn.net/junxinsiwo/article/details/142798051
免责声明:本站文章内容转载自网络资源,如本站内容侵犯了原著者的合法权益,可联系本站删除。更多内容请关注自学内容网(zxcms.com)!