【SSM详细教程】-02-Spring容器IOC详解
精品专题:
01.《C语言从不挂科到高绩点》课程详细笔记
https://blog.csdn.net/yueyehuguang/category_12753294.html?spm=1001.2014.3001.5482 https://blog.csdn.net/yueyehuguang/category_12753294.html?spm=1001.2014.3001.5482
02. 《SpringBoot详细教程》课程详细笔记
https://blog.csdn.net/yueyehuguang/category_12789841.html?spm=1001.2014.3001.5482![]() https://blog.csdn.net/yueyehuguang/category_12789841.html?spm=1001.2014.3001.548203.《SpringBoot电脑商城项目》课程详细笔记
https://blog.csdn.net/yueyehuguang/category_12789841.html?spm=1001.2014.3001.548203.《SpringBoot电脑商城项目》课程详细笔记
https://blog.csdn.net/yueyehuguang/category_12752883.html?spm=1001.2014.3001.5482![]() https://blog.csdn.net/yueyehuguang/category_12752883.html?spm=1001.2014.3001.548204.《VUE3.0 核心教程》课程详细笔记
https://blog.csdn.net/yueyehuguang/category_12752883.html?spm=1001.2014.3001.548204.《VUE3.0 核心教程》课程详细笔记
================================
|| 持续分享系列教程,关注一下不迷路 ||
|| 视频教程:小破站:墨轩大楼 ||
================================
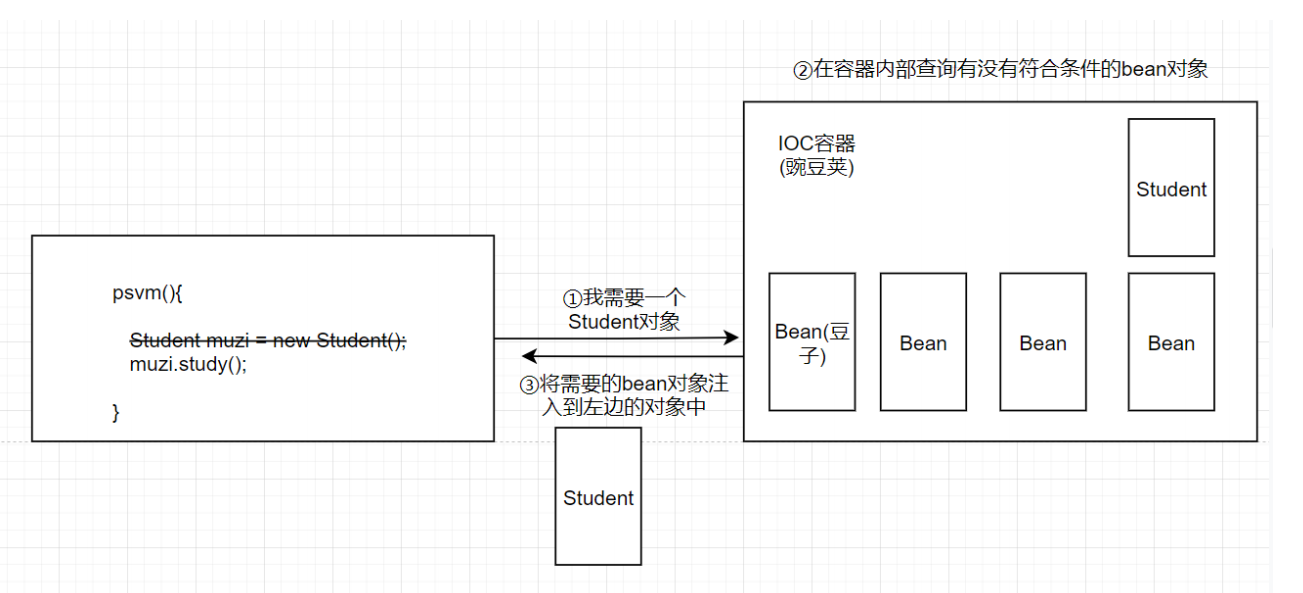
一、IOC 的概念
IOC全称是Inversion Of Control ,被译为控制反转。
指的是程序中对象的获取方式发生了反转,由最初的new方式创建,转变为由第三方框架创建、注入。第三方框架一般是通过配置方式注入一个具体实现,从而降低了对象之间的耦合度。
IOC按实现方法不同,可以分为依赖注入DI和依赖查找两种。Spring容器是采用DI实现了IOC控制,IOC是Spring框架的基础和核心。
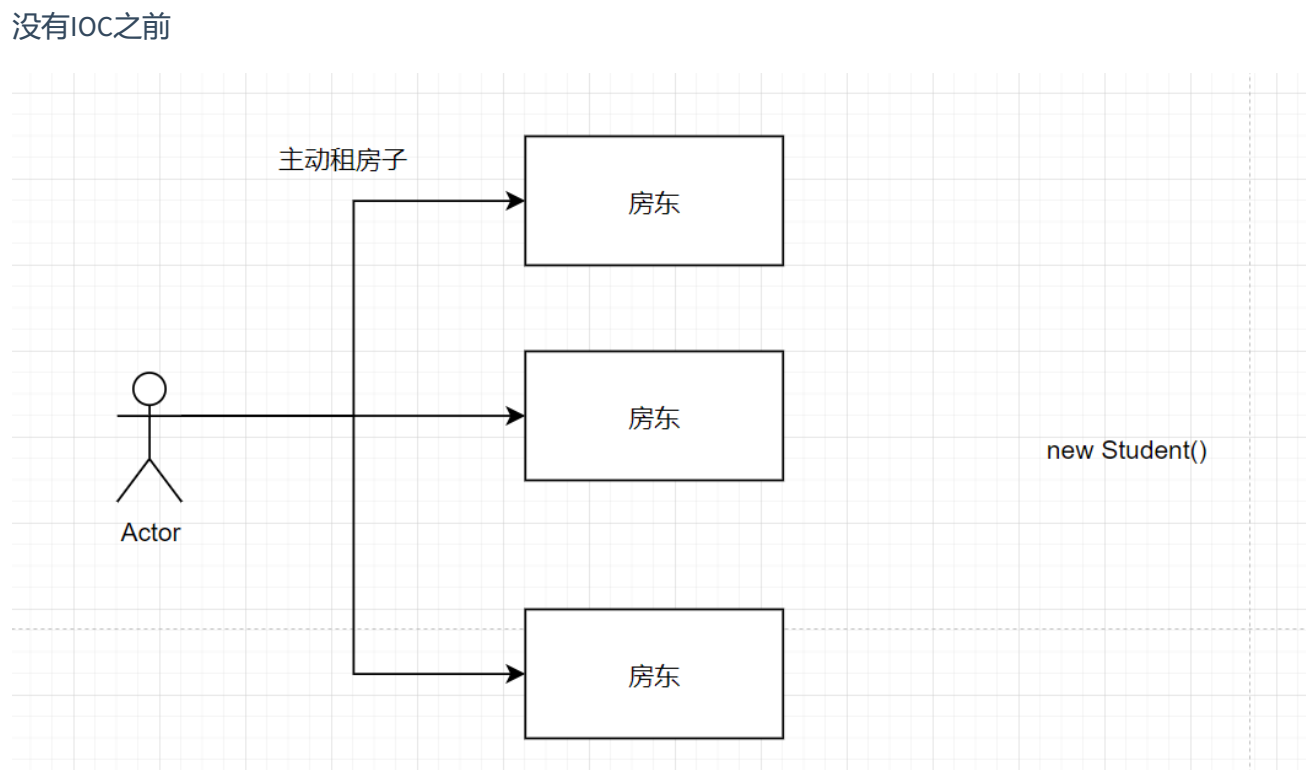
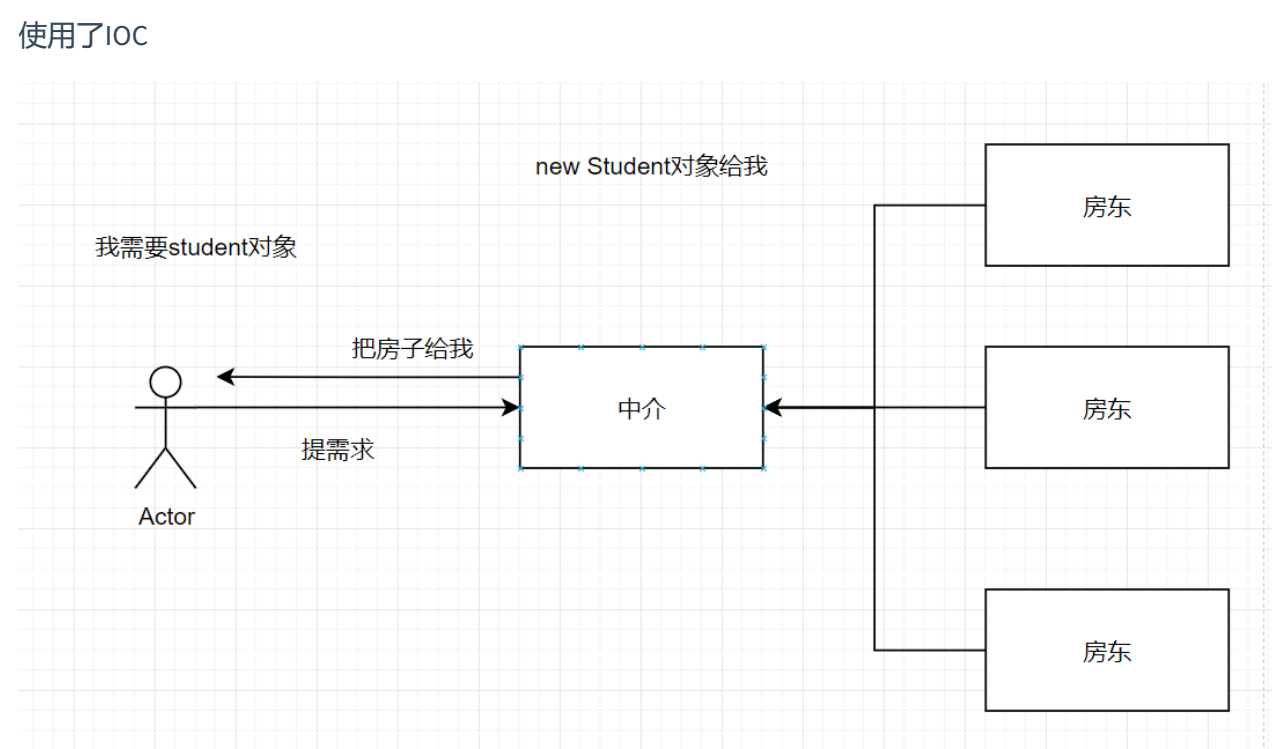
举个例子,租房子时的两种选择。没有IOC之前,是租户自己和每一个房东交涉。有了IOC之后,IOC可以看作中介,找房子时,你只需要和这个中介打交道就可以,中介再分别和各个房东交涉,具体看下图:
二、DI 的概念
DI全称是Dependency Injection ,被译为依赖注入。
DI的基本原理就是将一起工作具有关系的对象,通过构造方法参数或者方法参数传入建立关联,因此容器的工作就是创建Bean时注入那些依赖关系。
IOC是一种思想,而DI是实现IOC的主要技术途径。
DI主要有两种注入方式,即Setter注入和构造器注入。
没有DI时我们创建和使用对象的方式:
Student muzi = new Student();
st.study()
使用DI之后创建和使用对象的方式:
三、setter注入
通过调用无参构造器或者无参static工厂方法实例化bean之后,调用该Bean的setter方法,即可实现setter方式注入。
- 首先自定义一个Computer类
package com.moxuan.spring01.entity;

import java.io.Serializable;

public class Computer implements Serializable {

    private String mainBoard;// 主板
    private String hdd;// 硬盘
    private String ram; //内存

    public String getMainBoard() {
        return mainBoard;
    }

    public void setMainBoard(String mainBoard) {
        this.mainBoard = mainBoard;
    }

    public String getHdd() {
        return hdd;
    }

    public void setHdd(String hdd) {
        this.hdd = hdd;
    }

    public String getRam() {
        return ram;
    }

    public void setRam(String ram) {
        this.ram = ram;
    }
}
- 在applicationContext.xml中配置setter注入
<!--
property : 表示实体类的属性
  name: 实体类属性名称
  value: 实体类属性值
表示,将value值通过属性的set方法,设置到name属性中
-->
<bean id="computer" class="com.moxuan.spring01.entity.Computer">
    <property name="mainBoard" value="技嘉"></property>
    <property name="hdd" value="希捷"></property>
    <property name="ram" value="金士顿"></property>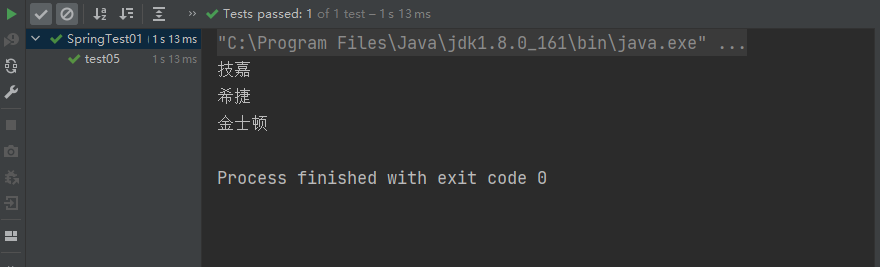
</bean>- 编写测试代码:
/**
* 测试setter注入
*/
@Test
public void test05(){
AbstractApplicationContext context =
new ClassPathXmlApplicationContext("applicationContext.xml");
Computer computer = context.getBean("computer",Computer.class);
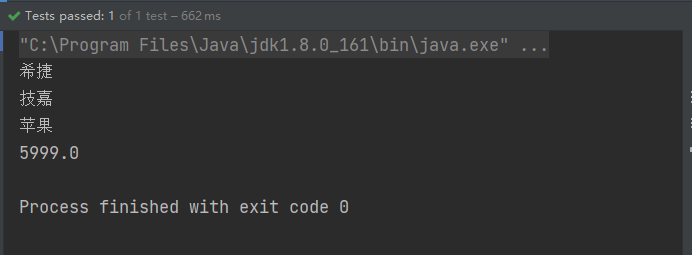
System.out.println(computer.getMainBoard());
System.out.println(computer.getHdd());
System.out.println(computer.getRam());
}运行效果:
四、构造器注入
基于构造器的注入是通过调用带参数的构造器来实现的。容器在bean被实例化的时候,根据参数类型执行响应的构造器。
- 首先新建一个MobliePhone手机类
package com.moxuan.spring01.entity;

public class MobilePhone {

    private String brand;
    private double price;

    public MobilePhone(String brand,double price){
        this.brand = brand;
        this.price = price;
    }

    public MobilePhone(){
        this.brand = "华为";
        this.price = 3999;
    }

    public String getBrand() {
        return brand;
    }

    public void setBrand(String brand) {
        this.brand = brand;
    }

    public double getPrice() {
        return price;
    }

    public void setPrice(double price) {
        this.price = price;
    }
}
- 在applicationContext.xml中配置bean
<!--构造器注入: 有参数构造器-->
<bean id="phone" class="com.moxuan.spring01.entity.MobilePhone">
    <constructor-arg index="0" value="苹果"></constructor-arg>
    <constructor-arg index="1" value="5999"></constructor-arg>
</bean>

<!--构造器注入: 无参数构造器-->
<bean id="noArgPhone" class="com.moxuan.spring01.entity.MobilePhone"></bean>- 添加测试方法
/**
     * 测试构造器注入
     */
@Test
public void test06(){
    AbstractApplicationContext context =
             new ClassPathXmlApplicationContext("applicationContext.xml");
    // 有参数构造器
    MobilePhone phone = context.getBean("phone",MobilePhone.class);
    System.out.println(phone.getBrand());
    System.out.println(phone.getPrice());

        // 无参数构造器
    MobilePhone phone1 = context.getBean("noArgPhone",MobilePhone.class);
    System.out.println(phone1.getBrand());
    System.out.println(phone1.getPrice());
}- 运行结果:

五、自动装配
Spring IOC 容器可以自动装配(autowire)相互协作bean之间的关联关系。autowire可以针对单个bean进行设置,autowire的方法之处在于减少xml的注入配置。
在xml配置文件中,可以在<bean/>元素中使用autowire属性指定自动装配规则,一共有五种类型值。
| 属性值 | 描述 |
| no | 禁用自动装配,默认值 |
| byName | 根据属性名自动装配,此选项将检查容器并根据名字查找与属性完全一致的bean,并将其与属性自动装配。 |
| byType | 如果容器中存在一个与指定属性类型相同的bean,那么将于该属性自动装配。 |
| constructor | 与byType的方式类似,不同之处在于它应用于构造器函数 |
| autodetect | 通过bean类决定是使用constructor还是byType方式进行自动装配,如果发现默认的构造器,那么将使用byType方式。 |
5.1 测试byName
- 新增Student类
package com.moxuan.spring01.entity;

public class Student {

    private Computer computer;
    private MobilePhone phone;

    public Computer getComputer() {
        return computer;
    }

    public void setComputer(Computer computer) {
        this.computer = computer;
    }

    public MobilePhone getPhone() {
        return phone;
    }

    public void setPhone(MobilePhone phone) {
        this.phone = phone;
    }
}
- 在applicationContext.xml中配置bean
<!-- setter 注入-->
<bean id="computer" class="com.moxuan.spring01.entity.Computer">
    <property name="mainBoard" value="技嘉"></property>
    <property name="hdd" value="希捷"></property>
    <property name="ram" value="金士顿"></property>
</bean>

<!--构造器注入: 有参数构造器-->
<bean id="phone" class="com.moxuan.spring01.entity.MobilePhone">
    <constructor-arg index="0" value="苹果"></constructor-arg>
    <constructor-arg index="1" value="5999"></constructor-arg>
</bean>

<!--构造器注入: 无参数构造器-->
<bean id="noArgPhone" class="com.moxuan.spring01.entity.MobilePhone">
</bean>

    <!--自动装配-->
<bean id="student" class="com.moxuan.spring01.entity.Student"
autowire="byName"></bean>- 添加测试方法
/**
* 测试自动装配
*/
@Test
public void test07(){
    AbstractApplicationContext context =
            new ClassPathXmlApplicationContext(
                "applicationContext.xml");
    Student student = context.getBean("student",Student.class);
    System.out.println(student.getComputer().getHdd());
    System.out.println(student.getComputer().getMainBoard());
    System.out.println(student.getPhone().getBrand());
    System.out.println(student.getPhone().getPrice());

}- 运行效果
从运行效果可以看出,虽然配置文件中配置了两个MobliePhone类型的,但是由于我们自动装配的时候选择的是byName,会根据属性名去匹配,也就是会找到xml文件中id或者name和属性名相同的bean去装配。
5.2 测试byType
首先我们先将上一个案例中的autowire="byName" 修改为 autowire="byType"
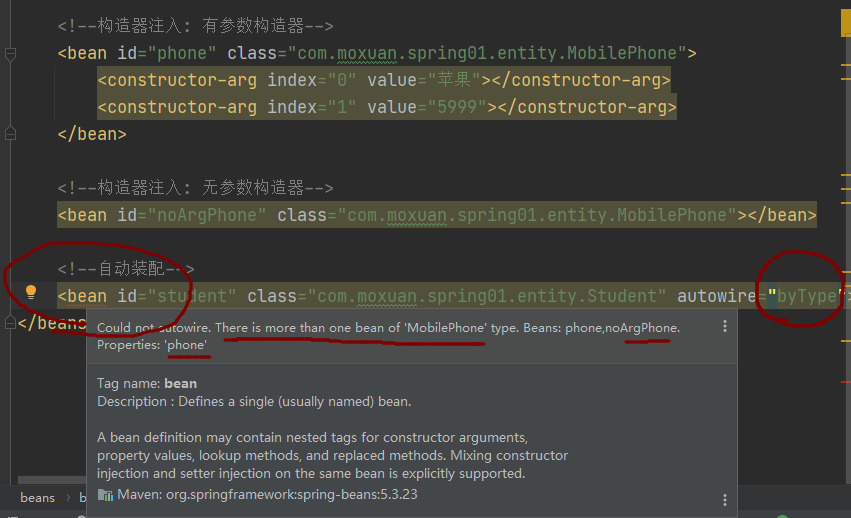
这个时候就会出现问题,从报错信息来看,是说配置了多个MobilePhone类型的bean,如果这个时候按照类型装配的话,不知道该装配哪个,会有冲突。所以当使用byType的时候,xml配置文件中,不能出现多个同种类型的bean。
我们把id="phone"的bean注释掉
<!--构造器注入: 无参数构造器-->
<bean id="noArgPhone" class="com.moxuan.spring01.entity.MobilePhone"></bean>

<!--自动装配-->
<bean id="student" class="com.moxuan.spring01.entity.Student"
    autowire="byType"></bean>
测试代码不变
/**
* 测试自动装配
*/
@Test
public void test07(){
    AbstractApplicationContext context =
            new ClassPathXmlApplicationContext("applicationContext.xml");
    Student student = context.getBean("student",Student.class);
    System.out.println(student.getComputer().getHdd());
    System.out.println(student.getComputer().getMainBoard());
    System.out.println(student.getPhone().getBrand());
    System.out.println(student.getPhone().getPrice());

}
测试结果

六、作业练习
6.1 利用Spring实现Bean属性Setter方式注入
JDBCDataSource类封装了管理数据库连接的方法getConnection(),这个方法在执行之前需要数据库连接参数:数据库驱动,连接URL,用户名和密码,代码如下:
package com.moxuan.spring01.entity;

import java.sql.Connection;
import java.sql.DriverManager;
import java.sql.SQLException;

public class JDBCDataSource {
    private String driver;
    private String url;
    private String user;
    private String password;

    public String getDriver() {
        return driver;
    }

    public void setDriver(String driver) {
        try{
            // 注册数据库驱动
            Class.forName(driver);
            this.driver = driver;
        }catch (Exception e){
            e.printStackTrace();
        }

    }

    public String getUrl() {
        return url;
    }

    public void setUrl(String url) {
        this.url = url;
    }

    public String getUser() {
        return user;
    }

    public void setUser(String user) {
        this.user = user;
    }

    public String getPassword() {
        return password;
    }

    public void setPassword(String password) {
        this.password = password;
    }

    public Connection getConnection(){
        Connection conn = null;
        try {
            conn = DriverManager.getConnection(url,user,password);
        } catch (SQLException throwables) {
            throwables.printStackTrace();
        }
        return conn;
    }

    public void close(Connection conn){
        if(conn!=null){
            try {
                conn.close();
            } catch (SQLException throwables) {
                throwables.printStackTrace();
            }
        }
    }
}
请利用Spring实现JDBCDataSource对象的创建,再使用setter注入的方式将数据库连接参数注入给JDBCDataSource。实现正常调用getConnection()方法获得数据库连接。
步骤一:在pom文件中导入mysql数据库所需要的依赖
<!-- https://mvnrepository.com/artifact/com.mysql/mysql-connector-j -->
<dependency>
  <groupId>com.mysql</groupId>
  <artifactId>mysql-connector-j</artifactId>
  <version>8.0.31</version>
</dependency>
步骤二:在applicationContext.xml中,增加setter代码注入JDBC参数
  <bean id="dataSource" class="com.moxuan.spring01.entity.JDBCDataSource">
      <property name="driver" value="com.mysql.cj.jdbc.Driver"></property>
      <property name="url" value="jdbc:mysql://@localhost:3306/student"></property>
      <property name="user" value="root"></property>
      <property name="password" value="123456"></property>
  </bean>
步骤三:在测试类中添加测试方法
/**
* 测试setter注入jdbc连接参数
*/
@Test
public void test08(){
AbstractApplicationContext context =
new ClassPathXmlApplicationContext("applicationContext.xml");
JDBCDataSource dataSource =
context.getBean("dataSource",JDBCDataSource.class);
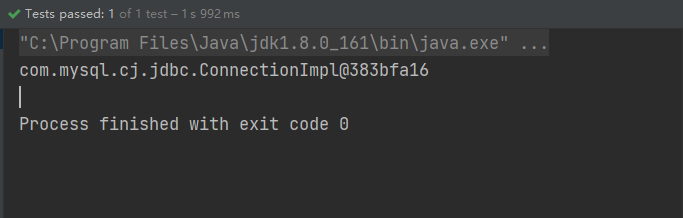
Connection conn = dataSource.getConnection();
System.out.println(conn);
}运行效果:
6.2 利用构造器参数实现依赖属性的注入
MysqlHeroDao是经典的数据库访问接口的实现类,这个类工作必须依赖mysql数据库连接来工作。JDBCDataSource实例可以提供mysql数据库的连接。MysqlHeroDao类采用构造器参数的方式依赖JDBCDataSource类,这样的好处是创建MysqlHeroDao对象必须有参数JDBCDataSource对象实例。
请完成以下几个练习:
- 请新建Hero类,添加id,name(名称),job(职业),sex(性别)等属性。
- 请在mysql数据库中添加hero表,添加id,name,job,sex等字段,并添加几条数据。
- 创建HeroDao接口,定义根据id查询英雄数据的接口。
- 创建MysqlHeroDao类,使用构造器注入的方式,注入JDBCDataSource,获取数据库连接,并实现HeroDao接口中定义的功能。
- 编写测试类,给定一个id能查询出对应id的英雄数据。
步骤一:新建Hero.java实体类
@Data
public class Hero implements Serializable {

    private Integer id;
    private String name;
    private String job;
    private String sex;
}
此处使用了lombok自动添加了get和set方法。
步骤二:在数据库中新增hero表,脚本如下:
DROP TABLE IF EXISTS `hero`;
CREATE TABLE `hero` (
  `id` int NOT NULL AUTO_INCREMENT,
  `name` varchar(30) DEFAULT NULL,
  `job` varchar(30) DEFAULT NULL,
  `sex` varchar(30) DEFAULT NULL,
  PRIMARY KEY (`id`)
) ENGINE=InnoDB AUTO_INCREMENT=5 DEFAULT CHARSET=utf8;

-- ----------------------------
-- Records of hero
-- ----------------------------
INSERT INTO `hero` VALUES ('1', '后羿', '射手', '男');
INSERT INTO `hero` VALUES ('2', '甄姬', '法师', '女');
INSERT INTO `hero` VALUES ('3', '典韦', '战士', '男');
INSERT INTO `hero` VALUES ('4', '蔡文姬', '辅助', '女');
步骤三:创建HeroDao接口,并定义根据ID查找数据的功能
public interface HeroDao {
    /** 根据id查找英雄数据**/
    Hero findHeroById(int id);
}
步骤四:创建MysqlHeroDao,实现HeroDao接口,并实现里面的功能
package com.moxuan.spring01.entity;

import java.sql.Connection;
import java.sql.PreparedStatement;
import java.sql.ResultSet;
import java.sql.SQLException;

public class MysqlHeroDao implements HeroDao{

    private JDBCDataSource dataSource;

    public MysqlHeroDao(JDBCDataSource dataSource){
        this.dataSource = dataSource;
    }

    @Override
    public Hero findHeroById(int id) {
        Connection con =  dataSource.getConnection();
        String sql = "select * from hero where id=?";
        try {
            PreparedStatement pst = con.prepareStatement(sql);
            pst.setInt(1,id);
            ResultSet rs = pst.executeQuery();
            Hero hero = null;
            if(rs.next()){
                hero = new Hero();
                hero.setId(rs.getInt("id"));
                hero.setName(rs.getString("name"));
                hero.setJob(rs.getString("job"));
                hero.setSex(rs.getString("sex"));
            }
            con.close();
            return hero;
        } catch (SQLException throwables) {
            throwables.printStackTrace();
        }

        return null;
    }
}
步骤五:在applicationContext.xml中配置MysqlHeroDao,并利用构造器注入datasource。
  <bean id="dataSource" class="com.moxuan.spring01.entity.JDBCDataSource">
      <property name="driver" value="com.mysql.cj.jdbc.Driver"></property>
      <property name="url" value="jdbc:mysql://@localhost:3306/student"></property>
      <property name="user" value="root"></property>
      <property name="password" value="123456"></property>
  </bean>

  <bean id="heroDao" class="com.moxuan.spring01.entity.MysqlHeroDao">
      <!-- 引用上面的datasource-->
      <constructor-arg index="0" ref="dataSource"></constructor-arg>
  </bean>
上面代码中dataSource为按构造参数注入,这个参数是引用了id为dataSource的Bean对象。
步骤六:编写测试方法
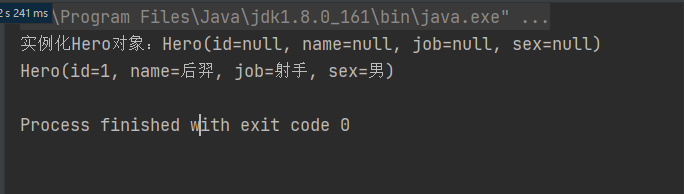
@Test
public void test09(){
    AbstractApplicationContext context =
    new ClassPathXmlApplicationContext("applicationContext.xml");
    HeroDao dao = context.getBean("heroDao",MysqlHeroDao.class);
    Hero hero = dao.findHeroById(1);
    System.out.println(hero);
}
运行效果:
6.3 利用Spring自动装配功能实现自动属性注入
HeroService类需要依赖HeroDao接口的实例实现查询hero数据的功能,也就是说要能够正确执行HeroService类型对象的查询hero数据的方法必须为HeroService对象注入HeroDao类型的实例。
请使用Spring自动装配的方式为HeroService提供HeroDao对象的实例。
步骤一:添加HeroService类,并添加根据id查询hero的方法
package com.moxuan.spring01.entity;

public class HeroService {

    private HeroDao heroDao;

    public HeroDao getHeroDao() {
        return heroDao;
    }

    public void setHeroDao(HeroDao heroDao) {
        this.heroDao = heroDao;
    }

    public Hero getHeroById(int id){
        return heroDao.findHeroById(id);
    }
}
步骤二:在applicationContext.xml中将heroDao自动装配到HeroService中。
<bean id="dataSource" class="com.moxuan.spring01.entity.JDBCDataSource">
    <property name="driver" value="com.mysql.cj.jdbc.Driver"></property>
    <property name="url" value="jdbc:mysql://@localhost:3306/student"></property>
    <property name="user" value="root"></property>
    <property name="password" value="123456"></property>
</bean>

<bean id="heroDao" class="com.moxuan.spring01.entity.MysqlHeroDao">
    <!-- 引用上面的datasource-->
<constructor-arg index="0" ref="dataSource"></constructor-arg>
</bean>

<bean id="heroService" class="com.moxuan.spring01.entity.HeroService"
  autowire="byType"></bean>
步骤三: 编写测试方法
@Test
public void test10(){
    AbstractApplicationContext context =
        new ClassPathXmlApplicationContext("applicationContext.xml");
    HeroService service = context.getBean(
        "heroService",HeroService.class);
    Hero hero = service.getHeroById(2);
    System.out.println(hero);

}
原文地址:https://blog.csdn.net/yueyehuguang/article/details/142935543
免责声明:本站文章内容转载自网络资源,如本站内容侵犯了原著者的合法权益,可联系本站删除。更多内容请关注自学内容网(zxcms.com)!