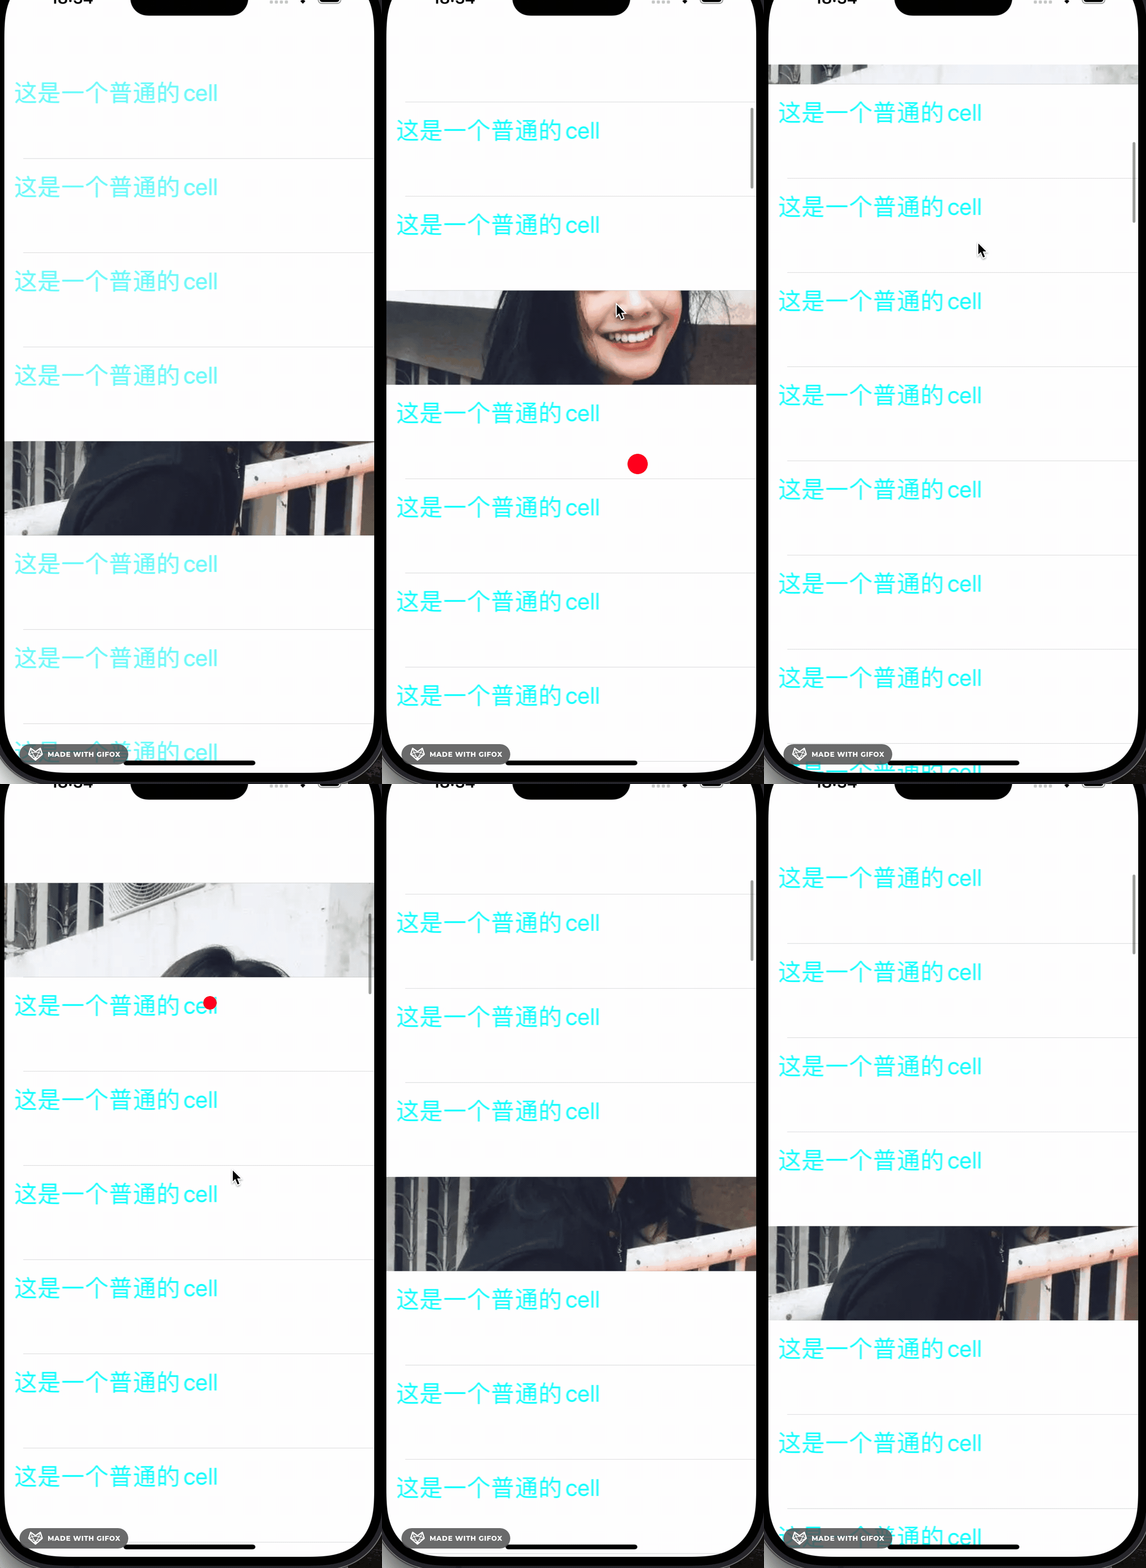
封装了一个iOS滚动厨窗效果
效果图

背景
我们要实现如图的厨窗效果,不能通过在tableView底部添加一个背景图片的方式,因为这需要修改整个tableView的背景色为透明,影响到的范围太大,只能将这个效果局限在这个cell 中,然后通过监听tableView的滚动的方式来实现
思路
以顶部为基准,在cell距离顶部为0 的时候,
展示图片的最顶部部分,在cell距离顶部的距离大于图片高度- cell高度的时候
展示图片的最底部的部分, 在滑动的过程中改变图片的frame,达到厨窗镂空展示的视觉效果
简单来说就是,当cell 从屏幕顶部到屏幕底部移动的过程中, image 同步的 相对于cell向上偏移,直到
偏移到图片的底部位置 (因为再偏移的话,就不能撑满整个cell的高度了)
注意:我们通常指考虑图片小于整个tableView展示高度的情况, 就是说我们cell展示到tabelView底部的时候(完全展示),已经展示到图片底部了,如果有大于 tableView展示高度的情况,因为我们有限展示图片顶部的,
所以,仍然是和前面同样的逻辑.由于图片高度大于tableView展示高度,则我们cell刚好展示在底部的时候,
还没有滚动到图片的底部,我们仍让可以让图片按照原来的逻辑继续修改偏移量,直到图片完全展示在cell的底部。
这种情况也是没有任何问题的。
思路:为了达到这个效果,我们不能讲tableView的背景色修改为透明背景,因为这会影响到整个列表。
这个时候,就想到,在cell中添加一个高度和图片相同的imageView, cell的clipToBounds 设置为YES,
然后随着tableView 的滚动,修改imageView的frame, 达到厨窗镂空的效果。
我们通过仔细观看这个效果可以得知,图片的frame 是和 tableView的偏移量有关系的, 更具体的说,是和cell 在屏幕中的
距离有关系的,当cell 在屏幕顶部的时候,展示的是图片的顶部,也就是这个时候图片的的frame.origin.y = 0, 然后就是在cell在屏幕中移动的过程,图片和cell的移动是同步的, cell 到屏幕的距离变大,image的frame.origin.y 就变小(因为要向上移动), 直到图片移动到cell的底部。
通过这个过程,我们得知有两个临界值, 一个就是 cell在顶部的时候,一个就是cell距离顶部的距离和高度产(图片的高度 - cell高度)相等的时候,中间的过程,origin.y = cell距离顶部的距离
这样的话就有了下面的代码逻辑
//
//  LBShowCaseCell.m
//  LBShowCase
//
//  Created by mac on 2024/6/29.
//

#import "LBShowCaseCell.h"
#define kScreenWidth \
([[UIScreen mainScreen] respondsToSelector:@selector(nativeBounds)] ? [UIScreen mainScreen].nativeBounds.size.width/[UIScreen mainScreen].nativeScale : [UIScreen mainScreen].bounds.size.width)
#define kScreenHeight \
([[UIScreen mainScreen] respondsToSelector:@selector(nativeBounds)] ? [UIScreen mainScreen].nativeBounds.size.height/[UIScreen mainScreen].nativeScale : [UIScreen mainScreen].bounds.size.height)
#define kScreenSize \
([[UIScreen mainScreen] respondsToSelector:@selector(nativeBounds)] ? CGSizeMake([UIScreen mainScreen].nativeBounds.size.width/[UIScreen mainScreen].nativeScale,[UIScreen mainScreen].nativeBounds.size.height/[UIScreen mainScreen].nativeScale) : [UIScreen mainScreen].bounds.size)


@interface LBShowCaseCell ()

@property (nonatomic, strong) UIImageView *imgView;

@end

@implementation LBShowCaseCell

- (id)initWithStyle:(UITableViewCellStyle)style reuseIdentifier:(NSString *)reuseIdentifier
{
    if (self = [super initWithStyle:style reuseIdentifier:reuseIdentifier]) {
        self.contentView.clipsToBounds = YES;
        [self.contentView addSubview:self.imgView];
    }
    return self;
}

- (void)cellOnTableView:(UITableView *)tableView didScrollView:(UIView *)view
{
    CGFloat topSpace = tableView.frame.origin.y;
    CGRect  rect = [self convertRect:self.contentView.frame toView:view];
       //旧的图片Frame
       CGRect imageRect = self.imgView.frame;
       //移动
       if (rect.origin.y > topSpace && rect.origin.y<imageRect.size.height-self.contentView.frame.size.height + topSpace) {
           imageRect.origin.y = - CGRectGetMinY(rect) + topSpace;
       }else if (rect.origin.y>imageRect.size.height-self.contentView.frame.size.height + topSpace){
           imageRect.origin.y = -(imageRect.size.height - self.contentView.frame.size.height);
       }else if(rect.origin.y< topSpace){
           imageRect.origin.y = 0;
       }
       //新的图片Frame
       self.imgView.frame = imageRect;

}

- (void)awakeFromNib {
    [super awakeFromNib];
    // Initialization code
}

- (void)setSelected:(BOOL)selected animated:(BOOL)animated {
    [super setSelected:selected animated:animated];

    // Configure the view for the selected state
}

- (UIImageView *)imgView
{
    if (!_imgView) {
        _imgView = [[UIImageView alloc] initWithFrame:CGRectMake(0, 0,kScreenWidth , 0)];
        UIImage *image = [UIImage imageNamed:@"lgx"];
        CGFloat height = kScreenWidth * image.size.height / image.size.width;
        _imgView.image = image;
        _imgView.frame = CGRectMake(0, 0, kScreenWidth, height);
    }
    return _imgView;
}

@end
链接: link
原文地址:https://blog.csdn.net/LIUXIAOXIAOBO/article/details/140068580
免责声明:本站文章内容转载自网络资源,如本站内容侵犯了原著者的合法权益,可联系本站删除。更多内容请关注自学内容网(zxcms.com)!
