linux i2c驱动实例之ISL29035
目录
概述
本文介绍ISL29035的使用方法,详细介绍了其各个寄存器的用法和配置参数,并用具体的案例介绍如何将采样数据转化为实际lux。应用linux平台架构实现其驱动程序,并编写应用App,验证驱动程序的性能。
1 认识ISL29035
1.1 ISL29035特征
ISL29035 - Integrated Digital Light Sensor with Interrupt | Renesas
ISL29035是一款数字型光感传感器,采用通用I2C接口,可实时采集环境的光照强度。其主要特点如下:
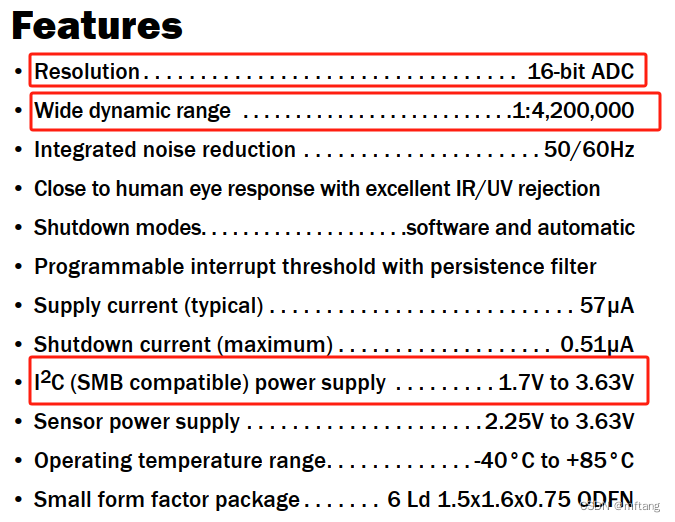
关注几个核心参数:
1) 其采用16-bit ADC采样数据,所以,该传感器有这个极高的分辨率
2)数据采样区间: 1: 420 0000
3)采用标准的I2C协议,便于使用MCU驱动该芯片
1.2 ISL29035工作电路
下图是官方给的标准工作电路,采用标准的i2c通信电路,还额外增加一个INT中断IO,用于对外提供一个报警信号,其在低电平时有效。
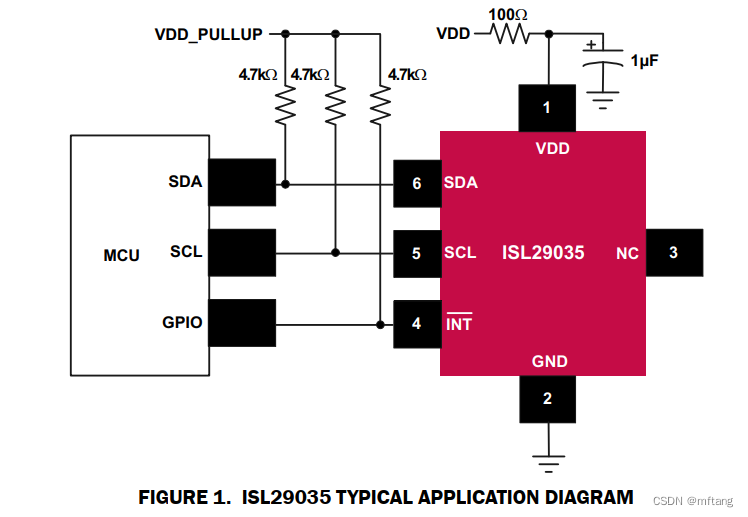
sensor IO接口定义如下:

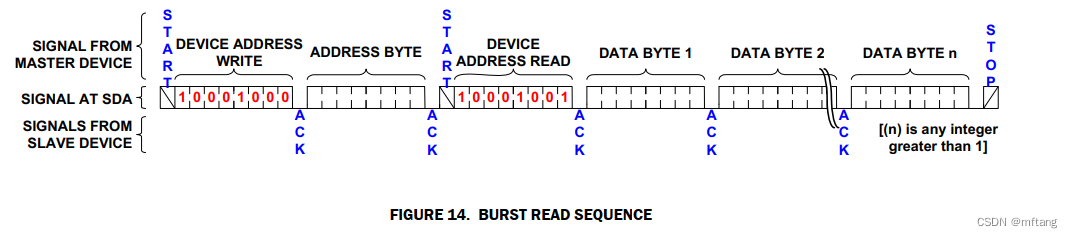
1.3 ISL29035工作时序分析
1) 写数据时序

2) 读数据时序

3) 连续读多个数据时序
1.4 ISL29035相关的寄存器
其主要寄存器如下表:

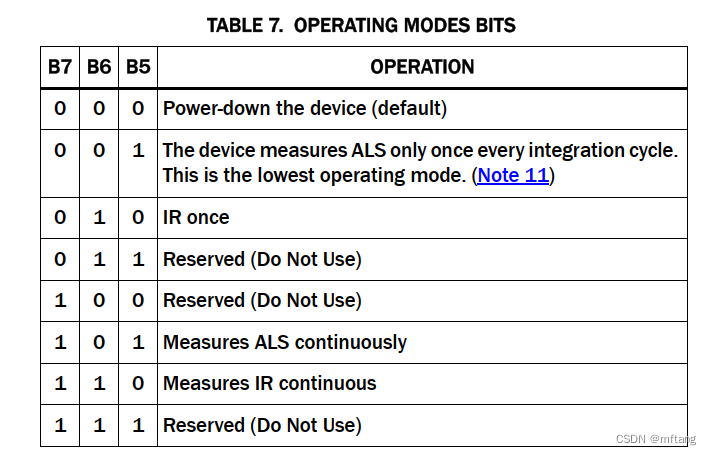
1.4.1 COMMAND-1( 0x00 )

其中:B7,B6,B5用于配置 采样方式,例如:配置为101则为连续采样模式
1.4.2 COMMAND-11(0x01)

在该寄存器中,B0和B1用于配置lux的范围

B3和B2用于配置ADC的采样精度:

1.4.3 DATA寄存器(0x02和0x03)
data寄存器的地址分别为0x02(数据低 8个 bit)和0x03(数据高8个bit)

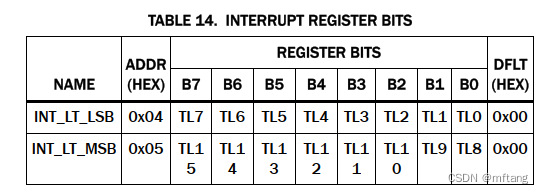
1.4.4 中断报警寄存器(0x04和0x05)
该寄存器的值用于设置报警数据的下限值
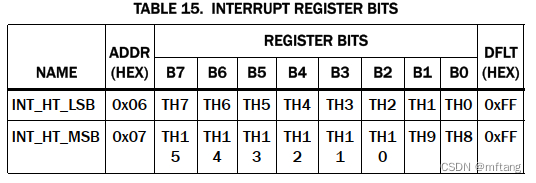
1.4. 5 中断报警寄存器(0x06和0x07)
该寄存器的值用于设置报警数据的上限值
1.4. 6 ID寄存器(0x0f)
该寄存器用于存在sensor的ID值

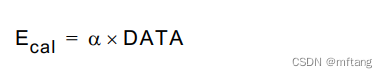
1.5 采样值到实际Lux值转换
根据datasheet的资料可得:
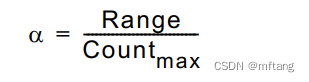
Range 可取的值(Lux): 1000, 4000, 16000, 64000
Count( Max) 可取的值: 16, 256, 4096, 65536
举个例子:
配置 address = 0x01寄存器, B3B2 = 10, adc 采样为8bit, Count(max) = 256
B1B0 = 01, Lux的range = 4000
当前从DATA寄存器读取的值为: 120, 其对应的lux值为 val = (4000/256)* 120
2 编写ISL29035驱动程序
驱动程序 .c 文件
/***************************************************************
Copyright  2024-2029. All rights reserved.
文件名     : drv_isl29035.c
作者       : tangmingfei2013@126.com
版本       : V1.0
描述       : isl29035驱动程序
其他       : 无
日志       : 初版V1.0 2024/02/01

***************************************************************/
#include <sys/types.h>
#include <sys/stat.h>
#include <linux/types.h>
#include <linux/i2c-dev.h>
#include <linux/i2c.h>
#include <sys/ioctl.h>
#include <unistd.h>
#include <stdio.h>
#include <string.h>
#include <fcntl.h>
#include <stdlib.h>
#include <linux/fs.h>
#include <errno.h>
#include <assert.h>
#include <string.h>
#include <time.h>

/* isl29035 i2c address */
#define ISL29035_ADDR                          (0x44U)

/* isl29035 register */
#define ISL29035_COMMAND_1_ADDR                (0x00U)
#define ISL29035_COMMAND_2_ADDR                (0x01U)
#define ISL29035_DATA_L_ADDR                   (0x02U)
#define ISL29035_DATA_H_ADDR                   (0x03U)
#define ISL29035_INT_LT_LSB_ADDR               (0x04U)
#define ISL29035_INT_LT_MSB_ADDR               (0x05U)
#define ISL29035_INT_HT_LSB_ADDR               (0x06U)
#define ISL29035_INT_HT_MSB_ADDR               (0x07U)
#define ISL29035_ID_ADDR                       (0x0FU)

/* 10100000: enable ALS consinuously  */
#define ISL29035_COMMAND_1_INIT                (0xA0U)

/* 00000110: Lux full scale range is 4000 and ADC  */
#define ISL29035_COMMAND_2_INIT                (0x06U)

/* ISL29035 ADC resolution */
#define ISL29035_RES_16BIT                     (65536U)
#define ISL29035_RES_12BIT                     (4096U)
#define ISL29035_RES_8BIT                      (256U)
#define ISL29035_RES_4BIT                      (16U)

/* ISL29035 full scale lux range */
#define ISL29035_LUX_SCALE_1K                  (1000U)
#define ISL29035_LUX_SCALE_4K                  (4000U)
#define ISL29035_LUX_SCALE_16K                 (16000U)
#define ISL29035_LUX_SCALE_64K                 (64000U)


#define DEV_FILE                                "/dev/i2c-1"

static int fd = -1;


static unsigned int convert_lux(unsigned int data)
{
   return (unsigned int)((double)ISL29035_LUX_SCALE_4K / (double)ISL29035_RES_8BIT * data);
}

static int isl29035_drv_init(void)
{
    fd = open(DEV_FILE, O_RDWR);
    if( fd < 0 )
    {
        close( fd );
        printf("%s %s i2c device open failure: %s\n", __FILE__, __FUNCTION__, strerror(errno));
        return -1;
    }

    ioctl(fd, I2C_TENBIT, 0);
    ioctl(fd, I2C_SLAVE, ISL29035_ADDR);

    return fd;
}

int isl29035_init(void)
{
    int ret;
    unsigned char   buff[2];

    isl29035_drv_init();

    buff[0] = ISL29035_COMMAND_1_ADDR;
    buff[1] = ISL29035_COMMAND_1_INIT;
    ret = write(fd, buff, 2);
    if( ret < 0 )
    {
        printf("write temper cmd to isl29035 register failure.\n");
        return -1;
    }

    buff[0] = ISL29035_COMMAND_2_ADDR;
    buff[1] = ISL29035_COMMAND_2_INIT;
    ret = write(fd, buff, 2);
    if( ret < 0 )
    {
        printf("write temper cmd to isl29035 register failure.\n");
        return -1;
    }

    return 0;
}

int isl29035_read_lux(unsigned int *lux )
{
    int ret;
    unsigned char   buff[1];
    unsigned int tempval;

    buff[0] = ISL29035_DATA_L_ADDR;
    ret = write(fd, buff, 1);
    if( ret < 0 )
    {
        printf("write  cmd to isl29035 register failure.\n");
        return -1;
    }

    ret = read(fd, buff, 1);
    if( ret < 0 )
    {
        printf("get the lux value failure.\n");
        return -1;
    }

    tempval = buff[0];

    buff[0] = ISL29035_DATA_H_ADDR;
    ret = write(fd, buff, 1);
    if( ret < 0 )
    {
        printf("write  cmd to isl29035 register failure.\n");
        return -1;
    }

    ret = read(fd, buff, 1);
    if( ret < 0 )
    {
        printf("get the lux value failure.\n");
        return -1;
    }

    tempval |= buff[0]<<8;
    printf("tempval = %d \r\n", tempval);

    *lux = convert_lux( tempval );

    return 0;
}
驱动文件 .h
#ifndef __DRV_ISL29035_H
#define __DRV_ISL29035_H

#ifdef __cplusplus
extern "C" {
#endif

int isl29035_init(void);
int isl29035_read_lux(unsigned int *lux );

#ifdef __cplusplus
}
#endif

#endif /* __DRV_ISL29035_H */
3 编写ISL29035应用程序
该程序主要实现,从sensor中读取lcount值,并将其转换成环境实际的lux值,其代码如下:
/***************************************************************
Copyright  2024-2029. All rights reserved.
文件名     : test_isl19035.c
作者       : tangmingfei2013@126.com
版本       : V1.0
描述       : 验证dev_isl19035.c
其他       : 无
日志       : 初版V1.0 2024/02/01

***************************************************************/
#include <sys/types.h>
#include <sys/stat.h>
#include <linux/types.h>
#include <linux/i2c-dev.h>
#include <linux/i2c.h>
#include <unistd.h>
#include <stdio.h>
#include <string.h>
#include <fcntl.h>
#include <stdlib.h>
#include <linux/fs.h>
#include <sys/ioctl.h>
#include <errno.h>
#include <assert.h>
#include <string.h>
#include <time.h>
#include "drv_isl29035.h"

int main(void)
{
    unsigned int temper;
    int count_run = 10000;
    int set;

    set = isl29035_init();
    if( set < 0){
        printf("initial isl19035 failure.\n");
        return -1;
    }

    while( count_run > 0){
        set = isl29035_read_lux( &temper );
        if(set != -1)
        {
            printf( "\r\n lux:  %d ", temper);
        }
        else{
            printf("read isl19035 failure.\n");
        }
        count_run--;

        sleep(1);
    }

    return 0;
}
4 运行应用程序App
4.1 编译测试程序
编写测试程序的Makefile
CFLAGS= -Wall -O2
CC=/home/ctools/gcc-linaro-4.9.4-arm-linux-gnueabihf/bin/arm-linux-gnueabihf-gcc
STRIP=/home/ctools/gcc-linaro-4.9.4-arm-linux-gnueabihf/bin/arm-linux-gnueabihf-strip

test_isl29035: test_isl29035.o drv_isl29035.o
$(CC) $(CFLAGS) -o test_isl29035 test_isl29035.o drv_isl29035.o
$(STRIP) -s test_isl29035

clean:
rm -f test_isl29035 test_isl29035.o drv_isl29035.o
使用Make命令,编译该程序。然后将生成的bin文件copy到NFS挂载的目录下,方便在板卡运行该App。

4.2 运行测试程序
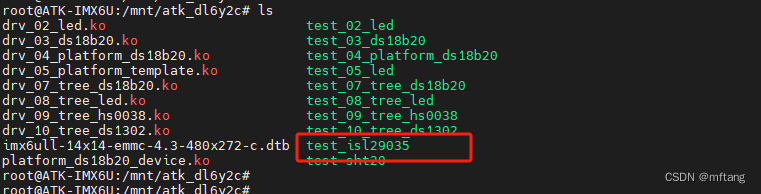
进入到NFS挂载目录下,可以看到生成的App文件:
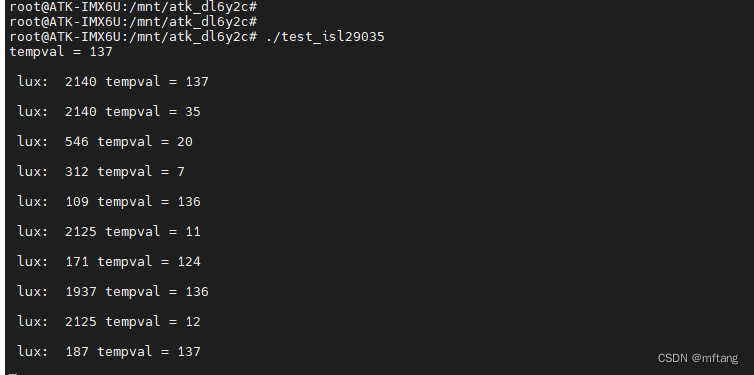
运行测试程序,可以得到实际环境中的lux值,使用障碍物遮挡sensor,可以看到光照强度的变化
5 逻辑分析仪查看波形
使用逻辑分析查看一个完整的读取实时lux值波形图:

原文地址:https://blog.csdn.net/mftang/article/details/136009956
免责声明:本站文章内容转载自网络资源,如本站内容侵犯了原著者的合法权益,可联系本站删除。更多内容请关注自学内容网(zxcms.com)!