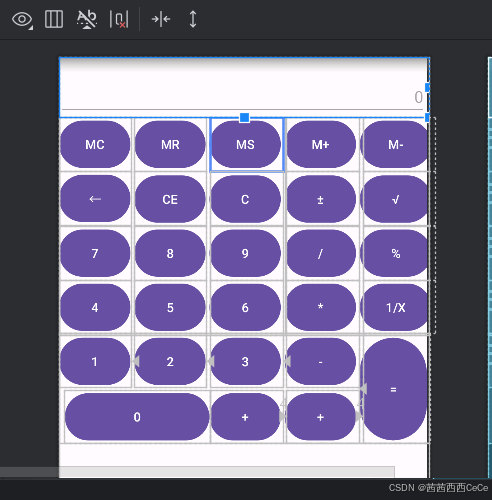
移动技术开发:简单计算器界面
1 实验名称
简单计算器界面
2实验目的
掌握基本布局管理器的使用方法和基本控件的使用方法,以及事件监听处理的使用方法
3 实验源代码
布局文件代码:
<?xml version="1.0" encoding="utf-8"?>
<LinearLayout xmlns:android="http://schemas.android.com/apk/res/android"
    android:orientation="vertical"
    android:layout_width="match_parent"
    android:layout_height="match_parent">

    <EditText
        android:layout_width="match_parent"
        android:layout_height="wrap_content"
        android:hint="0"
        android:gravity="right|bottom"
        android:minLines="2"
        android:enabled="false"
        />

    <GridLayout
        android:layout_width="match_parent"
        android:layout_height="wrap_content"
        android:columnCount="5"
        >

        <Button
            style="@style/btnStyle"
            android:text="MC"
            />

        <Button
            style="@style/btnStyle"
            android:text="MR"
            />

        <Button
            style="@style/btnStyle"
            android:text="MS"
            />

        <Button
            style="@style/btnStyle"
            android:text="M+"
            />

        <Button
            style="@style/btnStyle"
            android:text="M-"
            />

        <Button
            style="@style/btnStyle"
            android:text="←"
            />

        <Button
            style="@style/btnStyle"
            android:text="CE"
            />

        <Button
            style="@style/btnStyle"
            android:text="C"
            />

        <Button
            style="@style/btnStyle"
            android:text="±"
            />

        <Button
            style="@style/btnStyle"
            android:text="√"
            />

        <Button
            style="@style/btnStyle"
            android:text="7"
            />

        <Button
            style="@style/btnStyle"
            android:text="8"
            />

        <Button
            style="@style/btnStyle"
            android:text="9"
            />

        <Button
            style="@style/btnStyle"
            android:text="/"
            />

        <Button
            style="@style/btnStyle"
            android:text="%"
            />

        <Button
            style="@style/btnStyle"
            android:text="4"
            />

        <Button
            style="@style/btnStyle"
            android:text="5"
            />

        <Button
            style="@style/btnStyle"
            android:text="6"
            />

        <Button
            style="@style/btnStyle"
            android:text="*"
            />

        <Button
            style="@style/btnStyle"
            android:text="1/X"
            />


    </GridLayout>

    <RelativeLayout
        android:layout_width="match_parent"
        android:layout_height="wrap_content">
        <Button
            android:id="@+id/btnOne"
            style="@style/btnStyle"
            android:text="1"
            />
        <Button
            android:id="@+id/btnTwo"
            style="@style/btnStyle"
            android:text="2"
            android:layout_toRightOf="@id/btnOne"
            />
        <Button
            android:id="@+id/btnThree"
            style="@style/btnStyle"
            android:text="3"
            android:layout_toRightOf="@id/btnTwo"
            />
        <Button
            android:id="@+id/bar"
            style="@style/btnStyle"
            android:text="-"
            android:layout_toRightOf="@id/btnThree"
            />
        <Button
            android:id="@+id/btnEqual"
            android:layout_width="80dp"
            android:layout_height="122dp"
            android:text="="
            android:layout_toRightOf="@id/bar"
            />

        <Button
            android:id="@+id/btnAdd"
            style="@style/btnStyle"
            android:text="+"
            android:layout_toLeftOf="@id/btnEqual"
            android:layout_alignBottom="@+id/btnEqual"
            />

        <Button
            android:id="@+id/btnDot"
            style="@style/btnStyle"
            android:text="+"
            android:layout_toLeftOf="@id/btnAdd"
            android:layout_alignBottom="@+id/btnEqual"
            />

        <Button
            android:layout_width="162dp"
            android:layout_height="60dp"
            android:text="0"
            android:layout_toLeftOf="@id/btnDot"
            android:layout_alignBottom="@id/btnEqual"
            />

    </RelativeLayout>
</LinearLayout>
java代码:
package com.example.linearlayoutdemo;

import android.os.Bundle;
import androidx.activity.EdgeToEdge;
import androidx.appcompat.app.AppCompatActivity;
import androidx.core.graphics.Insets;
import androidx.core.view.ViewCompat;
import androidx.core.view.WindowInsetsCompat;

public class MainActivity extends AppCompatActivity {

    @Override
    protected void onCreate(Bundle savedInstanceState) {
        super.onCreate(savedInstanceState);
        EdgeToEdge.enable(this);
        setContentView(R.layout.activity_main);
        ViewCompat.setOnApplyWindowInsetsListener(findViewById(R.id.main), (v, insets) -> {
            Insets systemBars = insets.getInsets(WindowInsetsCompat.Type.systemBars());
            v.setPadding(systemBars.left, systemBars.top, systemBars.right, systemBars.bottom);
            return insets;
        });
    }
}
4 实验运行结果图

5 实验总结
在calculator.xml布局文件中对计算器的整体进行布局,包括一个文本编辑框、十个数字按钮以及一些功能按钮。
在写布局文件的过程中,一些功能键名称无法从键盘上直接输入,要从别的地方复制粘贴过来才行。
原文地址:https://blog.csdn.net/cxx0316/article/details/142369131
免责声明:本站文章内容转载自网络资源,如本站内容侵犯了原著者的合法权益,可联系本站删除。更多内容请关注自学内容网(zxcms.com)!
