初学ELK - elk部署
一、简介
ELK是3个开源软件组合,分别是 Elasticsearch ,Logstash,Kibana
Elasticsearch :是个开源分布式搜索引擎,提供搜集、分析、存储数据三大功能。它的特点有:分布式,零配置,自动发现,索引自动分片,索引副本机制,restful风格接口,多数据源,自动搜索负载等。主要负责将日志索引并存储起来,方便业务方检索查询。
Logstash : 主要是用来日志的搜集、分析、过滤日志的工具,支持大量的数据获取方式。一般工作方式为c/s架构,client端安装在需要收集日志的主机上,server端负责将收到的各节点日志进行过滤、修改等操作在一并发往elasticsearch上去。是一个日志收集、过滤、转发的中间件,主要负责将各条业务线的各类日志统一收集、过滤后,转发给 Elasticsearch 进行下一步处理。
Kibana :Kibana可以为 Logstash 和 ElasticSearch 提供的日志分析友好的 Web 界面,可以帮助汇总、分析和搜索重要数据日志。
二、部署
主机环境:
系统:CentOS Linux release 7.9.2009 (Core)
地址:192.168.92.42
本次是单机部署所有软件,确保主机配置不少于2c4g
软件包均为rpm包
-
软件包下载地址
Elasticsearch: https://www.elastic.co/cn/downloads/elasticsearch
Logstash:https://www.elastic.co/cn/downloads/logstash
Kibana:https://www.elastic.co/cn/downloads/kibana -
主机环境配置
# 关闭防火墙
systemctl disable firewalld --now
# 关闭selinux
setenforce 0
sed -i 's/SELINUX=enforcing/SELINUX=disabled/g' /etc/selinux/config
# 关闭swap分区 注释掉/etc/fstab和swap分区有关的信息
swapoff -a
# 设置主机名
hostnamectl set-hostname elk
su
# 下载相关软件
yum -y install lrzsz vim net-tools zip unzip bzip2 wget
- 安装Elasticsearch
Elasticsearch 依赖JDK8环境,所以在安装前需要安装jdk1.8,Centos可以直接使用yum安装:
yum -y install java-1.8.0-openjdk-devel
下载软件包:
cd /opt
wget https://artifacts.elastic.co/downloads/elasticsearch/elasticsearch-8.13.1-x86_64.rpm
安装
rpm -ivh elasticsearch-8.13.1-x86_64.rpm
修改配置文件
[root@elk opt]# vim /etc/elasticsearch/elasticsearch.yml
# 集群名称
cluster.name: ELK
# 当前节点名称
node.name: elk
# 对外通信地址
network.host: 192.168.92.42
# web端口,默认9200
http.port: 9200
# 安全
xpack.security.enabled: false
# 开启跨域
http.cors.enabled: true
http.cors.allow-origin: "*"
启动Elasticsearch
systemctl enable elasticsearch --now
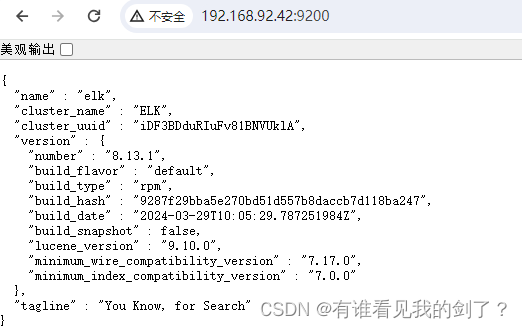
访问测试

安装elasticsearch-head插件
elasticsearch-head这个插件是es提供的一个用于图形化界面查看的一个插件工具,可以安装上这个插件之后,通过这个插件来实现我们通过浏览器查看es当中的数据
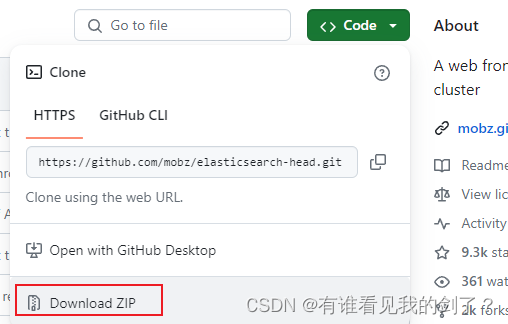
下载地址:https://github.com/mobz/elasticsearch-head,如果能克隆下来,就克隆下来,前期是需要安装git, 不能克隆就下载下来上传到服务器上。

上传到/opt目录,并解压

配置node环境
cd /opt
wget https://nodejs.org/dist/v12.13.1/node-v12.13.1-linux-x64.tar.gz
tar -zcvf node-v12.13.1-linux-x64.tar.gz
mv node-v12.13.1-linux-x64  node
# 配置环境变量
echo 'export NODE_HOME=/usr/local/node' >> /etc/profile
echo 'export PATH=$NODE_HOME/bin:$PATH' >> /etc/profile
source /etc/profile
# 查看版本
node -v
npm -v
进入到 /opt/elasticsearch-head-master 目录进行构建
cd /opt/elasticsearch-head-master
npm install
npm WARN notice [SECURITY] lodash has the following vulnerability: 1 low. Go here for more details:
npm WARN notice [SECURITY] debug has the following vulnerability: 1 low. Go here for more details: https://nodesecurity.io/advisories?search=debug&version=0.7.4 - Run `npm i npm@latest -g` to upgrade your npm version, and then `npm audit` to get more info.
npm ERR! Unexpected end of input at 1:2096
npm ERR! 7c1a1bc21c976bb49f3ea","tarball":"https://registry.npmjs.org/safer-bu
npm ERR!                                                                      ^
npm ERR! A complete log of this run can be found in:
npm ERR!     /opt/bigdata/soft/.npm/_logs/2020-11-27T14_35_39_453Z-debug.log
以上错误可以忽略
修改配置文件(注意自己的目录)
cd /opt/elasticsearch-head-master/node_modules/grunt/bin
# 启动
[root@elk bin]# ./grunt server
>> Local Npm module "grunt-contrib-jasmine" not found. Is it installed?

Running "connect:server" (connect) task
Waiting forever...
Started connect web server on http://192.168.92.42:9100
后台运行 nohup ./grunt server &> /dev/null &
访问测试
由于我没有搭建集群所以,集群健康值是灰色的

原文地址:https://blog.csdn.net/qq_50247813/article/details/137518534
免责声明:本站文章内容转载自网络资源,如本站内容侵犯了原著者的合法权益,可联系本站删除。更多内容请关注自学内容网(zxcms.com)!
