JS - 事件处理:鼠标移动监听事件、div块跟随鼠标移动事件、事件的绑定、实现拖拽效果
在DOM中,每个HTML元素都可以绑定各种事件,例如点击事件(click)、鼠标移入事件(mouseover)、键盘按下事件(keydown)等。当事件发生时,可以触发相应的事件处理程序(事件监听器),执行特定的操作。
常见的事件处理方式包括:
- HTML事件处理程序:直接在HTML元素上使用事件属性(比如onclick、onmouseover)来指定事件处理函数。
<button onclick="myFunction()">Click me</button> - DOM属性事件处理程序:通过JavaScript代码为DOM元素的事件属性赋值来指定事件处理函数。
document.getElementById("myButton").onclick = function() { // 事件处理逻辑 }; - DOM方法事件处理程序:使用addEventListener()方法或attachEvent()方法(在IE中)来为元素添加事件监听器。
document.getElementById("myButton").addEventListener("click", function() { // 事件处理逻辑 }); - 事件委托:将事件处理程序绑定在父元素上,通过事件冒泡的机制来处理子元素的事件,提高性能和代码简洁度。
document.getElementById("parentElement").addEventListener("click", function(event) { if (event.target.tagName === 'BUTTON') { // 处理按钮点击事件 } }); - 第三方库或框架:许多JavaScript库和框架(如jQuery、React、Vue等)提供了自己的事件绑定机制,简化了事件处理的操作。
事件处理程序通常是一个JavaScript函数,可以在事件发生时被调用执行。事件对象(Event Object)会被传递给事件处理程序,包含了关于事件的详细信息,比如事件类型、触发的元素等。
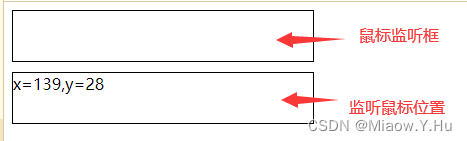
鼠标移动监听事件
<!DOCTYPE html>
<html lang="en">
<head>
    <meta charset="UTF-8">
    <meta http-equiv="X-UA-Compatible" content="IE=edge">
    <meta name="viewport" content="width=device-width, initial-scale=1.0">
    <title>Document</title>
    <style type="text/css">
    #areaDiv
    {
        border: 1px solid black;
        width: 300px;
        height: 50px;
        margin-bottom: 10px;
    }
    #showMsg
    {
        border: 1px solid black;
        width: 300px;
        height: 50px;
        margin-bottom: 10px;
    }
    </style>

    <script type="text/javascript">
    window.onload=function()
    {
        //当鼠标在areaDiv中移动时,在showMsg中来显示鼠标的坐标
        //来获取两个div
        var areaDiv=document.getElementById("areaDiv");
        var showMsg=document.getElementById("showMsg");

        //onmousemove
        //该事件将会在鼠标元素移动中被触发
        //事件对象
        //当事件的响应函数触发时,浏览器每次都会将一个事件对象作为实参传递进响应函数
        //在事件对象当中封装了当前事件相关的一切信息,比如,鼠标的坐标,键盘哪个键本按下,鼠标滚轮滚动的方向
        areaDiv.onmousemove=function(event)
        {
            //IE8中,响应函数处罚时,浏览器不会传递事件对象
            //在IE8及以下的浏览器中,是将事件对象作为window对象的属性保存的
            //即window.event.clientX和window.event.client

            //console.log(event);
            //在showMsg中显示鼠标移动的坐标
            //clientX返回当前事件触发时,鼠标指针的水平坐标
            //clientY返回当前事件触发时,鼠标指针的垂直坐标
            var x=event.clientX;
            var y=event.clientY;
            //console.log("x="+x+",y="+y);
            showMsg.innerHTML="x="+x+",y="+y;
        };
    };
    </script>
</head>
<body>
    <div id="areaDiv"></div>
    <div id="showMsg"></div>
</body>
</html>
div块跟随鼠标移动事件
<!DOCTYPE html>
<html lang="en">
<head>
    <meta charset="UTF-8">
    <meta http-equiv="X-UA-Compatible" content="IE=edge">
    <meta name="viewport" content="width=device-width, initial-scale=1.0">
    <title>Document</title>
    <style type="text/css">
    #box1
    {
        width:30px;
        height: 30px;
        background-color: red;
        /*开启绝对定位*/
        position:absolute;
    }
html{
  cursor: url('https://npm.elemecdn.com/akilar-candyassets/cur/arrow.cur'),auto !important;
}
    </style>

    <script type="text/javascript">
    window.onload=function()
    {
        //使div可以跟随鼠标移动
        //获取box1
        var box1=document.getElementById("box1");
        //锁定鼠标移动事件
        document.onmousemove=function(event)
        {
            //获取鼠标的坐标
            //鼠标坐标定位是相对于当前浏览器框的定位
            //clientX和clientY是相当于浏览器框的定位
            //pageX和pageY是相对于页面的定位
            //var left=event.clientX;
            //var top=event.clientY;
            var left=event.pageX;
            var top=event.pageY;
            //pageX和page这两个属性在IE8中不支持,所以如果需要兼容IE8,就不能使用


            //设置div的偏移量
            box1.style.left=left+"px";
            box1.style.top=top+"px";
        };

        //获取box2
        var box2=document.getElementById("box2");
        box2.onmousemove=function(event)
        {
            event.cancelBubble=true;
        };
    };
    </script>
</head>
<body style="height: 1000px;width: 2000px;">
    <div id="box2" style="width: 500px;height: 500px;background-color: #bfa;"></div>
    <div id="box1"></div>
</body>
</html>
事件的冒泡
<!DOCTYPE html>
<html lang="en">
<head>
    <meta charset="UTF-8">
    <meta http-equiv="X-UA-Compatible" content="IE=edge">
    <meta name="viewport" content="width=device-width, initial-scale=1.0">
    <title>Document</title>
    <style type="text/css">
    #box1
    {
        width: 200px;
        height: 200px;
        background-color: yellowgreen;
    }
    #s1
    {
        background-color: yellow;
    }
    </style>

    <script type="text/javascript">
    window.onload=function()
    {
        //事件的冒泡
        //所谓的冒泡指的就是事件上的向上传导,当后代元素上的事件被触发时,其祖先元素的相同事件也会被触发
        //在开发中大部分情况冒泡都是有用的,如果不希望发生事件冒泡,可以通过事件对象取消冒泡

        //为s1绑定一个单击响应函数
        var s1=document.getElementById("s1");
        s1.onclick=function(event)
        {
            console.log("我是span的单击响应函数");

            //取消冒泡
            //可以将事件对象的cancelBubble设置为true,即可取消
            event.cancelBubble=true;
        };

        //为box1绑定一个单击响应函数
        var box1=document.getElementById("box1");
        box1.onclick=function(event)
        {
            console.log("我是box1的单击响应函数");

            //取消冒泡
            event.cancelBubble=true;
        };

        //为body绑定一个单击响应函数
        document.body.onclick=function()
        {
            console.log("我是body的单击响应函数");
        };
    };
    </script>
</head>
<body>
    <div id="box1">
        我是box1
        <span id="s1">我是span</span>
    </div>
</body>
</html>
事件的委托
<!DOCTYPE html>
<html lang="en">
<head>
    <meta charset="UTF-8">
    <meta http-equiv="X-UA-Compatible" content="IE=edge">
    <meta name="viewport" content="width=device-width, initial-scale=1.0">
    <title>Document</title>
    <script type="text/javascript">
    window.onload=function()
    {
        //点击按钮以后添加超链接
        var btn01=document.getElementById("btn01");
        var u1=document.getElementById("u1");
        btn01.onclick=function()
        {
            //console.log("添加一个超链接");

            //创建一个li
            var li=document.createElement("li");

            li.innerHTML="<a href='javascript:;'>新建的超链接class='link'</a>";

            //将li添加到ul中
            u1.appendChild(li);
        };

        //为每一个超链接都绑定一个单击响应函数
        //为每一个超链接都绑定一个单击响应函数,这种操作比较麻烦
        //而且这些操作只能为已有的超链接设置事件,而新添加的超链接必须重新绑定

        /*
        //获取所有的a
        var allA=document.getElementsByTagName("a");
        //遍历
        for(var i=0;i<allA.length;i++)
        {
            console.log(allA[i]);
            allA[i].οnclick=function()
            {
                console.log("我是a的单击响应函数");
            };
        }
        */

        //我们希望只绑定一次事件,即可应用到所有的元素上.即时元素时后面添加的
        //我们可以尝试将其绑定给元素的共同的祖先元素
        //事件的委派
        //指将事件统一绑定给元素的共同的祖先元素,这样当后台元素上的事件被触发时,会一直冒泡祖先元素
        //从而通过祖先元素的响应函数来处理事件
        //事件委培利用了冒泡,通过委派可以减少事件绑定的次数,提高程序的性能

        //给ul绑定一个单击响应函数
        //这样ul的子元素全都有单击响应函数
        u1.onclick=function(event)
        {
            //这样绑定存在一个缺点,UI存在的区域全是判定区域,随便点击都能触发事件
            //所以需要定一个标准,如果触发事件的对象睡我们期望的元素,则继续执行,否则不执行
            //console.log("我是a的单击响应函数");

            //先检查一下target属性
            //event中的targe表示的触发事件的对象
            //确定target是被点击的对象
            if(event.target.className == "link")
            {
                console.log("我是ul的单击响应函数");
            }
        };
    };
    </script>
</head>
<body>
    <button id="btn01">添加超链接</button>
    <br>
    <ul id="u1">
        <li>我是li文档</li>
        <li><a href="javascript:;" class="link">超链接一</a></li>
        <li><a href="javascript:;" class="link">超链接二</a></li>
        <li><a href="javascript:;" class="link">超链接三</a></li>
    </ul>
</body>
</html>
事件的绑定
<!DOCTYPE html>
<html lang="en">
<head>
    <meta charset="UTF-8">
    <meta http-equiv="X-UA-Compatible" content="IE=edge">
    <meta name="viewport" content="width=device-width, initial-scale=1.0">
    <title>Document</title>
    <script type="text/javascript">
    window.onload=function()
    {
        //点击按钮以后弹出一个内容
        var btn01=document.getElementById("btn01");
        //使用 对象.事件=函数的形式绑定响应函数
        //他只能同时为一个元素的一个事件绑定一个响应函数,不能绑定多个,不然会出现覆盖

        /*
        btn01.οnclick=function()
        {
            console.log("1");
        }
        //为btn01绑定第二个单击响应函数,这样会造成函数覆盖
        btn01.οnclick=function()
        {
            console.log("2");
        }
        */

        //addEventListener()
        //通过这个方法也可以为元素绑定响应函数
        //参数: 1.事件的字符串,要把on舍去 2.回调函数,当事件触发时,该函数会被调用
        // 3.是否在捕获阶段触发事件,需要一个布尔值,一般都传false
        //使用它可以同时为一个元素的相同事件同时绑定多个响应函数
        //当事件被触发时,响应函数将会按照函数的绑定顺序执行
        btn01.addEventListener("click",function()
        {
            console.log(123);
        },false);

        btn01.addEventListener("click",function()
        {
            console.log(456);
        },false);
    };
    </script>
</head>
<body>
    <button id="btn01">点我一下</button>
</body>
</html>
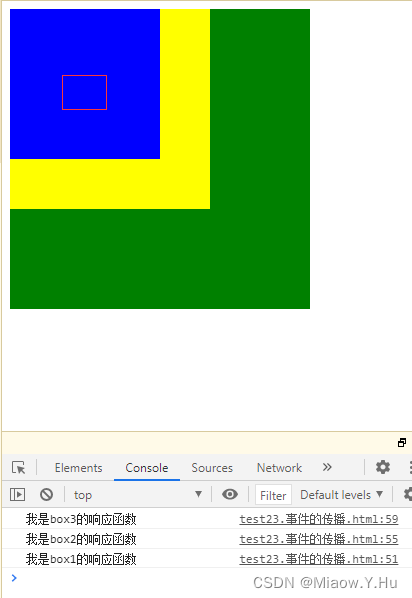
事件的传播
事件传播是指当事件发生在DOM元素上时,该事件如何在DOM树中传播到其他元素的过程。事件传播分为三个阶段:捕获阶段(capturing phase)、目标阶段(target phase)和冒泡阶段(bubbling phase)。这三个阶段统称为事件流(event flow)。
-
捕获阶段:事件从最外层的祖先元素向目标元素传播的阶段。在捕获阶段中,事件会依次经过祖先元素,直到达到目标元素。
-
目标阶段:事件达到目标元素后,在目标元素上触发相应的事件处理程序。
-
冒泡阶段:事件从目标元素开始,沿着DOM树向外传播的阶段。在冒泡阶段中,事件会依次经过目标元素的祖先元素,直到达到最外层的祖先元素。
在事件传播过程中,可以通过事件处理程序的第三个参数来控制事件的传播方式。如果第三个参数为true,则表示在捕获阶段处理事件;如果为false(默认值),则表示在冒泡阶段处理事件。
事件传播的机制使得可以在DOM树的不同层次上捕获和处理事件,同时也提供了事件委托(event delegation)的可能性。通过在祖先元素上绑定事件处理程序,可以在冒泡阶段捕获子元素上的事件,减少事件处理程序的数量,提高性能和代码简洁度。
<!DOCTYPE html>
<html lang="en">
<head>
    <meta charset="UTF-8">
    <meta http-equiv="X-UA-Compatible" content="IE=edge">
    <meta name="viewport" content="width=device-width, initial-scale=1.0">
    <title>Document</title>
    <style type="text/css">
    #box1
    {
        width: 300px;
        height: 300px;
        background-color: green;
    }
    #box2
    {
        width: 200px;
        height: 200px;
        background-color: yellow;
    }
    #box3
    {
        width: 150px;
        height: 150px;
        background-color: blue;
    }
    </style>

    <script type="text/javascript">
    window.onload=function()
    {
        //分别为三个div绑定单击响应函数
        var box1=document.getElementById("box1");
        var box2=document.getElementById("box2");
        var box3=document.getElementById("box3");

        //事件的传播
        //关于事件的传播网景公司和微软公司有不同的理解
        //微软公司认为事件应该是由内向外传播,也就是事件触发时,先触发当前元素上的事件
        //然后再向当前元素的祖先元素上传播,事件应该在冒泡阶段执行
        //网景公司认为事件应该是在由外向内传播,也就是当事件触发时,应该先触发当前元素的最外层的祖先元素的事件
        //然后再向内传播给后代元素
        //最后是W3C综合两个公司的方案,将事件传播分成了三个阶段
        //1.捕获阶段 由最外层的祖先元素向目标元素进行事件的捕获,但默认此时不会触发事件
        //2.目标阶段 事件捕获到目标元素,捕获结束开始在目标元素上触发事件
        //3.冒泡阶段 事件从目标元素向他的祖先元素传递,依次触发祖先元素上的事件
        //如果希望在捕获阶段触发事件,可以将addEventListener()的第三个参数设置为true
        //一般情况下我们不会希望在捕获阶段触发事件,所以这个参数一般都是false
        box1.addEventListener("click",function()
        {
            console.log("我是box1的响应函数");
        },false);
        box2.addEventListener("click",function()
        {
            console.log("我是box2的响应函数");
        },false);
        box3.addEventListener("click",function()
        {
            console.log("我是box3的响应函数");
        },false);
    }
    /*
    function bind(obj,eventStr,callback)
    {
        if(obj.addEventListener)
        {
            obj.addEventListener(event,callback,false);
        }
        else
        {
            obj.attachEvent("on"+eventStr,function()
            {
                callback.call(obj);
            }
            );
        }
    }
    */
    </script>
</head>
<body>
    <div id="box1">
        <div id="box2">
            <div id="box3"></div>
        </div>
    </div>
</body>
</html>
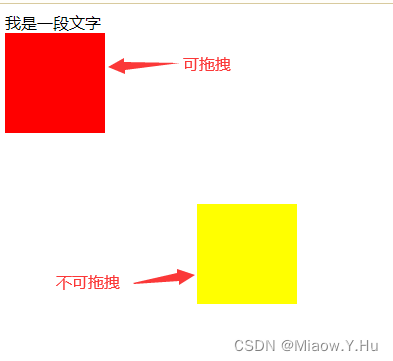
拖拽效果实现1
<!DOCTYPE html>
<html lang="en">
<head>
    <meta charset="UTF-8">
    <meta http-equiv="X-UA-Compatible" content="IE=edge">
    <meta name="viewport" content="width=device-width, initial-scale=1.0">
    <title>Document</title>
    <style type="text/css">
    #box1
    {
        width: 100px;
        height: 100px;
        background-color: red;
        position: absolute;
    }
    #box2
    {
        width: 100px;
        height: 100px;
        background-color: yellow;
        position: absolute;
        left: 200px;
        top: 200px;
    }
    </style>

    <script type="text/javascript">
        window.onload=function()
        {
            //拖拽box1元素
            //拖拽的流程
            //1.当鼠标在被拖拽元素上按下时,开始拖拽 onmousedown
            //2.当鼠标移动时被拖拽元素跟随鼠标移动 onmousemove
            //3.当鼠标松开时,被拖拽元素固定在当前位置 onmouseup

            //获取box1
            var box1=document.getElementById("box1");
            /*
            var box1Style=getComputedStyle(box1,null)
            console.log(box1Style.height);
            console.log(box1Style.width);
            */
            //为box1绑定一个鼠标按下事件
            box1.onmousedown=function(event)
            {
                //div的水平偏移量 鼠标.clentX-元素.offsetLeft
                //div的垂直偏移量 鼠标.clentY-元素.offsetTo
                var ol=event.clientX - box1.offsetLeft;
                var ot=event.clientY - box1.offsetTop;

                //给document绑定一个onmousemove
                document.onmousemove=function(event)
                {
                    //console.log(event);
                    //当鼠标移动时被拖拽元素跟随鼠标移动 onmousemove
                    //获取鼠标的坐标
                    var left=event.clientX-ol;
                    var top=event.clientY-ot;
                    //修改box1的位置
                    box1.style.left=left+"px";//横纵坐标加一个-50,能使鼠标移动点固定在元素中间
                    box1.style.top=top+"px";
                };

                //为元素绑定一个鼠标松开事件
                document.onmouseup=function()
                {
                    //当鼠标松开时,被拖拽元素固定在当前位置 onmouseup
                    //取消document的onmousemove事件
                    document.onmousemove=null;
                    //取消document的onmouseup事件
                    document.onmouseup=null;
                };
                //当我们拖拽一个网页中的内容时,该浏览器会默认去搜索引擎中搜索内容
                //此时会导致拖拽功能的异常,这个是浏览器的默认行为
                //如果不希望发生这个行为,则可以通过return false来取消默认行为
                return false;
                //IE8不兼容

            };
        }
    </script>
</head>
<body>
    <!--谷歌浏览器Ctrl+A全选页面内容然后拖动,不会出现连带元素一起拖动的情况-->
    我是一段文字
    <div id="box1"></div>
    <div id="box2"></div>
</body>
</html>
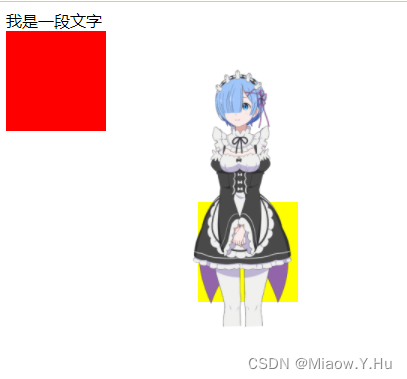
拖拽效果实现图片拖拽
<!DOCTYPE html>
<html lang="en">
<head>
    <meta charset="UTF-8">
    <meta http-equiv="X-UA-Compatible" content="IE=edge">
    <meta name="viewport" content="width=device-width, initial-scale=1.0">
    <title>Document</title>
    <style type="text/css">
    #box1
    {
        width: 100px;
        height: 100px;
        background-color: red;
        position: absolute;
    }
    #box2
    {
        width: 100px;
        height: 100px;
        background-color: yellow;
        position: absolute;
        left: 200px;
        top: 200px;
    }
    #图一
    {
        width: 300px;
        height: 300px;
    }
    </style>

    <script type="text/javascript">

        //元素拖拽代码一个一个定义过于麻烦,可以尝试进行封装
        //提取一个专门用来设置拖拽的函数,拖拽英文trag
        //传递一个参数:开启拖拽的元素obj
        function drag(obj)
        {
            obj.onmousedown=function(event)
            {
                //div的水平偏移量 鼠标.clentX-元素.offsetLeft
                //div的垂直偏移量 鼠标.clentY-元素.offsetTo
                var ol=event.clientX - obj.offsetLeft;
                var ot=event.clientY - obj.offsetTop;

                //给document绑定一个onmousemove
                document.onmousemove=function(event)
                {
                    //console.log(event);
                    //当鼠标移动时被拖拽元素跟随鼠标移动 onmousemove
                    //获取鼠标的坐标
                    var left=event.clientX-ol;
                    var top=event.clientY-ot;
                    //修改box1的位置
                    obj.style.left=left+"px";//横纵坐标加一个-50,能使鼠标移动点固定在元素中间
                    obj.style.top=top+"px";
                };

                //为元素绑定一个鼠标松开事件
                document.onmouseup=function()
                {
                    //当鼠标松开时,被拖拽元素固定在当前位置 onmouseup
                    //取消document的onmousemove事件
                    document.onmousemove=null;
                    //取消document的onmouseup事件
                    document.onmouseup=null;
                };
                //当我们拖拽一个网页中的内容时,该浏览器会默认去搜索引擎中搜索内容
                //此时会导致拖拽功能的异常,这个是浏览器的默认行为
                //如果不希望发生这个行为,则可以通过return false来取消默认行为
                return false;
                //IE8不兼容


            };
        }
        window.onload=function()
        {
            //拖拽的流程
            //1.当鼠标在被拖拽元素上按下时,开始拖拽 onmousedown
            //2.当鼠标移动时被拖拽元素跟随鼠标移动 onmousemove
            //3.当鼠标松开时,被拖拽元素固定在当前位置 onmouseup

            //获取box1
            var box1=document.getElementById("box1");
            var box2=document.getElementById("box2");
            var img1=document.getElementById("图一");
            drag(box1);
            drag(box2);
            drag(img1);

        };
    </script>
</head>
<body>
    <!--谷歌浏览器Ctrl+A全选页面内容然后拖动,不会出现连带元素一起拖动的情况-->
    我是一段文字
    <div id="box1"></div>
    <div id="box2"></div>
    <img id="图一" src="./photo (1).png" style="position: absolute;">
</body>
</html>
实现滚动事件
<!DOCTYPE html>
<html lang="en">
<head>
    <meta charset="UTF-8">
    <meta http-equiv="X-UA-Compatible" content="IE=edge">
    <meta name="viewport" content="width=device-width, initial-scale=1.0">
    <title>Document</title>
    <style type="text/css">
    #box1
    {
        width: 100px;
        height: 100px;
        background-color: red;
    }
    </style>

    <script type="text/javascript">
    window.onload=function()
    {


        //获取id为box1的div
        var box1=document.getElementById("box1");

        //为box1绑定一个鼠标滚轮滚动的事件onmousewheel
        //火狐只支持DOMMouseScroll事件
        box1.onmousewheel=function(event)
        {
            //当鼠标滚轮向下滚动时,box1变长
            //当滚轮向上滚动时,box1变短
            //console.log("滚了");

            //判断鼠标滚轮滚动的方向
            //event.wheelDelta 可以获取鼠标滚轮滚动的方向向上滚是120,向下滚是-120
            //wheelDelta这个值我们不看大小,只看正负
            //console.log(event.wheelDelta);
            if(event.wheelDelta >0)
            {
                //向上滚,box1变短
                //console.log("向上滚");
                box1.style.height=box1.clientHeight-10+"px";
            }
            else
            {
                //向下滚,box2变长
                //console.log("向下滚");
                box1.style.height=box1.clientHeight+10+"px";
            }

            //当滚轮滚动时,如果浏览器有滚动条,那么就会随着滚动条滚动
            //这是浏览器的默认行为,如果不希望发生,则可以取消该行为
            return false;//但此时不能把鼠标滚轮绑定在document上
        };
        //另一种方法
        /*
        box1.addEventListener("mousewheel",function()
        {
            console.log("滚了");
        },false);
        */
        //此方法可以用event.preventDefault();来处理
        //但是IE8不能支持此方法


    };
    </script>
</head>
<body style="height: 2000px;">
    <div id="box1"></div>
</body>
</html>
实现一个键盘监听事件
<!DOCTYPE html>
<html lang="en">
<head>
<meta charset="UTF-8">
<meta http-equiv="X-UA-Compatible" content="IE=edge">
<meta name="viewport" content="width=device-width, initial-scale=1.0">
<title>Document</title>
<style type="text/css">
#box1
{
width: 100px;
height: 100px;
background-color: red;
}
</style>
<script type="text/javascript">
window.onload=function()
{
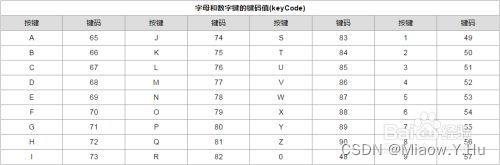
//key是指键盘字符
//keyCode是指键盘字符代码
//获取input1
var input1=document.getElementById("input1");
//键盘事件
//onkeydown 按键被按下
//对于onkeydown来说 如果一直按着某个按键不松手,则事件会被一直触发
//当onkeydown连续触发时,第一次和第二次之间会间隔稍微长一点,其他的会非常快
//防止误操作的发生
//onkeyup 按键被松开 但他不会被连续触发,只能一次一次触发
//键盘事件一般都会绑定给一些可以获取到焦点的对象(也就是可以获取光标的对象)或者是document
//如何知道键盘敲击的是什么字符?需要使用event
document.onkeydown=function(event)
{
//console.log("按键被按下了");
//console.log(event.keyCode);
/*
if(event.keyCode === 89)
{
console.log("y被按下了");
}
*/
//除了keyCode,事件对象中还提供了几个属性
//altKey ctrlKey shiftKey
//这三个用来判断alt ctrl shift是否同时被按下
if(event.keyCode === 89 && event.ctrlKey)
{
//console.log("ctrl和y都被按下了");
}
};
document.onkeyup=function(event)
{
//console.log("按键被松开了");
};
//给input1绑定键盘事件
input1.onkeydown=function(event)
{
//console.log(event.keyCode);
//如果增加return false
//那么文本框将无法输入字符,但是控制台依旧会显示字符的keyCode码
//在文本框输入内容,属于onkeydown的默认行为
//如果再onkeydown中取消了默认行为,则输入的内容,不会出现在文本框中
//return false;
//如何使文本框中不能输入数字
//数字值在48-57和96-105之间
/*
if((event.keyCode>=48 && event.keyCode<=57) || (event.keyCode>=96 && event.keyCode<=105))
{
console.log("无法输入数字");
return false;
}
*/
};
};
</script>
</head>
<body>
<!--<div id="box1"></div>-->
文本框<input type="text" id="input1">
</body>
</html>
键盘控制div移动
<!DOCTYPE html>
<html lang="en">
<head>
    <meta charset="UTF-8">
    <meta http-equiv="X-UA-Compatible" content="IE=edge">
    <meta name="viewport" content="width=device-width, initial-scale=1.0">
    <title>Document</title>
    <style type="text/css">
    #box1
    {
        width: 100px;
        height: 100px;
        background-color: red;
        position: absolute;
    }
    </style>

    <script type="text/javascript">
    //使div可以根据不同的方向键向不同的方向移动
    //按左键,div向左移
    //按右键,div向右移
    //key是键盘字符 keyCode是键盘字符代码
    window.onload=function()
    {
        var box1=document.getElementById("box1");
        //开启一个定时器,来控制div的移动
        var speed=20;
        //创建一个变量表示方向
        var dir;
        //通过修改dir来影响移动的方向
        setInterval(function()
        {
            switch(dir)
            {

                case "ArrowUp":
                //console.log("向上");
                box1.style.top=box1.offsetTop-speed+"px";
                break;

                case "ArrowRight":
                //console.log("向右");
                box1.style.left=box1.offsetLeft+speed+"px";
                break;

                case "ArrowDown":
                //console.log("向下");
                box1.style.top=box1.offsetTop+speed+"px";
                break;

                case "ArrowLeft":
                //console.log("向左");
                box1.style.left=box1.offsetLeft-speed+"px";
                break;
            }
        },30);


        //先给documment绑定一个按键按下事件
        document.onkeydown=function(event)
        {
            dir=event.key;

            //当用户按了ctrl时,速度加快
            if(event.ctrlKey)
            {
                speed=50;
            }
            else
            {
                speed=20;
            }
        };

        //当按键松开时,div不再移动
        document.onkeyup=function()
        {
            //设置方向为0
            dir=0;
        };
    };
    </script>
</head>
<body>
    <div id="box1"></div>
</body>
</html>
HTML实现一个俄罗斯方块
<!DOCTYPE html>
<html lang="en">
<head>
<meta charset="UTF-8">
<title>es6-重构俄罗斯方块(基于canvas)</title>
<style type="text/css">
#tetris{ margin: 10px 250px;}
</style>
</head>
<body>
<canvas width="700" height="525" id="tetris"></canvas>
<div id="text" style='color: red;font-size: 30px;'>当前分数:0</div>
<script type="text/javascript">
/**
* [一个完整的俄罗斯方块类 design by magic_xiang]
* @param {number} side [每个方块边长(px),默认35]
* @param {number} width [一行包含的方块数(个),默认20]
* @param {number} height [一列包含的方块数(个),默认15]
* @param {number} speed [方块下落移动速度(ms),默认400]
*/
class tetris{
constructor(side=35, width=20, height=15, speed=400){
this.side = side // 每个方块边长
this.width = width // 一行包含的方块数
this.height = height // 一列包含的方块数
this.speed = speed // 方块下落移动速度
this.num_blcok // 当前方块类型的数字变量
this.type_color // 当前颜色类型的字符串变量
this.ident // setInterval的标识
this.direction = 1 // 方块方向,初始化为1,默认状态
this.grade = 0 // 用来计算分数
this.over = false // 游戏是否结束
this.arr_bX = [] // 存放当前方块的X坐标
this.arr_bY = [] // 存放当前方块的Y坐标
this.arr_store_X = [] // 存放到达底部所有方块的X坐标
this.arr_store_Y = [] // 存放到达底部所有方块的Y坐标
this.arr_store_color = [] // 存放到达底部所有方块的颜色
this.paints = document.getElementById('tetris').getContext('2d')
//获取画笔
self = this
}
// 封装paints方法,让代码更简洁
paintfr(x, y, scale=1){
this.paints.fillRect(x*this.side, y*this.side, scale*this.side, scale*this.side)
}
// 游戏开始
gameStart(){
this.init()
this.run()
}
// 初始化工作
init(){
this.initBackground()
this.initBlock()
}
// 方块自动下落
run(){
this.ident = setInterval("self.down_speed_up()", this.speed)
}
// 初始化地图
initBackground(){
this.paints.beginPath()
this.paints.fillStyle='#000000' //地图填充颜色为黑色
for(let i = 0; i < this.height; i++){
for(let j = 0; j < this.width; j++){
this.paintfr(j, i)
}
}
this.paints.closePath()
}
// 初始化方块的位置和颜色
initBlock(){
this.paints.beginPath()
this.createRandom('rColor') //生成颜色字符串,
this.paints.fillStyle = this.type_color
this.createRandom('rBlock') //生成方块类型数字
this.arr_bX.forEach((item, index) => {
this.paintfr(item, this.arr_bY[index], 0.9)
})
this.paints.closePath()
}
// 利用数组画方块
drawBlock(color){
this.paints.beginPath()
this.paints.fillStyle = color
this.arr_bX.forEach((item, index) => {
this.paintfr(item, this.arr_bY[index], 0.9)
})
this.paints.closePath()
}
// 画已经在定位好的方块
drawStaticBlock(){
this.arr_store_X.forEach((item, index) => {
this.paints.beginPath()
this.paints.fillStyle = this.arr_store_color[index]
this.paintfr(item, this.arr_store_Y[index], 0.9)
this.paints.closePath()
})
}
// 生成随机数返回方块类型或颜色类型
createRandom(type){
let temp = this.width/2-1
if (type == 'rBlock'){ //如果是方块类型
this.num_blcok = Math.round(Math.random()*4+1)
switch(this.num_blcok){
case 1:
this.arr_bX.push(temp,temp-1,temp,temp+1)
this.arr_bY.push(0,1,1,1)
break
case 2:
this.arr_bX.push(temp,temp-1,temp-1,temp+1)
this.arr_bY.push(1,0,1,1)
break
case 3:
this.arr_bX.push(temp,temp-1,temp+1,temp+2)
this.arr_bY.push(0,0,0,0)
break
case 4:
this.arr_bX.push(temp,temp-1,temp,temp+1)
this.arr_bY.push(0,0,1,1)
break
case 5:
this.arr_bX.push(temp,temp+1,temp,temp+1)
this.arr_bY.push(0,0,1,1)
break
}
}
if (type == 'rColor'){ //如果是颜色类型
let num_color = Math.round(Math.random()*8+1)
switch(num_color){
case 1:
this.type_color='#3EF72A'
break
case 2:
this.type_color='yellow'
break
case 3:
this.type_color='#2FE0BF'
break
case 4:
this.type_color='red'
break
case 5:
this.type_color='gray'
break
case 6:
this.type_color='#C932C6'
break
case 7:
this.type_color= '#FC751B'
break
case 8:
this.type_color= '#6E6EDD'
break
case 9:
this.type_color= '#F4E9E1'
break
}
}
}
// 判断方块之间是否碰撞(下),以及变形时是否越过下边界
judgeCollision_down(){
for(let i = 0; i < this.arr_bX.length; i++){
if (this.arr_bY[i] + 1 == this.height){ //变形时是否越过下边界
return false
}
if (this.arr_store_X.length != 0) { //判断方块之间是否碰撞(下)
for(let j = 0; j < this.arr_store_X.length; j++){
if (this.arr_bX[i] == this.arr_store_X[j]) {
if (this.arr_bY[i] + 1 == this.arr_store_Y[j]) {
return false
}
}
}
}
}
return true
}
//判断方块之间是否碰撞(左右),以及变形时是否越过左右边界
judgeCollision_other(num){
for(let i = 0; i < this.arr_bX.length; i++){
if (num == 1) { //变形时是否越过右边界
if (this.arr_bX[i] == this.width - 1)
return false
}
if (num == -1) { //变形时是否越过左边界
if (this.arr_bX[i] == 0)
return false
}
if (this.arr_store_X.length != 0) { //判断方块之间是否碰撞(左右)
for(let j = 0; j < this.arr_store_X.length; j++){
if (this.arr_bY[i] == this.arr_store_Y[j]) {
if (this.arr_bX[i] + num == this.arr_store_X[j]) {
return false
}
}
}
}
}
return true;
}
//方向键为下的加速函数
down_speed_up(){
let flag_all_down = true
flag_all_down = this.judgeCollision_down()
if (flag_all_down) {
this.initBackground()
for(let i = 0; i < this.arr_bY.length; i++){
this.arr_bY[i] = this.arr_bY[i] + 1
}
}
else{
for(let i=0; i < this.arr_bX.length; i++){
this.arr_store_X.push(this.arr_bX[i])
this.arr_store_Y.push(this.arr_bY[i])
this.arr_store_color.push(this.type_color)
}
this.arr_bX.splice(0,this.arr_bX.length)
this.arr_bY.splice(0,this.arr_bY.length)
this.initBlock()
}
this.clearUnderBlock()
this.drawBlock(this.type_color)
this.drawStaticBlock()
this.gameover()
}
//方向键为左右的左移动函数
move(dir_temp){
this.initBackground()
if (dir_temp == 1) { //右
let flag_all_right = true
flag_all_right = this.judgeCollision_other(1)
if (flag_all_right) {
for(let i = 0; i < this.arr_bY.length; i++){
this.arr_bX[i] = this.arr_bX[i]+1
}
}
}
else{
let flag_all_left = true
flag_all_left = this.judgeCollision_other(-1)
if (flag_all_left) {
for(let i=0; i < this.arr_bY.length; i++){
this.arr_bX[i] = this.arr_bX[i]-1
}
}
}
this.drawBlock(this.type_color)
this.drawStaticBlock()
}
//方向键为空格的变换方向函数
up_change_direction(num_blcok){
if (num_blcok == 5) {
return
}
let arr_tempX = []
let arr_tempY = []
//因为不知道是否能够变形成功,所以先存储起来
for(let i = 0;i < this.arr_bX.length; i++){
arr_tempX.push(this.arr_bX[i])
arr_tempY.push(this.arr_bY[i])
}
this.direction++
//将中心坐标提取出来,变形都以当前中心为准
let ax_temp = this.arr_bX[0]
let ay_temp = this.arr_bY[0]
this.arr_bX.splice(0, this.arr_bX.length) //将数组清空
this.arr_bY.splice(0, this.arr_bY.length)
if (num_blcok == 1) {
switch(this.direction%4){
case 1:
this.arr_bX.push(ax_temp,ax_temp-1,ax_temp,ax_temp+1)
this.arr_bY.push(ay_temp,ay_temp+1,ay_temp+1,ay_temp+1)
break
case 2:
this.arr_bX.push(ax_temp,ax_temp-1,ax_temp,ax_temp)
this.arr_bY.push(ay_temp,ay_temp,ay_temp-1,ay_temp+1)
break
case 3:
this.arr_bX.push(ax_temp,ax_temp-1,ax_temp,ax_temp+1)
this.arr_bY.push(ay_temp,ay_temp,ay_temp+1,ay_temp)
break
case 0:
this.arr_bX.push(ax_temp,ax_temp,ax_temp,ax_temp+1)
this.arr_bY.push(ay_temp,ay_temp-1,ay_temp+1,ay_temp)
break
}
}
if (num_blcok == 2) {
switch(this.direction%4){
case 1:
this.arr_bX.push(ax_temp,ax_temp-1,ax_temp-1,ax_temp+1)
this.arr_bY.push(ay_temp,ay_temp,ay_temp-1,ay_temp)
break
case 2:
this.arr_bX.push(ax_temp,ax_temp,ax_temp,ax_temp-1)
this.arr_bY.push(ay_temp,ay_temp-1,ay_temp+1,ay_temp+1)
break
case 3:
this.arr_bX.push(ax_temp,ax_temp-1,ax_temp+1,ax_temp+1)
this.arr_bY.push(ay_temp,ay_temp,ay_temp,ay_temp+1)
break
case 0:
this.arr_bX.push(ax_temp,ax_temp,ax_temp,ax_temp+1)
this.arr_bY.push(ay_temp,ay_temp-1,ay_temp+1,ay_temp-1)
break
}
}
if (num_blcok == 3) {
switch(this.direction%4){
case 1:
this.arr_bX.push(ax_temp,ax_temp-1,ax_temp+1,ax_temp+2)
this.arr_bY.push(ay_temp,ay_temp,ay_temp,ay_temp)
break
case 2:
this.arr_bX.push(ax_temp,ax_temp,ax_temp,ax_temp)
this.arr_bY.push(ay_temp,ay_temp-1,ay_temp+1,ay_temp+2)
break
case 3:
this.arr_bX.push(ax_temp,ax_temp-1,ax_temp+1,ax_temp+2)
this.arr_bY.push(ay_temp,ay_temp,ay_temp,ay_temp)
break
case 0:
this.arr_bX.push(ax_temp,ax_temp,ax_temp,ax_temp)
this.arr_bY.push(ay_temp,ay_temp-1,ay_temp+1,ay_temp+2)
break
}
}
if (num_blcok == 4) {
switch(this.direction%4){
case 1:
this.arr_bX.push(ax_temp,ax_temp-1,ax_temp,ax_temp+1)
this.arr_bY.push(ay_temp,ay_temp,ay_temp+1,ay_temp+1)
break
case 2:
this.arr_bX.push(ax_temp,ax_temp,ax_temp+1,ax_temp+1)
this.arr_bY.push(ay_temp,ay_temp+1,ay_temp,ay_temp-1)
break
case 3:
this.arr_bX.push(ax_temp,ax_temp,ax_temp-1,ax_temp+1)
this.arr_bY.push(ay_temp,ay_temp-1,ay_temp,ay_temp-1)
break
case 0:
this.arr_bX.push(ax_temp,ax_temp,ax_temp+1,ax_temp+1)
this.arr_bY.push(ay_temp,ay_temp-1,ay_temp,ay_temp+1)
break
}
}
if (! (this.judgeCollision_other(-1) && this.judgeCollision_down() && this.judgeCollision_other(1) )) { //如果变形不成功则执行下面代码
this.arr_bX.splice(0, this.arr_bX.length)
this.arr_bY.splice(0, this.arr_bY.length)
for(let i=0; i< arr_tempX.length; i++){
this.arr_bX.push(arr_tempX[i])
this.arr_bY.push(arr_tempY[i])
}
}
this.drawStaticBlock()
}
//一行满了清空方块,上面方块Y坐标+1
clearUnderBlock(){
//删除低层方块
let arr_row=[]
let line_num
if (this.arr_store_X.length != 0) {
for(let j = this.height-1; j >= 0; j--){
for(let i = 0; i < this.arr_store_color.length; i++){
if (this.arr_store_Y[i] == j) {
arr_row.push(i)
}
}
if (arr_row.length == this.width) {
line_num = j
break
}else{
arr_row.splice(0, arr_row.length)
}
}
}
if (arr_row.length == this.width) {
//计算成绩grade
this.grade++
document.getElementById('text').innerHTML = '当前成绩:'+this.grade
for(let i = 0; i < arr_row.length; i++){
this.arr_store_X.splice(arr_row[i]-i, 1)
this.arr_store_Y.splice(arr_row[i]-i, 1)
this.arr_store_color.splice(arr_row[i]-i, 1)
}
//让上面的方块往下掉一格
for(let i = 0; i < this.arr_store_color.length; i++){
if (this.arr_store_Y[i] < line_num) {
this.arr_store_Y[i] = this.arr_store_Y[i]+1
}
}
}
}
//判断游戏结束
gameover(){
for(let i=0; i < this.arr_store_X.length; i++){
if (this.arr_store_Y[i] == 0) {
clearInterval(this.ident)
this.over = true
}
}
}
}
let tetrisObj = new tetris()
tetrisObj.gameStart()
//方向键功能函数
document.onkeydown = (e) => {
if (tetrisObj.over)
return
switch(e.keyCode){
case 40: // 方向为下
tetrisObj.down_speed_up()
break
case 32: // 空格换方向
tetrisObj.initBackground() //重画地图
tetrisObj.up_change_direction(tetrisObj.num_blcok)
tetrisObj.drawBlock(tetrisObj.type_color)
break
case 37: // 方向为左
tetrisObj.initBackground()
tetrisObj.move(-1)
tetrisObj.drawBlock(tetrisObj.type_color)
break
case 39: // 方向为右
tetrisObj.initBackground()
tetrisObj.move(1)
tetrisObj.drawBlock(tetrisObj.type_color)
break
}
}
</script>
</body>
</html>
HTML实现一个贪吃蛇
<!doctype html>
<html>
<head>
<meta charset="utf-8">
<title>html5实现贪吃蛇小游戏</title>
<style>
#myCanvas {
    box-shadow: 0 0 6px #000;
}
</style>
</head>
<body>
<br/><br/><br/>
<input type="button" value="开始游戏" onclick="beginGame();"><br/><br/><br/>
<canvas id="myCanvas" width="450" height="450"></canvas>

<script>
var canvas = document.getElementById("myCanvas");
var ctx = canvas.getContext("2d");
var w = 15; //格子宽、高
var snaLen = 6; //初始长度
var snake = []; //身体长度
for (var i = 0; i < snaLen; i++) {
    snake[i] = new cell(i, 0, 39);
}
var head = snake[snaLen - 1]; //头部
//初始食物
var foodx = Math.ceil(Math.random() * 28 + 1);
var foody = Math.ceil(Math.random() * 28 + 1);
var food = new Food(foodx, foody);
//食物
function Food(x, y) {
    this.x = x;
    this.y = y;
    return this;
}

//身体
function cell(x, y, d) {
    this.x = x;
    this.y = y;
    this.d = d;
    return this;
}

//动作
function draw() {
    ctx.clearRect(0, 0, 450, 450);
    //画布局
    //      for(var i = 0; i < 30; i++){
    //          ctx.strokeStyle = "#ccc";//线条颜色
    //          ctx.beginPath();
    //          ctx.moveTo(0,i*w);
    //          ctx.lineTo(450,i*w);

    //          ctx.moveTo(i*w,0);
    //          ctx.lineTo(i*w,450);
    //          ctx.closePath();
    //          ctx.stroke();
    //      }
    //画蛇身
    for (var j = 0; j < snake.length; j++) {
        ctx.fillStyle = "green";
        if (j == snake.length - 1) {
            ctx.fillStyle = "red";
        }
        ctx.beginPath();
        ctx.rect(snake[j].x * w, snake[j].y * w, w, w);
        ctx.closePath();
        ctx.fill();
        ctx.stroke();
    }
    //出现食物
    drawFood();
    //吃到食物
    if (head.x == food.x && head.y == food.y) {
        initFood();
        food = new Food(foodx, foody);
        //重新出现食物
        drawFood();

        //增加蛇的长度  有些小瑕疵,蛇身增长时应该是身体增长,而不是在蛇头上增长
        var newCell = new cell(head.x, head.y, head.d);
        switch (head.d) {
            case 40:
                newCell.y++;
                break; //下
            case 39:
                newCell.x++;
                break; //右
            case 38:
                newCell.y--;
                break; //上
            case 37:
                newCell.x--;
                break; //左
        }
        snake[snake.length] = newCell;
        head = newCell;
        //head =
    }
}
//随机初始化食物
function initFood() {
    foodx = Math.ceil(Math.random() * 28 + 1);
    foody = Math.ceil(Math.random() * 28 + 1);
    for (var i = 0; i < snake.length; i++) {
        if (snake[i].x == foodx && snake[i].y == foody) {
            initFood();
        }
    }
}
//画食物
function drawFood() {
    //绘制食物
    ctx.fillStyle = "orange";
    ctx.beginPath();
    ctx.rect(food.x * w, food.y * w, w, w);
    ctx.closePath();
    ctx.fill();
}
draw();
//监听键盘事件
document.onkeydown = function(e) {
    //下40 , 右边39,左边37,上38  键盘事件
    var keyCode = e.keyCode;
    if (head.d - keyCode != 2 && head.d - keyCode != -2 && keyCode >= 37 && keyCode <= 40) {
        moveSnake(keyCode);
    }
}
//控制蛇移动方向
function moveSnake(keyCode) {
    var newSnake = [];
    var newCell = new cell(head.x, head.y, head.d); //头
    //身体
    for (var i = 1; i < snake.length; i++) {
        newSnake[i - 1] = snake[i];
    }
    newSnake[snake.length - 1] = newCell;
    newCell.d = keyCode;
    switch (keyCode) {
        case 40:
            newCell.y++;
            break; //下
        case 39:
            newCell.x++;
            break; //右
        case 38:
            newCell.y--;
            break; //上
        case 37:
            newCell.x--;
            break; //左
    }
    snake = newSnake;
    head = snake[snake.length - 1];
    checkDeath();
    draw();
}
//游戏规则
function checkDeath() {
    //超出边框
    if (head.x >= 30 || head.y >= 30 || head.x < 0 || head.y < 0) {
        alert("Game over!");
        window.location.reload();
    }
    //咬到自己
    for (var i = 0; i < snake.length - 1; i++) {
        if (head.x == snake[i].x && head.y == snake[i].y) {
            alert("Game over!");
            window.location.reload();
        }
    }
}
//蛇自动走
function moveClock() {
    moveSnake(head.d);
}
var isMove = false;
function beginGame() {
    !isMove && setInterval(moveClock, 300);
    isMove = true;
}

</script>

</body>
</html>
原文地址:https://blog.csdn.net/qq_45922256/article/details/137833683
免责声明:本站文章内容转载自网络资源,如本站内容侵犯了原著者的合法权益,可联系本站删除。更多内容请关注自学内容网(zxcms.com)!