springcloud 整合swagger文档教程
我用的是nacos和gateway
我的模块

父依赖没什么太大关系如果出现版本冲突问题可用参考我的依赖版本
<?xml version="1.0" encoding="UTF-8"?>
<project xmlns="http://maven.apache.org/POM/4.0.0"
         xmlns:xsi="http://www.w3.org/2001/XMLSchema-instance"
         xsi:schemaLocation="http://maven.apache.org/POM/4.0.0 http://maven.apache.org/xsd/maven-4.0.0.xsd">
    <modelVersion>4.0.0</modelVersion>

    <groupId>com.heima</groupId>
    <artifactId>dataFactory</artifactId>
    <packaging>pom</packaging>
    <version>1.0.0</version>
    <modules>
        <module>apiService</module>
        <module>databaseService</module>
        <module>codeService</module>
        <module>dataAssetService</module>
        <module>dataStandardService</module>
        <module>accountService</module>
        <module>cloud-getway</module>
        <module>cloud-swwager</module>
        <module>cloud-common</module>
        <module>cloud-api</module>
    </modules>

    <parent>
        <groupId>org.springframework.boot</groupId>
        <artifactId>spring-boot-starter-parent</artifactId>
        <version>2.7.12</version>
        <relativePath/>
    </parent>

    <properties>
        <maven.compiler.source>8</maven.compiler.source>
        <maven.compiler.target>8</maven.compiler.target>
        <project.build.sourceEncoding>UTF-8</project.build.sourceEncoding>
        <project.reporting.outputEncoding>UTF-8</project.reporting.outputEncoding>
        <org.projectlombok.version>1.18.20</org.projectlombok.version>
        <spring-cloud.version>2021.0.3</spring-cloud.version>
        <spring-cloud-alibaba.version>2021.0.4.0</spring-cloud-alibaba.version>
        <mybatis-plus.version>3.4.3</mybatis-plus.version>
        <hutool.version>5.8.10</hutool.version>
        <mysql.version>8.0.23</mysql.version>
        <jjwt.version>0.9.1</jjwt.version>
        <nimbus-jose-jwt.version>9.8.1</nimbus-jose-jwt.version>
    </properties>

    <!-- 对依赖包进行管理 -->
    <dependencyManagement>

        <dependencies>
            <!--spring cloud-->
            <dependency>
                <groupId>org.springframework.cloud</groupId>
                <artifactId>spring-cloud-dependencies</artifactId>
                <version>${spring-cloud.version}</version>
                <type>pom</type>
                <scope>import</scope>
            </dependency>
            <!--spring cloud alibaba-->
            <dependency>
                <groupId>com.alibaba.cloud</groupId>
                <artifactId>spring-cloud-alibaba-dependencies</artifactId>
                <version>${spring-cloud-alibaba.version}</version>
                <type>pom</type>
                <scope>import</scope>
            </dependency>
            <!-- 数据库驱动包管理 -->
            <dependency>
                <groupId>mysql</groupId>
                <artifactId>mysql-connector-java</artifactId>
                <version>${mysql.version}</version>
            </dependency>
            <!-- mybatis plus 管理 -->
            <dependency>
                <groupId>com.baomidou</groupId>
                <artifactId>mybatis-plus-boot-starter</artifactId>
                <version>${mybatis-plus.version}</version>
            </dependency>
            <!--hutool工具包-->
            <dependency>
                <groupId>cn.hutool</groupId>
                <artifactId>hutool-all</artifactId>
                <version>${hutool.version}</version>
            </dependency>
            <!-- jwt -->
            <dependency>
                <groupId>io.jsonwebtoken</groupId>
                <artifactId>jjwt</artifactId>
                <version>${jjwt.version}</version>
            </dependency>
            <dependency>
                <groupId>com.nimbusds</groupId>
                <artifactId>nimbus-jose-jwt</artifactId>
                <version>${nimbus-jose-jwt.version}</version>
            </dependency>
<!--            <dependency>-->
<!--                <groupId>org.reflections</groupId>-->
<!--                <artifactId>reflections</artifactId>-->
<!--               <version>0.9.12</version>-->
<!--            </dependency>-->
        </dependencies>
    </dependencyManagement>
    <dependencies>
        <!-- lombok 管理 -->
        <dependency>
            <groupId>org.projectlombok</groupId>
            <artifactId>lombok</artifactId>
            <version>${org.projectlombok.version}</version>
        </dependency>
        <!--单元测试-->
        <dependency>
            <groupId>org.springframework.boot</groupId>
            <artifactId>spring-boot-starter-test</artifactId>
            <scope>test</scope>
        </dependency>
    </dependencies>

    <build>
        <pluginManagement>
            <plugins>
                <plugin>
                    <groupId>org.apache.maven.plugins</groupId>
                    <artifactId>maven-compiler-plugin</artifactId>
                    <version>3.8.1</version>
                    <configuration>
                        <source>11</source> <!-- depending on your project -->
                        <target>11</target> <!-- depending on your project -->
                    </configuration>
                </plugin>
            </plugins>
        </pluginManagement>
    </build>
</project>
开始配置以我的code模块为例
加入swagger依赖
  <dependency>
        <groupId>io.springfox</groupId>
        <artifactId>springfox-swagger2</artifactId>
        <version>3.0.0</version>
    </dependency>
    <!-- 为Spring Boot应用程序提供Swagger UI,用于可视化展示和测试Swagger API文档 -->
    <dependency>
        <groupId>io.springfox</groupId>
        <artifactId>springfox-swagger-ui</artifactId>
        <version>3.0.0</version>
    </dependency>

<!--    swagger-ui  这里是用了一个好看一点ui界面-->
    <dependency>
        <groupId>com.github.xiaoymin</groupId>
        <artifactId>swagger-bootstrap-ui</artifactId>
        <version>1.9.6</version>
    </dependency>
和两个配置类

package com.cqie.conf;

import org.springframework.beans.factory.annotation.Autowired;
import org.springframework.context.annotation.Bean;
import org.springframework.context.annotation.ComponentScan;
import org.springframework.context.annotation.Configuration;
import org.springframework.context.annotation.Profile;
import springfox.documentation.builders.ApiInfoBuilder;
import springfox.documentation.builders.PathSelectors;
import springfox.documentation.builders.RequestHandlerSelectors;
import springfox.documentation.service.*;
import springfox.documentation.spi.DocumentationType;
import springfox.documentation.spi.service.contexts.SecurityContext;
import springfox.documentation.spring.web.plugins.Docket;
import springfox.documentation.swagger2.annotations.EnableSwagger2;
//import springfox.documentation.swagger2.annotations.EnableSwagger2WebMvc;

import java.util.*;

@ComponentScan
@Configuration
@EnableSwagger2
@Profile(value = {"dev","test"})
public class SwaggerAutoCofniguration {

    @Autowired
    private SwaggerProperties properties;


    //配置了Swagger的Docket的bean实例
    //enable是否启动swagger,如果为False则Swagger不能在浏览器访问
    @Bean
    public Docket docket() {
        Set<String> set = new HashSet<>();
        set.add("https");
        set.add("http");
        return new Docket(DocumentationType.SWAGGER_2).pathMapping("/")
                .enable(true)//定义是否开启swagger,false为关闭,可以通过变量控制
                // 微信关注开发者技术前线:定义是否开启swagger,false为关闭,可以通过变量控制
                .apiInfo(apiInfo())//将api的元信息设置为包含在json ResourceListing响应中。
                .select()
                .apis(RequestHandlerSelectors.basePackage(properties.getBasePackage()))
                //paths()过滤什么路径
                .paths(PathSelectors.any())
                .build()
                .protocols(set)// 支持的通讯协议集合
                .securitySchemes(securitySchemes())// 授权信息设置,必要的header token等认证信息
                .securityContexts(securityContexts());// 授权信息全局应用
    }

    //配置Swagger 信息 = ApiInfo
    private ApiInfo apiInfo(){
        //作者信息
        Contact contact = new Contact(properties.getAuthor().getName(),properties.getAuthor().getUrl(),properties.getAuthor().getEmail());
        return new ApiInfo(properties.getApiInfo().getTitle(),
                properties.getApiInfo().getDescription(),
                properties.getApiInfo().getVersion(),
                properties.getApiInfo().getTermsOfServiceUrl(),
                contact,
                properties.getApiInfo().getLicense(),
                properties.getApiInfo().getLicenseUrl(),
                new ArrayList<>());
    }
    /**
     * 设置授权信息
     */
    private List<SecurityScheme> securitySchemes()
    {
        List<ApiKey> result = new ArrayList<>();
        //添加OAuth2的令牌认证
        ApiKey apiKey = new ApiKey("Authorization","Authorization" ,"Header" );
        result.add(apiKey);
        return  Collections.singletonList(apiKey);
    }
    /**
     * 授权信息全局应用
     */
    private List<SecurityContext> securityContexts() {
        return Collections.singletonList(
                SecurityContext.builder()
                        .securityReferences(Collections.singletonList(new SecurityReference("Authorization",
                                new AuthorizationScope[]{new AuthorizationScope("global", "Authorization")})))
                        .build()
        );
    }

}
package com.cqie.conf;

import lombok.Data;
import org.springframework.boot.context.properties.ConfigurationProperties;
import org.springframework.boot.context.properties.EnableConfigurationProperties;
import org.springframework.stereotype.Component;

@Data
@ConfigurationProperties(prefix = SwaggerProperties.PREFIX)
@Component
@EnableConfigurationProperties
public class SwaggerProperties {
    public static final String PREFIX="spring.swagger";

    //包
    private String basePackage;

    //作者相关信息
    private Author author;

    //API的相关信息
    private ApiInfo apiInfo;

    @Data
    public static class ApiInfo{
        String title;
        String description;
        String version;
        String termsOfServiceUrl;
        String license;
        String licenseUrl;
    }
    @Data
    public static class Author{
        private String name;

        private String email;

        private String url;
    }
}
其他的是你自己模块中的spring-boot-starter依赖等
然后再该模块的启动类上加
@EnableSwagger2 注解
我的
pom依赖
<?xml version="1.0" encoding="UTF-8"?>
<project xmlns="http://maven.apache.org/POM/4.0.0"
xmlns:xsi="http://www.w3.org/2001/XMLSchema-instance"
xsi:schemaLocation="http://maven.apache.org/POM/4.0.0 http://maven.apache.org/xsd/maven-4.0.0.xsd">
<modelVersion>4.0.0</modelVersion>
<parent>
<groupId>com.heima</groupId>
<artifactId>dataFactory</artifactId>
<version>1.0.0</version>
</parent>
<groupId>org.cqie</groupId>
<artifactId>codeService</artifactId>
<properties>
<maven.compiler.source>8</maven.compiler.source>
<maven.compiler.target>8</maven.compiler.target>
<project.build.sourceEncoding>UTF-8</project.build.sourceEncoding>
</properties>
<dependencies>
<!-- <!–Swagger相关–>-->
<!-- <dependency>-->
<!-- <groupId>io.springfox</groupId>-->
<!-- <artifactId>springfox-swagger2</artifactId>-->
<!-- </dependency>-->
<!-- <dependency>-->
<!-- <groupId>io.springfox</groupId>-->
<!-- <artifactId>springfox-swagger-ui</artifactId>-->
<!-- </dependency>-->
<dependency>
<groupId>com.heima</groupId>
<artifactId>cloud-swwager</artifactId>
<version>1.0.0</version>
</dependency>
<dependency>
<groupId>com.heima</groupId>
<artifactId>cloud-common</artifactId>
<version>1.0.0</version>
</dependency>
</dependencies>
<build>
<finalName>${project.artifactId}</finalName>
<plugins>
<plugin>
<groupId>org.springframework.boot</groupId>
<artifactId>spring-boot-maven-plugin</artifactId>
</plugin>
</plugins>
</build>
</project>我是将swagger单独作为一个模块后面会说到
我的启动类
其他的就看你自己的需求了

我的yml文件
server:
  port: 8081
  servlet:
    context-path: /code
mybatis-plus:
  configuration:
    log-impl: org.apache.ibatis.logging.stdout.StdOutImpl

spring:
  application:
    name: service-code
  cloud:
    nacos:
      server-addr: 自己nacosip:8848
#      discovery:
#        server-adder: ${spring.cloud.nachos.server-adder}
#        password: cqhlglnacos
#        username: nacos


  # mysql
  datasource:
    username: data_factory
    password: data_factory
    url: jdbc:mysql://数据库ip:3306/data_factory?serverTimezone=UTC&useSSL=false&allowPublicKeyRetrieval=true&useSSL=false&useLegacyDatetimeCode=false
    driver-class-name: com.mysql.cj.jdbc.Driver
  swagger:
    basePackage: com.cqie.controller
    author:
      name: xxxx
      email: @qq.com
      url:
    apiInfo:
      title: 码表管理模块
      description: 码表相关的接口
      version: 1.0
      termsOfServiceUrl: http://ip:${server.port}/${spring.application.name}
      license: license
      licenseUrl: licenseUrl
    profiles:
      active: dev
主要的地方是

servlet:
  context-path: 自己写一个项目名字
application:
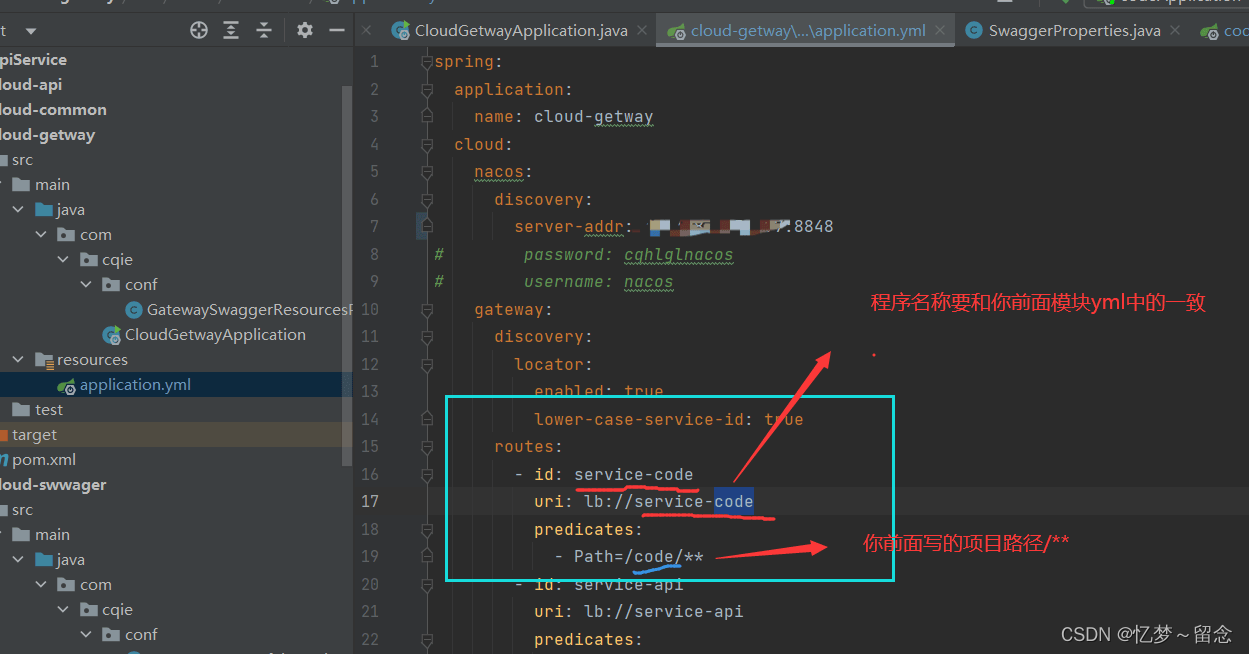
  name: 自己的应用程序名称 要是 任意一个名称-上面项目名称 (最好小写)
swagger:
  basePackage: 标注你controller的位置
其他的没太多要求
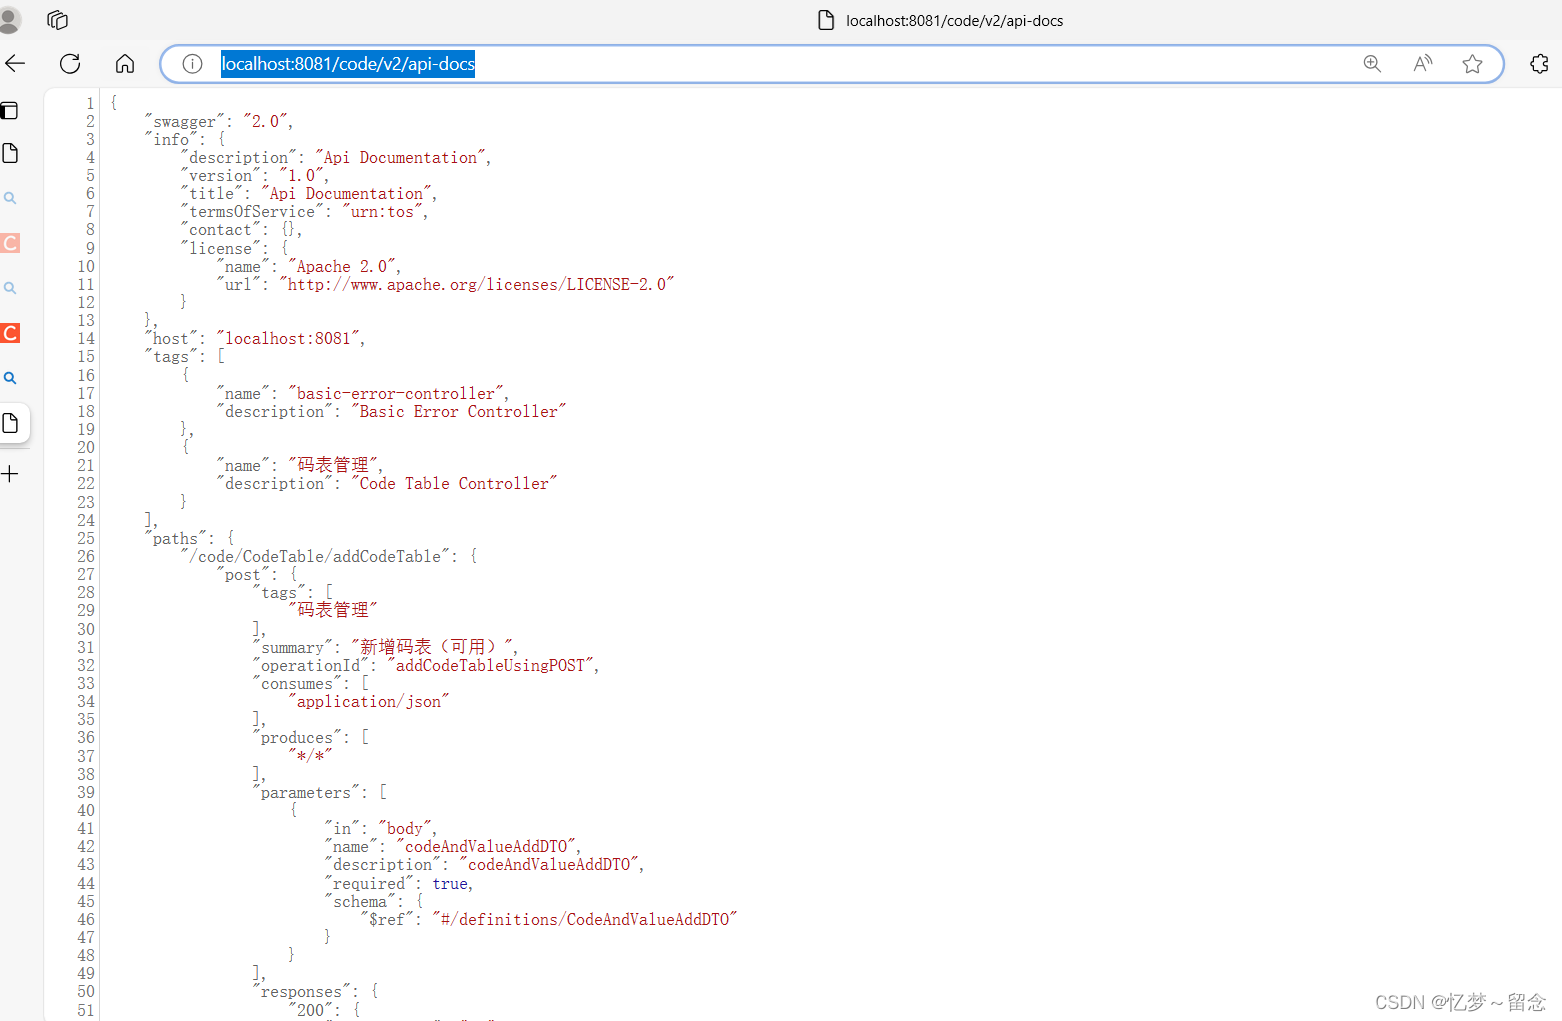
然后运行该模块浏览器访问localhost:8081/code/v2/api-docs(就是ip:该项目端口号/项目名字/v2/api-docs)
像我这样出现数据就行了(有数据不报错就行不用和我一样)

然后网关配置
依赖xml
除了你自己的一些依赖加上swagger依赖
            <!-- 用于在Spring Boot应用程序中生成和展示Swagger API文档 -->
            <dependency>
                <groupId>io.springfox</groupId>
                <artifactId>springfox-swagger2</artifactId>
                <version>3.0.0</version>
            </dependency>
            <!-- 为Spring Boot应用程序提供Swagger UI,用于可视化展示和测试Swagger API文档 -->
            <dependency>
                <groupId>io.springfox</groupId>
                <artifactId>springfox-swagger-ui</artifactId>
                <version>3.0.0</version>
            </dependency>
      <!--swagger-ui  这里是用了一个好看一点ui界面-->
      <dependency>
          <groupId>com.github.xiaoymin</groupId>
          <artifactId>swagger-bootstrap-ui</artifactId>
          <version>1.9.6</version>
      </dependency>
然后加入配置类

package com.cqie.conf;

import org.springframework.beans.factory.annotation.Autowired;
import org.springframework.beans.factory.annotation.Qualifier;
import org.springframework.beans.factory.annotation.Value;
import org.springframework.cloud.gateway.route.RouteLocator;
import org.springframework.context.annotation.Primary;
import org.springframework.stereotype.Component;
import springfox.documentation.swagger.web.SwaggerResource;
import springfox.documentation.swagger.web.SwaggerResourcesProvider;
import springfox.documentation.swagger2.annotations.EnableSwagger2;

import java.util.ArrayList;
import java.util.HashSet;
import java.util.List;
import java.util.Set;

/**
 * 网关的swagger的配置类
 */
@Component
@Primary
public class GatewaySwaggerResourcesProvider implements SwaggerResourcesProvider {
    /**
     * swagger3默认的url后缀
     */


    private static final String SWAGGER2URL = "/v2/api-docs";
    /**
     * 网关路由
     */
    @Autowired
    private  RouteLocator routeLocator;
    /**
     * 网关应用名称
     */
    @Value("${spring.application.name}")
    private String self;
    /**
     * 对于gateway来说这块比较重要 让swagger能找到对应的服务
     */
    @Override
    public List<SwaggerResource> get() {
        List<SwaggerResource> resources = new ArrayList<>();
        List<String> routeHosts = new ArrayList<>();
        // 获取所有可用的host:serviceId
        routeLocator.getRoutes().filter(route -> route.getUri().getHost() != null)
                .filter(route -> !self.equals(route.getUri().getHost()))
                .subscribe(route -> routeHosts.add(route.getUri().getHost()));
        // 记录已经添加过的server
        Set<String> dealed = new HashSet<>();
        routeHosts.forEach(instance -> {
            String url=null;
            // 拼接url
            if (instance.contains("-")) {
                url = "/" + instance.toLowerCase().split("-")[1] + SWAGGER2URL;
            }
            System.out.println("url = " + url);
            if (!dealed.contains(url)) {
                dealed.add(url);
                SwaggerResource swaggerResource = new SwaggerResource();
                swaggerResource.setUrl(url);
                swaggerResource.setName(instance);
                resources.add(swaggerResource);
            }
        });
        return resources;
    }
}
再加上上面模块的配置类就是这两个

也可以像我这样建一个swagger模块放这两个配置类

getaway引入就行了

他的xml
<?xml version="1.0" encoding="UTF-8"?>
<project xmlns="http://maven.apache.org/POM/4.0.0"
xmlns:xsi="http://www.w3.org/2001/XMLSchema-instance"
xsi:schemaLocation="http://maven.apache.org/POM/4.0.0 http://maven.apache.org/xsd/maven-4.0.0.xsd">
<parent>
<artifactId>dataFactory</artifactId>
<groupId>com.heima</groupId>
<version>1.0.0</version>
</parent>
<modelVersion>4.0.0</modelVersion>
<artifactId>cloud-getway</artifactId>
<dependencies>
<dependency>
<groupId>org.springframework.cloud</groupId>
<artifactId>spring-cloud-starter-gateway</artifactId>
<version>3.1.3</version>
</dependency>
<!-- 端点监控 -->
<dependency>
<groupId>org.springframework.boot</groupId>
<artifactId>spring-boot-starter-actuator</artifactId>
</dependency>
<!-- nacos注册中⼼
-->
<dependency>
<groupId>com.alibaba.cloud</groupId>
<artifactId>spring-cloud-starter-alibaba-nacos-discovery</artifactId>
</dependency>
<dependency>
<groupId>com.heima</groupId>
<artifactId>cloud-swwager</artifactId>
<version>1.0.0</version>
</dependency>
<!-- 用于在Spring Boot应用程序中生成和展示Swagger API文档 -->
<dependency>
<groupId>io.springfox</groupId>
<artifactId>springfox-swagger2</artifactId>
<version>3.0.0</version>
</dependency>
<!-- 为Spring Boot应用程序提供Swagger UI,用于可视化展示和测试Swagger API文档 -->
<dependency>
<groupId>io.springfox</groupId>
<artifactId>springfox-swagger-ui</artifactId>
<version>3.0.0</version>
</dependency>
<!--swagger-ui 这里是用了一个好看一点ui界面-->
<dependency>
<groupId>com.github.xiaoymin</groupId>
<artifactId>swagger-bootstrap-ui</artifactId>
<version>1.9.6</version>
</dependency>
<!-- <dependency>-->
<!-- <groupId>io.springfox</groupId>-->
<!-- <!–提供了使用Swagger和OpenAPI规范创建API文档的支持。–>-->
<!-- <artifactId>springfox-boot-starter</artifactId>-->
<!-- <version>3.0.0</version>-->
<!-- </dependency>-->
<dependency>
<groupId>org.springframework.cloud</groupId>
<artifactId>spring-cloud-loadbalancer</artifactId>
</dependency>
<dependency>
<groupId>org.reflections</groupId>
<artifactId>reflections</artifactId>
<version>0.9.11</version>
</dependency>
</dependencies>
<build>
<finalName>${project.artifactId}</finalName>
<plugins>
<plugin>
<groupId>org.springframework.boot</groupId>
<artifactId>spring-boot-maven-plugin</artifactId>
</plugin>
</plugins>
</build>
</project>而下面这个配置类只有网关加

网关yml

我的yml
spring:
  application:
    name: cloud-getway
  cloud:
    nacos:
      discovery:
        server-addr: 自己nacosip:8848
#        password: cqhlglnacos
#        username: nacos
    gateway:
      discovery:
        locator:
          enabled: true
          lower-case-service-id: true
      routes:
        - id: service-code
          uri: lb://service-code
          predicates:
            - Path=/code/**
        - id: service-api
          uri: lb://service-api
          predicates:
            - Path=/api/**
        - id: service-database
          uri: lb://service-database
          predicates:
            - Path=/database/**
        - id: service-account
          uri: lb://service-account
          predicates:
              - Path=/account/**
        - id: service-standard
          uri: lb://service-standard
          predicates:
              - Path=/standard/**
        - id: service-asset
          uri: lb://service-asset
          predicates:
            - Path=/asset/**
#          filters:
###            - RewritePath=/code/(?<segment>.*),/$\{segment} # 将请求路径重写为实际的服务路径
#            - StripPrefix=1 # 剥离路径

  swagger:
    basePackage: com.cqie.controller
    author:
      name: xxxx
      email: xxx@qq.com
      url:
    apiInfo:
      title: 网关模块
      description: 网关
      version: 1.0
      termsOfServiceUrl: http://ip:${server.port}/${spring.application.name}
      license: license2
      licenseUrl: licenseUrl2
  profiles:
    active: dev
  #          filters:
    # 前缀过滤,默认配置下,我们的请求路径是 http://localhost:8888/business-oauth2/** 这时会路由到指定的服务
    # 此处配置去掉 1 个路径前缀,再配置上面的 Path=/api/**,就能按照 http://localhost:8888/api/** 的方式访问了
#            - StripPrefix=1 # 剥离路径
#        - id: swagger_route
#          uri: http://localhost:8090
#          predicates:
#            - Path=/swagger-ui/**
#          filters:
#            - RewritePath=/swagger-ui/(?<segment>.*),/$\{segment}
#        - id: global_swagger_route
#          uri: http://localhost:8090
#          predicates:
#            - Path=/global-swagger-ui/**
#          filters:
#            - RewritePath=/global-swagger-ui/(?<segment>.*),/$\{segment}
server:
  #gateway的端⼝
  port: 8090
网关启动类

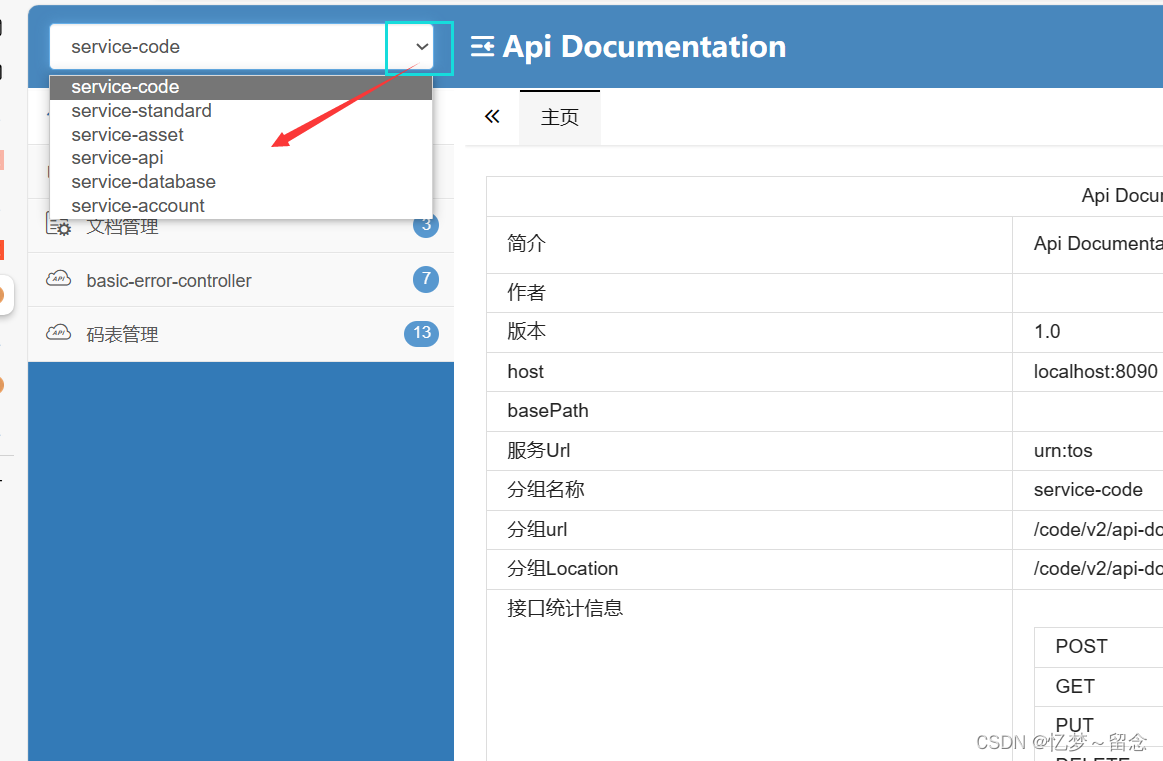
运行gateway 浏览器访问
ip:网关端口号/dochtml
就可以访问了

像这样多配置几个服务模块就行了点击进行切换

原文地址:https://blog.csdn.net/qq_67832732/article/details/137584809
免责声明:本站文章内容转载自网络资源,如本站内容侵犯了原著者的合法权益,可联系本站删除。更多内容请关注自学内容网(zxcms.com)!
