2024-07-23 Unity插件 Odin Inspector11 —— 使用 Odin 自定义编辑窗口
文章目录
Odin Window 可以完整地访问 Odin 绘图系统,不再需要操心 Window 的绘制 方式,而是专注于真正重要的事情:Window 提供的功能。

OdinWindow 分为两类:
-
OdinEditorWindow
用法与 Inspector 中使用特性自定义属性显示方式类似。
-
OdinMenuEditorWindow
能够创建具有左侧导航目录的窗口。本教程着重讲解如何创建 OdinMenuEditorWindow。
1 OdinEditorWindow
1.1 运作方式
只需继承 OdinEditorWindow 类,而不是 EditorWindow ,就可以像使用 Odin Inspector 一样,在窗口中呈现字段、属性和方法,而无需编写任何自定义编辑器 GUI 代码。
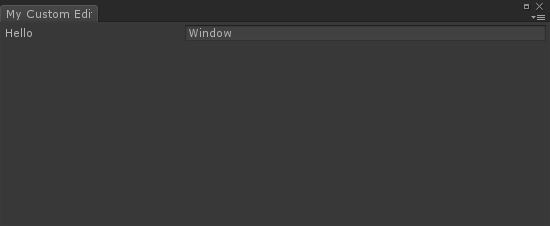
public class MyCustomEditorWindow : OdinEditorWindow
{
    [MenuItem("My Game/My Editor")]
    private static void OpenWindow() {
        GetWindow<MyCustomEditorWindow>().Show();
    }

    public string Hello;
}
1.2 使用特性绘制 OdinEditorWindow
和 MonoBehaviour 或 ScriptableObject 一样,在 OdinEditorWindow 中对字段、属性和方法添加特性,以实现自定义绘制效果。
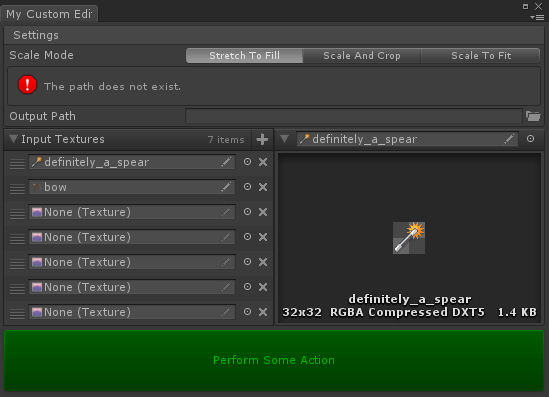
public class MyCustomEditorWindow : OdinEditorWindow
{
[MenuItem("My Game/My Editor")]
private static void OpenWindow() {
GetWindow<MyCustomEditorWindow>().Show();
}
[EnumToggleButtons, BoxGroup("Settings")]
public ScaleMode ScaleMode;
[FolderPath(RequireExistingPath = true), BoxGroup("Settings")]
public string OutputPath;
[HorizontalGroup(0.5f)]
public List<Texture> InputTextures;
[HorizontalGroup, InlineEditor(InlineEditorModes.LargePreview)]
public Texture Preview;
[Button(ButtonSizes.Gigantic), GUIColor(0, 1, 0)]
public void PerformSomeAction() { }
}
1.3 在 OdinEditorWindow 中渲染对象
重写 GetTarget() 方法,并为其提供任何类型的任何实例进行呈现。它不需要可序列化,甚至不需要是 Unity 对象。
public class MyCustomEditorWindow : OdinEditorWindow
{
    [MenuItem("My Game/My Editor")]
    private static void OpenWindow() {
        GetWindow<MyCustomEditorWindow>().Show();
    }

    protected override void Initialize() {
        this.WindowPadding = Vector4.zero;
    }

    protected override object GetTarget() {
        return Selection.activeObject;
    }
}
2 OdinMenuEditorWindow
2.1 添加菜单导航栏
继承 OdinMenuEditorWindow 类后,需要实现其抽象方法:BuildMenuTree(),该方法用于指定窗口左侧的导航目录显示什么内容。
using Sirenix.OdinInspector.Editor;

public class EnemyDataEditor : OdinMenuEditorWindow
{
    protected override OdinMenuTree BuildMenuTree() {
        throw new System.NotImplementedException();
    }
}
添加导航目录的方法通常有 2 种:
-
OdinMenuTree.Add(string path, object instance)直接在导航目录中绘制某个对象。
- path:导航栏名称。
- instance:右侧绘制的对象。
-
OdinMenuTree.AddAllAssetsAtPath( string menuPath, string assetFolderPath, Type type, bool includeSubDirectories = false, bool flattenSubDirectories = false)在导航目录中绘制某个目录下所有类型为 type 的对象。
- menuPath:导航栏名称。
- assetFolderPath:选择的目录。
- type:对象类型。
- includeSubDirectories:是否在子目录中也寻找对象。
- flattenSubDirectories:如果为 true,选择的对象将不会在左侧菜单栏中依据目录折叠显示。

public class MyCustomEditorWindow : OdinMenuEditorWindow
{
[MenuItem("My Game/My Editor")]
private static void OpenWindow() {
GetWindow<MyCustomEditorWindow>().Show();
}
protected override OdinMenuTree BuildMenuTree() {
var tree = new OdinMenuTree();
tree.Selection.SupportsMultiSelect = false;
// 方法 1
tree.Add("Settings", GeneralDrawerConfig.Instance);
tree.Add("Utilities", new TextureUtilityEditor());
// 方法 2
tree.AddAllAssetsAtPath("Odin Settings", "Assets/Plugins/Sirenix", typeof(ScriptableObject), true, true);
return tree;
}
}
public class TextureUtilityEditor
{
[BoxGroup("Tool"), HideLabel, EnumToggleButtons]
public Tool Tool;
public List<Texture> Textures;
[Button(ButtonSizes.Large), HideIf("Tool", Tool.Rotate)]
public void SomeAction() { }
[Button(ButtonSizes.Large), ShowIf("Tool", Tool.Rotate)]
public void SomeOtherAction() { }
}
2.2 添加导航栏示例
public class MyCustomEditorWindow : OdinMenuEditorWindow
{
    [MenuItem("My Game/My Editor")]
    private static void OpenWindow() {
        GetWindow<MyCustomEditorWindow>().Show();
    }

    protected override OdinMenuTree BuildMenuTree() {
        var tree = new OdinMenuTree();
        tree.Selection.SupportsMultiSelect = false;

        OdinMenuTree tree = new OdinMenuTree(supportsMultiSelect: true) {
            { "Home", this, EditorIcons.House },
            { "Odin Settings", null, SdfIconType.GearFill },
            { "Odin Settings/ Color Palettes", ColorPaletteManager.Instance, EditorIcons.EyeDropper  },
            { "Odin Settings/ AOT Generation", AOTGenerationConfig.Instance, EditorIcons.SmartPhone  },
            { "Camera current", Camera.current },
            { "Some Class", this.someData }
        };

        tree.AddAllAssetsAtPath("Some Menu Item", "Some Asset Path", typeof(ScriptableObject), true)
            .AddThumbnailIcons();

        tree.AddAssetAtPath("Some Second Menu Item", "SomeAssetPath/ SomeAssetFile. asset");

        var customMenuItem = new OdinMenuItem(tree, "Menu Style", tree.DefaultMenuStyle);
        tree.MenuItems.Insert(2, customMenuItem);

        tree.Add("Menu/ Items/ Are/ Created/ As/ Needed", new GUIContent());
        tree.Add("Menu/ Items/ Are/ Created", new GUIContent("And can be overridden"));

        return tree;
    }
}
原文地址:https://blog.csdn.net/zheliku/article/details/140646918
免责声明:本站文章内容转载自网络资源,如本站内容侵犯了原著者的合法权益,可联系本站删除。更多内容请关注自学内容网(zxcms.com)!