博客系统(Servlet实现)
目录
如果想要源码可以私信作者
1.准备工作
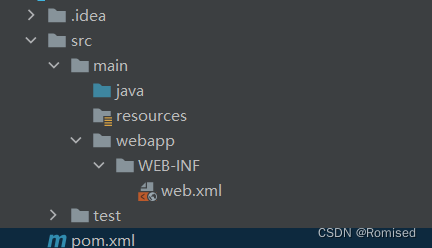
1.1创建web项目
1.2创建目录结构
1.3配置pom.xml和web.xml
pom.xml:
<?xml version="1.0" encoding="UTF-8"?>
<project xmlns="http://maven.apache.org/POM/4.0.0"
         xmlns:xsi="http://www.w3.org/2001/XMLSchema-instance"
         xsi:schemaLocation="http://maven.apache.org/POM/4.0.0 http://maven.apache.org/xsd/maven-4.0.0.xsd">
    <modelVersion>4.0.0</modelVersion>

    <groupId>org.example</groupId>
    <artifactId>messageWall</artifactId>
    <version>1.0-SNAPSHOT</version>

    <properties>
        <maven.compiler.source>8</maven.compiler.source>
        <maven.compiler.target>8</maven.compiler.target>
        <project.build.sourceEncoding>UTF-8</project.build.sourceEncoding>
    </properties>

    <dependencies>
        <!-- https://mvnrepository.com/artifact/javax.servlet/javax.servlet-api -->
        <dependency>
            <groupId>javax.servlet</groupId>
            <artifactId>javax.servlet-api</artifactId>
            <version>3.1.0</version>
            <scope>provided</scope>
        </dependency>

        <!-- https://mvnrepository.com/artifact/com.fasterxml.jackson.core/jackson-databind -->
        <dependency>
            <groupId>com.fasterxml.jackson.core</groupId>
            <artifactId>jackson-databind</artifactId>
            <version>2.14.2</version>
        </dependency>

        <!-- https://mvnrepository.com/artifact/mysql/mysql-connector-java -->
        <dependency>
            <groupId>mysql</groupId>
            <artifactId>mysql-connector-java</artifactId>
            <version>8.0.16</version>
        </dependency>

    </dependencies>


</project>
web.xml:
<!DOCTYPE web-app PUBLIC
        "-//Sun Microsystems, Inc.//DTD Web Application 2.3//EN"
        "http://java.sun.com/dtd/web-app_2_3.dtd" >

<web-app>
    <display-name>Archetype Created Web Application</display-name>
</web-app>
2.数据库设计
2.1表设计
当前需要设计两张表, 文章表和用户表
文章表:
create table blog (
                      blogId int primary key auto_increment,
    -- 博客的标题
                      title varchar(256),
    -- 博客的正文
                      content varchar(4096),
    -- 博客的作者
                      userId int,
    -- 博客的发布时间
                      postTime datetime
);
用户表:
create table user (
                      userId int primary key auto_increment,
    -- 用户名, 约定用户名不能重复.
                      username varchar(64) unique,
    -- 密码
                      password varchar(64)
    -- user 里还可以增加很多别的属性. github 链接, 头像链接.....
);
完整SQL文件
-- 编写 SQL 完成建库建表操作.

create database if not exists blog_system charset utf8;

use blog_system;

drop table if exists user;
drop table if exists blog;

create table blog (
                      blogId int primary key auto_increment,
    -- 博客的标题
                      title varchar(256),
    -- 博客的正文
                      content varchar(4096),
    -- 博客的作者
                      userId int,
    -- 博客的发布时间
                      postTime datetime
);

create table user (
                      userId int primary key auto_increment,
    -- 用户名, 约定用户名不能重复.
                      username varchar(64) unique,
    -- 密码
                      password varchar(64)
    -- user 里还可以增加很多别的属性. github 链接, 头像链接.....
);

-- 构造一些初始数据, 方便后续的测试.
insert into user values(1, 'zhangsan', '123'), (2, 'lisi', '123');

insert into blog values(1, '这是我的第一篇博客', '从今天开始我要好好敲代码', 1, '2023-09-23 19:00:00');
insert into blog values(2, '这是我的第二篇博客', '从昨天开始我要好好敲代码', 1, '2023-09-24 19:00:00');
insert into blog values(3, '这是我的第三篇博客', '从前天开始我要好好敲代码', 1, '2023-09-25 19:00:00');
2.2封装数据库操作代码
创建DBUtil类,通过单例模式来获取数据库连接
// 通过这个类, 把数据库建立连接的逻辑进行封装.
public class DBUtil {
    private static volatile DataSource dataSource = null;

    private static DataSource getDataSource() {
        if (dataSource == null) {
            synchronized (DBUtil.class) {
                if (dataSource == null) {
                    dataSource = new MysqlDataSource();
                    ((MysqlDataSource)dataSource).setUrl("jdbc:mysql://127.0.0.1:3306/blog_system?useSSL=false&characterEncoding=utf8");
                    ((MysqlDataSource)dataSource).setUser("root");
                    ((MysqlDataSource)dataSource).setPassword("123456");
                }
            }
        }
        return dataSource;
    }

    // 提供一个方法, 和数据库建立连接
    public static Connection getConnection() {
        try {
            return getDataSource().getConnection();
        } catch (SQLException e) {
            e.printStackTrace();
        }
        return null;
    }

    // 提供一个方法, 和数据库断开连接.
    public static void close(Connection connection, PreparedStatement statement, ResultSet resultSet) {
        // 如果把 3 个 close 都放到同一个 try 中, 一旦前面的 close 出现异常, 就会导致后续的 close 执行不到了.
        // 相比之下, 还是分开写 try 比较好.
        if (resultSet != null) {
            try {
                resultSet.close();
            } catch (SQLException e) {
                e.printStackTrace();
            }
        }
        if (statement != null) {
            try {
                statement.close();
            } catch (SQLException e) {
                e.printStackTrace();
            }
        }
        if (connection != null) {
            try {
                connection.close();
            } catch (SQLException e) {
                e.printStackTrace();
            }
        }
    }
}
2.3创建 Blog 类 和 User 类
Blog表示一篇博客,此处省略get、set和toString方法
public class Blog {
    private int blogId;
    private String title;
    private String content;
    private int userId;
    // SQL 里有 timestamp 类型, 还有 datetime 类型.
    // 使用 SQL 时, 推荐使用 datetime, 因为 timestamp 只有 4 字节, 2038 年就不够用了.
    // 但是 Java 代码中的 Timestamp 是可以使用的.
    private Timestamp postTime;
}
User表示一个用户,此处省略get、set和toString方法
public class User {
    private int userId;
    private String username;
    private String password;
}
2.4创建 BlogDao 类和 UserDao 类
理解 DAO
DAO 全称为 "data access object",主要的功能就是对于某个数据库表进行增删改查. 一般每张数据库表会对应一个 DAO 类. 这是一种给类命名的习惯做法, 并不是强制要求.
创建BlogDao类,针对博客表进行操作
// 通过这个类, 封装针对 blog 表的增删改查操作
public class BlogDao {
    // 1. 新增一个博客
    //    调用 insert 的时候, 需要先构造一个 Blog 对象.
    //    作为 参数 传递给 insert. 再由 insert 内部完成数据库的插入操作.
    public void insert(Blog blog) {
        Connection connection = null;
        PreparedStatement statement = null;
        try {
            // 1. 和数据库建立连接.
            connection = DBUtil.getConnection();
            // 2. 构造 SQL 语句.
            //    此处的博客发布时间, 正好是执行 SQL 的时刻. 直接使用 SQL 里的 now() 库函数, 完成获取当前时间工作.
            String sql = "insert into blog values(null, ?, ?, ?, now())";
            statement = connection.prepareStatement(sql);
            statement.setString(1, blog.getTitle());
            statement.setString(2, blog.getContent());
            statement.setInt(3, blog.getUserId());
            // 3. 执行 SQL 语句.
            statement.executeUpdate();
        } catch (SQLException e) {
            e.printStackTrace();
        } finally {
            // 4. 关闭连接, 释放资源
            DBUtil.close(connection, statement, null);
        }
    }

    // 2. 查询 blog 表里所有的博客
    //    正常开发中, 一般不会直接把整个表里的数据都查询出来, 一般都是要指定筛选条件/最大条数的.
    //    此处咱们先不考虑这么多, 就简单粗暴全都查询就行了.
    public List<Blog> getBlogs() {
        Connection connection = null;
        PreparedStatement statement = null;
        ResultSet resultSet = null;
        List<Blog> blogs = new ArrayList<>();
        try {
            // 1. 和数据库建立连接
            connection = DBUtil.getConnection();
            // 2. 构造 SQL 语句
            String sql = "select * from blog order by postTime desc";
            statement = connection.prepareStatement(sql);
            // 3. 执行 SQL
            resultSet = statement.executeQuery();
            // 4. 遍历结果集合
            while (resultSet.next()) {
                Blog blog = new Blog();
                blog.setBlogId(resultSet.getInt("blogId"));
                blog.setTitle(resultSet.getString("title"));
                blog.setContent(resultSet.getString("content"));
                blog.setUserId(resultSet.getInt("userId"));
                blog.setPostTime(resultSet.getTimestamp("postTime"));
                blogs.add(blog);
            }
        } catch (SQLException throwables) {
            throwables.printStackTrace();
        } finally {
            DBUtil.close(connection, statement, resultSet);
        }
        // 如果前面的查询出现问题, blogs 就会得到空的 List
        return blogs;
        // return null;
    }

    // 3. 指定 blogId, 查询某一个博客.
    public Blog getBlog(int blogId) {
        Connection connection = null;
        PreparedStatement statement = null;
        ResultSet resultSet = null;
        try {
            connection = DBUtil.getConnection();
            String sql = "select * from blog where blogId = ?";
            statement = connection.prepareStatement(sql);
            statement.setInt(1, blogId);
            resultSet = statement.executeQuery();
            // 由于此处是按照 blogId 来查询, blogId 又是主键.
            // 查询到的结果要么是 1 条记录, 要么是 0 条记录. 不会有别的情况.
            // 因此这里就没必要循环了, 直接条件判定即可.
            if (resultSet.next()) {
                Blog blog = new Blog();
                blog.setBlogId(resultSet.getInt("blogId"));
                blog.setTitle(resultSet.getString("title"));
                blog.setContent(resultSet.getString("content"));
                blog.setUserId(resultSet.getInt("userId"));
                blog.setPostTime(resultSet.getTimestamp("postTime"));
                return blog;
            }
        } catch (SQLException throwables) {
            throwables.printStackTrace();
        } finally {
            DBUtil.close(connection, statement, resultSet);
        }
        return null;
    }

    // 4. 指定博客进行删除
    public void delete(int blogId) {
        Connection connection = null;
        PreparedStatement statement = null;
        try {
            connection = DBUtil.getConnection();
            String sql = "delete from blog where blogId = ?";
            statement = connection.prepareStatement(sql);
            statement.setInt(1, blogId);
            statement.executeUpdate();
        } catch (SQLException throwables) {
            throwables.printStackTrace();
        } finally {
            DBUtil.close(connection, statement, null);
        }
    }

    // 像修改博客这样的操作, 此处暂时不涉及.
    // 同学们如果想自己实现, 代码和上述都差不多.
}
创建 UserDao 类, 实现对于用户表的增删改查.
// 使用这个类封装针对 user 表的增删改查
public class UserDao {
    // 对于新增 user, 主要就是需要实现一个 "注册" 功能. 但是当前不打算实现注册.
    // 对于删除 user, 主要就是需要实现一个 "注销" 功能. 但是当前也不打算实现注销.

    // 1. 根据 userId 来查询用户信息. (后续根据博客查询出作者详情)
    public User getUserById(int userId) {
        Connection connection = null;
        PreparedStatement statement = null;
        ResultSet resultSet = null;
        try {
            connection = DBUtil.getConnection();
            String sql = "select * from user where userId = ?";
            statement = connection.prepareStatement(sql);
            statement.setInt(1, userId);
            resultSet = statement.executeQuery();
            if (resultSet.next()) {
                User user = new User();
                user.setUserId(resultSet.getInt("userId"));
                user.setUsername(resultSet.getString("username"));
                user.setPassword(resultSet.getString("password"));
                return user;
            }
        } catch (SQLException throwables) {
            throwables.printStackTrace();
        } finally {
            DBUtil.close(connection, statement, resultSet);
        }
        return null;
    }

    // 2. 根据 username 来查询用户信息. (实现登陆效果)
    public User getUserByName(String username) {
        Connection connection = null;
        PreparedStatement statement = null;
        ResultSet resultSet = null;
        try {
            connection = DBUtil.getConnection();
            String sql = "select * from user where username = ?";
            statement = connection.prepareStatement(sql);
            statement.setString(1, username);
            resultSet = statement.executeQuery();
            if (resultSet.next()) {
                User user = new User();
                user.setUserId(resultSet.getInt("userId"));
                user.setUsername(resultSet.getString("username"));
                user.setPassword(resultSet.getString("password"));
                return user;
            }
        } catch (SQLException throwables) {
            throwables.printStackTrace();
        } finally {
            DBUtil.close(connection, statement, resultSet);
        }
        return null;
    }
}
3.读取博客列表功能
3.1约定前后端交互接口
[请求]
GET /blog

[响应]
[
    {
        blogId: 1,
        title: "第一篇博客",
        content: "博客正文",
        userId: 1,
        postTime: "2021-07-07 12:00:00"
    },


    {
        blogId: 2,
        title: "第二篇博客",
        content: "博客正文",
        userId: 1,
        postTime: "2021-07-07 12:10:00"
    },

...
]我们约定, 浏览器给服务器发送一个 GET /blog 这样的 HTTP 请求, 服务器给浏览器返回了一个 JSON 格式的数据.
3.2实现服务器代码
创建 BlogServlet 、实现 doGet, 完成读取博客列表的功能.如果blogId为空则显示博客列表页面,如果点击了查看详情,则就会有blogId,则显示博客详情
@WebServlet("/blog")
public class BlogServlet extends HttpServlet {
    private ObjectMapper objectMapper = new ObjectMapper();

    @Override
    protected void doGet(HttpServletRequest req, HttpServletResponse resp) throws ServletException, IOException {
        // 查询数据库, 获取到数据之后, 构造成要求的 json 格式并返回.
        // 先尝试获取下 blogId 这个参数, 看看能不能获取到.
        BlogDao blogDao = new BlogDao();
        String blogId = req.getParameter("blogId");
        if (blogId == null) {
            // 此时说明是获取博客列表. 没有 blogId 参数
            List<Blog> blogs = blogDao.getBlogs();
            String respJson = objectMapper.writeValueAsString(blogs);
            resp.setContentType("application/json; charset=utf8");
            resp.getWriter().write(respJson);
        } else {
            // 此时说明是获取博客详情. 有 blogId 参数.
            Blog blog = blogDao.getBlog(Integer.parseInt(blogId));
            if (blog == null) {
                // 返回一个 id 为 0 的 blog 对象. 前端再根据这里进行判定.
                blog = new Blog();
            }
            String respJson = objectMapper.writeValueAsString(blog);
            resp.setContentType("application/json; charset=utf8");
            resp.getWriter().write(respJson);
        }
    }
3.3实现客户端代码
使用 ajax 给服务器发送 HTTP 请求.
服务器返回的响应是一个 JSON 格式的数据, 根据这个响应数据使用 DOM API 构造页面内容.
响应中的 postTime 字段为 ms级时间戳, 需要转成格式化日期.
列表页中拿到的 "content" 字段其实是已经裁剪过的摘要.
跳转到博客详情页的 url 形如 blog_content.html?blogId=1这样就可以让博客详情页知道当前是要访问哪篇博客.
function getBlogs() {
        $.ajax({
            type: 'get',
            url: 'blog',
            success: function (body) {
                // 就需要根据响应的内容, 构造出 html 片段, 展示到页面上.
                // 由于服务器响应中已经设置了 Content-Type 为 application/json, 此时
                // jQuery 就能够自动的把此处响应的内容解析成 js 对象数组.
                let containter = document.querySelector('.container-right');
                for (let blog of body) {
                    // 根据当前这个 blog 构造出一个 html 片段.
                    let blogDiv = document.createElement('div');
                    blogDiv.className = 'blog';
                    // 构造标题
                    let titleDiv = document.createElement('div');
                    titleDiv.className = 'title';
                    titleDiv.innerHTML = blog.title;
                    blogDiv.appendChild(titleDiv);
                    // 构造发布时间
                    let dateDiv = document.createElement('div');
                    dateDiv.className = 'date';
                    dateDiv.innerHTML = blog.postTime;
                    blogDiv.appendChild(dateDiv);
                    // 构造摘要信息
                    let descDiv = document.createElement('div');
                    descDiv.className = 'desc';
                    descDiv.innerHTML = blog.content;
                    blogDiv.appendChild(descDiv);
                    // 构造 "查看全文" 按钮
                    let a = document.createElement("a");
                    a.href = 'blog_detail.html?blogId=' + blog.blogId;
                    a.innerHTML = '查看全文 >>';
                    blogDiv.appendChild(a);
                    // 最后把拼好的 blogDiv 添加到 container 的后面
                    containter.appendChild(blogDiv);
                }
            }
        });
}运行结果:博客列表成功显示

理解数据交互过程
在刚才的页面访问过程中, 涉及两次 HTTP 请求-响应的交互. (不考虑从服务器下载 css, js, 图片等)
![]()
第一次请求: 浏览器从服务器下载 blog_list.html 页面.
第二次请求: blog_list.html 中触发了 ajax 请求, 获得到 博客列表 数据.
在前后端分离的模式中, 往往一个页面的显示需要多次 HTTP 交互过程.
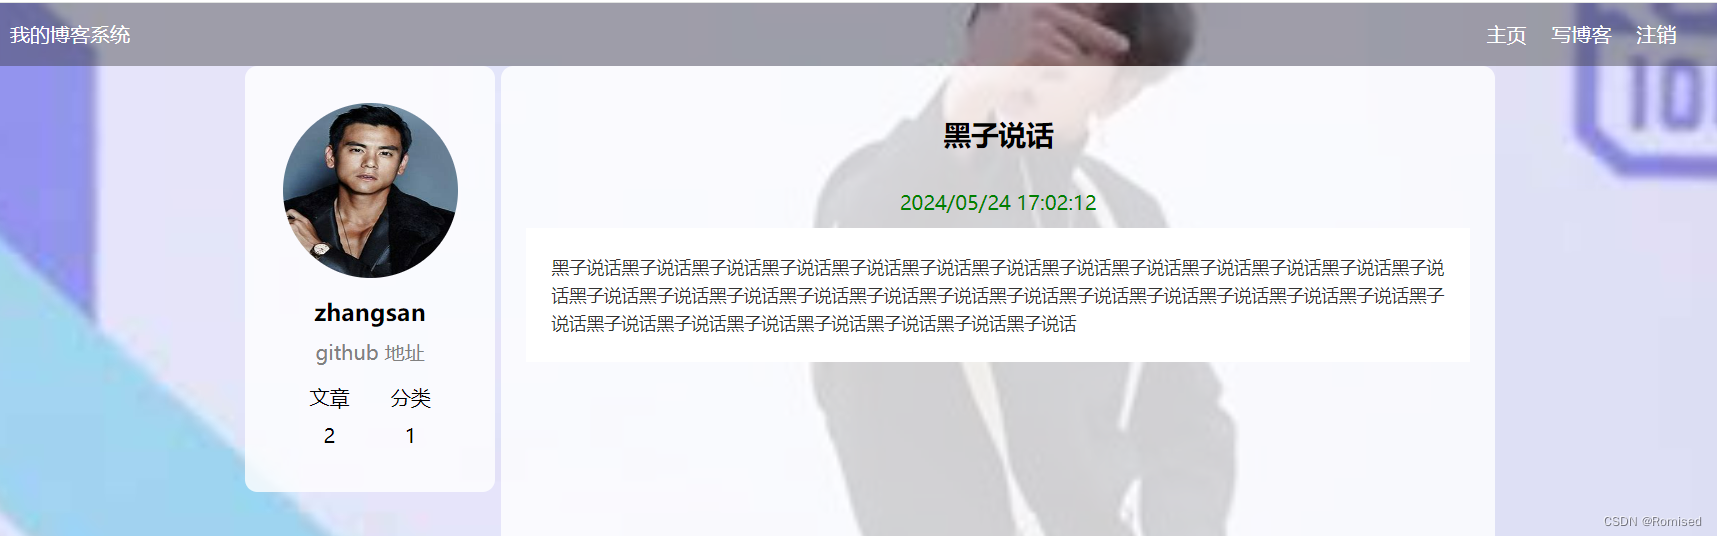
4.实现博客详情
目前点击博客列表页的 "查看全文" , 能进入博客详情页, 但是这个博客详情页是写死的内容. 我们期望能够根据当前的 博客 id 从服务器动态获取博客内容.
4.1约定前后端交互接口
[请求]
GET /blog?blogId=1

[响应] {
        blogId: 1,
        title: "第一篇博客",
        content: "博客正文",
        userId: 1,
        postTime: "2021-07-07 12:00:00"
},相比于博客列表页, 博客详情页的请求中多了一个 blogId 参数, 响应中只获取到一个博客的内容.
4.2实现服务器代码
在之前BlogServlet中,设置了参数blogId,如果是输入网站的话blogId就为空,点击博客列表中的查看详情,就会带一个blogId参数给当前页面,并放到Querystring中,
@WebServlet("/blog")
public class BlogServlet extends HttpServlet {
    private ObjectMapper objectMapper = new ObjectMapper();

    @Override
    protected void doGet(HttpServletRequest req, HttpServletResponse resp) throws ServletException, IOException {
        // 查询数据库, 获取到数据之后, 构造成要求的 json 格式并返回.
        // 先尝试获取下 blogId 这个参数, 看看能不能获取到.
        BlogDao blogDao = new BlogDao();
        String blogId = req.getParameter("blogId");
        if (blogId == null) {
            // 此时说明是获取博客列表. 没有 blogId 参数
            List<Blog> blogs = blogDao.getBlogs();
            String respJson = objectMapper.writeValueAsString(blogs);
            resp.setContentType("application/json; charset=utf8");
            resp.getWriter().write(respJson);
        } else {
            // 此时说明是获取博客详情. 有 blogId 参数.
            Blog blog = blogDao.getBlog(Integer.parseInt(blogId));
            if (blog == null) {
                // 返回一个 id 为 0 的 blog 对象. 前端再根据这里进行判定.
                blog = new Blog();
            }
            String respJson = objectMapper.writeValueAsString(blog);
            resp.setContentType("application/json; charset=utf8");
            resp.getWriter().write(respJson);
        }
    }
4.3实现客户端代码
其中blog_list.html中有跳转到详情页的代码:
当用户点击这个按钮后会携带blogId参数进入blog_detail.html

修改 blog_detail.html:
其中要引入editor_md的依赖
    function getBlog() {
        $.ajax({
            url: 'blog' + location.search,
            type: 'get',
            success: function (body) {
                // 根据拿到的响应数据, 构造页面内容.
                let h3 = document.querySelector('.container-right h3');
                h3.innerHTML = body.title;
                let dateDiv = document.querySelector('.container-right .date');
                dateDiv.innerHTML = body.postTime;
                editormd.markdownToHTML('content', {markdown: body.content});
            }
        });
    }

    getBlog();
运行结果:
5.实现登录功能
登陆页面提供一个 form 表单, 通过 form 的方式把用户名密码提交给服务器.
服务器端验证用户名密码是否正确.
如果密码正确, 则在服务器端创建 Session ,并把 sessionId 通过 Cookie 返回给浏览器.
5.1约定前后端交互接口
[请求]
POST /login
Content-Type: application/x-www-form-urlencoded
username=test&password=123
[响应]
HTTP/1.1 302
Location: blog_list.html5.2实现服务器代码
创建 LoginServlet
@WebServlet("/login")
public class LoginServlet extends HttpServlet {
    @Override
    protected void doPost(HttpServletRequest req, HttpServletResponse resp) throws ServletException, IOException {
        // 1. 获取请求中的用户名和密码
        //    给请求对象设置字符集, 保证说请求中的 username 或者 password 是中文, 也能正确处理.
        req.setCharacterEncoding("utf8");
        String username = req.getParameter("username");
        String password = req.getParameter("password");
        if (username == null || password == null || "".equals(username) || "".equals(password)) {
            // 当前提交的用户名密码有误!
            resp.setContentType("text/html; charset=utf8");
            resp.getWriter().write("当前传过来的 username 或者 password 为空");
            return;
        }
        // 2. 和数据库进行验证. 看当前这样的用户名和密码是否匹配.
        UserDao userDao = new UserDao();
        User user = userDao.getUserByName(username);
        if (user == null) {
            // 当前提交的用户名密码有误!
            resp.setContentType("text/html; charset=utf8");
            resp.getWriter().write("您的用户名或者密码错误!");
            return;
        }
        if (!password.equals(user.getPassword())) {
            // 当前提交的用户名密码有误!
            resp.setContentType("text/html; charset=utf8");
            resp.getWriter().write("您的用户名或者密码错误!");
            return;
        }
        // 3. 创建会话
        HttpSession session = req.getSession(true);
        // 把当前登录的用户信息保存到 session 中, 方便后续进行获取.
        session.setAttribute("user", user);
        // 4. 跳转到博客列表页.
        resp.sendRedirect("blog_list.html");
}5.3实现客户端代码
修改login.html:
<div class="login-container">
    <!-- 登录对话框 -->
    <div class="login-dialog">
        <h3>登录</h3>
        <!-- 使用 form 包裹一下下列内容, 便于后续给服务器提交数据 -->
        <form action="login" method="post">
            <div class="row">
                <span>用户名</span>
                <input type="text" id="username" name="username">
            </div>
            <div class="row">
                <span>密码</span>
                <input type="password" id="password" name="password">
            </div>
            <div class="row">
                <input type="submit" id="submit" value="登录">
            </div>
        </form>
    </div>
</div>
部署程序验证效果:

6.实现强制要求登陆
当用户访问 博客列表页 和 博客详情页 时, 如果用户当前尚未登陆, 就自动跳转到登陆页面.
6.1实现服务器代码
修改LoginServlet代码:添加方法检测登录状态
    // 通过这个方法, 来检测当前的登录状态.
    @Override
    protected void doGet(HttpServletRequest req, HttpServletResponse resp) throws ServletException, IOException {
        // 会话不存在, 就认为是未登录.
        HttpSession session = req.getSession(false);
        if (session == null) {
            // 未登录
            resp.setStatus(403);
            return;
        }
        // 不仅仅是看 session 对象本身, 还需要看 user 对象存在. (为了后面实现 "退出登录" 功能)
        User user = (User) session.getAttribute("user");
        if (user == null) {
            resp.setStatus(403);
            return;
        }
        // 返回 200 表示已经登陆.
        resp.setStatus(200);
    }
6.2实现服务器代码
单独编写一个js文件,在每个页面中都加上登录检查机制
function checkLogin() {
    $.ajax({
        type: 'get',
        url: 'login',
        success: function(body) {

        },
        error: function(body) {
            location.assign('login.html');
        }
    });
}7.实现显示用户信息
目前页面的用户信息部分是写死的. 形如:

我们期望这个信息可以随着用户登陆而发生改变.
如果当前页面是博客列表页, 则显示当前登陆用户的信息.
如果当前页面是博客详情页, 则显示该博客的作者用户信息.
7.1约定前后端交互接口
在博客列表页, 获取当前登陆的用户的用户信息.
[请求]
GET /user

[响应] {
         userId: 1,
        username: test
}在博客详情页, 获取当前文章作者的用户信息
[请求]
GET /user?blogId=1

[响应] {
        userId: 1,
        username: test
}
7.2实现服务器代码
创建UserServlet:
@WebServlet("/user")
public class UserServlet extends HttpServlet {
    private ObjectMapper objectMapper = new ObjectMapper();

    @Override
    protected void doGet(HttpServletRequest req, HttpServletResponse resp) throws ServletException, IOException {
        String blogId = req.getParameter("blogId");
        if (blogId == null) {
            // 博客列表页
            // 从 session 中拿到 user 对象.
            HttpSession session = req.getSession(false);
            if (session == null) {
                User user = new User();
                String respJson = objectMapper.writeValueAsString(user);
                resp.setContentType("application/json; charset=utf8");
                resp.getWriter().write(respJson);
                return;
            }
            User user = (User) session.getAttribute("user");
            if (user == null) {
                user = new User();
                String respJson = objectMapper.writeValueAsString(user);
                resp.setContentType("application/json; charset=utf8");
                resp.getWriter().write(respJson);
                return;
            }
            String respJson = objectMapper.writeValueAsString(user);
            resp.setContentType("application/json; charset=utf8");
            resp.getWriter().write(respJson);
        } else {
            // 博客详情页
            // 需要查询数据库了.
            BlogDao blogDao = new BlogDao();
            Blog blog = blogDao.getBlog(Integer.parseInt(blogId));
            if (blog == null) {
                User user = new User();
                String respJson = objectMapper.writeValueAsString(user);
                resp.setContentType("application/json; charset=utf8");
                resp.getWriter().write(respJson);
                return;
            }
            UserDao userDao = new UserDao();
            User user = userDao.getUserById(blog.getUserId());
            if (user == null) {
                user = new User();
                String respJson = objectMapper.writeValueAsString(user);
                resp.setContentType("application/json; charset=utf8");
                resp.getWriter().write(respJson);
                return;
            }
            String respJson = objectMapper.writeValueAsString(user);
            resp.setContentType("application/json; charset=utf8");
            resp.getWriter().write(respJson);
        }
    }
}
7.3实现客户端代码
1. 修改 blog_list.html和blog_detail.html,都要加上下列代码
    function getUser() {
        $.ajax({
            type: 'get',
            url: 'user',
            success: function (body) {
                // body 就是解析后的 user 对象了.
                let h3 = document.querySelector('.card h3');
                h3.innerHTML = body.username;
            }
        })
    }

getUser();8.实现注销登陆
8.1约定前后端交互接口
[请求]
GET /logout

[响应]
HTTP/1.1 302
Location: login.html8.2实现服务器代码
从 session 中删除掉保存的 User 对象
响应重定向到 login.html 页面.
创建 LogoutServlet:
@WebServlet("/logout")
public class LogoutServlet extends HttpServlet {
    @Override
    protected void doGet(HttpServletRequest req, HttpServletResponse resp) throws ServletException, IOException {
        HttpSession session = req.getSession(false);
        if (session == null) {
            // 当前就是未登录状态, 谈不上退出登录!
            resp.sendRedirect("login.html");
            return;
        }
        // 之前在登录成功后, 就会给 session 中存储 user 这样的 Attribute .
        // 把这个删掉之后, 自然就会判定为 "未登录" 了.
        session.removeAttribute("user");
        resp.sendRedirect("login.html");
    }
}
9.实现发布博客
9.1约定前后端交互接口
[请求]
POST /blog
Content-Type: application/x-www-form-urlencoded
title=标题&content=正文 ...
[响应]
HTTP/1.1 302
Location: blog_list.html
9.2实现服务器代码
修改 BlogServlet, 新增 doPost 方法.
    @Override
    protected void doPost(HttpServletRequest req, HttpServletResponse resp) throws ServletException, IOException {
        // 1. 获取到登录的用户
        //    在博客编辑页, 已经做了登录检查了. 当用户提交的时候, 必然是已经登录的状态.
        HttpSession session = req.getSession(false);
        if (session == null) {
            resp.setContentType("text/html; charset=utf8");
            resp.getWriter().write("用户未登录! 无法发布博客!");
            return;
        }
        User user = (User) session.getAttribute("user");
        if (user == null) {
            resp.setContentType("text/html; charset=utf8");
            resp.getWriter().write("用户未登录! 无法发布博客!");
            return;
        }
        // 2. 获取到请求中传递过来的内容
        req.setCharacterEncoding("utf8");  // 这个操作不要忘, 否则遇到中文可能会乱码
        String title = req.getParameter("title");
        String content = req.getParameter("content");
        if (title == null || content == null || "".equals(title) || "".equals(content)) {
            resp.setContentType("text/html; charset=utf8");
            resp.getWriter().write("标题或者正文为空");
            return;
        }
        // 3. 构造 Blog 对象, 并且插入到数据库中.
        Blog blog = new Blog();
        blog.setTitle(title);
        blog.setContent(content);
        blog.setUserId(user.getUserId());
        // 由于在 sql 插入数据的时候, 已经使用 sql 自带的 now 获取当前时间, 不需要此处代码中手动设置时间了.
        blog.setPostTime(new Timestamp(System.currentTimeMillis()));
        BlogDao blogDao = new BlogDao();
        blogDao.insert(blog);
        // 4. 跳转到博客列表页
        resp.sendRedirect("blog_list.html");
    }
9.3实现客户端代码
修改 blog_edit.html 页面结构,
增加 form 标签, action 为 blog_edit , method 为 POST
给 form 指定 height: 100%; 防止编辑器高度不能正确展开. . 给标题的 input 标签加上 name 属性
把提交按钮改成 <input type="submit" value="发布文章"> •
在 <div id="editor"> 里面加上一个隐藏的 textarea
<!-- 博客编辑页的版心 -->
<div class="blog-edit-container">
    <form action="blog" method="post">
        <!-- 标题编辑区 -->
        <div class="title">
            <input type="text" id="title-input" name="title">
            <input type="submit" id="submit">
        </div>
        <!-- 博客编辑器 -->
        <!-- 把 md 编辑器放到这个 div 中 -->
        <div id="editor">
            <textarea name="content" style="display: none;"></textarea>
        </div>
    </form>
</div>

<script src="js/app.js"></script>
<script>
    var editor = editormd("editor", {
        // 这里的尺寸必须在这里设置. 设置样式会被 editormd 自动覆盖掉.
        width: "100%",
        // 设定编辑器高度
        height: "calc(100% - 50px)",
        // 编辑器中的初始内容
        markdown: "# 在这里写下一篇博客",
        // 指定 editor.md 依赖的插件路径
        path: "editor.md/lib/"
    });

    checkLogin();
</script>
原文地址:https://blog.csdn.net/Romised/article/details/139173177
免责声明:本站文章内容转载自网络资源,如本站内容侵犯了原著者的合法权益,可联系本站删除。更多内容请关注自学内容网(zxcms.com)!