CSS-文字环绕浮动、行内块分页、三角强化妙用、伪元素选择器
文字环绕浮动
<!DOCTYPE html>
<html lang="en">

<head>
    <meta charset="UTF-8">
    <meta name="viewport" content="width=device-width, initial-scale=1.0">
    <title>文字环绕浮动效果</title>
<style>
.container {
  width: 300px; /* 根据需要设置容器的宽度 */
}

img {
  float: left; /* 图片向左浮动 */
  margin-right: 10px; /* 可根据需要设置图片与文本之间的间距 */
  width: 100px;
  height: 100px;
}

p {
  overflow: hidden; /* 清除浮动 */
}

</style>
</head>

<body>

<div class="container">
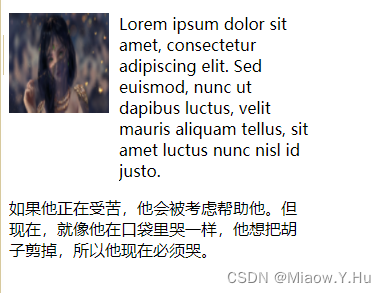
  <img src="img/7bf51d9fa40156eccb6c7cec218996368dc72872.jpg" alt="Image">
  <p>Lorem ipsum dolor sit amet, consectetur adipiscing elit. Sed euismod, nunc ut dapibus luctus, velit mauris aliquam tellus, sit amet luctus nunc nisl id justo.</p>
<p>如果他正在受苦,他会被考虑帮助他。但现在,就像他在口袋里哭一样,他想把胡子剪掉,所以他现在必须哭。</p>
</div>

</body>

</html>

行内块分页
<!DOCTYPE html>
<html lang="cn-ZH">
<head>
<meta charset="UTF-8">
<meta name="viewport" content="width=device-width, initial-scale=1.0">
<title>行内块分页</title>
<style>
* {
margin: 0;
padding: 0;
}
li {
list-style: none;
display: inline-block;
width: 45px;
line-height: 45px;
height: 45px;
background-color: silver;
border-radius: 15px;
border: 1px solid wheat;
}
li:hover {
box-shadow: 0 0 7px 3px rgba(0, 0, 0, 0.6);
}
ul .s {
list-style: none;
display: inline-block;
width: 100px;
line-height: 45px;
height: 45px;
background-color: silver;
border-radius: 10px;
border: 1px solid wheat;
}
.box {
font-size: 16px;
font-weight: 600;
margin: 100px auto;
text-align: center;
}
.box .two,
.box .three {
background-color: white;
}
</style>
</head>
<body>
<div class="box">
<ul>
<li class="s"><<上一页</li>
<li>1</li>
<li class="two">2</li>
<li>3</li>
<li>4</li>
<li>5</li>
<li class="three">...</li>
<li class="s">下一页>></li>
<span style="width: 200x;height: 40px;display: inline-block;
font-weight: 400;
">到第<input style="width: 40px;height: 30px;border: 1px solid;margin: 0 5px;" type="text">页
<input type="button" style="width: 40px;height: 30px;" value="确定"></span>
</ul>
</div>
</body>
</html>

三角强化的妙用
<!DOCTYPE html>
<html lang="en">

<head>
    <meta charset="UTF-8">
    <meta name="viewport" content="width=device-width, initial-scale=1.0">
    <title>三角形</title>

    <style>
        .box {
            width: 0px;
            height: 0px;
            border-top: 50px solid transparent;
            border-bottom: 0px solid yellow;
            border-left: 0px solid violet;
            border-right: 25px solid white;
            position: relative;
            right: 50px;
            float: left;
        }

        .box2 {
            width: 100px;
            height: 50px;
            float: left;
            position: relative;
            right: 50px;
            background-color: white;
            line-height: 50px;
            text-align: center;
            color: darkgray;
            font-weight: 800;
        }

        .box3 {
            width: 150px;
            height: 50px;
            line-height: 50px;
            text-align: left;
            padding-left: 50px;
            float: left;
            color: white;
            font-weight: 800;
            background-color: tomato;
        }

        .nav {
            position: absolute;
            border: 1px solid tomato;
        }
    </style>


</head>

<body>

    <div class="nav">
        <div class="box3">
            <span> $1405</span>
        </div>
        <div class="box"></div>
        <div class="box2">
            <span><del>$1243.62</del></span>
        </div>
    </div>


</body>

</html>

伪类选择器
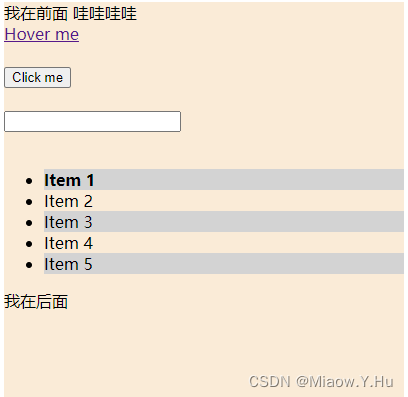
伪类选择器是CSS中一种特殊的选择器,用于选择元素的特定状态或位置。通过使用伪类选择器,可以为元素的不同状态或位置应用不同的样式。以下是一些常见的伪类选择器及其功能:
:hover:选择鼠标悬停在元素上时的状态。
a:hover {
  color: red;
}
当鼠标悬停在链接上时,链接的颜色将变为红色。
:active:选择元素被激活(被点击)时的状态。
button:active {
 background-color: yellow;
}
当按钮被点击时,按钮的背景颜色将变为黄色。
- :focus:选择元素获得焦点时的状态。
input:focus {
  border-color: blue;
}
当输入框获得焦点时,输入框的边框颜色将变为蓝色。
:first-child:选择作为其父元素的第一个子元素的元素。
ul li:first-child {
  font-weight: bold;
}
选择ul元素下的第一个li元素,并将其字体加粗。
:nth-child(n):选择作为其父元素的第n个子元素的元素。
ul li:nth-child(odd) {
  background-color: lightgray;
}
选择ul元素下的奇数位置的li元素,并将其背景颜色设置为浅灰色。
<!DOCTYPE html>
<html lang="en">

<head>
    <meta charset="UTF-8">
    <meta name="viewport" content="width=device-width, initial-scale=1.0">
    <title>伪元素选择器</title>
    <style>
        div {
            width: 400px;
            height: 400px;
            background-color: antiquewhite;
        }

        div::after {
            content: '我在后面';
        }

        div::before {
            content: '我在前面';
        }

 a:hover {
      color: red;
    }

    button:active {
      background-color: yellow;
    }

    input:focus {
      border-color: blue;
    }

    ul li:first-child {
      font-weight: bold;
    }

    ul li:nth-child(odd) {
      background-color: lightgray;
    }
    </style>
</head>

<body>

    <div>
        哇哇哇哇
<br />

<a href="#">Hover me</a>
  <br><br>
  <button>Click me</button>
  <br><br>
  <input type="text">
  <br><br>
  <ul>
    <li>Item 1</li>
    <li>Item 2</li>
    <li>Item 3</li>
    <li>Item 4</li>
    <li>Item 5</li>
  </ul>

    </div>
</body>

</html>

当鼠标悬停在链接上时,链接的颜色将变为红色。当按钮被点击时,按钮的背景颜色将变为黄色。当输入框获得焦点时,输入框的边框颜色将变为蓝色。列表中的第一个li元素的字体将加粗,奇数位置的li元素的背景颜色将设置为浅灰色。
原文地址:https://blog.csdn.net/qq_45922256/article/details/137630435
免责声明:本站文章内容转载自网络资源,如本站内容侵犯了原著者的合法权益,可联系本站删除。更多内容请关注自学内容网(zxcms.com)!
