【Java多线程(1)】创建线程的几种方式和Thread类及其常见方法
目录
示例二:使用Thread对象的interrupted() 方法通知线程结束
一、Java创建线程的方式
在了解了进程和线程后,就可以开始学习Java多线程的内容了。
在 Java 中的线程(Thread)是由 Java 虚拟机(JVM)来管理和调度的,它们并不直接映射到操作系统的原生线程(OS Thread)。Java 线程是由 JVM 在后台使用一种称为“轻量级进程(Lightweight Process)”的概念来实现的。
1. 通过继承 Thread 类实现多线程
class MyThread extends Thread {
    @Override
    public void run() {
        while (true) {
            System.out.println("Hello thread");
            try {
                Thread.sleep(1000);
            } catch (InterruptedException e) {
                throw new RuntimeException(e);
            }
        }
    }
}

public class Demo1 {
    public static void main(String[] args) {
        Thread t = new MyThread();

        t.start();

        while (true) {
            System.out.println("Hello main");
            try {
                Thread.sleep(1000);
            } catch (InterruptedException e) {
                throw new RuntimeException(e);
            }
        }
    }
}- 这段代码定义了一个继承自 Thread 类的 MyThread 类(重写Thread类的run方法),该类会在运行时不断输出 "Hello thread",并且在每次输出后休眠1秒(Thread.sleep() 方法用于让当前线程暂停执行指定的时间(以毫秒为单位)。当调用 Thread.sleep() 方法时,当前线程会进入阻塞状态,并暂停执行指定的时间长度,然后重新进入就绪状态等待 CPU 时间片。)。同时,在 Demo1 类的 main 方法中创建了一个 MyThread 的实例 t,并启动了该线程(调用start()方法启动线程)。在主线程中也会不断输出 "Hello main",并且在每次输出后休眠1秒。
- 当你运行这段代码时,将会看到两个线程(主线程和t的线程)同时执行,分别输出 "Hello thread" 和 "Hello main",并且它们会交替输出,因为两个线程是并发执行的。这样可以展示 Java 多线程编程中的基本概念和线程交替执行的特点。

2. 通过实现 Runnable 接口实现多线程
class MyRun implements Runnable {
    @Override
    public void run() {
        while (true) {
            System.out.println("Hello thread");
            try {
                Thread.sleep(1000);
            } catch (InterruptedException e) {
                throw new RuntimeException(e);
            }
        }
    }
}

public class Demo2 {
    public static void main(String[] args) {
        Thread t = new Thread(new MyRun());

        t.start();

        while (true) {
            System.out.println("Hello main");
            try {
                Thread.sleep(1000);
            } catch (InterruptedException e) {
                throw new RuntimeException(e);
            }
        }
    }
}
这段代码定义了一个实现了 Runnable 接口的 MyRun 类,其中重写了 run() 方法。其余内容与第一种一致。
上述两种方式的区别:
- 在创建实例时,第一种方式new的是子类MyThread的对象,第二种方式则是以MyRun的对象为参数创建Thread的对象。
- 第二种方式的好处是代码耦合度更低。run()方法中的代码表示多线程要做的事情,第二种方式相当于把自己要做的事情让别人帮你记录,第一种则是自己记录自己要做的事情。
3. 其他变形
注:这里的所有实现多线程的方式的代码效果都与前面一致:
- 匿名内部类创建 Thread 子类对象
public class Demo3 {
    public static void main(String[] args) {
        //匿名内部类创建线程
        Thread t = new Thread() {
            @Override
            public void run() {
                while (true) {
                    System.out.println("Hello thread");
                    try {
                        Thread.sleep(1000);
                    } catch (InterruptedException e) {
                        throw new RuntimeException(e);
                    }
                }
            }
        };

        t.start();

        while (true) {
            System.out.println("Hello main");
            try {
                Thread.sleep(1000);
            } catch (InterruptedException e) {
                throw new RuntimeException(e);
            }
        }
    }
}
对于只需要使用一次的类,我们就可以用匿名内部类的方式创建它的对象。
- 匿名内部类创建 Runnable 实现类对象
public class Demo4 {
    public static void main(String[] args) {
        //匿名内部类创建线程
        Thread t = new Thread(new Runnable() {
            @Override
            public void run() {
                while (true) {
                    System.out.println("Hello thread");
                    try {
                        Thread.sleep(1000);
                    } catch (InterruptedException e) {
                        throw new RuntimeException(e);
                    }
                }
            }
        });

        t.start();

        while (true) {
            System.out.println("Hello main");
            try {
                Thread.sleep(1000);
            } catch (InterruptedException e) {
                throw new RuntimeException(e);
            }
        }
    }
}- Lambda表达式创建 Runnable 实现类对象
public class Demo5 {
    public static void main(String[] args) {
        //lambda表达式创建线程
        Thread t = new Thread(() -> {
            while (true) {
                System.out.println("Hello thread");
                try {
                    Thread.sleep(1000);
                } catch (InterruptedException e) {
                    throw new RuntimeException(e);
                }
            }
        });

        t.start();

        while (true) {
            System.out.println("Hello main");
            try {
                Thread.sleep(1000);
            } catch (InterruptedException e) {
                throw new RuntimeException(e);
            }
        }
    }
}
二、Thread类及常见方法
1. Thread类的常见构造方法

Thread t1 = new Thread();
Thread t2 = new Thread(new MyRunnable());
Thread t3 = new Thread("这是我的名字");
Thread t4 = new Thread(new MyRunnable(), "这是我的名字");
2. Thread类的几个常见属性

- ID 是线程的唯⼀标识,不同线程不会重复
- 名称是各种调试⼯具⽤到
- 状态表⽰线程当前所处的⼀个情况(就绪、阻塞、运行态)
- 优先级⾼的线程理论上来说更容易被调度到
- 关于后台(守护)线程,需要记住⼀点:JVM会在⼀个进程的所有⾮后台线程结束后,才会结束运⾏。
- 是否存活,即简单的理解,为 run ⽅法是否运⾏结束了
- 线程的中断问题,下⾯我们进⼀步说明
下面是几个方法的示例:
2.1 getName()
public class Demo1 {
    public static void main(String[] args) {
        //名称 getName()
        Thread t = new Thread(() ->
                System.out.println(Thread.currentThread().getName()), "线程0");

        t.start();
    }
}
2.2 setDaemon() & isDaemon()
JVM会在⼀个进程的所有⾮后台线程结束后(即所有前台线程结束,后台线程也就结束),才会结束运⾏。每一个线程默认都是前台线程。
public class Demo2 {
    public static void main(String[] args) {
        //setDaemon() & isDaemon()
        Thread t = new Thread(() -> {
            for (int i = 0; i < 5; i++) {
                System.out.println("Hello thread");
                try {
                    Thread.sleep(1000);
                } catch (InterruptedException e) {
                    throw new RuntimeException(e);
                }
            }
        });
        //设置为后台(守护)线程 当前台线程都执行结束,后台线程也要结束
        t.setDaemon(true);

        t.start();
    }
}
上述代码中,线程 t 是一个后台线程,它会输出 "Hello thread" 消息,然后休眠一秒钟,循环执行这个过程。但由于设置了守护线程,当主线程(前台线程)执行完毕时,即使后台线程 t 没有执行完毕,程序也会结束并退出。而这里前台线程很快就结束了,因此很大概率控制台是不会输入任何信息的。

2.3 isAlive()
public class Demo3 {
    public static void main(String[] args) {
        //isAlive() 判断当前线程是否存活
        Thread t = new Thread(() -> {
            try {
                Thread.sleep(2000);
            } catch (InterruptedException e) {
                throw new RuntimeException(e);
            }
        });

        t.start();

        try {
            Thread.sleep(3000);
        } catch (InterruptedException e) {
            throw new RuntimeException(e);
        }

        System.out.println(t.isAlive());
    }
}
在这段代码中,通过 t.isAlive() 方法可以判断线程 t 是否处于存活状态。具体来说:
- 首先创建了一个线程 t,让它在启动后休眠 2000 毫秒(2秒)。
- 然后主线程休眠 3000 毫秒(3秒),等待线程 t 执行完成。
- 在主线程休眠结束后,通过
t.isAlive()方法检查线程 t 是否仍然存活,即线程是否仍在执行中。
因为线程 t 在启动后休眠了 2 秒,而主线程休眠了 3 秒,所以在主线程判断线程 t 的存活状态时,线程 t 应该已经执行完毕,因此 t.isAlive() 返回 false。
2.4 中断一个线程
示例一:使用自定义的变量来作为标志位
public class Demo4 {
    //中断一个线程
    //方式一:使用自定义的变量来作为标志位(可能涉及到变量捕获)

    private static boolean isRunning = true;

    public static void main(String[] args) {
        Thread t = new Thread(() -> {
            while (isRunning) {
                System.out.println("hello thread");
                try {
                    Thread.sleep(1000);
                } catch (InterruptedException e) {
                    throw new RuntimeException(e);
                }
            }
            System.out.println(" t 进程结束了");
        });

        t.start();

        try {
            Thread.sleep(3000);
        } catch (InterruptedException e) {
            throw new RuntimeException(e);
        }
        //中断线程
        System.out.println("控制 t 进程结束");
        isRunning = false;
    }
}
这段代码展示了一种通过自定义变量来中断线程的方式。具体来说:
- 定义了一个静态的 boolean 类型变量 isRunning,初始值为 true。
- 在主线程中创建了一个新线程 t,该线程通过检查 isRunning 变量来确定是否继续执行。
- 线程 t 在循环中打印"hello thread",并每隔1秒执行一次。
- 主线程休眠3秒后,将 isRunning 设置为 false,以此来中断线程 t 的执行。
在这个例子中,通过设置 isRunning 变量为 false,可以使线程 t 在下一次循环时退出循环,从而结束线程的执行。这种方式是一种简单粗暴的中断线程的方法,但在实际应用中需要注意线程间状态同步和可见性等问题,避免出现并发安全性问题。
如果自定义变量不是成员变量,而是main当中的局部变量,这时候就可能涉及到变量捕获。

示例二:使用Thread对象的interrupted() 方法通知线程结束
public class Demo5 {
    //中断进程
    //方式二:使用Thread对象的Interrupted()方法通知线程结束
    public static void main(String[] args) {
        //isInterrupted() & Interrupted()
        Thread t = new Thread(() -> {
            while (!Thread.currentThread().isInterrupted()) {
                System.out.println("hello thread");
                try {
                    Thread.sleep(10000);
                } catch (InterruptedException e) {
                    //以 InterruptedException 异常的形式通知,清除中断标志
                    //自行决定如何处理
                    System.out.println("决定要执行哪些代码");
                    break;
                }
            }
        });

        t.start();

        try {
            Thread.sleep(3000);
        } catch (InterruptedException e) {
            throw new RuntimeException(e);
        }
        //通知线程结束,将标志位设为true
        t.interrupt();
    }
}
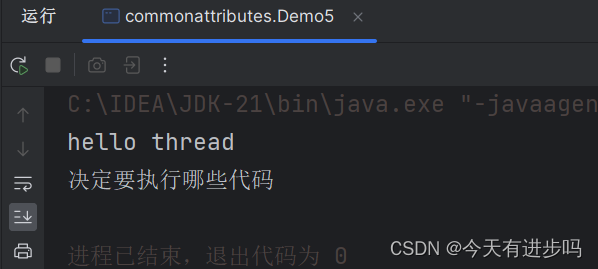
这段代码展示了另一种中断线程的方式,通过使用Thread对象的interrupt()方法来通知线程结束。具体来说:
- 在主线程中创建了一个新线程 t,该线程在循环中通过检查Thread.currentThread().isInterrupted()方法的返回值来确定是否继续执行。
- 线程 t 在循环中打印"hello thread",并每隔10秒执行一次。
- 主线程休眠3秒后,调用t.interrupt()方法,向线程 t 发出中断通知。此时执行catch中的代码。

需要注意的是,当调用t.interrupt()方法后,并不会立即终止线程 t 的执行,而是设置了线程的中断标志位。即在调用Thread.sleep()方法的线程在睡眠期间被中断,就会导致InterruptedException异常的抛出。在catch块中捕获这个异常可以让程序员对线程中断进行相应的处理,比如释放资源、恢复状态等操作。
总结,thread 收到通知的方式有两种:
- 如果线程因为调⽤ wait/join/sleep 等⽅法⽽阻塞挂起,则以 InterruptedException 异常的形式通知,清除中断标志 当出现 InterruptedException 的时候, 要不要结束线程取决于 catch 中代码的写法. 可以选择忽 略这个异常, 也可以跳出循环结束线程.
- 否则,只是内部的⼀个中断标志被设置,thread 可以通过Thread.currentThread().isInterrupted() 判断指定线程的中断标志被设置,不清除中断标志。这种⽅式通知收到的更及时,即使线程正在 sleep 也可以⻢上收到。
原文地址:https://blog.csdn.net/sjsjzhx/article/details/136988829
免责声明:本站文章内容转载自网络资源,如本站内容侵犯了原著者的合法权益,可联系本站删除。更多内容请关注自学内容网(zxcms.com)!
