云计算实训13——DNS域名解析、ntp时间服务器配置、主从DNS配置、多区域DNS搭建
一、DNS域名解析
1.正向解析
将域名解析为IP地址
DNS正向解析核心配置
(1)安装bind
[root@dns ~]# yum -y install bind
(2)编辑配置文件
编辑named.conf文件,限定访问权限
[root@dns ~]# vim /etc/named.conf

编辑named.rfc文件,指定要访问的域名
[root@dns ~]# vim /etc/named.rfc1912.zones

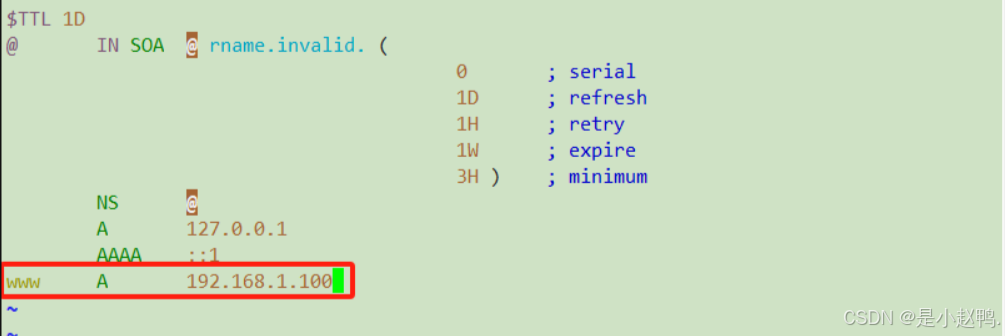
编辑解析文件,将对应的域名解析为IP地址
[root@dns named]# vim ayou.dongdong.zone
(3)启动服务
[root@dns ~]# systemctl start named
在客户端进行访问测试
[root@client ~]# elinks

下面就是我们访问到的页面

至此实现了将域名解析为IP地址继而访问到web页面,完成了dns的正向解析
有关正向解析更多的详细配置可查看上一篇内容
2.反向解析
将IP地址解析为域名
(1)复制配置文件
[root@dns named]# cp -p named.localhost 192.168.1.20.zone
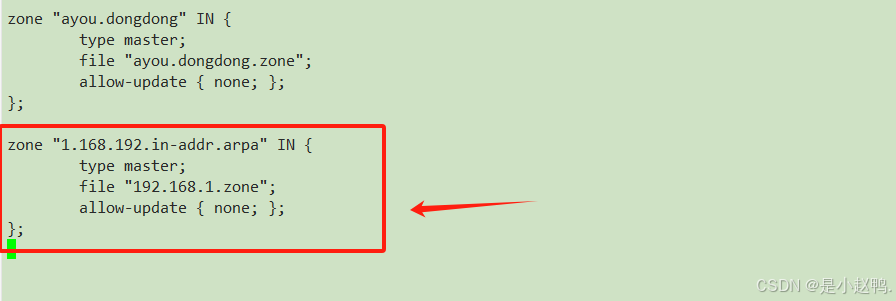
(2)编辑配置文件
[root@dns named]# vim 192.168.1.20.zone

[root@dns named]# vim /etc/named.rfc1912.zones
(3)重启服务
[root@dns named]# systemctl restart named
(4)客户端验证
查看域名对应的IP地址
查看www.baidu.com对应的IP地址
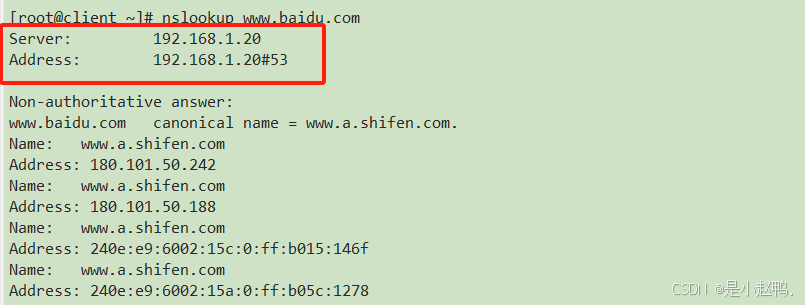
查看www.ayou.dongdong对应的IP地址

查看dns服务器所对应的域名

如上图所示,dns服务器找到了对应的域名,成功完成了反向解析
二、配置ntp服务器
做内网ntp服务器,这台主机可以定时访问外网
1.查找ntp软件包
[root@ntp ~]# yum search ntp
2.安装ntp软件包
[root@ntp ~]# yum -y install ntp.x86_64
3.编辑配置文件
[root@ntp ~]# vim /etc/ntp.conf

4.同步时间
[root@ntp ~]# ntpdate cn.ntp.org.cn
24 Jul 15:06:19 ntpdate[1768]: adjust time server 120.25.115.20 offset -0.004753 sec
5.开启ntpd服务
[root@ntp ~]# systemctl start ntpd
查看ntpdate所在目录
[root@ntp ~]# which ntpdate
/usr/sbin/ntpdate
6.编辑计划任务
[root@ntp ~]# crontab -e
7.在DNS服务器上操作
(1)安装ntpdate软件包
[root@dns named]# yum -y intsall ntpdate
(2)让DNS服务器跟ntp服务器同步
[root@dns named]# ntpdate 192.168.1.40
24 Jul 15:37:56 ntpdate[2519]: adjust time server 192.168.1.40 offset 0.009912 sec
[root@dns named]# date
2024年 07月 24日 星期三 15:38:01 CST
8.客户端验证
要求集群服务器主机的时间同步
(1)安装ntpdate软件包
[root@client ~]# yum -y install ntpdate.x86_64
(2)让客户端跟ntp服务器同步
[root@client ~]# ntpdate 192.168.1.40
24 Jul 15:11:21 ntpdate[3199]: adjust time server 192.168.1.40 offset 0.002753 sec
(3)更改时间
[root@client ~]# date -s "2009-7-30 12:34:56"
2009年 07月 30日 星期四 12:34:56 CST
[root@client ~]# date
2009年 07月 30日 星期四 12:34:59 CST
(4)再次同步
[root@client ~]# ntpdate 192.168.1.40
24 Jul 15:12:59 ntpdate[3202]: step time server 192.168.1.40 offset 472876649.802769 sec
[root@client ~]# date
2024年 07月 24日 星期三 15:13:07 CST
三、配置主从DNS
1.配置主DNS
(1)修改配置文件
[root@dns named]# vim /etc/named.conf
(2)重启服务
[root@dns named]# systemctl restart named
2.配置从DNS
(1)关闭防火墙
[root@sla ~]# systemctl stop firewalld
[root@sla ~]# systemctl disable firewalld
(2)关闭selinux
[root@sla ~]# setenforce 0
[root@sla ~]# vim /etc/selinux/configSELINUX=premissive
(3)关闭软件管理软件
[root@sla ~]# systemctl stop NetworkManager
[root@sla ~]# systemctl disable NetworkManager
(4)安装ntpdate软件包
[root@sla ~]# yum -y install ntpdate
让从DNS服务器跟ntp服务器同步
[root@sla ~]# ntpdate 192.168.1.40
24 Jul 15:36:26 ntpdate[1928]: adjust time server 192.168.1.40 offset 0.005453 sec
[root@sla ~]# date
2024年 07月 24日 星期三 15:37:12 CST
(5)下载bind软件包
[root@sla ~]# yum -y install bind
(6)修改配置文件
修改.conf文件
[root@sla ~]# vim /etc/named.conf
修改.zones文件
[root@sla ~]# vim /etc/named.rfc1912.zones
检查named.rfc文件配置是否正确
[root@sla ~]# named-checkconf /etc/named.rfc1912.zones
(7)启动服务
[root@sla ~]# systemctl start named
查看
四、配置多区域DNS
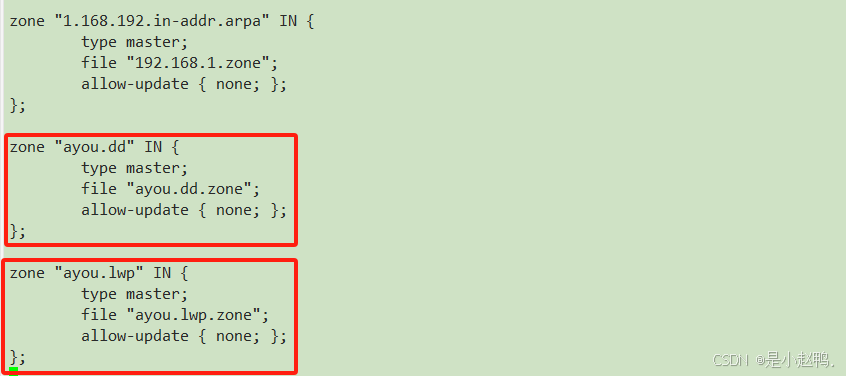
1.修改配置文件
[root@dns named]# vim /etc/named.rfc1912.zones
2.复制文件
[root@dns named]# cp -p named.localhost ayou.dd.zone
[root@dns named]# cp -p named.localhost ayou.lwp.zone
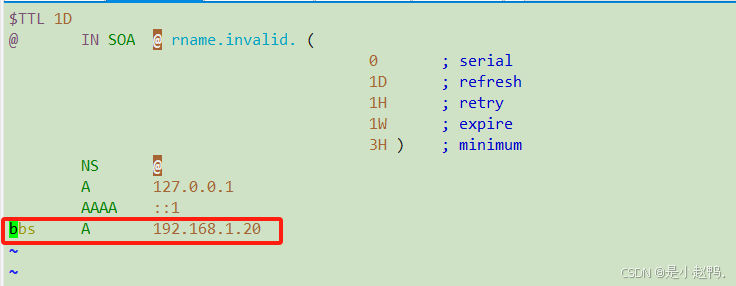
3.修改配置文件
[root@dns named]# vim ayou.lwp.zone

[root@dns named]# vim ayou.dd.zone
4.重启服务
[root@dns named]# systemctl restart named
5.客户端验证
(1)重定向dns地址

(2)进行验证
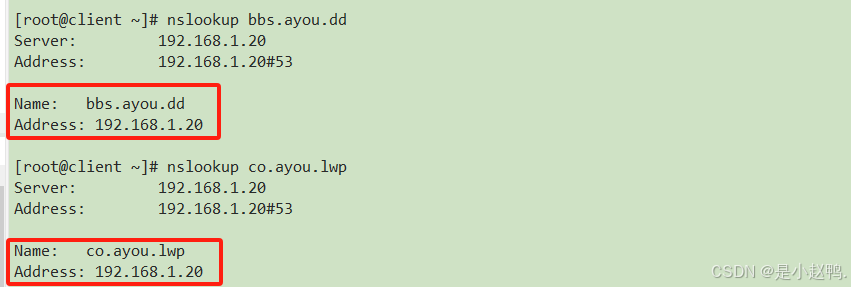
至此,多区域DNS的配置就全部完成了
原文地址:https://blog.csdn.net/m0_73907608/article/details/140666422
免责声明:本站文章内容转载自网络资源,如本站内容侵犯了原著者的合法权益,可联系本站删除。更多内容请关注自学内容网(zxcms.com)!


