maven聚合ssm
如果没有写过ssm项目请移步SSM后端框架搭建(有图有真相)-CSDN博客
数据库准备
create table `user` (
`id` int (11),
`uid` varchar (60),
`name` varchar (60),
`age` int (11),
`sex` varchar (12)
);
insert into `user` (`id`, `uid`, `name`, `age`, `sex`) values('10','20240909','张三丰','9999','男');
insert into `user` (`id`, `uid`, `name`, `age`, `sex`) values('11','20240907','张无忌','111','男');
insert into `user` (`id`, `uid`, `name`, `age`, `sex`) values('12','12010909','郭靖','11','男');
insert into `user` (`id`, `uid`, `name`, `age`, `sex`) values('13','22222222','黄蓉','18','女');
insert into `user` (`id`, `uid`, `name`, `age`, `sex`) values('14','43215678','赵敏','18','女');
insert into `user` (`id`, `uid`, `name`, `age`, `sex`) values('15','78787878','杨过','22','男');
insert into `user` (`id`, `uid`, `name`, `age`, `sex`) values('18','12344321','小龙女','18','女');
1.创建父项目
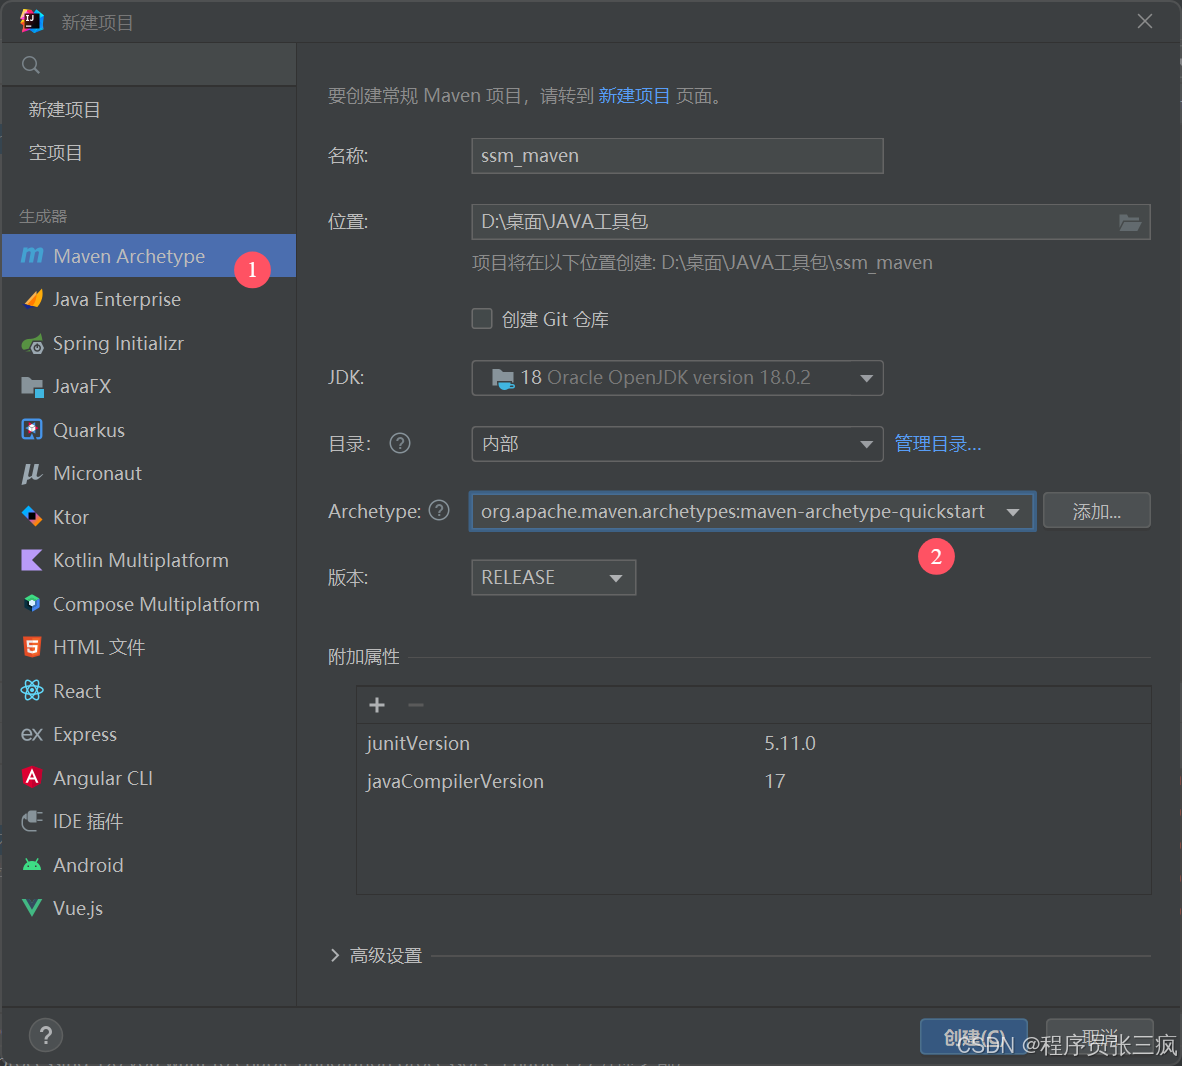
首先创建一个空项目
删除src目录,并整理pom.xml文件
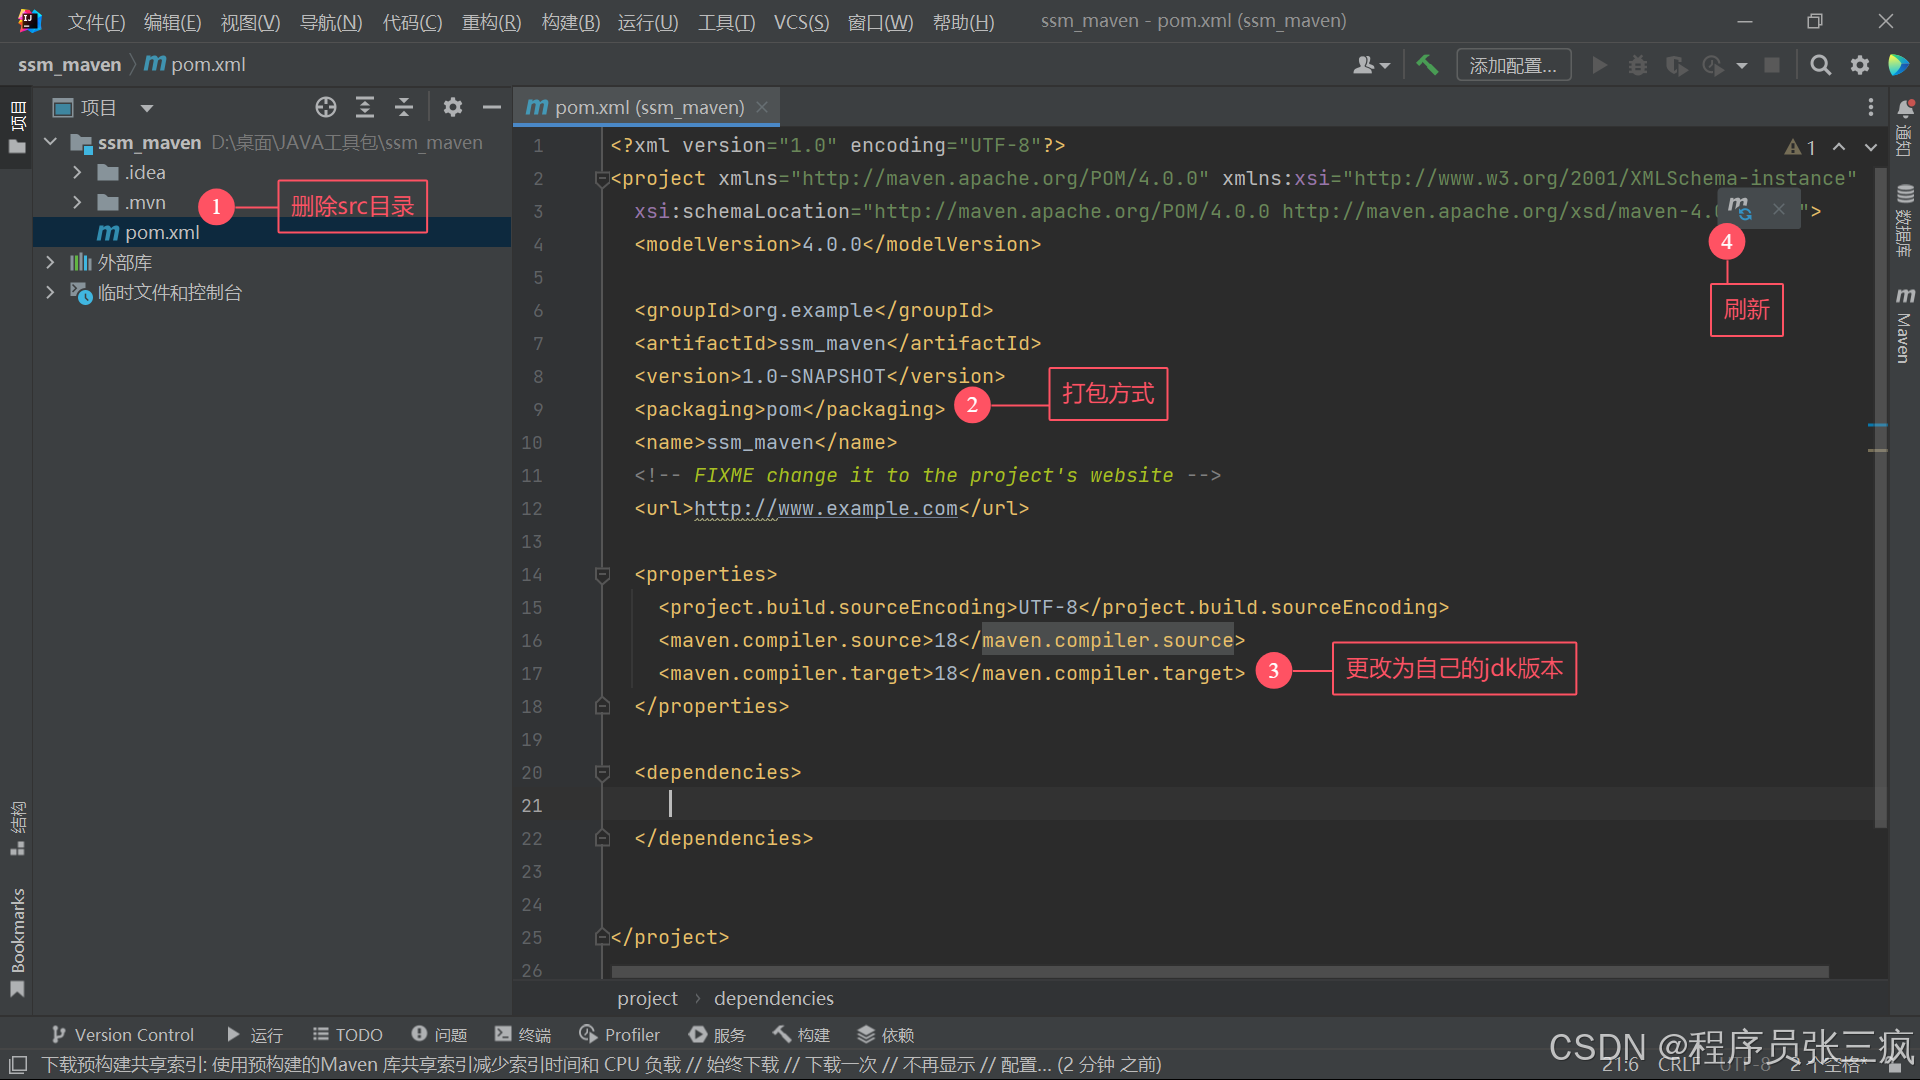
在标签中引入项目所需的所有依赖(如下)并刷新
<!--mysql-->
<dependency>
  <groupId>com.mysql</groupId>
  <artifactId>mysql-connector-j</artifactId>
  <version>8.0.32</version>
</dependency>

<!--德鲁伊-->
<dependency>
  <groupId>com.alibaba</groupId>
  <artifactId>druid</artifactId>
  <version>1.0.9</version>
</dependency>

<!--mybatis-->
<dependency>
  <groupId>org.mybatis</groupId>
  <artifactId>mybatis</artifactId>
  <version>3.5.5</version>
</dependency>

<!--单元测试-->
<dependency>
  <groupId>junit</groupId>
  <artifactId>junit</artifactId>
  <version>4.13.1</version>
</dependency>

<!--补充实体类-->
<dependency>
  <groupId>org.projectlombok</groupId>
  <artifactId>lombok</artifactId>
  <version>1.18.30</version>
</dependency>

<!--spring上下文核心-->
<dependency>
  <groupId>org.springframework</groupId>
  <artifactId>spring-context</artifactId>
  <version>5.3.20</version>
</dependency>

<!--代替单元测试-->
<dependency>
  <groupId>org.springframework</groupId>
  <artifactId>spring-test</artifactId>
  <version>5.3.20</version>
</dependency>

<!--spring 事务-->
<dependency>
  <groupId>org.springframework</groupId>
  <artifactId>spring-tx</artifactId>
  <version>5.3.20</version>
</dependency>

<!--spring切面-->
<dependency>
  <groupId>org.aspectj</groupId>
  <artifactId>aspectjweaver</artifactId>
  <version>1.9.9</version>
</dependency>

<!--springtemplate-->
<dependency>
  <groupId>org.springframework</groupId>
  <artifactId>spring-jdbc</artifactId>
  <version>5.3.20</version>
</dependency>

<!--mybatis整合spring坐标-->
<dependency>
  <groupId>org.mybatis</groupId>
  <artifactId>mybatis-spring</artifactId>
  <version>1.3.1</version>
</dependency>
<!--springmvc-->
<dependency>
  <groupId>org.springframework</groupId>
  <artifactId>spring-webmvc</artifactId>
  <version>5.3.20</version>
</dependency>
<!--servlet-->
<dependency>
  <groupId>javax.servlet</groupId>
  <artifactId>javax.servlet-api</artifactId>
  <version>4.0.1</version>
</dependency>
<!--支持jsp-->
<dependency>
  <groupId>javax.servlet.jsp</groupId>
  <artifactId>jsp-api</artifactId>
  <version>2.2</version>
</dependency>
<!--标准标签库-->
<dependency>
  <groupId>jstl</groupId>
  <artifactId>jstl</artifactId>
  <version>1.2</version>
</dependency>
<!--日志-->
<dependency>
  <groupId>org.slf4j</groupId>
  <artifactId>slf4j-api</artifactId>
  <version>1.7.36</version>
</dependency>
<dependency>
  <groupId>org.slf4j</groupId>
  <artifactId>slf4j-log4j12</artifactId>
  <version>1.7.36</version>
</dependency>
<!--支持web-->
<dependency>
  <groupId>org.springframework</groupId>
  <artifactId>spring-web</artifactId>
  <version>5.3.20</version>
</dependency>
<!--解析xml-->
<dependency>
  <groupId>com.fasterxml.jackson.core</groupId>
  <artifactId>jackson-databind</artifactId>
  <version>2.9.6</version>
</dependency>
<!--文件上传-->
<dependency>
  <groupId>commons-fileupload</groupId>
  <artifactId>commons-fileupload</artifactId>
  <version>1.3.3</version>
</dependency>
<dependency>
  <groupId>commons-io</groupId>
  <artifactId>commons-io</artifactId>
  <version>2.6</version>
</dependency>
<!--分页助手-->
<dependency>
  <groupId>com.github.pagehelper</groupId>
  <artifactId>pagehelper</artifactId>
  <version>5.2.0</version>
</dependency>
<dependency>
  <groupId>com.alibaba</groupId>
  <artifactId>fastjson</artifactId>
  <version>1.2.76</version>
</dependency>
2.创建mapper层
在父模块下新建子模块

整理pom.xml文件

构建mapper模块的结构

在resources创建spring配置文件applicationContext-mapper.xml
<?xml version="1.0" encoding="UTF-8"?>
<beans xmlns="http://www.springframework.org/schema/beans"
       xmlns:xsi="http://www.w3.org/2001/XMLSchema-instance"
       xmlns:context="http://www.springframework.org/schema/context"
       xmlns:tx="http://www.springframework.org/schema/tx"
       xmlns:aop="http://www.springframework.org/schema/aop"
       xsi:schemaLocation="http://www.springframework.org/schema/beans
        http://www.springframework.org/schema/beans/spring-beans.xsd
        http://www.springframework.org/schema/context
        http://www.springframework.org/schema/context/spring-context.xsd
        http://www.springframework.org/schema/tx
        http://www.springframework.org/schema/tx/spring-tx.xsd
        http://www.springframework.org/schema/aop
        http://www.springframework.org/schema/aop/spring-aop.xsd">
    <!--注解组件扫描-->
    <context:component-scan base-package="com.myself.mapper"/>
    <!--spring整合mybatis-->
    <context:property-placeholder location="classpath:druid.properties"/>
    <bean id="dataSource" class="com.alibaba.druid.pool.DruidDataSource">
        <property name="driverClassName" value="${jdbc.driverClassName}"/>
        <property name="url" value="${jdbc.url}"/>
        <property name="username" value="${jdbc.username}"/>
        <property name="password" value="${jdbc.password}"/>
    </bean>
    <!--SqlSessionFactory创建交给spring的IOC容器-->
    <bean id="sqlSessionFactory" class="org.mybatis.spring.SqlSessionFactoryBean">
        <!--数据库环境配置-->
        <property name="dataSource" ref="dataSource"/>
        <!--类型别名配置-->
        <property name="typeAliasesPackage" value="com.myself.pojo"/>
        <!--如果要引入mybatis主配置文件,可以通过如下配置-->
        <!--<property name="configLocation" value="classpath:SqlMapConfig.xml"/>-->
    </bean>
    <!--映射接口扫描配置,由spring创建代理对象,交给IOC容器-->
    <bean class="org.mybatis.spring.mapper.MapperScannerConfigurer">
        <property name="basePackage" value="com.myself.mapper"/>
    </bean>
    <!--事务管理器-->
    <bean id="transactionManager" class="org.springframework.jdbc.datasource.DataSourceTransactionManager">
        <property name="dataSource" ref="dataSource"></property>
    </bean>
    <!--开启事务注解支持-->
    <tx:annotation-driven/>
</beans>
在resources创建数据库连接文件
jdbc.driverClassName=com.mysql.cj.jdbc.Driver
jdbc.url=jdbc:mysql://localhost:3306/db1?serverTimezone=UTC&characterEncoding=utf8&useUnicode=true&useSSL=false
jdbc.username=root
jdbc.password=123456

initialSize=5
maxActive=10
maxWait=3000
创建User对象
@Data
public class User {
private int id;
private String uid;
private String name;
private int age;
private String sex;
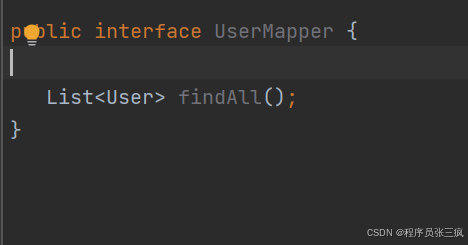
}在UserMapper创建接口
在其对应的映射文件中实现
<?xml version="1.0" encoding="UTF-8" ?>
<!DOCTYPE mapper PUBLIC "-//mybatis.org//DTD Mapper 3.0//EN"
        "http://mybatis.org/dtd/mybatis-3-mapper.dtd">
<mapper namespace="com.myself.mapper.UserMapper">
    <select id="findAll" resultType="com.myself.pojo.User">
        select * from user;
    </select>
</mapper>
在test中创建测试类
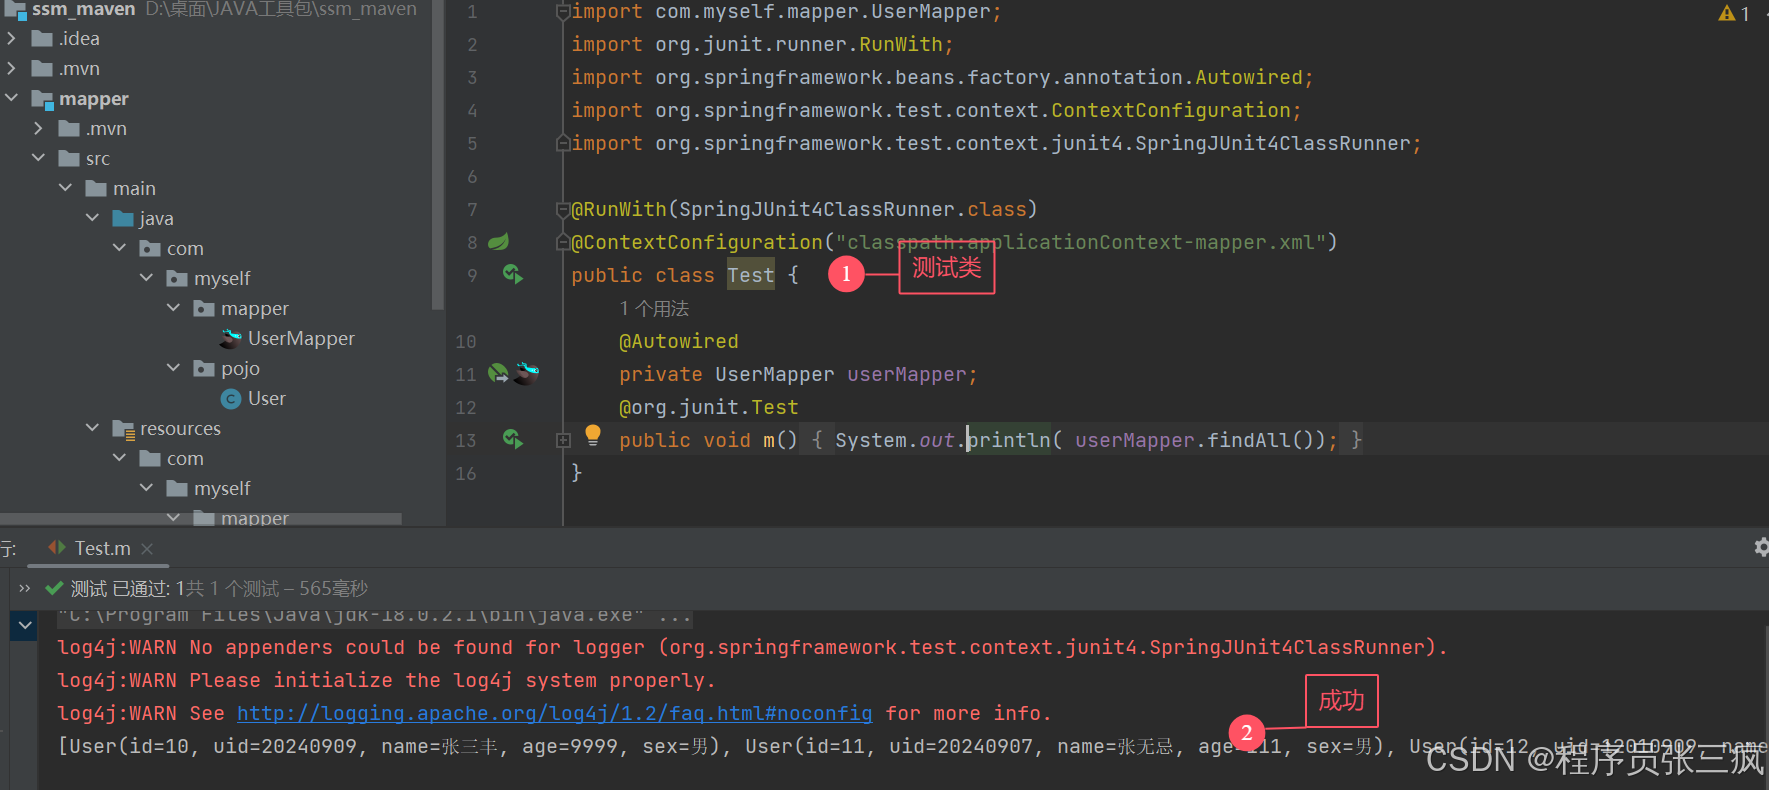
3.创建service层
在父模块下创建子模块

整理pom.xml文件
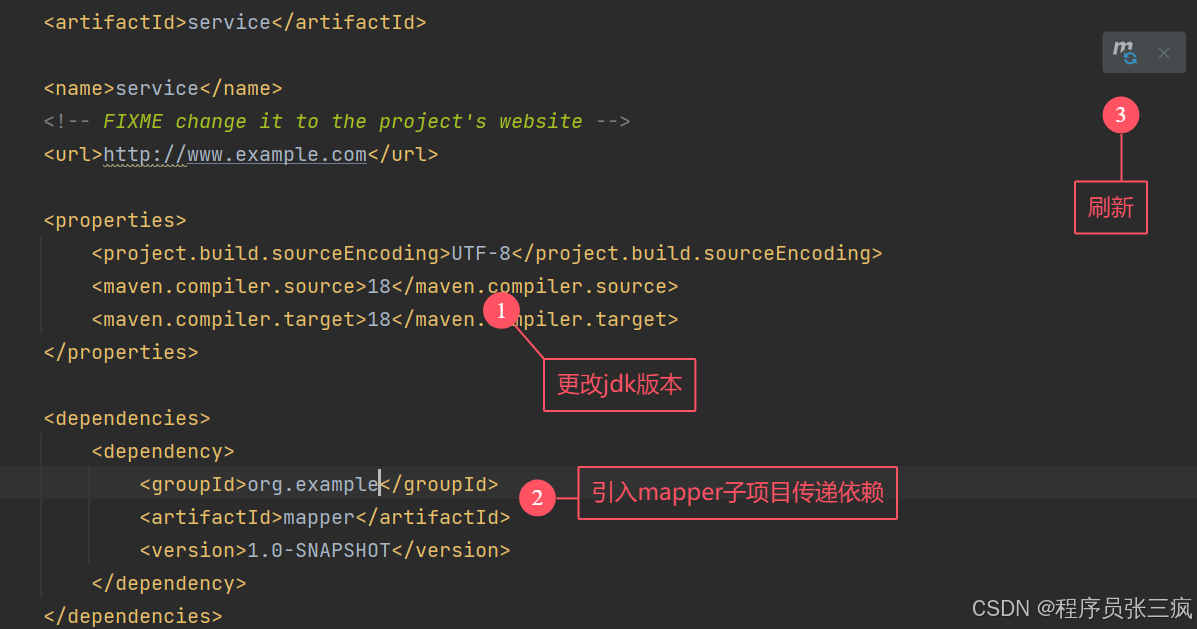
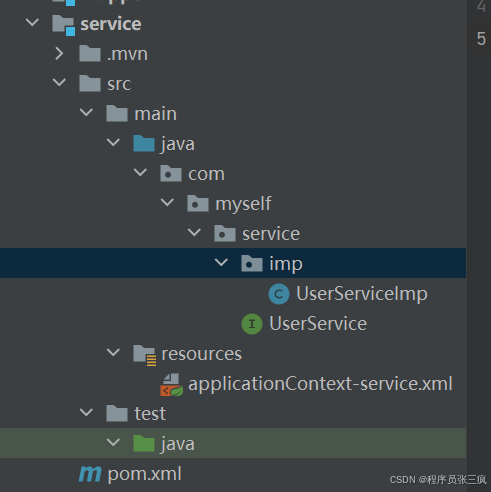
创建service模块结构
在resources文件下创建spring配置文件applicationContext-service.xml
<?xml version="1.0" encoding="UTF-8"?>
<beans xmlns="http://www.springframework.org/schema/beans"
xmlns:xsi="http://www.w3.org/2001/XMLSchema-instance"
xmlns:context="http://www.springframework.org/schema/context"
xmlns:tx="http://www.springframework.org/schema/tx"
xmlns:aop="http://www.springframework.org/schema/aop"
xsi:schemaLocation="http://www.springframework.org/schema/beans
http://www.springframework.org/schema/beans/spring-beans.xsd
http://www.springframework.org/schema/context
http://www.springframework.org/schema/context/spring-context.xsd
http://www.springframework.org/schema/tx
http://www.springframework.org/schema/tx/spring-tx.xsd
http://www.springframework.org/schema/aop
http://www.springframework.org/schema/aop/spring-aop.xsd">
<!--注解组件扫描-->
<context:component-scan base-package="com.myself.service"/>
<import resource="classpath:applicationContext-mapper.xml"/>
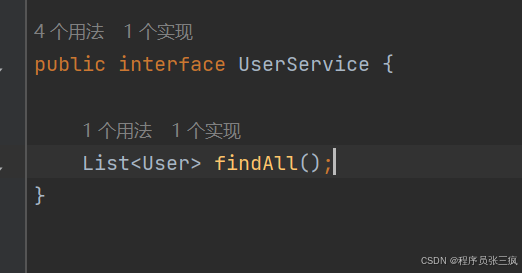
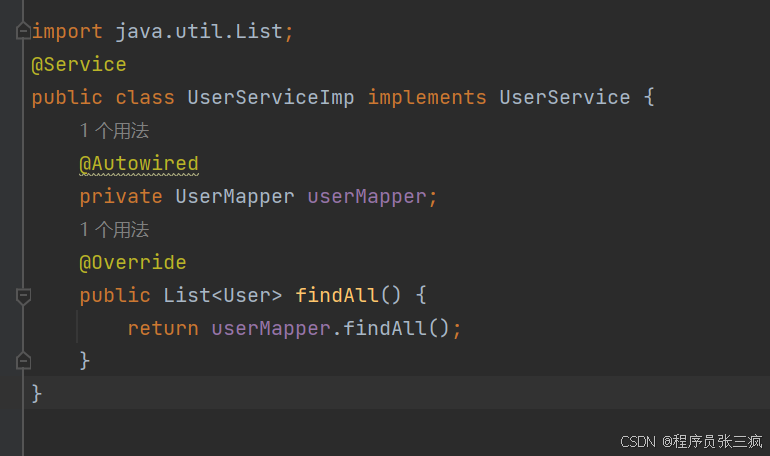
</beans>在UserService 创建接口 并实现
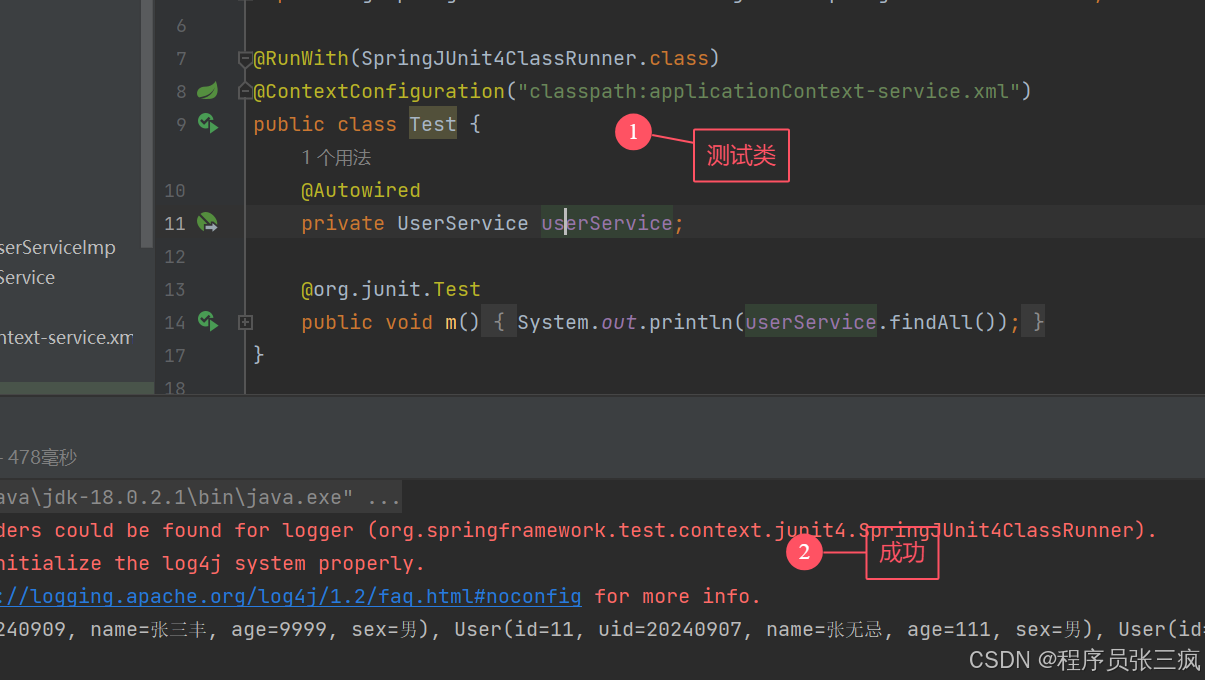
创建测试类
4.创建web层
在父模块下创建子模块
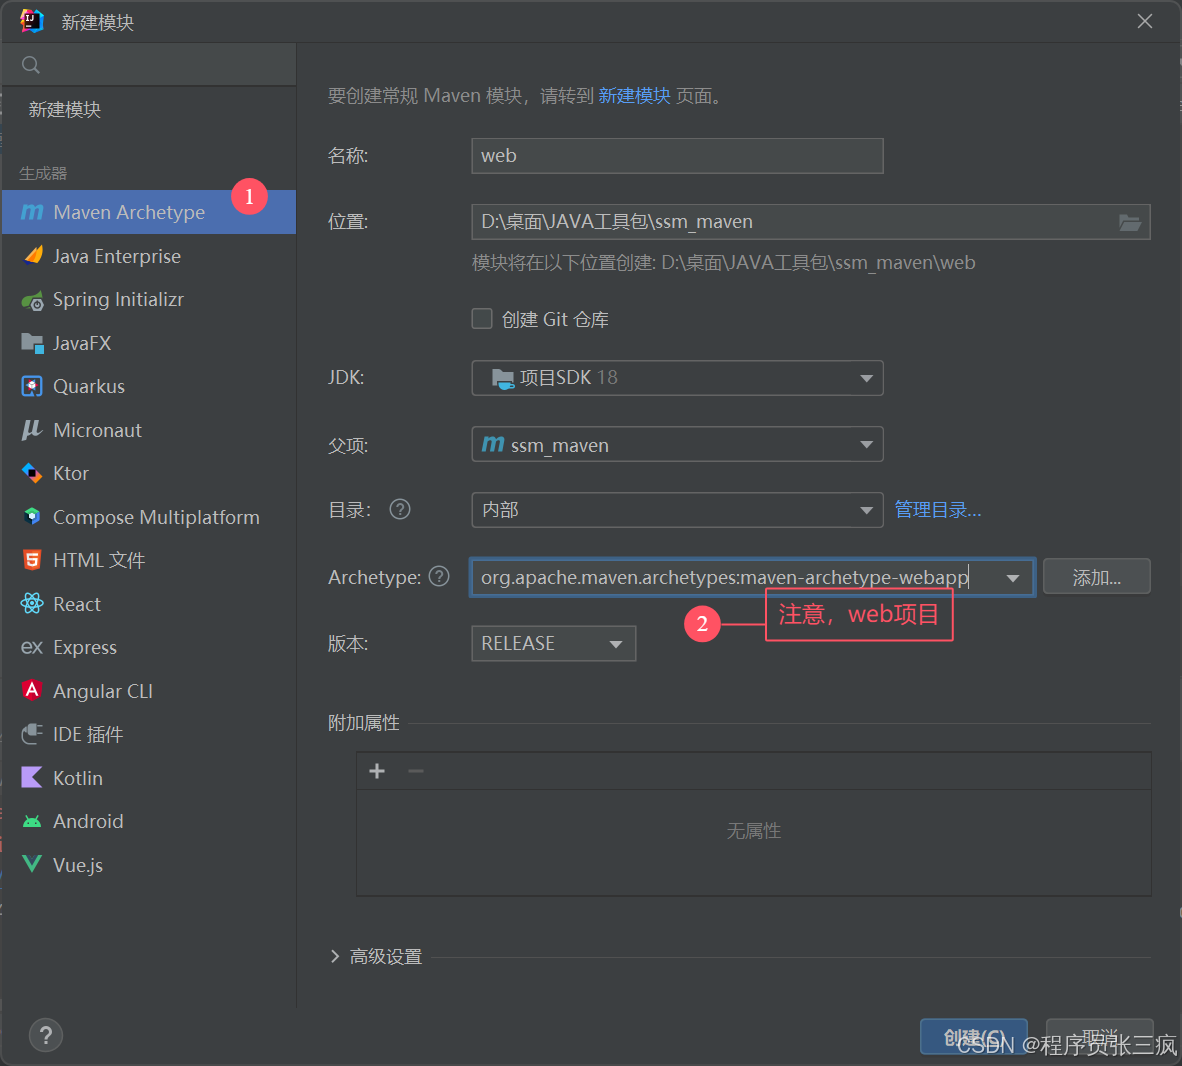
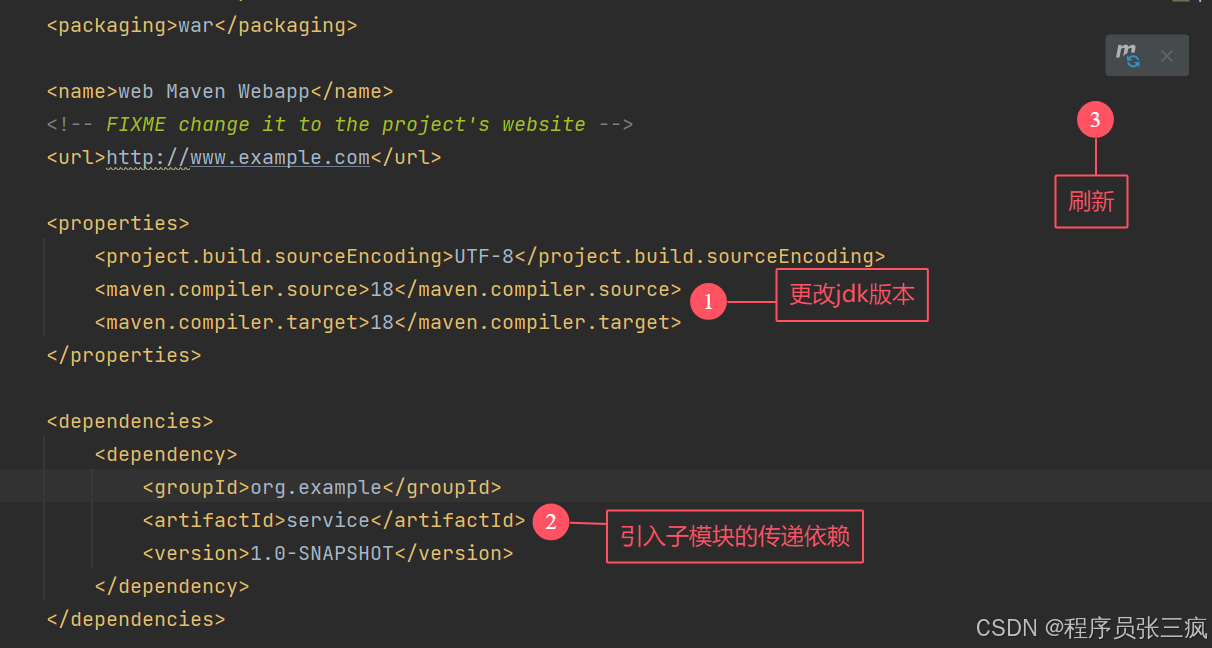
整理pom.xml文件
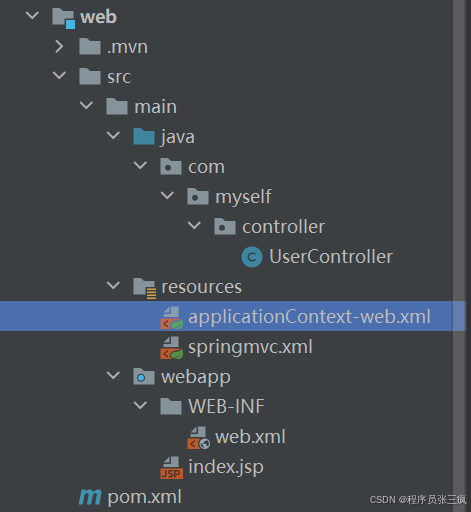
构建web子模块结构
在resources下创建springmvc配置文件
<beans xmlns="http://www.springframework.org/schema/beans"
       xmlns:mvc="http://www.springframework.org/schema/mvc"
       xmlns:context="http://www.springframework.org/schema/context"
       xmlns:xsi="http://www.w3.org/2001/XMLSchema-instance"
       xsi:schemaLocation="http://www.springframework.org/schema/beans
        http://www.springframework.org/schema/beans/spring-beans.xsd
        http://www.springframework.org/schema/mvc
        http://www.springframework.org/schema/mvc/spring-mvc.xsd
        http://www.springframework.org/schema/context
        http://www.springframework.org/schema/context/spring-context.xsd">
    <!--组件扫描-->
    <context:component-scan base-package="com.myself.controller"/>
    <!--mvc注解增强-->
    <mvc:annotation-driven/>
    <!--视图解析器 如果前后端分离则不需要-->
    <bean class="org.springframework.web.servlet.view.InternalResourceViewResolver">
        <property name="prefix" value="/"/>
        <property name="suffix" value=".jsp"/>
    </bean>
    <!--实现静态资源映射-->
    <mvc:default-servlet-handler/>
</beans>
在resources文件下创建spring配置文件applicationContext-web.xml
<?xml version="1.0" encoding="UTF-8"?>
<beans xmlns="http://www.springframework.org/schema/beans"
       xmlns:xsi="http://www.w3.org/2001/XMLSchema-instance"
       xmlns:context="http://www.springframework.org/schema/context"
       xmlns:tx="http://www.springframework.org/schema/tx"
       xmlns:aop="http://www.springframework.org/schema/aop"
       xsi:schemaLocation="http://www.springframework.org/schema/beans
        http://www.springframework.org/schema/beans/spring-beans.xsd
        http://www.springframework.org/schema/context
        http://www.springframework.org/schema/context/spring-context.xsd
        http://www.springframework.org/schema/tx
        http://www.springframework.org/schema/tx/spring-tx.xsd
        http://www.springframework.org/schema/aop
        http://www.springframework.org/schema/aop/spring-aop.xsd">

    <import resource="classpath:applicationContext-service.xml"/>

</beans>
在web.xml配置文件中加入配置
<!--前端控制器-->
<servlet>
<servlet-name>DispatcherServlet</servlet-name>
<servlet-class>org.springframework.web.servlet.DispatcherServlet</servlet-class>
<init-param>
<param-name>contextConfigLocation</param-name>
<param-value>classpath:springmvc.xml</param-value>
</init-param>
<load-on-startup>2</load-on-startup>
</servlet>
<servlet-mapping>
<servlet-name>DispatcherServlet</servlet-name>
<url-pattern>/</url-pattern>
</servlet-mapping>
<!--post中文处理-->
<filter>
<filter-name>CharacterEncodingFilter</filter-name>
<filter-class>org.springframework.web.filter.CharacterEncodingFilter</filter-class>
<init-param>
<param-name>encoding</param-name>
<param-value>UTF-8</param-value>
</init-param>
</filter>
<filter-mapping>
<filter-name>CharacterEncodingFilter</filter-name>
<url-pattern>/*</url-pattern>
</filter-mapping>
<listener>
<listener-class>
org.springframework.web.context.ContextLoaderListener
</listener-class>
</listener>
<context-param>
<param-name>contextConfigLocation</param-name>
<param-value>classpath:applicationContext-web.xml</param-value>
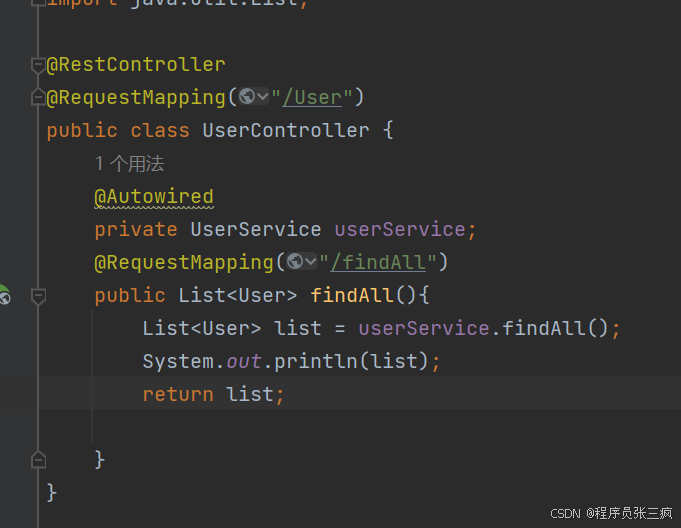
</context-param>在UserController中写入
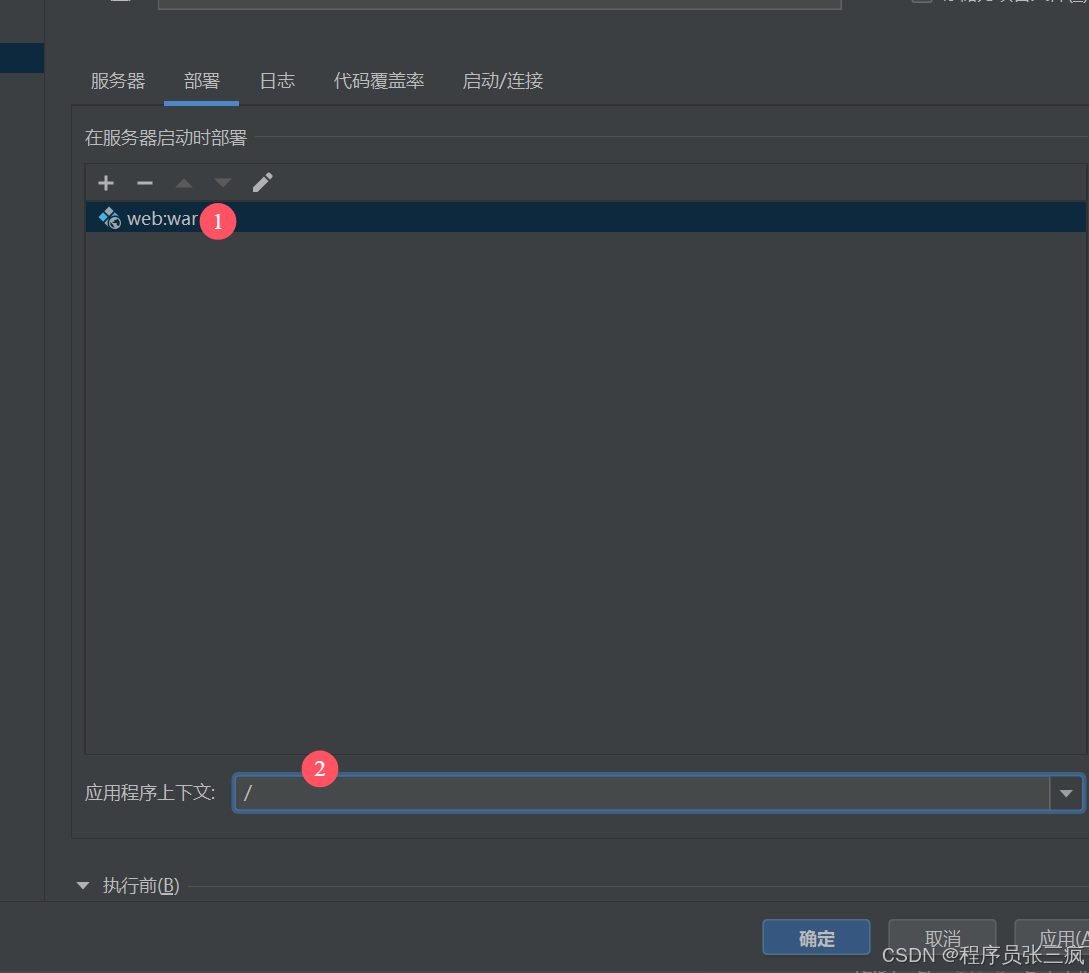
配置tomcat
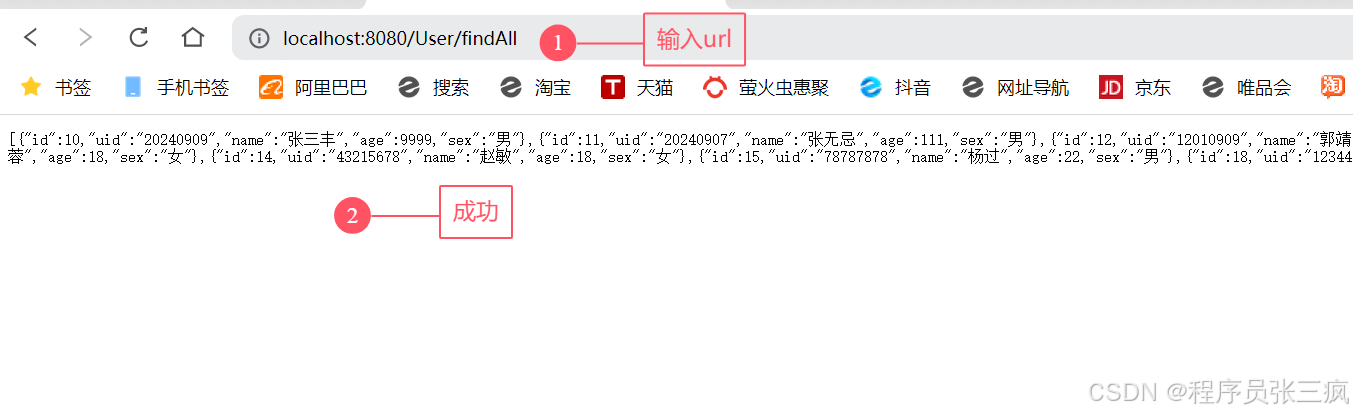
测试运行
原文地址:https://blog.csdn.net/qq_65993561/article/details/142884336
免责声明:本站文章内容转载自网络资源,如本站内容侵犯了原著者的合法权益,可联系本站删除。更多内容请关注自学内容网(zxcms.com)!