React【Day2】
React表单控制
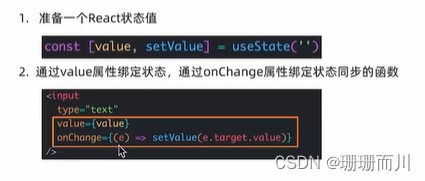
受控绑定
概念:使用React组件的状态(useState)控制表单的状态
双向绑定 MVVM

报错记录:

错误代码:
import { useState } from "react";

const App = () => {
  const [value, setValue] = useState("");
  return (
    <div>{value}</div>
    <input
      value={value}
      onChange={(e) => {
        setValue(e.target.value);
      }}
      type="text"
    />
  );
};

export default App;
报错原因:
相邻的 JSX 元素必须被包裹在一个父元素中。您可以使用 React Fragments(JSX Fragments)来解决这个问题。React Fragments 允许您将多个相邻的 JSX 元素包裹在一个父元素中,而不会在最终的 DOM 结构中引入额外的节点。您可以使用空标签 <>…</> 或 <React.Fragment>…</React.Fragment> 来创建 React Fragments。
修改后的正确代码:
import { useState } from "react";

const App = () => {
  const [value, setValue] = useState("");
  return (
    <>
      <div>{value}</div>
      <input
        value={value}
        onChange={(e) => {
          setValue(e.target.value);
        }}
        type="text"
      />
    </>
  );
};

export default App;

非受控绑定(React中获取DOM
概念:通过获取DOM的方式获取表单的输入数据
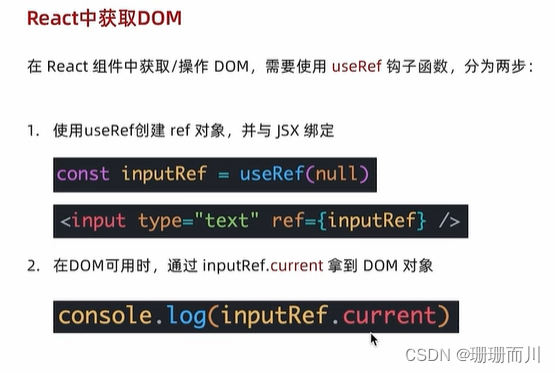
function App(){
  const inputRef = useRef(null)

  const onChange = ()=>{
    console.log(inputRef.current.value)
  }

  return (
    <input
      type="text"
      ref={inputRef}
      onChange={onChange}
    />
  )
}
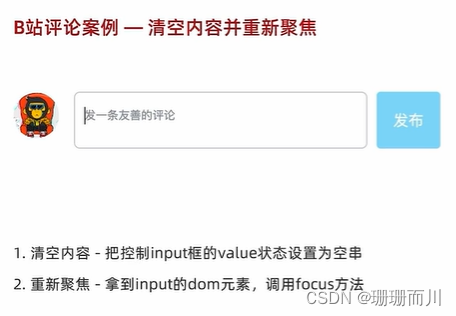
案例-B站评论案例
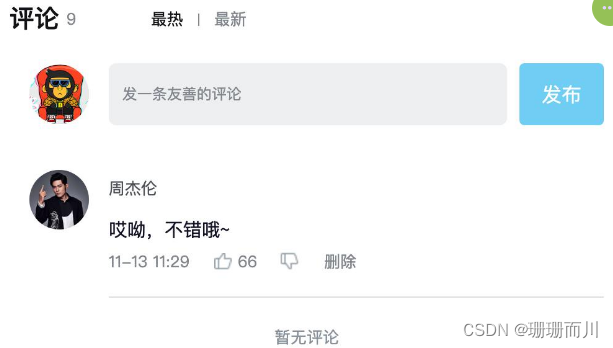
- 手机输入框评论内容,并发布评论
- id处理和时间处理(uuid 和 day.js)
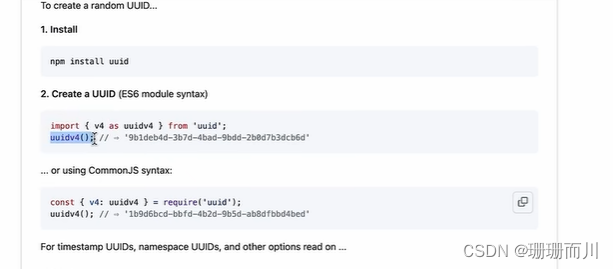
id随机数 ——uuid库
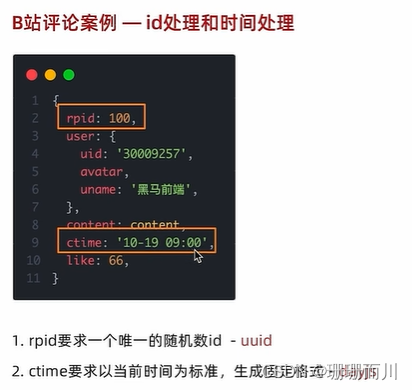
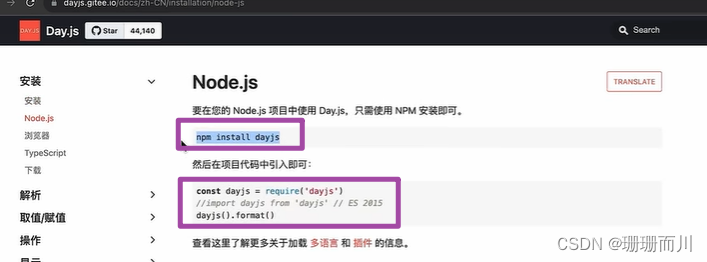
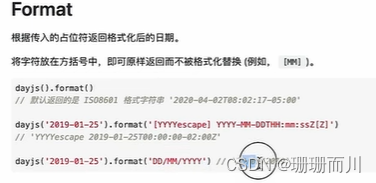
日期格式化——dayjs
完整代码
import { useState, useRef } from "react";
import "./App.scss";
import avatar from "./images/bozai.png";
import orderBy from "lodash/orderBy";
import { v4 as uuidV4 } from "uuid"; // uuid
import dayjs from "dayjs";
/**
 * 发布评论
 *
 * 1. 获取评论内容
 * 2. 点击发布按钮 发布评论
 */

// 评论列表数据
const defaultList = [
  {
    // 评论id
    rpid: 3,
    // 用户信息
    user: {
      uid: "13258165",
      avatar: "",
      uname: "周杰伦",
    },
    // 评论内容
    content: "哎哟,不错哦",
    // 评论时间
    ctime: "10-18 08:15",
    like: 88,
  },
  {
    rpid: 2,
    user: {
      uid: "36080105",
      avatar: "",
      uname: "许嵩",
    },
    content: "我寻你千百度 日出到迟暮",
    ctime: "11-13 11:29",
    like: 88,
  },
  {
    rpid: 1,
    user: {
      uid: "30009257",
      avatar,
      uname: "黑马前端",
    },
    content: "学前端就来黑马",
    ctime: "10-19 09:00",
    like: 66,
  },
];
// 当前登录用户信息
const user = {
  // 用户id
  uid: "30009257",
  // 用户头像
  avatar,
  // 用户昵称
  uname: "黑马前端",
};

// 导航 Tab 数组
const tabs = [
  { type: "hot", text: "最热" },
  { type: "time", text: "最新" },
];

const App = () => {
  // 导航 Tab 高亮的状态
  const [activeTab, setActiveTab] = useState("hot");
  const [list, setList] = useState(defaultList);
  const textareaRef = useRef(null);

  const handleCommentSend = () => {
    console.log("textareaRef.current.value", textareaRef.current.value);
    let obj = {
      // 评论id
      //   rpid: uuidV4(),
      rpid: 7,
      // 用户信息
      user: {
        uid: "888",
        avatar: "",
        uname: "周杰伦",
      },
      // 评论内容
      content: textareaRef.current.value,
      // 评论时间
      ctime: dayjs,
      //   ctime: "10-18 08:15",
      like: 0,
    };

    // 注意list.push(obj) 返回的是新数组长度,而不是新数组
    // list.push(obj);
    // console.log("list", list); // 显示新增了一条元素
    // setList(list); // 但是这一步还是不会让页面的评论重新渲
    // 就算换一个新的变量也不好用,(浅拷贝
    // let newList = list; // 不能生效

    // let newList = [...list]; // 这种是可以的
    // setList(newList);

    // 下面这种也好用:还是这个更省事
    setList([
      ...list,
      {
        // 评论id
        // rpid: 7,
        rpid: uuidV4(),
        // 用户信息
        user: {
          uid: "888",
          avatar: "",
          uname: "周杰伦",
        },
        // 评论内容
        content: textareaRef.current.value,
        // 评论时间
        ctime: dayjs(new Date()).format("MM-DD hh:mm"),
        // ctime: "10-18 08:15",
        like: 0,
      },
    ]);

    // 1. 清空输入框内容
    textareaRef.current.value = "";
    // 2. 重新聚焦
    textareaRef.current.focus();
  };
  // 删除评论
  const onDelete = (rpid) => {
    // 如果要删除数组中的元素,需要调用 filter 方法,并且一定要调用 setList 才能更新状态
    setList(list.filter((item) => item.rpid !== rpid));
  };

  // tab 高亮切换
  const onToggle = (type) => {
    setActiveTab(type);
    let newList;
    if (type === "time") {
      // 按照时间降序排序
      // orderBy(对谁进行排序, 按照谁来排, 顺序)
      newList = orderBy(list, "ctime", "desc");
    } else {
      // 按照喜欢数量降序排序
      newList = orderBy(list, "like", "desc");
    }
    setList(newList);
  };

  return (
    <div className="app">
      {/* 导航 Tab */}
      <div className="reply-navigation">
        <ul className="nav-bar">
          <li className="nav-title">
            <span className="nav-title-text">评论</span>
            {/* 评论数量 */}
            <span className="total-reply">{list.length}</span>
          </li>
          <li className="nav-sort">
            {/* 高亮类名: active */}
            {tabs.map((item) => {
              return (
                <div
                  key={item.type}
                  className={
                    item.type === activeTab ? "nav-item active" : "nav-item"
                  }
                  onClick={() => onToggle(item.type)}
                >
                  {item.text}
                </div>
              );
            })}
          </li>
        </ul>
      </div>

      <div className="reply-wrap">
        {/* 发表评论 */}
        <div className="box-normal">
          {/* 当前用户头像 */}
          <div className="reply-box-avatar">
            <div className="bili-avatar">
              <img className="bili-avatar-img" src={avatar} alt="用户头像" />
            </div>
          </div>
          <div className="reply-box-wrap">
            {/* 评论框 */}
            <textarea
              ref={textareaRef}
              className="reply-box-textarea"
              placeholder="发一条友善的评论"
            />
            {/* 发布按钮 */}
            <div className="reply-box-send" onClick={handleCommentSend}>
              <div className="send-text">发布</div>
            </div>
          </div>
        </div>
        {/* 评论列表 */}
        <div className="reply-list">
          {/* 评论项 */}
          {list.map((item) => {
            return (
              <div key={item.rpid} className="reply-item">
                {/* 头像 */}
                <div className="root-reply-avatar">
                  <div className="bili-avatar">
                    <img
                      className="bili-avatar-img"
                      src={item.user.avatar}
                      alt=""
                    />
                  </div>
                </div>

                <div className="content-wrap">
                  {/* 用户名 */}
                  <div className="user-info">
                    <div className="user-name">{item.user.uname}</div>
                  </div>
                  {/* 评论内容 */}
                  <div className="root-reply">
                    <span className="reply-content">{item.content}</span>
                    <div className="reply-info">
                      {/* 评论时间 */}
                      <span className="reply-time">{item.ctime}</span>
                      {/* 评论数量 */}
                      <span className="reply-time">点赞数:{item.like}</span>
                      {user.uid === item.user.uid && (
                        <span
                          className="delete-btn"
                          onClick={() => onDelete(item.rpid)}
                        >
                          删除
                        </span>
                      )}
                    </div>
                  </div>
                </div>
              </div>
            );
          })}
        </div>
      </div>
    </div>
  );
};

export default App;
React组件通信
概念:组件通信就是
组件之间的数据传递, 根据组件嵌套关系的不同,有不同的通信手段和方法

- A-B 父子通信
- B-C 兄弟通信
- A-E 跨层通信
父子通信-父传子
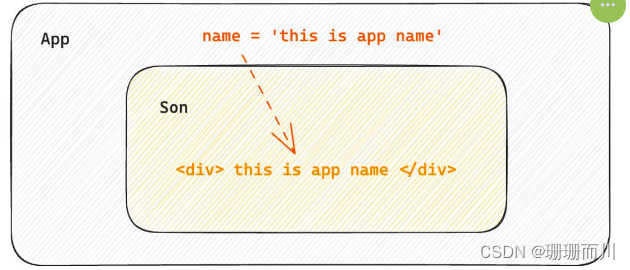
基础实现
实现步骤
- 父组件传递数据 - 在子组件标签上绑定属性
- 子组件接收数据 - 子组件通过props参数接收数据
function Son(props){
//参数名建议这样成props,里面包含父组件传递过来的所有数据

  return <div>{ props.name }</div>
}


function App(){
  const name = 'this is app name'
  return (
    <div>
       <Son name={name}/>
    </div>
  )
}
props说明
props可以传递任意的合法数据,比如数字、字符串、布尔值、数组、对象、函数、JSX

props是只读对象
子组件只能读取props中的数据,不能直接进行修改, 父组件的数据只能由父组件修改 !!!!
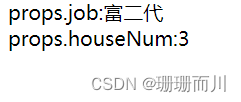
传递多个数据:
import { useState, useRef } from "react";
const Son = (props) => {
  console.log("poprps", props);

  return (
    <div>
      props.job:{props.job} <br /> props.houseNum:{props.houseNum}
    </div>
  );
};
const App = () => {
  const money = 100;
  const job = "富二代";
  return (
    <div>
      {" "}
      <Son money={money} houseNum={3} job={job}></Son>
    </div>
  );
};

export default App;

特殊的prop-chilren
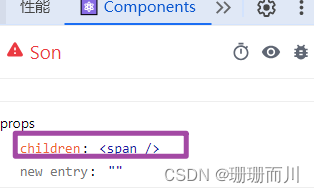
场景:当我们把内容嵌套在组件的标签内部时,组件会自动在名为children的prop属性中接收该内容
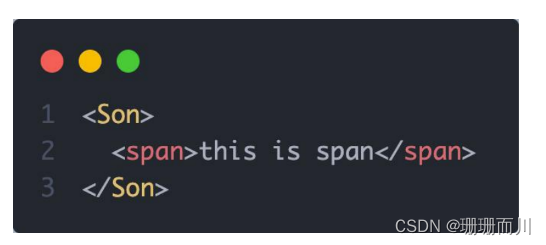
import { useState, useRef } from "react";
const Son = (props) => {
  console.log("poprps", props);

  return <div>{props.children}</div>;
};
const App = () => {
  return (
    <div>
      <Son>
        <span>父亲给孩子的</span>
      </Son>
    </div>
  );
};

export default App;
父子通信-子传父
核心思想:在子组件中调用父组件的函数并传递参数
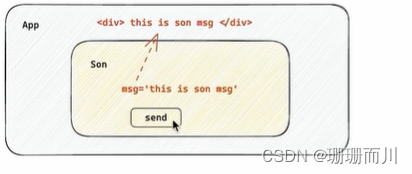
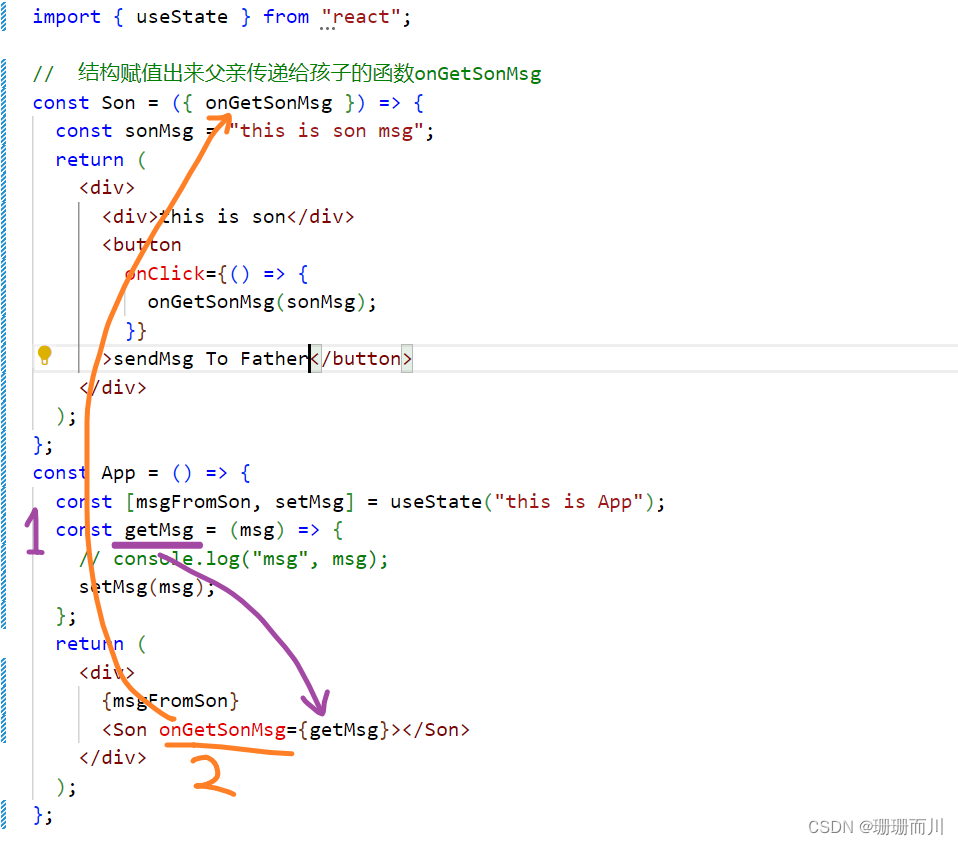
核心思路:在子组件中调用父组件中的函数并传递参数
import { useState } from "react";

//  结构赋值出来父亲传递给孩子的函数onGetSonMsg
const Son = ({ onGetSonMsg }) => {
  const sonMsg = "this is son msg";
  return (
    <div>
      <div>this is son</div>
      <button
        onClick={() => {
          onGetSonMsg(sonMsg);
        }}
      >
        sendMsg To Father
      </button>
    </div>
  );
};
const App = () => {
  const [msgFromSon, setMsg] = useState("this is App");
  const getMsg = (msg) => {
    // console.log("msg", msg);
    setMsg(msg);
  };
  return (
    <div>
      {msgFromSon}
      <Son onGetSonMsg={getMsg}></Son>
    </div>
  );
};

export default App;
兄弟组件通信
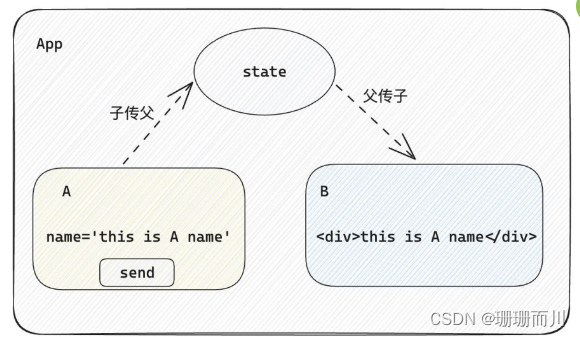
实现思路: 借助
状态提升机制,通过共同的父组件进行兄弟之间的数据传递
- A组件先通过子传父的方式把数据传递给父组件App
- App拿到数据之后通过父传子的方式再传递给B组件
// 1. 通过子传父 A -> App
// 2. 通过父传子 App -> B

import { useState } from "react"

function A ({ onGetAName }) {
  // Son组件中的数据
  const name = 'this is A name'
  return (
    <div>
      this is A compnent,
      <button onClick={() => onGetAName(name)}>send</button>
    </div>
  )
}

function B ({ name }) {
  return (
    <div>
      this is B compnent,
      {name}
    </div>
  )
}

function App () {
  const [name, setName] = useState('')
  const getAName = (name) => {
    setName(name)
  }
  return (
    <div>
      this is App
      <A onGetAName={getAName} />
      <B name={name} />
    </div>
  )
}

export default App
我自己的代码:
import { useState, useRef } from "react";

// 实现sonA的数据传递给sonB
const SonA = ({ onGetMsg }) => {
  const [sonAName, setAName] = useState("");
  const sonARef = useRef(null);
  const changeAName = () => {
    console.log("sonARef.current.value", sonARef.current.value);
    setAName(sonARef.current.value);
    console.log("sonAName:", sonAName); // 更新慢一拍

    onGetMsg(sonARef.current.value);
  };
  return (
    <div style={{ border: "red 1px solid", width: "300px" }}>
      <h4>sonAName:{sonAName}</h4>
      <input type="text" ref={sonARef} />
      <button onClick={changeAName}>changeAName</button>
    </div>
  );
};

const SonB = (props) => {
  return (
    <div style={{ border: "pink 1px solid", width: "300px" }}>
      <h4>sonBName:{props.sonBname}</h4>
    </div>
  );
};

const App = () => {
  const [msg, setMsg] = useState("");
  const getMsg = (newMsg) => {
    setMsg(newMsg);
  };
  return (
    <div>
      <SonA onGetMsg={getMsg}> </SonA>
      <SonB sonBname={msg}></SonB>
    </div>
  );
};

export default App;
但是我感觉A组件的 const [sonAName, setAName] = useState("");挺鸡肋,因为我已经使用Ref来获得输入框的数据,所以,删减代码后:
import { useState, useRef } from "react";

// 实现sonA的数据传递给sonB
const SonA = ({ onGetMsg }) => {
  //   const [sonAName, setAName] = useState("");
  const sonARef = useRef(null);
  const changeAName = () => {
    console.log("sonARef.current.value", sonARef.current.value);
    // setAName(sonARef.current.value);
    // console.log("sonAName:", sonAName); // 更新慢一拍

    onGetMsg(sonARef.current.value);
  };
  return (
    <div style={{ border: "red 1px solid", width: "300px" }}>
      <h4>sonAName:{sonARef.current?.value ?? "现在还没有名字"}</h4>
      {/* <h4>sonAName:{sonAName}</h4> */}
      <input type="text" ref={sonARef} />
      <button onClick={changeAName}>changeAName</button>
    </div>
  );
};

const SonB = (props) => {
  return (
    <div style={{ border: "pink 1px solid", width: "300px" }}>
      <h4>sonBName:{props.sonBname}</h4>
    </div>
  );
};

const App = () => {
  const [msg, setMsg] = useState("");
  const getMsg = (newMsg) => {
    setMsg(newMsg);
  };
  return (
    <div>
      <SonA onGetMsg={getMsg}> </SonA>
      <SonB sonBname={msg}></SonB>
    </div>
  );
};

export default App;
跨层组件通信
 也就是从APP直接传到B 完全没经过A
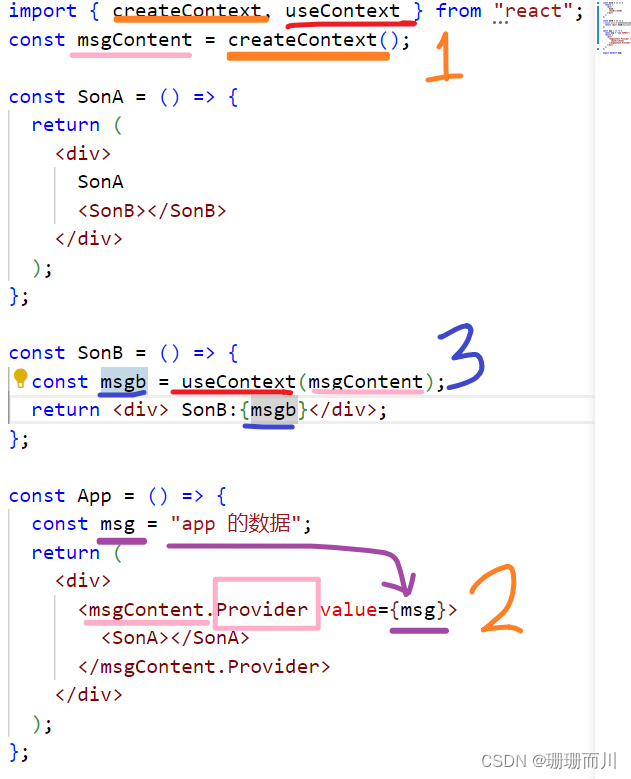
实现步骤:
- 使用
createContext方法创建一个上下文对象Ctx - 在顶层组件(App)中通过
Ctx.Provider组件提供数据 - 在底层组件(B)中通过
useContext钩子函数获取消费数据
// App -> A -> B

import { createContext, useContext } from "react"

// 1. createContext方法创建一个上下文对象

const MsgContext = createContext()

function A () {
  return (
    <div>
      this is A component
      <B />
    </div>
  )
}

function B () {
  // 3. 在底层组件 通过useContext钩子函数使用数据
  const msg = useContext(MsgContext)
  return (
    <div>
      this is B compnent,{msg}
    </div>
  )
}

function App () {
  const msg = 'this is app msg'
  return (
    <div>
      {/* 2. 在顶层组件 通过Provider组件提供数据 */}
      <MsgContext.Provider value={msg}>
        this is App
        <A />
      </MsgContext.Provider>
    </div>
  )
}

export default App
React副作用管理-useEffect
概念理解
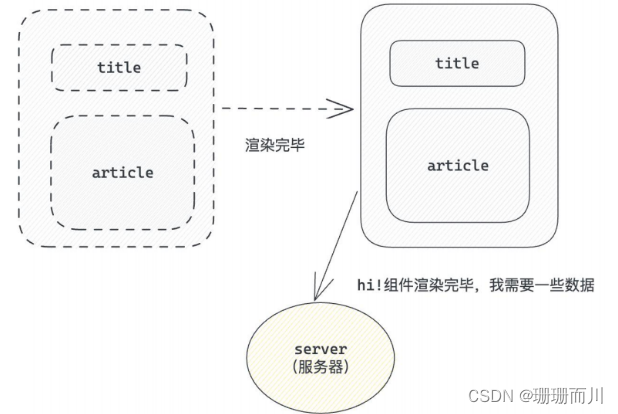
useEffect是一个React Hook函数,用于在React组件中创建不是由事件引起而是由渲染本身引起的操作(副作用), 比 如发送AJAX请求,更改DOM等等
:::warning
说明:上面的组件中没有发生任何的用户事件,组件渲染完毕之后就需要和服务器要数据,整个过程属于“只由渲染引起的操作”
:::
基础使用
需求:在组件渲染完毕之后,立刻从服务端获取平道列表数据并显示到页面中
外链图片转存失败,源站可能有防盗链机制,建议将图片保存下来直接上传
说明:
- 参数1是一个函数,可以把它叫做副作用函数,在函数内部可以放置要执行的操作
- 参数2是一个数组(可选参),在数组里放置依赖项,不同依赖项会影响第一个参数函数的执行,当是一个空数组的时候,副作用函数只会在组件渲染完毕之后执行一次
:::warning
接口地址:http://geek.itheima.net/v1_0/channels
:::
import { createContext, useContext, useState, useEffect } from "react";
import axios from "axios";

const App = () => {
  const [dataList, setDataList] = useState([]);
  useEffect(() => {
    axios
      .get("http://geek.itheima.net/v1_0/channels")
      .then((response) => {
        console.log(response.data.data.channels);
        setDataList(response.data.data.channels);
        console.log("dataList", dataList);
      })
      .catch((error) => {
        console.err("error", error);
      });
  }, []);
  return (
    <div>
      {dataList.map((item) => {
        return <li key={item.id}>{item.name}</li>;
      })}
    </div>
  );
};

export default App;
useEffect依赖说明
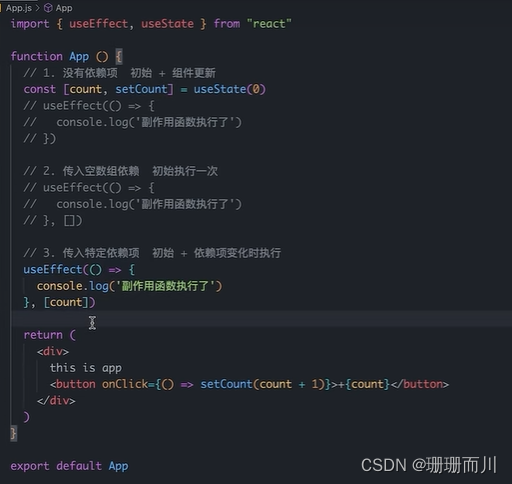
useEffect副作用函数的执行时机存在多种情况,根据传入依赖项的不同,会有不同的执行表现
| 依赖项 | 副作用功函数的执行时机 |
|---|---|
| 没有依赖项 | 组件初始渲染 + 组件更新时执行 |
| 空数组依赖 | 只在初始渲染时执行一次 |
| 添加特定依赖项 | 组件初始渲染 + 依赖项变化时执行 |
清除副作用
概念:在useEffect中编写的由渲染本身引起的对接组件外部的操作,社区也经常把它叫做副作用操作,比如在useEffect中开启了一个定时器,我们想在组件卸载时把这个定时器再清理掉,这个过程就是清理副作用
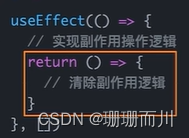
语法就是在函数的末尾,return一个新的函数,在里面清除副作用
:::warning
说明:清除副作用的函数最常见的执行时机是在组件卸载时自动执行
:::
import { useEffect, useState } from "react"

function Son () {
  // 1. 渲染时开启一个定时器
  useEffect(() => {
    const timer = setInterval(() => {
      console.log('定时器执行中...')
    }, 1000)

    return () => {
      // 清除副作用(组件卸载时,就会执行这个函数)
      clearInterval(timer)
    }
  }, [])
  return <div>this is son</div>
}

function App () {
  // 通过条件渲染模拟组件卸载
  const [show, setShow] = useState(true)
  return (
    <div>
      {show && <Son />}
      <button onClick={() => setShow(false)}>卸载Son组件</button>
    </div>
  )
}

export default App
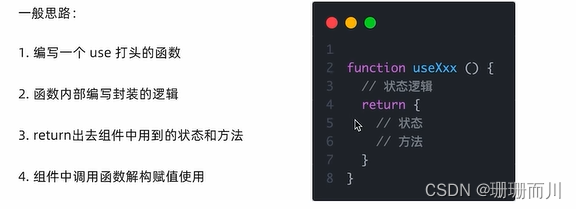
自定义Hook实现
概念:自定义Hook是以
use打头的函数,通过自定义Hook函数可以用来实现逻辑的封装和复用

封装自定义hook通用思路
- 声明一个以use打头的函数
- 在函数体内封装可复用的逻辑(只要是可复用的逻辑)
- 把组件中用到的状态或者回调return出去(以对象或者数组)
- 在哪个组件中要用到这个逻辑,就执行这个函数,解构出来状态和回调进行使用
// 封装自定义Hook

// 问题: 布尔切换的逻辑 当前组件耦合在一起的 不方便复用

// 解决思路: 自定义hook

import { useState } from "react"

function useToggle () {
  // 可复用的逻辑代码

// 注意这里value必须要用useStatel来声明,不然不生效,也就是组件的创建和销毁不会因为flag的值改变而改变
  const [value, setValue] = useState(true)

  const toggle = () => setValue(!value)

  // 哪些状态和回调函数需要在其他组件中使用 return
  return {
    value,
    toggle
  }
}

// 封装自定义hook通用思路

// 1. 声明一个以use打头的函数
// 2. 在函数体内封装可复用的逻辑(只要是可复用的逻辑)
// 3. 把组件中用到的状态或者回调return出去(以对象或者数组)
// 4. 在哪个组件中要用到这个逻辑,就执行这个函数,解构出来状态和回调进行使用


function App () {
  const { value, toggle } = useToggle()
  return (
    <div>
      {value && <div>this is div</div>}
      <button onClick={toggle}>toggle</button>
    </div>
  )
}

export default App
React Hooks使用规则
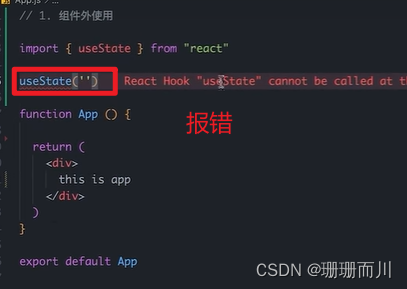
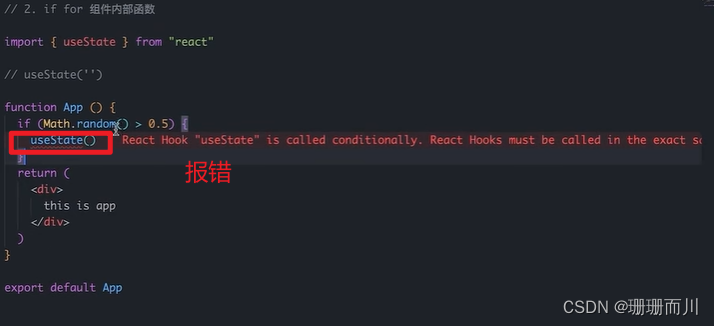
- 只能在组件中或者其他自定义Hook函数中调用,外部不可以
- 只能在组件的顶层调用,不能嵌套在if、for、其它的函数中
案例-优化B站评论案例
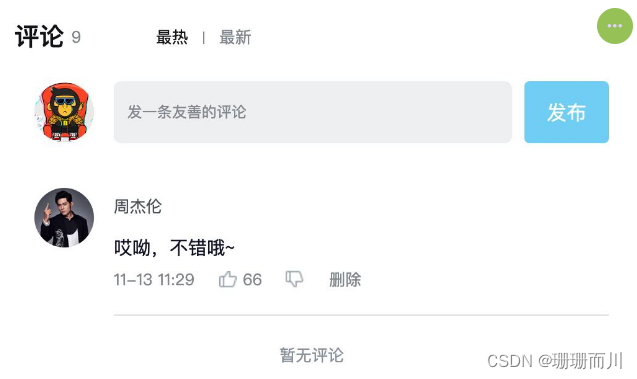
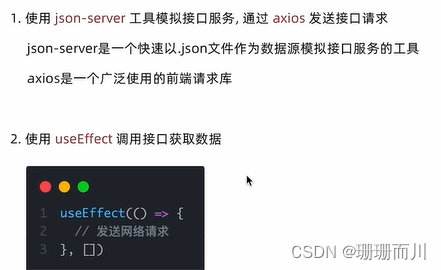
- 使用请求接口的方式获取评论列表并渲染
- 使用自定义Hook函数封装数据请求的逻辑
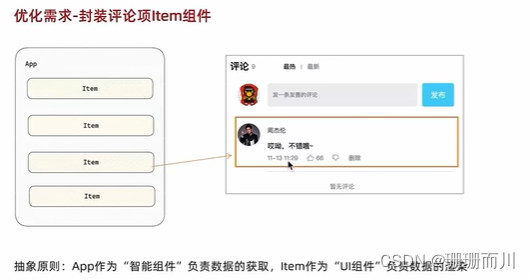
- 把评论中的每一项抽象成一个独立的组件实现渲染
json-server 模拟服务器的工具
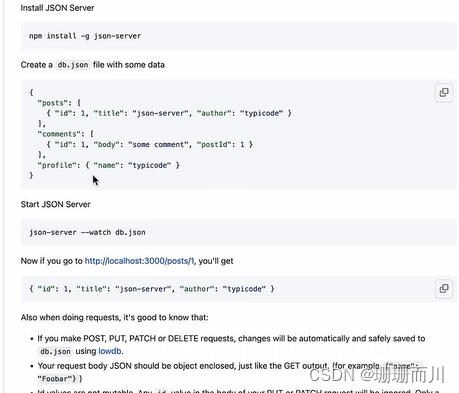
- 下载
pnpm i json-server -D - 创建数据 json文件
db.json
{
  "list": [
    {
      "rpid": 3,
      "user": {
        "uid": "13258165",
        "avatar": "http://toutiao.itheima.net/resources/images/98.jpg",
        "uname": "周杰伦"
      },
      "content": "哎哟,不错哦",
      "ctime": "10-18 08: 15",
      "like": 126
    },
    {
      "rpid": 2,
      "user": {
        "uid": "36080105",
        "avatar": "http://toutiao.itheima.net/resources/images/98.jpg",
        "uname": "许嵩"
      },
      "content": "我寻你千百度 日出到迟暮",
      "ctime": "11-13 11: 29",
      "like": 88
    },
    {
      "rpid": 1,
      "user": {
        "uid": "30009257",
        "avatar": "http://toutiao.itheima.net/resources/images/98.jpg",
        "uname": "黑马前端"
      },
      "content": "学前端就来黑马",
      "ctime": "10-19 09: 00",
      "like": 66
    }
  ]
}
- 运行Json-Server 启动服务
在packjson添加自定义命令

添加完成后,运行npm run serve 就会运行后面的命令json-server db.json --port 3004以db.json为数据源,以端口3004开启一个服务
或者不自定义指令,直接使用官方的:
在终端(命令行界面)中,进入到存储 db.json 文件的目录,在命令行中运行以下命令来启动 JSON Server
json-server --watch db.json --port 3004
或者:
pnpm json-server --watch db.json --port 3004
其中,--watch db.json 参数表示 JSON Server 将会监视 db.json 文件中的变化,并相应地提供数据;--port 3004 参数表示 JSON Server 将在本地的 3004 端口上运行。你可以根据需要调整端口号。
启动成功后,JSON Server 将会在命令行中显示类似以下的信息:
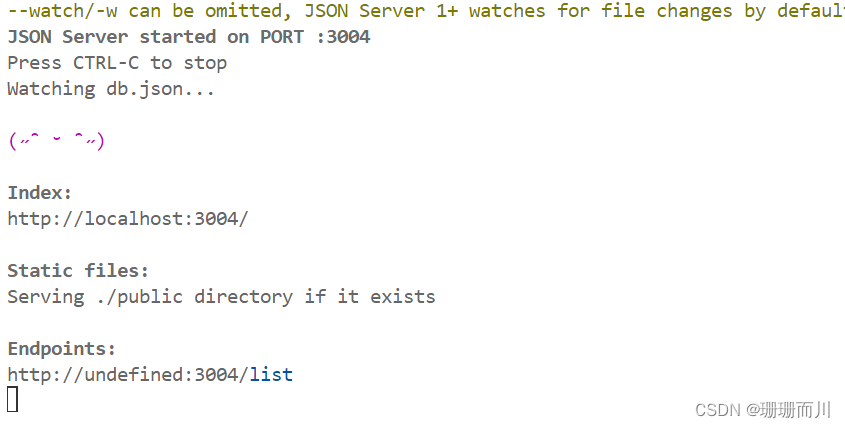 注意这个终端页面不能关闭,才能正常提供服务
然后在浏览器中查看数据是否成功
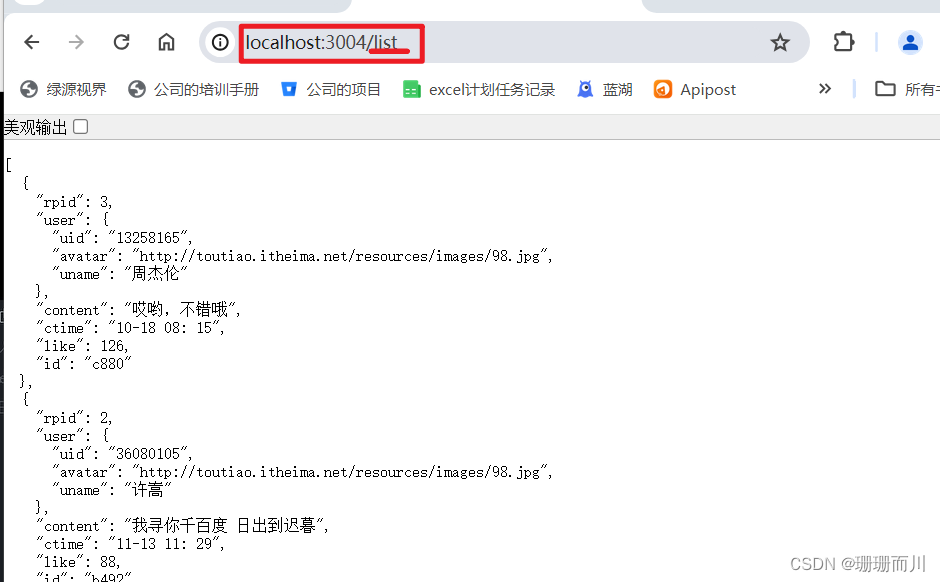
接口请求工具axios
pnpm i axios
自定义Hook函数封装数据请求
封装评论项Item组件
完整代码
import { useState, useRef, useEffect } from "react";
import "./App.scss";
import avatar from "./images/bozai.png";
import orderBy from "lodash/orderBy";
import { v4 as uuidV4 } from "uuid"; // uuid
import dayjs from "dayjs";

import axios from "axios";
/**
 * 发布评论
 *
 * 1. 获取评论内容
 * 2. 点击发布按钮 发布评论
 */

// 评论列表数据
// const defaultList = [
//   {
//     // 评论id
//     rpid: 3,
//     // 用户信息
//     user: {
//       uid: "13258165",
//       avatar: "",
//       uname: "周杰伦",
//     },
//     // 评论内容
//     content: "哎哟,不错哦",
//     // 评论时间
//     ctime: "10-18 08:15",
//     like: 88,
//   },
//   {
//     rpid: 2,
//     user: {
//       uid: "36080105",
//       avatar: "",
//       uname: "许嵩",
//     },
//     content: "我寻你千百度 日出到迟暮",
//     ctime: "11-13 11:29",
//     like: 88,
//   },
//   {
//     rpid: 1,
//     user: {
//       uid: "30009257",
//       avatar,
//       uname: "黑马前端",
//     },
//     content: "学前端就来黑马",
//     ctime: "10-19 09:00",
//     like: 66,
//   },
// ];
// 当前登录用户信息
const user = {
  // 用户id
  uid: "30009257",
  // 用户头像
  avatar,
  // 用户昵称
  uname: "黑马前端",
};

// 导航 Tab 数组
const tabs = [
  { type: "hot", text: "最热" },
  { type: "time", text: "最新" },
];
const useGetList = () => {
  const [list, setList] = useState([]);
  // 获取接口数据渲染
  useEffect(() => {
    // 规范写法,现在写一个内部函数

    async function getList() {
      // axios请求
      const res = await axios.get("http://localhost:3004/list");
      setList(res.data);
    }
    getList();
  }, []);

  return {
    list,
    setList,
  };
};

function CommentItem({ item, handleDel }) {
  console.log("item", item);

  return (
    <div className="reply-item">
      {/* 头像 */}
      <div className="root-reply-avatar">
        <div className="bili-avatar">
          <img className="bili-avatar-img" src={item.user.avatar} alt="" />
        </div>
      </div>

      <div className="content-wrap">
        {/* 用户名 */}
        <div className="user-info">
          <div className="user-name">{item.user.uname}</div>
        </div>
        {/* 评论内容 */}
        <div className="root-reply">
          <span className="reply-content">{item.content}</span>
          <div className="reply-info">
            {/* 评论时间 */}
            <span className="reply-time">{item.ctime}</span>
            {/* 评论数量 */}
            <span className="reply-time">点赞数:{item.like}</span>
            {user.uid === item.user.uid && (
              <span className="delete-btn" onClick={() => handleDel(item.rpid)}>
                {/* <span className="delete-btn" onClick={() => onDelete(item.rpid)}> */}
                删除
              </span>
            )}
          </div>
        </div>
      </div>
    </div>
  );
}
const App = () => {
  // 导航 Tab 高亮的状态
  const [activeTab, setActiveTab] = useState("hot");
  //   const [list, setList] = useState(defaultList);

  const { list, setList } = useGetList();
  const textareaRef = useRef(null);

  const handleCommentSend = () => {
    console.log("textareaRef.current.value", textareaRef.current.value);

    // 下面这种也好用:还是这个更省事
    setList([
      ...list,
      {
        // 评论id
        // rpid: 7,
        rpid: uuidV4(),
        // 用户信息
        user: {
          uid: "888",
          avatar: "",
          uname: "周杰伦",
        },
        // 评论内容
        content: textareaRef.current.value,
        // 评论时间
        ctime: dayjs(new Date()).format("MM-DD hh:mm"),
        // ctime: "10-18 08:15",
        like: 0,
      },
    ]);

    // 1. 清空输入框内容
    textareaRef.current.value = "";
    // 2. 重新聚焦
    textareaRef.current.focus();
  };
  // 删除评论
  const onDelete = (rpid) => {
    // 如果要删除数组中的元素,需要调用 filter 方法,并且一定要调用 setList 才能更新状态
    setList(list.filter((item) => item.rpid !== rpid));
  };

  // tab 高亮切换
  const onToggle = (type) => {
    setActiveTab(type);
    let newList;
    if (type === "time") {
      // 按照时间降序排序
      // orderBy(对谁进行排序, 按照谁来排, 顺序)
      newList = orderBy(list, "ctime", "desc");
    } else {
      // 按照喜欢数量降序排序
      newList = orderBy(list, "like", "desc");
    }
    setList(newList);
  };

  return (
    <div className="app">
      {/* 导航 Tab */}
      <div className="reply-navigation">
        <ul className="nav-bar">
          <li className="nav-title">
            <span className="nav-title-text">评论</span>
            {/* 评论数量 */}
            <span className="total-reply">{list.length}</span>
          </li>
          <li className="nav-sort">
            {/* 高亮类名: active */}
            {tabs.map((item) => {
              return (
                <div
                  key={item.type}
                  className={
                    item.type === activeTab ? "nav-item active" : "nav-item"
                  }
                  onClick={() => onToggle(item.type)}
                >
                  {item.text}
                </div>
              );
            })}
          </li>
        </ul>
      </div>

      <div className="reply-wrap">
        {/* 发表评论 */}
        <div className="box-normal">
          {/* 当前用户头像 */}
          <div className="reply-box-avatar">
            <div className="bili-avatar">
              <img className="bili-avatar-img" src={avatar} alt="用户头像" />
            </div>
          </div>
          <div className="reply-box-wrap">
            {/* 评论框 */}
            <textarea
              ref={textareaRef}
              className="reply-box-textarea"
              placeholder="发一条友善的评论"
            />
            {/* 发布按钮 */}
            <div className="reply-box-send" onClick={handleCommentSend}>
              <div className="send-text">发布</div>
            </div>
          </div>
        </div>
        {/* 评论列表 */}
        <div className="reply-list">
          {/* 评论项 */}
          {list.map((item) => {
            console.log("map 里面的item", item);

            return (
              <CommentItem item={item} handleDel={onDelete} key={item.id} />
            );
          })}
        </div>
      </div>
    </div>
  );
};

export default App;
原文地址:https://blog.csdn.net/weixin_63681863/article/details/137888393
免责声明:本站文章内容转载自网络资源,如本站内容侵犯了原著者的合法权益,可联系本站删除。更多内容请关注自学内容网(zxcms.com)!
