【深度学习入门项目】多层感知器(MLP)实现手写数字识别
多层感知器(MLP)实现手写数字识别
在这个任务中,我们使用PyTorch训练两个多层感知机(MLP),以对MNIST数据库中的手写数字图像进行分类。
该过程将分解为以下步骤:
- 载入并可视化数据。
- 定义神经网络
- 训练模型
- 评估我们训练的模型在测试数据集上的性能
- 分析结果
导入必要的包
import torch
from torch import nn
import numpy as np
import logging
import sys


# set log
logging.basicConfig(level=logging.INFO,
                    format='%(asctime)s %(levelname)s: %(message)s',
                     datefmt='%Y-%m-%d %H:%M:%S',)
获得软件包的版本信息
logging.info('The version information:')
logging.info(f'Python: {sys.version}')
logging.info(f'PyTorch: {torch.__version__}')
assert torch.cuda.is_available() == True, 'Please finish your GPU develop environment'
下载并可视化数据
from torchvision import datasets
import torchvision.transforms as transforms
from torch.utils.data.dataset import Dataset

# number of subprocesses to use for data loading
num_workers = 0
# how many samples per batch to load
batch_size = 20

# convert data to torch.FloatTensor
transform = transforms.ToTensor()

# choose the training and test datasets
train_data = datasets.MNIST(root='data', train=True,
                                   download=True, transform=transform)
test_data = datasets.MNIST(root='data', train=False,
                                  download=True, transform=transform)

# prepare data loaders
def classify_label(dataset, num_classes):
    list_index = [[] for _ in range(num_classes)]
    for idx, datum in enumerate(dataset):
        list_index[datum[1]].append(idx)
    return list_index

def partition_train(list_label2indices: list, num_per_class: int):
    random_state = np.random.RandomState(0)
    list_label2indices_train = []
    for indices in list_label2indices:
        random_state.shuffle(indices)
        list_label2indices_train.extend(indices[:num_per_class])
    return list_label2indices_train

class Indices2Dataset(Dataset):
    def __init__(self, dataset):
        self.dataset = dataset
        self.indices = None

    def load(self, indices: list):
        self.indices = indices

    def __getitem__(self, idx):
        idx = self.indices[idx]
        image, label = self.dataset[idx]
        return image, label

    def __len__(self):
        return len(self.indices)

#  sort train data by label
list_label2indices = classify_label(dataset=train_data, num_classes=10)

# how many samples per class to train
list_train = partition_train(list_label2indices, 500)

# prepare data loaders
indices2data = Indices2Dataset(train_data)
indices2data.load(list_train)
train_loader = torch.utils.data.DataLoader(indices2data, batch_size=batch_size, num_workers=num_workers, shuffle=True)
test_loader = torch.utils.data.DataLoader(test_data, batch_size=batch_size, num_workers=num_workers, shuffle=True)
查看一个batch的数据
import matplotlib.pyplot as plt
%matplotlib inline

# obtain one batch of training images
dataiter = iter(train_loader)
images, labels = dataiter.next()
images = images.numpy()

# plot the images in the batch, along with the corresponding labels
fig = plt.figure(figsize=(25, 4))
for idx in np.arange(20):
    ax = fig.add_subplot(2, 20//2, idx+1, xticks=[], yticks=[])
    ax.imshow(np.squeeze(images[idx]), cmap='gray')
    # print out the correct label for each image
    # .item() gets the value contained in a Tensor
    ax.set_title(str(labels[idx].item()))

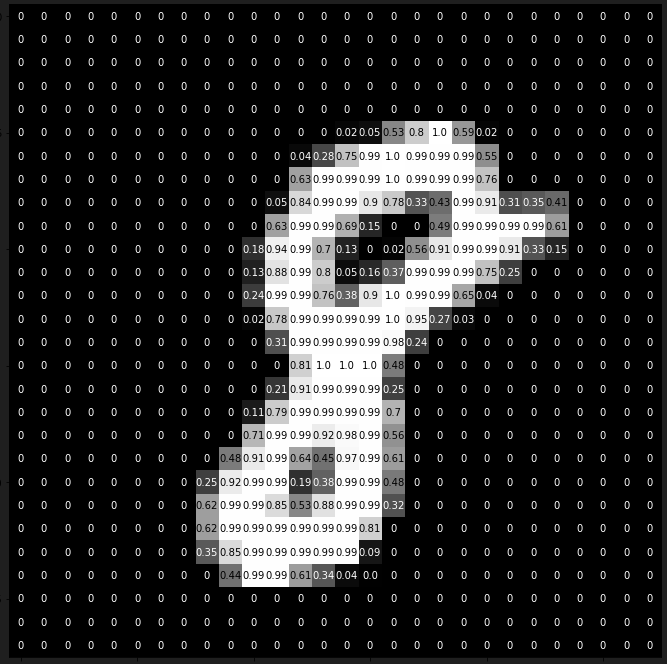
查看图片细节信息
img = np.squeeze(images[1])

fig = plt.figure(figsize = (12,12))
ax = fig.add_subplot(111)
ax.imshow(img, cmap='gray')
width, height = img.shape
thresh = img.max()/2.5
for x in range(width):
    for y in range(height):
        val = round(img[x][y],2) if img[x][y] !=0 else 0
        ax.annotate(str(val), xy=(y,x),
                    horizontalalignment='center',
                    verticalalignment='center',
                    color='white' if img[x][y]<thresh else 'black')
设置随机种子
随机种子用于确保结果是可复现的。
import random
import os

## give the number you like such as 2023
seed_value = 2023

np.random.seed(seed_value)
random.seed(seed_value)
os.environ['PYTHONHASHSEED'] = str(seed_value)

torch.manual_seed(seed_value)
torch.cuda.manual_seed(seed_value)
torch.cuda.manual_seed_all(seed_value)
torch.backends.cudnn.deterministic = True
logging.info(f"tha value of the random seed: {seed_value}")
定义模型架构
- Input: a 784-dim Tensor of pixel values for each image.
- Output: a 10-dim Tensor of number of classes that indicates the class scores for an input image.
You need to implement three models:
- a vanilla multi-layer perceptron. (10 marks)
- a multi-layer perceptron with regularization (dropout or L2 or both). (10 marks)
- the corresponding loss functions and optimizers. (10 marks)
Build model_1
## Define the MLP architecture
class VanillaMLP(nn.Module):
    def __init__(self):
        super(VanillaMLP, self).__init__()

        # implement your codes here
        self.net = nn.Sequential(nn.Linear(784, 256), nn.ReLU(),
                                 nn.Linear(256, 256), nn.ReLU(),
                                 nn.Linear(256,10))


    def forward(self, x):
        # flatten image input
        x = x.view(-1, 28 * 28)

        # implement your codes here
        x = self.net(x)


        return x

# initialize the MLP
model_1 = VanillaMLP()

# specify loss function
# implement your codes here
loss_model_1 = torch.nn.CrossEntropyLoss()

# specify your optimizer
# implement your codes here
optimizer_model_1 = torch.optim.Adam(model_1.parameters(),lr=1e-4)
Build model_2
## Define the MLP architecture
class RegularizedMLP(nn.Module):
    def __init__(self):
        super(RegularizedMLP, self).__init__()

        # implement your codes here
        self.net = nn.Sequential(nn.Linear(784, 256),
                                 nn.Dropout(0.3),
                                 nn.ReLU(),
                                 nn.Linear(256, 256),
                                 nn.Dropout(0.5),
                                 nn.ReLU(),
                                 nn.Linear(256,10))


    def forward(self, x):
        # flatten image input
        x = x.view(-1, 28 * 28)

        # implement your codes here
        x=self.net(x)

        return x


# initialize the MLP
model_2 = RegularizedMLP()

# specify loss function
# implement your codes here
loss_model_2 = torch.nn.CrossEntropyLoss()

# specify your optimizer
# implement your codes here
optimizer_model_2 = torch.optim.Adam(model_2.parameters(),lr=1e-4)# weight_decay=1e-5
Train the Network (30 marks)
Train your models in the following two cells.
The following loop trains for 30 epochs; feel free to change this number. For now, we suggest somewhere between 20-50 epochs. As you train, take a look at how the values for the training loss decrease over time. We want it to decrease while also avoiding overfitting the training data.
We will introduce some metrics of classification tasks and you will learn how implement these metrics with scikit-learn.
There are supply some references for you to learn: evaluation_metrics_spring2020.
In training processing, we will use accuracy, Area Under ROC and top k accuracy.
The key parts in the training process are left for you to implement.
Train model_1
Train model_1
# import scikit-learn packages
# please use the function imported from scikit-learn to metric the process of training of the model
from sklearn.metrics import accuracy_score,roc_auc_score, top_k_accuracy_score
# number of epochs to train the model
n_epochs = 20  # suggest training between 20-50 epochs

model_1.train() # prep model for training

train_loss_list = []
train_acc_list = []
train_auc_list = []
train_top_k_acc_list = []


# GPU check
logging.info(f'GPU is available: {torch.cuda.is_available()}')
if torch.cuda.is_available():
    gpu_num = torch.cuda.device_count()
    logging.info(f"Train model on {gpu_num} GPUs:")
    for i in range(gpu_num):
        print('\t GPU {}.: {}'.format(i,torch.cuda.get_device_name(i)))
    model_1 = model_1.cuda()

for epoch in range(n_epochs):
    # monitor training loss
    train_loss = 0.0
    pred_array = None
    label_array =  None

    one_hot_label_matrix = None
    pred_matrix = None


    for data, label in train_loader:
        data = data.cuda()
        label = label.cuda()
        # implement your code here
        optimizer_model_1.zero_grad()
        pred = model_1(data)
        loss = loss_model_1(pred, label)
        loss.backward()
        optimizer_model_1.step()
        train_loss += loss

        # finish the the computation of variables of metric
        # implement your codes here
        if pred_matrix is None:
            pred_matrix = pred.cpu().detach().numpy()
        else:
            pred_matrix = np.concatenate((pred_matrix, pred.cpu().detach().numpy()))

        if one_hot_label_matrix is None:
            one_hot_label_matrix = nn.functional.one_hot(label, num_classes=10).cpu().detach().numpy()
        else:
            one_hot_label_matrix = np.concatenate((one_hot_label_matrix, nn.functional.one_hot(label, num_classes=10).cpu().detach().numpy()))

        pred = torch.argmax(pred, axis=1)
        if pred_array is None:
            pred_array = pred.cpu().detach().numpy()
        else:
            pred_array = np.concatenate((pred_array, pred.cpu().detach().numpy()))

        if label_array is None:
            label_array = label.cpu().detach().numpy()
        else:
            label_array = np.concatenate((label_array, label.cpu().detach().numpy()))


    # print training statistics
    # read the API document at https://scikit-learn.org/stable/modules/classes.html#module-sklearn.metrics to finish your code
    # don't craft your own code
    # calculate average loss and accuracy over an epoch

    top_k = 3
    train_loss = train_loss / len(train_loader.dataset)
    train_acc = 100. * accuracy_score(label_array, pred_array)
    train_auc = roc_auc_score(one_hot_label_matrix, pred_matrix , multi_class='ovo')
    top_k_acc = top_k_accuracy_score(label_array, pred_matrix , k=top_k,)
    # append the value of the metric to the list
    train_loss_list.append(train_loss.cpu().detach().numpy())
    train_acc_list.append(train_acc)
    train_auc_list.append(train_auc)
    train_top_k_acc_list.append(top_k_acc)

    logging.info('Epoch: {} \tTraining Loss: {:.6f} \tTraining Acc: {:.2f}% \t top {} Acc: {:.2f}% \t AUC Score: {:.4f}'.format(
        epoch+1,
        train_loss,
        train_acc,
        top_k,
        top_k_acc,
        train_auc,
        ))
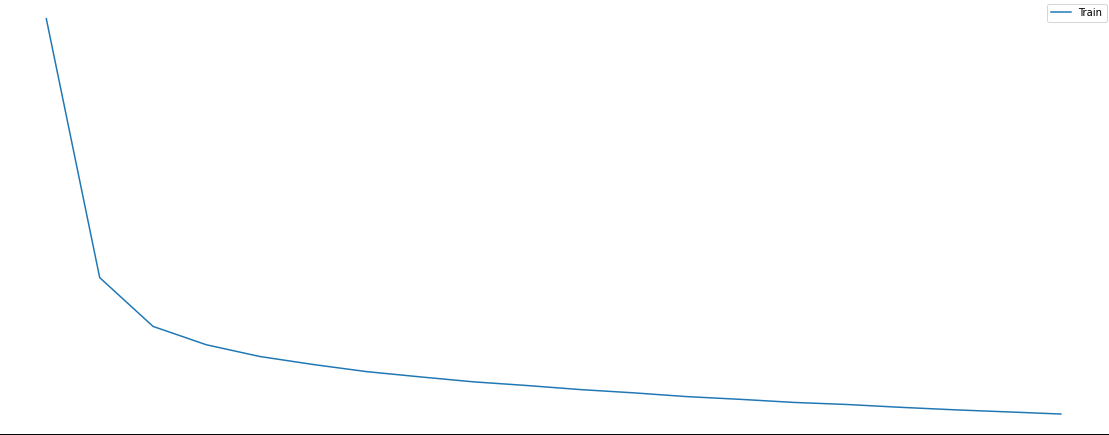
Visualize the training process of the model_1
Please read the document to finish the training process visualization.
For more information, please refer to the document
Plot the change of the loss of model_1 during training
epochs_list = list(range(1,n_epochs+1))
plt.figure(figsize=(20, 8))
plt.plot(epochs_list, train_loss_list)
plt.title('Model_1 loss')
plt.ylabel('Loss')
plt.xlabel('Epoch')
plt.legend(['Train'], loc='upper right')
plt.show()
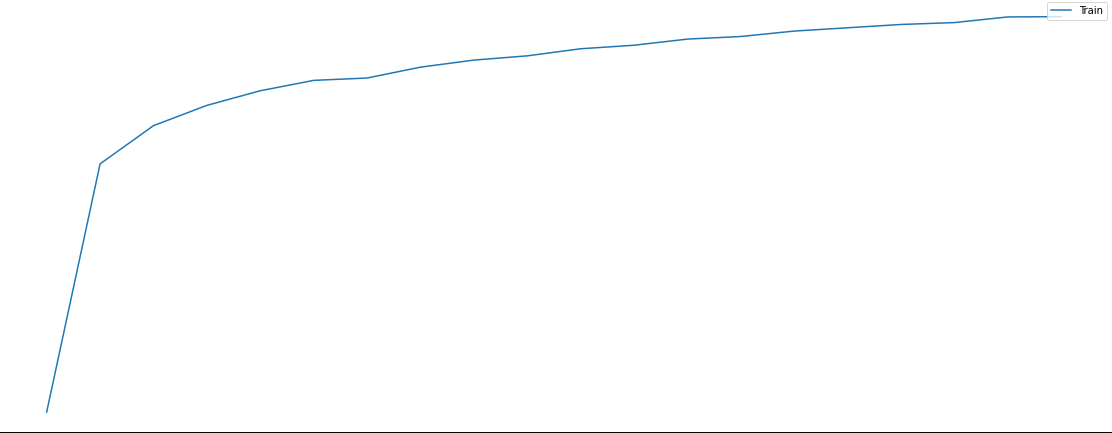
Plot the change of the accuracy of model_1 during training
plt.figure(figsize=(20, 8))
plt.plot(epochs_list, train_acc_list)
plt.title('Model_1 accuracy')
plt.ylabel('accuracy')
plt.xlabel('Epoch')
plt.legend(['Train'], loc='upper right')
plt.show()
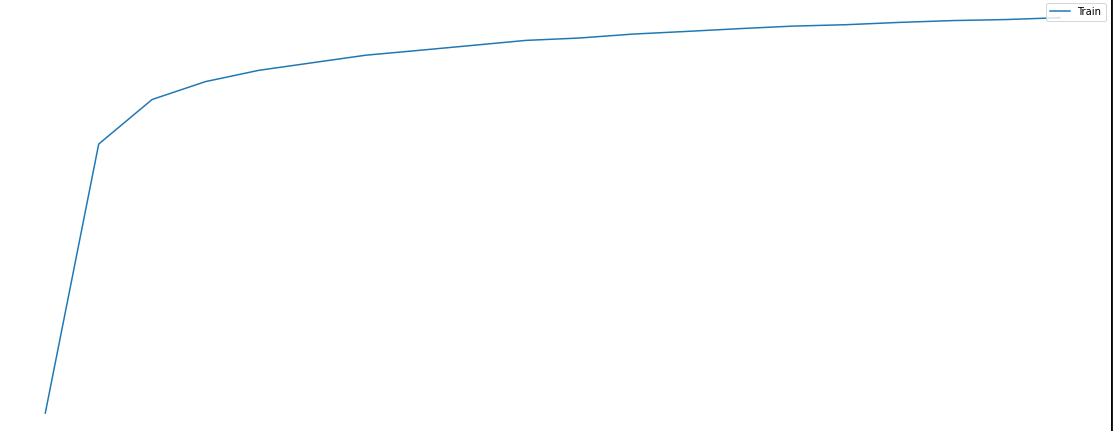
Plot the change of the AUC Score of model_1 during training
plt.figure(figsize=(20, 8))
plt.plot(epochs_list, train_auc_list)
plt.title('Model_1 auc')
plt.ylabel('Auc')
plt.xlabel('Epoch')
plt.legend(['Train'], loc='upper right')
plt.show()
Test the Trained Network (20 marks)
Test the performance of trained models on test data. Except the total test accuracy, you should calculate the accuracy for each class.
About metrics, in test processing, we will use accuracy, top k accuracy, precision, recall, f1-score and confusion matrix.
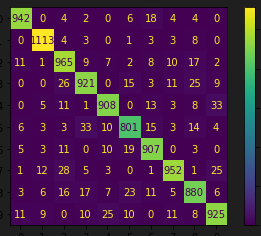
Besides, we will visualize the confusion matrix.
Last but not least, we will compare your implementation of function to compute accuracy with the implementation of scikit-learn.
## define your implementation of function to compute accuracy
def accuracy_score_manual(label_array, pred_array):
    # implement your codes here
    accuracy = np.sum(label_array == pred_array) / float(len(label_array))
    return accuracy
Test model_1
from sklearn.metrics import classification_report,ConfusionMatrixDisplay
# initialize lists to monitor test loss and accuracy
test_loss = 0.0

pred_array = None
label_array =  None

one_hot_label_matrix = None
pred_matrix = None

model_1.eval() # prep model for *evaluation*

for data, label in test_loader:
    data = data.cuda()
    label = label.cuda()
    # implement your code here
    pred = model_1(data)
    test_loss = loss_model_1(pred, label)

    if pred_matrix is None:
        pred_matrix = pred.cpu().detach().numpy()
    else:
        pred_matrix = np.concatenate((pred_matrix, pred.cpu().detach().numpy()))

    if one_hot_label_matrix is None:
        one_hot_label_matrix = nn.functional.one_hot(label, num_classes=10).cpu().detach().numpy()
    else:
        one_hot_label_matrix = np.concatenate((one_hot_label_matrix, nn.functional.one_hot(label, num_classes=10).cpu().detach().numpy()))

    pred = torch.argmax(pred, axis=1)
    if pred_array is None:
        pred_array = pred.cpu().detach().numpy()
    else:
        pred_array = np.concatenate((pred_array, pred.cpu().detach().numpy()))

    if label_array is None:
        label_array = label.cpu().detach().numpy()
    else:
        label_array = np.concatenate((label_array, label.cpu().detach().numpy()))
# calculate and print avg test loss
test_loss = test_loss / len(test_loader.dataset)
test_acc = accuracy_score(label_array, pred_array)
test_auc = roc_auc_score(one_hot_label_matrix, pred_matrix , multi_class='ovo')
test_top_k3_acc = top_k_accuracy_score(label_array, pred_matrix , k=3)
test_top_k5_acc = top_k_accuracy_score(label_array, pred_matrix , k=5)

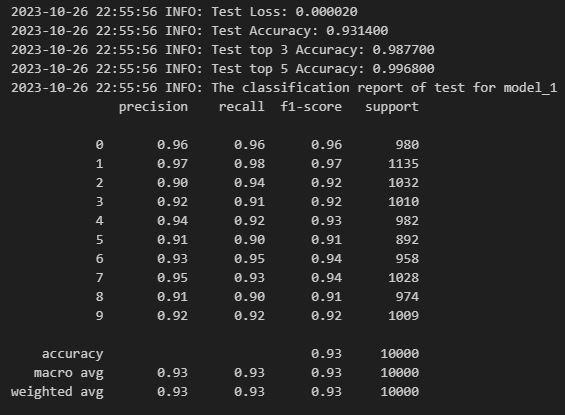
logging.info('Test Loss: {:.6f}'.format(test_loss))
logging.info('Test Accuracy: {:.6f}'.format(test_acc))
logging.info('Test top 3 Accuracy: {:.6f}'.format(test_top_k3_acc ))
logging.info('Test top 5 Accuracy: {:.6f}'.format(test_top_k5_acc ))
logging.info('The classification report of test for model_1')
print(classification_report(label_array, pred_array))
ConfusionMatrixDisplay.from_predictions(label_array,pred_array)
plt.show()
原文地址:https://blog.csdn.net/Magnolia_He/article/details/135113018
免责声明:本站文章内容转载自网络资源,如本站内容侵犯了原著者的合法权益,可联系本站删除。更多内容请关注自学内容网(zxcms.com)!
