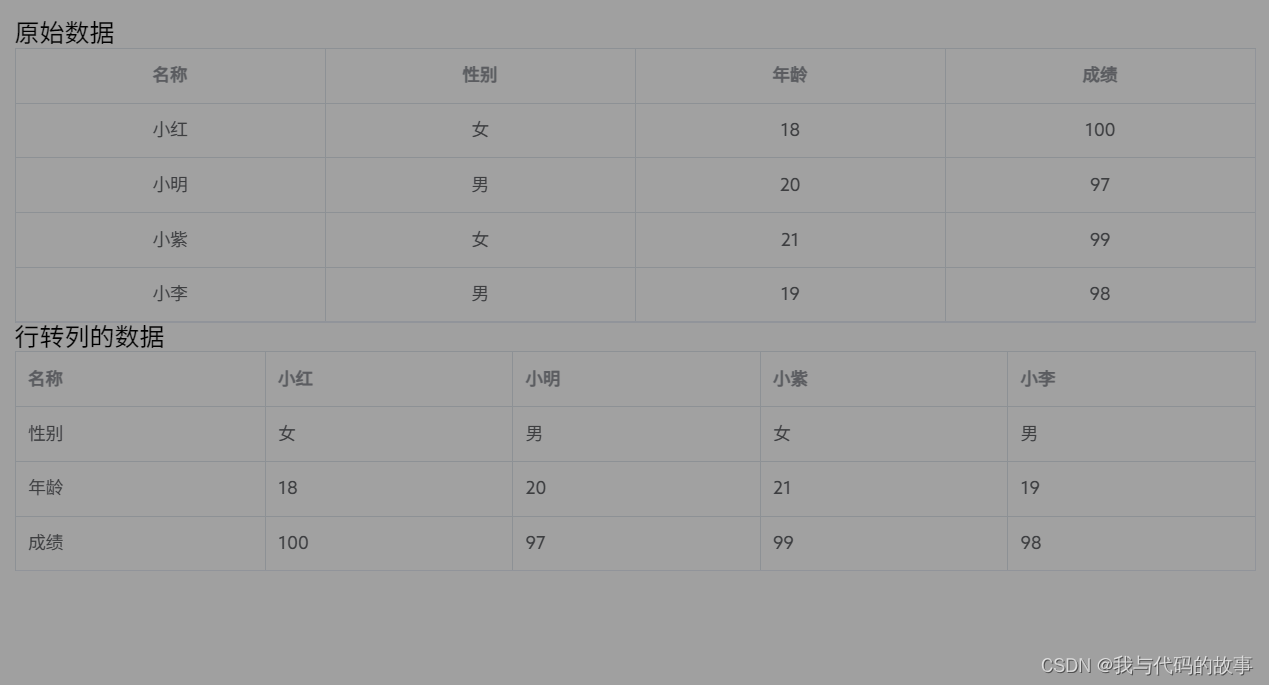
el-table实现转置表格
vue版本:vue2.6.10
elementui版本:2.15.14
实现效果:el-table实现行列互换
代码:
<template>
  <div class="app-container">
    <span>原始数据</span>
    <el-table
      :data="datas"
      border
    >
      <template v-for="(item, index) in columns">
        <el-table-column
          :key="index"
          :prop="item.prop"
          align="center"
          :label="item.label"
        />
      </template>
    </el-table>

    <span>行转列的数据</span>
    <el-table
      :data="tableData"
      border
    >
      <el-table-column v-for="item in columnsData" :key="item.prop" :label="item.label" :prop="item.prop">
        <template slot-scope="scope">
          {{scope.row[item.prop]}}
        </template>
      </el-table-column>
    </el-table>
  </div>
</template>

<script>
export default {
  name: 'TestTable',
  data() {
    return {
      datas: [
        {
          "user_name": "小红",
          "user_sex": "女",
          "user_age": 18,
          "grade": 100
        },
        {
          "user_name": "小明",
          "user_sex": "男",
          "user_age": 20,
          "grade": 97
        },
        {
          "user_name": "小紫",
          "user_sex": "女",
          "user_age": 21,
          "grade": 99
        },
        {
          "user_name": "小李",
          "user_sex": "男",
          "user_age": 19,
          "grade": 98
        }
      ],
      columns: [
        { "label": "名称", "prop": "user_name" },
        { "label": "性别", "prop": "user_sex" },
        { "label": "年龄", "prop": "user_age" },
        { "label": "成绩", "prop": "grade" },
      ],
      tableData: [],
      columnsData: []
    }
  },
  created() {
    this.init()
  },
  methods: {
    init() {
      console.log('test')
      const _this = this
      const columnObj = {} //创建标题数组中第一个对象
      columnObj.label = '名称' //第一个标题名称
      columnObj.prop = 'title' //第一个标题名称对应的字段
      _this.columnsData.push(columnObj) //第一个标题 放入标题数组中
      _this.tableData.push({ 'title': '性别' }) //表格数据中第一个对象数据 属性名叫 title 与上面的第一个prop设置一样
      _this.tableData.push({ 'title': '年龄' }) //表格数据中第二个对象数据 属性名叫 title 与上面的第一个prop设置一样
      _this.tableData.push({ 'title': '成绩' }) //表格数据中第三个对象数据 属性名叫 title 与上面的第一个prop设置一样
      var props = 'prop' //自定义字段名称
      _this.datas.forEach(function(item, index) {
        const columnObj = {}
        columnObj.label = item.user_name // 每一列的标题的名称
        columnObj.prop = props + index //自定义每一列标题字段名称
        _this.columnsData.push(columnObj)
        _this.$set(_this.tableData[0], columnObj.prop, item.user_sex) //表格数据中第一个数组对象 往里面添加自定义的属性
        _this.$set(_this.tableData[1], columnObj.prop, item['user_age']) //表格数据中第二个数组对象 往里面添加自定义的属性
        _this.$set(_this.tableData[2], columnObj.prop, item.grade) //表格数据中第三个数组对象 往里面添加自定义的属性
      })
      console.log(_this.columnsData)
      console.log(_this.tableData)
    }
  }
}
</script>
界面展示效果:

原文地址:https://blog.csdn.net/xing7290/article/details/136338351
免责声明:本站文章内容转载自网络资源,如本站内容侵犯了原著者的合法权益,可联系本站删除。更多内容请关注自学内容网(zxcms.com)!
