Unreal Engine 5 C++: 编辑器工具编写入门01(中文解释)
目录
快速资产操作(quick asset action) 自定义编辑器功能
2.创建新的cpp class,derived from AssetActionUtility (如下图)
版本bug:editor面板没有Scripted Asset Action...
5.dynamically load other modules to help fix up redirectors from code
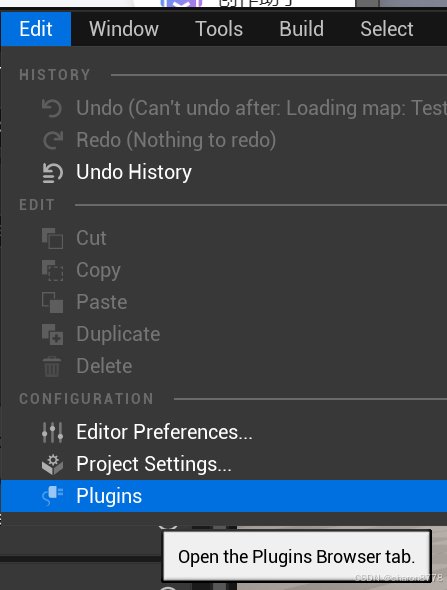
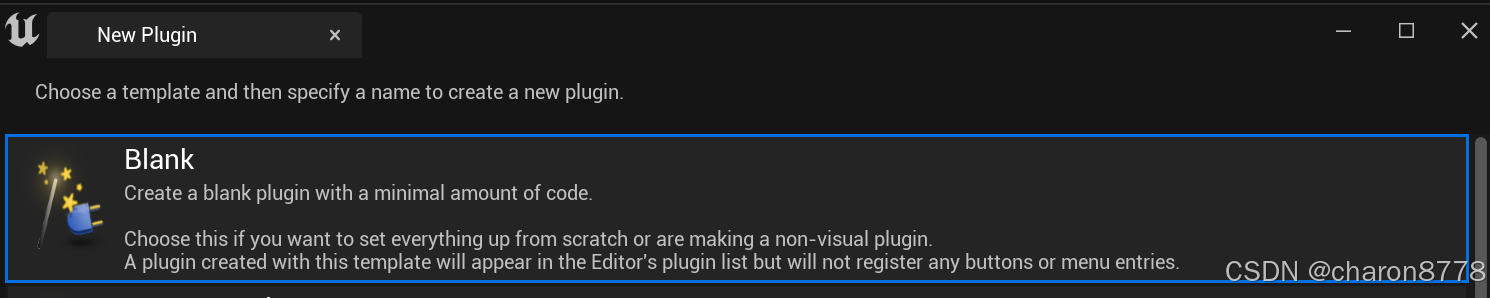
准备工作
1.创建插件

2.修改插件设置
.uplugin 是 Unreal Engine 插件的描述文件,它以 JSON 格式存储插件的元数据和配置信息,用于定义插件的基本属性、模块、依赖项以及启用方式。
在.uplugin文件中
- Type: Runtime是游戏实时使用的插件,Editor是编辑器使用的插件
- LoadingPhase改成PreDefault,插件会在游戏模块前被加载
ctrl+B编译
快速资产操作(quick asset action) 自定义编辑器功能
we create three custom editor functionalities that could allow us to automatically add prefix to assets, batch duplication, and remove unused assets from selection.我们主要会制作三个编辑器工具:批量添加前缀,批量复制,批量移除无用资产。另外还有创建编辑器信息、修复重定向器
——————————————————————————————————————————
0.创建编辑器button,测试debug message功能
大致流程
- 对于actions to assets, 有一个built-in class叫做AssetActionUtility
- 我们创建一个class,derived from AssetActionUtility
- 我们创建一个function inside that class,Mark as UFUNCTION(CallInEditor)
详细步骤
1.ctrl+F5 launch editor
2.创建新的cpp class,derived from AssetActionUtility (如下图)
- 放在新创的插件模块里,name后面可以选择插件模块(我的插件是SuperManager(editor))(不是默认的ExtendEditor(Runtime)模块)
- class name起名叫做QuickAssetAction,
- 路径在SuperManager下新建一个AssetAction文件夹。
- Class type选public,header file will be put into public folder, and cpp file will be in private folder.

3.ACCESS HEADER FILE
Header File
头文件(Header File)是编程中常用的一种文件类型,尤其在 C 和 C++ 语言中尤为重要。它们主要用于声明函数、类、宏、常量和其他编程元素,以便在多个源文件(.c 或 .cpp 文件)之间共享和重用代码。
头文件通常以 .h 或 .hpp 为扩展名,包含了程序中需要共享的声明部分,而具体的实现部分则放在源文件(.cpp)中。通过包含头文件,多个源文件可以访问和使用这些声明,从而实现代码的模块化和组织。
在QuickAssetAction.h里
#include "AssetActionUtility.h"如果#include下面有red squiggle,means无法access这个 header file,证明这个headerfile在一个我们无法access的module里。
去VS右边的search solution explorer搜索,会找到AssetActionUtility.h在Blutility下
Blutility
"Blutility" 是 Unreal Engine 中的一个功能,是 "Blueprint Utility" 的缩写,专门用于创建可以在编辑器内执行的 Blueprint 工具或功能。它允许开发者通过 Blueprint 脚本创建自定义的编辑器实用工具,从而自动化一些常见的任务,提高工作效率。
去插件的build.cs SuperManager.Build.cs文件里找到PublicDependencyModuleNames.AddRange();部分加入"Blutility"
此时出现identifier"UAssetActionUtility" is undefined.证明还有一些private include path我们需要去include
clear search, 然后去到Blutility.Build.cs文件,会看到一个
PrivateIncludePaths.Add("Editor/Blutility/Private");by default, anything in private folder, we do not have the access to, unless we add it to this include path.
去插件的build.cs SuperManager.Build.cs文件里找到 PrivateIncludePaths.AddRange();部分加入System.IO.Path.GetFullPath(Target.RelativeEnginePath)+"/Source/Editor/Blutility/Private"(是按private文件层级)
System.IO.Path.GetFullPath(Target.RelativeEnginePath)+"/Source/Editor/Blutility/Private"depending where your engine is installed, the path for the engine folder varies from computer to computer, System.IO.Path.GetFullPath(Target.RelativeEnginePath) this big chunk simply means engine path.
总结:在SuperManager.Build.cs里加入如下代码↓
PrivateIncludePaths.AddRange(
new string[] {
    System.IO.Path.GetFullPath(Target.RelativeEnginePath)+"/Source/Editor/Blutility/Private"
//"D:\\Epic Games\\UE_5.2\\Engine\\Source\\Editor\\Blutility\\Private"
//Path.Combine(Target.RelativeEnginePath, "Source", "Editor", "Blutility", "Private")
            }
);


PublicDependencyModuleNames.AddRange(
new string[]
{
"Core","Blutility"
// ... add other public dependencies that you statically link with here ...
}
);
4.DECLARE A FUNCTION放进编辑器中
在QuickAssetAction.h里,declare a function(如下图),我们就可以在右键时加一个按键。
public:
UFUNCTION(CallInEditor)
void TestFuckingFunc();
};
UFUNCTION(CallInEditor)
-
UFUNCTION是 Unreal Engine 的一个宏,用于向 Unreal Engine 的反射系统注册函数。通过这个宏,你可以为函数指定各种属性和功能。 -
CallInEditor是这个UFUNCTION宏中的修饰符,表明该函数可以在 编辑器中 调用。它的作用是在不运行游戏的情况下,在 Unreal Editor 的界面中手动触发该函数。常用于创建在编辑器中帮助开发的功能,如自动化工具、批量处理任务等。
void TestFuckingFunc();
-
这是一个函数声明,名为
TestFuckingFunc,返回类型为void(即无返回值)。这个函数没有参数。
5.编写打印debug message的功能
创建DebugHeader.h (里面声明print和print log两个function,然后QuickAssetAction.cpp里调用这个头文件)省的一直写GEngine
#pragma once

void Print(const FString& Message, const FColor& Color)
{
if (GEngine)
{
GEngine->AddOnScreenDebugMessage(-1, 8.f, Color, Message);
}
}

void PrintLog(const FString& Message)
{
UE_LOG(LogTemp, Warning, TEXT("%s"),*Message);
}
8.f是debugMessage显示8秒的意思
6.去QuickAssetAction.cpp里具体实现QuickAssetAction.h声明的这个TestFuckingFunc功能
头文件声明函数,而具体的实现部分则放在源文件(.cpp)中。
#include "AssetAction/QuickAssetAction.h"
#include "DebugHeader.h"

void UQuickAssetAction::TestFuckingFunc()
{
Print(TEXT("I hate the plugin"), FColor::Cyan);
PrintLog(TEXT("杀杀杀"));

//if (GEngine)
//{
//GEngine->AddOnScreenDebugMessage(-1, 8.f, FColor::Yellow, TEXT("I hate this plugin"));
//}
}
key (-1)
// key 为 0 的调试消息
GEngine->AddOnScreenDebugMessage(0, 5.f, FColor::Green, TEXT("Message with key 0"));
// key 为 2 的调试消息
GEngine->AddOnScreenDebugMessage(2, 5.f, FColor::Blue, TEXT("Message with key 2"));
// 再次调用 key 为 0,会替换之前 key 为 0 的消息
GEngine->AddOnScreenDebugMessage(0, 5.f, FColor::Red, TEXT("Updated message with key 0"));
key只会覆盖相同编号的message,which means, 下一个key是-1时就会覆盖它
10.这时候创建一个Blueprint,右键,就可以在Scripted Asset Action里看到自定义的这个TestFuckingFunc
版本bug: 面板没有Scripted Asset Action...(黑字英文为讲师回答)
This is a bug reappearing in versions above 5.2. To get rid of it, you'll need to create an AssetActionUtilityBlueprint asset for debugging.(Valid for 5.3 and above)
这是一个在5.2以上版本重复出现的bug,你需要创建一个AssetActionUtilityBlueprint资产用于debug。
1. An AssetActionUtilityBlueprint asset
Go to your plugin's content folder. Very important. Not your project's content folder. 亲测直接在content folder里创建EditorUtilityBlueprint (can rename it EUB_dummy) 并reparent也可以(parent class改为QuickAssetAction)(默认的parent class是Asset Action Utilities)
 Right mouse click your content browser, go to
 EditorUtilities, select EditorUtilityBlueprint , a window will pop out,select AssetActionUtility, then an asset will appear. Double click to open that asset, click file and select reparent blueprint(如下图). In the selection panel, type in the C++ class we created. In my case, it's called QuickAssetAction. Click compile and save, and now you should see ScriptedAssetAction.
2.I can't see new menu entry created after I create a new CallInEditor function in C++(这个bug我没有遇到)
In case you run into this issue as well, you just need to manually open the debug asset we created. Click compile and save again. That should do the trick.
Keep this newly created asset in your plugin's content folder during development.
补充:GEngine
“GEngine” 通常出现在 Unreal Engine(虚幻引擎) 的 C++ 编程中。它是一个全局指针,指向当前运行的引擎实例,允许开发者在代码中访问引擎的各种功能,比如日志记录、调试信息输出、渲染管理等。
详细解释
1. GEngine 是什么?
在 Unreal Engine 中,GEngine 是一个全局变量,类型为 UEngine*。它提供了一种访问引擎核心功能的便捷方式。通过 GEngine,你可以执行诸如打印调试信息、访问渲染设置、管理游戏状态等操作。
2. 常见用途
-
打印调试信息: 使用
GEngine可以在游戏窗口中显示调试信息,这对于调试非常有用。if (GEngine) { GEngine->AddOnScreenDebugMessage(-1, 5.f, FColor::Red, TEXT("Hello, Unreal!")); }//此代码会在游戏屏幕上显示一条持续 5 秒的红色调试信息“Hello, Unreal!”。 -
访问引擎功能: 你可以通过
GEngine访问引擎的各种子系统,例如渲染、声音、输入等。if (GEngine && GEngine->GameViewport) { // 例如,获取当前视口大小 FVector2D ViewportSize; GEngine->GameViewport->GetViewportSize(ViewportSize); UE_LOG(LogTemp, Log, TEXT("Viewport Size: %f, %f"), ViewportSize.X, ViewportSize.Y); }
3. 注意事项
-
空指针检查: 在使用
GEngine之前,最好检查它是否为nullptr,以避免潜在的崩溃。 -
if (GEngine) { // 安全地使用 GEngine } -
if (GEngine) { // 安全地使用 GEngine GEngine->AddOnScreenDebugMessage(-1, 5.f, FColor::Red, TEXT("Hello, Unreal!")); } else { // 处理 GEngine 为 nullptr 的情况 UE_LOG(LogTemp, Warning, TEXT("GEngine is not available.")); } -
性能考虑: 虽然
GEngine很有用,但过度依赖全局变量可能会影响代码的可维护性和测试性。尽量在需要的地方使用,并考虑依赖注入或其他设计模式来减少对全局变量的依赖。 -
仅在适当的上下文中使用:
GEngine通常在游戏运行时有效,但在编辑器模式或某些特殊情况下可能不可用。因此,确保在适当的上下文中使用它。
4. 示例代码
以下是一个在角色类中使用 GEngine 打印玩家位置的示例:
#include "GameFramework/Actor.h"
#include "Engine/Engine.h"

void AMyCharacter::PrintPlayerLocation()
{
    if (GEngine)
    {
        FVector Location = GetActorLocation();
        FString LocationString = FString::Printf(TEXT("Player Location: X=%f, Y=%f, Z=%f"), Location.X, Location.Y, Location.Z);
        GEngine->AddOnScreenDebugMessage(-1, 5.f, FColor::Green, LocationString);
    }
}//这个函数获取角色的位置并在屏幕上显示出来,持续 5 秒,颜色为绿色。
总结
总结:GEngine 是 Unreal Engine 中一个非常有用的全局指针,允许开发者在 C++ 代码中方便地访问引擎的各种功能。正确使用 GEngine 可以大大简化调试和开发过程,但也要注意其使用场景和潜在的风险。
——————————————————————————————————————————
待更新
1.add prefix
2.batch duplication
3.remove unused assets
4.create editor message
5.dynamically load other modules to help fix up redirectors from code
原文地址:https://blog.csdn.net/charon8778/article/details/142393073
免责声明:本站文章内容转载自网络资源,如本站内容侵犯了原著者的合法权益,可联系本站删除。更多内容请关注自学内容网(zxcms.com)!